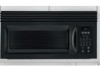
Complete Owner's Guide (English)
Page 6
...DO NOT use this appliance near a swimming pool or similar locations. 22 DO NOT allow grease to avoid burns. 20 DO NOT use this oven for commercial purposes it is not working ... this oven cavity for use . 17 Liquids such as lye-based oven cleaners may damage the filters. 24 When flaming foods under the hood, turn oven off and disconnect the power cord, or... Safety Instructions When using oven. 2 READ AND FOLLOW the specific "PRECAUTIONS TO AVOID POSSIBLE EXPOSURE TO EXCESSIVE MICROWAVE ENERGY" on page 5. 3 This appliance must be serviced ONLY by CHILDREN or INFIRM PERSONS 8 DO NOT...
...DO NOT use this appliance near a swimming pool or similar locations. 22 DO NOT allow grease to avoid burns. 20 DO NOT use this oven for commercial purposes it is not working ... this oven cavity for use . 17 Liquids such as lye-based oven cleaners may damage the filters. 24 When flaming foods under the hood, turn oven off and disconnect the power cord, or... Safety Instructions When using oven. 2 READ AND FOLLOW the specific "PRECAUTIONS TO AVOID POSSIBLE EXPOSURE TO EXCESSIVE MICROWAVE ENERGY" on page 5. 3 This appliance must be serviced ONLY by CHILDREN or INFIRM PERSONS 8 DO NOT...
Installation Instructions (All Languages)
Page 4
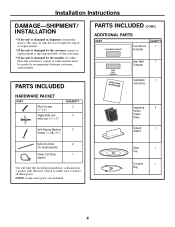
...⁄4") PARTS INCLUDED (CONT.) ADDITIONAL PARTS PART TOP CABINET TEMPLATE Top Cabinet Template QUANTITY 1 REAR WALL TEMPLATE ININSSTTRAULCLTAITOIONNS Rear Wall 1 Template Installation 1 Instructions Separately 2 Packed Grease Filters Exhaust 1 adaptor Nylon Grommet 2 (for repair or replacement. • If the unit is damaged by arrangement between customer and installer.
...⁄4") PARTS INCLUDED (CONT.) ADDITIONAL PARTS PART TOP CABINET TEMPLATE Top Cabinet Template QUANTITY 1 REAR WALL TEMPLATE ININSSTTRAULCLTAITOIONNS Rear Wall 1 Template Installation 1 Instructions Separately 2 Packed Grease Filters Exhaust 1 adaptor Nylon Grommet 2 (for repair or replacement. • If the unit is damaged by arrangement between customer and installer.
Installation Instructions (All Languages)
Page 15
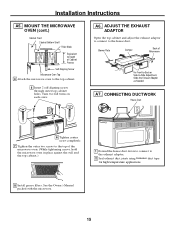
... duct joints using furnance duct tape for high temperature applications. 8 Install grease filters. Blower Plate Damper Back of Cabinet Recess Self-Aligning Screw Microwave Oven Top 4 Attach the microwave oven to -Side Adjustment, Slide the Exhaust Adaptor as Needed A7. MOUNT THE MICROWAVE OVEN (cont.) Cabinet Front Cabinet Bottom Shelf Filler Block Equivalent to Depth...
... duct joints using furnance duct tape for high temperature applications. 8 Install grease filters. Blower Plate Damper Back of Cabinet Recess Self-Aligning Screw Microwave Oven Top 4 Attach the microwave oven to -Side Adjustment, Slide the Exhaust Adaptor as Needed A7. MOUNT THE MICROWAVE OVEN (cont.) Cabinet Front Cabinet Bottom Shelf Filler Block Equivalent to Depth...
Installation Instructions (All Languages)
Page 19
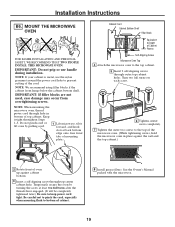
...the power cord hole to bottom of oven up against the wall and the top cabinet.) 2 Rotate front of cabinet. 8 Install grease filters. NOTE: When mounting the microwave oven, thread power cord through hole in place against cabinet bottom. 3 Insert a self-aligning screw through outer top cabinet holes. ... turns on each screw. 6 Tighten center screw completely. 7 Tighten the outer two screws to the top of the microwave oven. (While tightening screws, hold the microwave oven in bottom of the cord. Be careful not to pinch the cord, especially when mounting flush to prevent cutting ...
...the power cord hole to bottom of oven up against the wall and the top cabinet.) 2 Rotate front of cabinet. 8 Install grease filters. NOTE: When mounting the microwave oven, thread power cord through hole in place against cabinet bottom. 3 Insert a self-aligning screw through outer top cabinet holes. ... turns on each screw. 6 Tighten center screw completely. 7 Tighten the outer two screws to the top of the microwave oven. (While tightening screws, hold the microwave oven in bottom of the cord. Be careful not to pinch the cord, especially when mounting flush to prevent cutting ...
Installation Instructions (All Languages)
Page 22
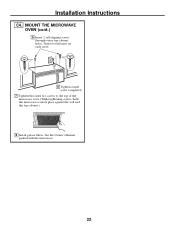
Turn two full turns on each screw. 6 Tighten center screw completely. 7 Tighten the outer two screws to the top of the microwave oven. (While tightening screws, hold the microwave oven in place against the wall and the top cabinet.) 8 Install grease filters. See the Owner's Manual packed with the microwave. 22 MOUNT THE MICROWAVE OVEN (cont.) 5 Insert 2 self-aligning screws through outer top cabinet holes. Installation Instructions C4.
Turn two full turns on each screw. 6 Tighten center screw completely. 7 Tighten the outer two screws to the top of the microwave oven. (While tightening screws, hold the microwave oven in place against the wall and the top cabinet.) 8 Install grease filters. See the Owner's Manual packed with the microwave. 22 MOUNT THE MICROWAVE OVEN (cont.) 5 Insert 2 self-aligning screws through outer top cabinet holes. Installation Instructions C4.


