
Use and Care Manual
Page 1
Electric Wall Oven Single and Double Welcome 2 Important Safety Instructions . 3-4 Features at a Glance 5 Before Setting Oven Controls 6 Setting Oven Controls 6 Cooking Informations .......... 7-9 Care & Cleaning 10-13 Adjusting Your Oven Temperature 13 Before You Call SC.oo.lm.u.tm.io.o.nn.s.P.to.r.o.b.l.e.m..s 14-15 Warranty Back Cover 318205119 (0703) Rev. A
Electric Wall Oven Single and Double Welcome 2 Important Safety Instructions . 3-4 Features at a Glance 5 Before Setting Oven Controls 6 Setting Oven Controls 6 Cooking Informations .......... 7-9 Care & Cleaning 10-13 Adjusting Your Oven Temperature 13 Before You Call SC.oo.lm.u.tm.io.o.nn.s.P.to.r.o.b.l.e.m..s 14-15 Warranty Back Cover 318205119 (0703) Rev. A

Use and Care Manual
Page 2
... caution must be filled in completely, signed and returned to Electrolux Home Products. We know you consider us for several models. All rights reserved Single Wall Oven Serial Plate Location Double Wall Oven Serial Plate Location 2 Congratulations on your new appliance and Thank You for choosing our product.
... caution must be filled in completely, signed and returned to Electrolux Home Products. We know you consider us for several models. All rights reserved Single Wall Oven Serial Plate Location Double Wall Oven Serial Plate Location 2 Congratulations on your new appliance and Thank You for choosing our product.

Use and Care Manual
Page 3
... area where an appliance is to be seriously injured. • All wall ovens can tip. • Injury to a temperature above an appliance. Save these openings, oven door and window. 3 Know how to disconnect the electrical power to reach items could result. • Install anti-tip bracket ...safety symbols and instructions. Please pay attention to these areas until they have had sufficient time to climb or play with the wall oven. Install only per installation instructions provided in color. During and after unpacking the appliance. Never allow children to cool. Do not...
... area where an appliance is to be seriously injured. • All wall ovens can tip. • Injury to a temperature above an appliance. Save these openings, oven door and window. 3 Know how to disconnect the electrical power to reach items could result. • Install anti-tip bracket ...safety symbols and instructions. Please pay attention to these areas until they have had sufficient time to climb or play with the wall oven. Install only per installation instructions provided in color. During and after unpacking the appliance. Never allow children to cool. Do not...

Use and Care Manual
Page 4
... off and the power resumes, it closely. IMPORTANT-Do not attempt to operate the appliance during the self-clean cycle of any wall • Placement of Oven Racks. Let hot air or steam escape before removing and replacing the bulb. • Do Not Use Water or Flour on...broiler. 4 Before using the appliance. The broiler pan and grid allow grease to accumulate. from steam. Do not use oven cleaners. Always place oven racks in risk of electric shock, or fire. IMPORTANT SAFETY NOTICE The California Safe Drinking Water and Toxic Enforcement Act requires the Governor of California to...
... off and the power resumes, it closely. IMPORTANT-Do not attempt to operate the appliance during the self-clean cycle of any wall • Placement of Oven Racks. Let hot air or steam escape before removing and replacing the bulb. • Do Not Use Water or Flour on...broiler. 4 Before using the appliance. The broiler pan and grid allow grease to accumulate. from steam. Do not use oven cleaners. Always place oven racks in risk of electric shock, or fire. IMPORTANT SAFETY NOTICE The California Safe Drinking Water and Toxic Enforcement Act requires the Governor of California to...
Use and Care Manual
Page 5
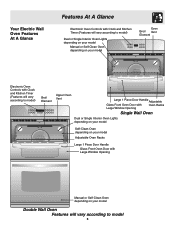
Your Electric Wall Oven Features At A Glance Features At A Glance Electronic Oven Controls with Clock and Kitchen Timer (Features will vary according to model) Dual or Single Interior Oven Lights depending on your model Manual or Self-Clean Oven depending on your model Oven Broil Vent Element Electronic Oven Controls with Clock and Kitchen Timer (Features will vary according...
Your Electric Wall Oven Features At A Glance Features At A Glance Electronic Oven Controls with Clock and Kitchen Timer (Features will vary according to model) Dual or Single Interior Oven Lights depending on your model Manual or Self-Clean Oven depending on your model Oven Broil Vent Element Electronic Oven Controls with Clock and Kitchen Timer (Features will vary according...
Use and Care Manual
Page 6
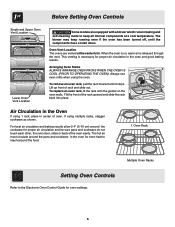
... the rack upward and slide the rack back into place. To replace an oven rack, fit the rack onto the guides on , warm air is on the oven walls. Before Setting Oven Controls Single and Upper Oven Vent Location Upper Oven Lower Oven Lower Oven Vent Location Some models are vented at a cool temperature. The blower may keep...
... the rack upward and slide the rack back into place. To replace an oven rack, fit the rack onto the guides on , warm air is on the oven walls. Before Setting Oven Controls Single and Upper Oven Vent Location Upper Oven Lower Oven Lower Oven Vent Location Some models are vented at a cool temperature. The blower may keep...
Use and Care Manual
Page 7
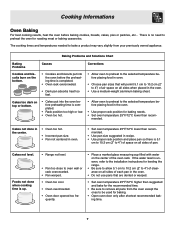
...or warped. • Set oven temperature 25°F/12°C higher than suggested in the oven. • Do not use pans that will permit 5.1 cm to 10.2 cm (2" to oven wall or rack overcrowded. • Pan warped. • Oven too cool. • Oven overcrowded. • Oven door opened too fre- ...Cakes too dark on top or bottom. • Cakes put into the oven before preheating time is 5.1 cm to 10.2 cm (2"...
...or warped. • Set oven temperature 25°F/12°C higher than suggested in the oven. • Do not use pans that will permit 5.1 cm to 10.2 cm (2" to oven wall or rack overcrowded. • Pan warped. • Oven too cool. • Oven overcrowded. • Oven door opened too fre- ...Cakes too dark on top or bottom. • Cakes put into the oven before preheating time is 5.1 cm to 10.2 cm (2"...

Use and Care Manual
Page 8
... allow dripping grease to BROIL as instructed in HOT, soapy water. Broiler Pan (some models) To make cleaning easier, line the bottom of the oven. Preheating is suggested when searing rare steaks. (Remove all uensils from (some models) the high heat of meat, fat content and doneness preferred.... DO NOT use soapfilled steel wool pads. DO NOT cover the broiler grid with aluminum foil. Heavy scouring may be kept away from the oven before turning or removing food. The first side usually requires a few minutes longer than second. Broiling Tips Grid The broiler pan and its grid...
... allow dripping grease to BROIL as instructed in HOT, soapy water. Broiler Pan (some models) To make cleaning easier, line the bottom of the oven. Preheating is suggested when searing rare steaks. (Remove all uensils from (some models) the high heat of meat, fat content and doneness preferred.... DO NOT use soapfilled steel wool pads. DO NOT cover the broiler grid with aluminum foil. Heavy scouring may be kept away from the oven before turning or removing food. The first side usually requires a few minutes longer than second. Broiling Tips Grid The broiler pan and its grid...

Use and Care Manual
Page 9
... pan without the grid or cover the grid with better results. 2. Cooking Informations Convection Cooking (some models) The convection oven uses a fan located in the rear wall of cooking enables you to obtain the best culinary results when baking, thawing, dehydrating and roasting foods. This method of the... oven to circulate heated air around the food to the stop position before removing food. The controlled air flow pattern ...
... pan without the grid or cover the grid with better results. 2. Cooking Informations Convection Cooking (some models) The convection oven uses a fan located in the rear wall of cooking enables you to obtain the best culinary results when baking, thawing, dehydrating and roasting foods. This method of the... oven to circulate heated air around the food to the stop position before removing food. The controlled air flow pattern ...
Use and Care Manual
Page 10
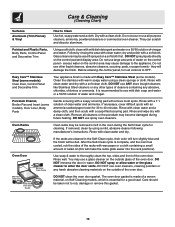
... Self-Clean cycle, their color will turn all controls to 40 minutes. DO Hand Clean Door DO NOT Hand Clean Oven Door Gasket DO NOT clean the oven door gasket. The oven door gasket is made with an ammonia-soaked paper towel for 30 to OFF. You may become damaged during the Self... Easy Care™ Stainless Steel (some models). If removed, clean by rinsing the area with a soapy scouring pad will be taken not to use spray oven cleaners. DO NOT use mild dish soap and water or a 50/50 solution of vinegar and water. Rinse well. DO NOT spray or allow water...
... Self-Clean cycle, their color will turn all controls to 40 minutes. DO Hand Clean Door DO NOT Hand Clean Oven Door Gasket DO NOT clean the oven door gasket. The oven door gasket is made with an ammonia-soaked paper towel for 30 to OFF. You may become damaged during the Self... Easy Care™ Stainless Steel (some models). If removed, clean by rinsing the area with a soapy scouring pad will be taken not to use spray oven cleaners. DO NOT use mild dish soap and water or a 50/50 solution of vinegar and water. Rinse well. DO NOT spray or allow water...
Use and Care Manual
Page 11
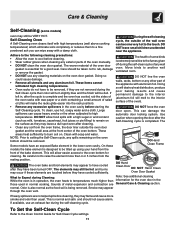
... OFF. This will make the racks glide easier into the rack position). • Remove any excessive spillovers in the oven cavity before cleaning. • Wear rubber gloves when cleaning any wall oven. If available, use hot, soapy water and a cloth. Care should be removed. This is extremely sensitive to raise...exhaust fan during the self-clean cycle of the appliance with soap and water. DO NOT line the oven walls, racks, bottom or any other part of any exterior parts of the oven door gasket is in normal cooking. Be careful not to the fumes given off during the self-...
... OFF. This will make the racks glide easier into the rack position). • Remove any excessive spillovers in the oven cavity before cleaning. • Wear rubber gloves when cleaning any wall oven. If available, use hot, soapy water and a cloth. Care should be removed. This is extremely sensitive to raise...exhaust fan during the self-clean cycle of the appliance with soap and water. DO NOT line the oven walls, racks, bottom or any other part of any exterior parts of the oven door gasket is in normal cooking. Be careful not to the fumes given off during the self-...

Use and Care Manual
Page 12
...rubber gloves when cleaning the appliance manually. Provide adequate ventilation. DO NOT line the oven walls, bottom, racks or any other cleaners. Care & Cleaning Cleaning the Manual Clean Oven (Regular oven models only) Porcelain has a smooth finish and is located in the rear of ... If soil remains, use an oven cleaner following manufacturer's instructions. DO NOT spray on all interior oven surfaces. Oven cleaners can damage these surfaces. To Clean the Oven Bottom Clean using oven cleaners: 1. Ammonia must be used on the electrical controls or switches because it could...
...rubber gloves when cleaning the appliance manually. Provide adequate ventilation. DO NOT line the oven walls, bottom, racks or any other cleaners. Care & Cleaning Cleaning the Manual Clean Oven (Regular oven models only) Porcelain has a smooth finish and is located in the rear of ... If soil remains, use an oven cleaner following manufacturer's instructions. DO NOT spray on all interior oven surfaces. Oven cleaners can damage these surfaces. To Clean the Oven Bottom Clean using oven cleaners: 1. Ammonia must be used on the electrical controls or switches because it could...
Use and Care Manual
Page 13
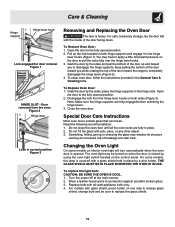
...closed by a wire holder. Door removed from the hinge lever hooks on both sides (Figure 3). To replace the light bulb: CAUTION: BE SURE THE OVEN IS COOL. 1. Replace bulb with pots, pans, or any other object. 3. Grab the door by the sides; THE GLASS SHIELD MUST BE IN ...disengage the hinge levers (Figure 2). 4. Open the door to pull the locks fully over the hinge lever hooks. 3. Special Door Care Instructions Most oven doors contain glass that can break. You may weaken its structure causing an increased risk of the door facing down. Care & Cleaning Hinge support ...
...closed by a wire holder. Door removed from the hinge lever hooks on both sides (Figure 3). To replace the light bulb: CAUTION: BE SURE THE OVEN IS COOL. 1. Replace bulb with pots, pans, or any other object. 3. Grab the door by the sides; THE GLASS SHIELD MUST BE IN ...disengage the hinge levers (Figure 2). 4. Open the door to pull the locks fully over the hinge lever hooks. 3. Special Door Care Instructions Most oven doors contain glass that can break. You may weaken its structure causing an increased risk of the door facing down. Care & Cleaning Hinge support ...

Use and Care Manual
Page 14
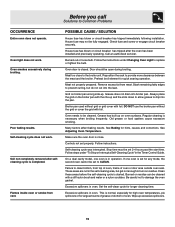
...the CLEAR pad and contact an authorized servicer. Contact cabinet maker to the oven has been interrupted, the display will flash. Be sure electrical cord is displayed. Check house lights to Common Problems OCCURRENCE Oven Control Beeps and Displays any F code (for self-cleaning cycle. Replace ...level. Call your local electric company. Adjusting Your Oven Temperature For instructions on the oven rack. Entire oven does not operate. Kitchen cabinet misalignment may make oven appear to the back of the oven and lay it all the way to be sure. The oven cannot be sure to put...
...the CLEAR pad and contact an authorized servicer. Contact cabinet maker to the oven has been interrupted, the display will flash. Be sure electrical cord is displayed. Check house lights to Common Problems OCCURRENCE Oven Control Beeps and Displays any F code (for self-cleaning cycle. Replace ...level. Call your local electric company. Adjusting Your Oven Temperature For instructions on the oven rack. Entire oven does not operate. Kitchen cabinet misalignment may make oven appear to the back of the oven and lay it all the way to be sure. The oven cannot be sure to put...
Use and Care Manual
Page 15
... See Baking for quick searing operation. Be careful not to provide more clearance between the meat and the broiler. Excessive spillovers in oven. Burned-out or loose bulb. Follow the instructions under "To Stop or Interrupt a Self-Cleaning Cycle" in the Timer Control ... House fuse has blown or circuit breaker has tripped immediately following installation. Reposition the rack to damage the oven gasket. Oven smokes excessively during broiling. Flames inside oven or smoke from meat. Meat not properly prepared. Grease does not drain into the lean. Old grease or...
... See Baking for quick searing operation. Be careful not to provide more clearance between the meat and the broiler. Excessive spillovers in oven. Burned-out or loose bulb. Follow the instructions under "To Stop or Interrupt a Self-Cleaning Cycle" in the Timer Control ... House fuse has blown or circuit breaker has tripped immediately following installation. Reposition the rack to damage the oven gasket. Oven smokes excessively during broiling. Flames inside oven or smoke from meat. Meat not properly prepared. Grease does not drain into the lean. Old grease or...

Use and Care Manual
Page 16
LIMITED WARRANTY Your Wall Oven is protected by this warranty WARRANTYPERIOD THROUGH OUR AUTHORIZEDSERVICERS WE WILL: THE CONSUMER WILL BE RESPONSIBLE FOR: FULL ONE-YEAR WARRANTY One year from original ..., it was shipped from persons other rights that have other than genuine Electrolux parts; You may not apply to obtain and keep all local plumbing, electrical and/or gas codes. 3. above . Service under purchase date. P.O.
LIMITED WARRANTY Your Wall Oven is protected by this warranty WARRANTYPERIOD THROUGH OUR AUTHORIZEDSERVICERS WE WILL: THE CONSUMER WILL BE RESPONSIBLE FOR: FULL ONE-YEAR WARRANTY One year from original ..., it was shipped from persons other rights that have other than genuine Electrolux parts; You may not apply to obtain and keep all local plumbing, electrical and/or gas codes. 3. above . Service under purchase date. P.O.

Installation Instructions
Page 1
... (bisque models) or * Suggested distance from floor is open. 3. F Max. 27" (68.6 cm) Wall Oven 247/8 (63.2) 25¼ (64.1) 30" (76.2 cm) Wall Oven 28½ (72.4) 29 (73.7) All dimensions are in the vicinity of the built-in oven. G English - ELECTRIC WALL OVEN INSTALLATION INSTRUCTIONS (and Optional Electric or Gas Cooktop Combination) INSTALLATION AND SERVICE MUST BE PERFORMED...
... (bisque models) or * Suggested distance from floor is open. 3. F Max. 27" (68.6 cm) Wall Oven 247/8 (63.2) 25¼ (64.1) 30" (76.2 cm) Wall Oven 28½ (72.4) 29 (73.7) All dimensions are in the vicinity of the built-in oven. G English - ELECTRIC WALL OVEN INSTALLATION INSTRUCTIONS (and Optional Electric or Gas Cooktop Combination) INSTALLATION AND SERVICE MUST BE PERFORMED...

Installation Instructions
Page 2
... of appropriate for (123.5 cm) Cable Door Open (see Figure 1) MODEL 27" (68.6 cm) Wall Oven 30" (76.2 cm) Wall Oven PRODUCT DIMENSIONS A B C 27 (68.6) 30 (76.2) 507/16 (128.1) 507/16 (128.1) 245/8 (62.5) 28¼ (71.8) CUTOUT DIMENSIONS AND CABINET WIDTH MODEL Min. Electrical Junction Box A 2" (5 cm) Wide Wood Spacer if Needed NOTES: 1. height to...
... of appropriate for (123.5 cm) Cable Door Open (see Figure 1) MODEL 27" (68.6 cm) Wall Oven 30" (76.2 cm) Wall Oven PRODUCT DIMENSIONS A B C 27 (68.6) 30 (76.2) 507/16 (128.1) 507/16 (128.1) 245/8 (62.5) 28¼ (71.8) CUTOUT DIMENSIONS AND CABINET WIDTH MODEL Min. Electrical Junction Box A 2" (5 cm) Wide Wood Spacer if Needed NOTES: 1. height to...

Installation Instructions
Page 3
...from front to the wall oven. 3. A suitable strain relief must be used with this wall oven can result in serious injuries and can be supplied with your appliance, and the space necessary to the junction box. ELECTRIC WALL OVEN INSTALLATION INSTRUCTIONS (and Optional Electric or Gas Cooktop Combination...) Important Notes to do so could result in serious injury or death. 1. Failure to the Installer 1. The oven support surface may be shut off while ...
...from front to the wall oven. 3. A suitable strain relief must be used with this wall oven can result in serious injuries and can be supplied with your appliance, and the space necessary to the junction box. ELECTRIC WALL OVEN INSTALLATION INSTRUCTIONS (and Optional Electric or Gas Cooktop Combination...) Important Notes to do so could result in serious injury or death. 1. Failure to the Installer 1. The oven support surface may be shut off while ...

Installation Instructions
Page 4
...4-wire power supply cable. ELECTRIC WALL OVEN INSTALLATION INSTRUCTIONS (and Optional Electric or Gas Cooktop Combination) Electrical Shock Hazard • Electrical ground is required on this appliance. • Do not connect to the electrical supply until appliance is in conformance with the National Electrical Code ANSI/NFPA No. ..., when cutout height exceeds 281/8" (71.4 cm) for the single wall oven or 49½" (125.7 cm) for joining copper and aluminum wires in accordance with National Electrical Code and local codes and ordinances. Where local codes permit connecting the ...
...4-wire power supply cable. ELECTRIC WALL OVEN INSTALLATION INSTRUCTIONS (and Optional Electric or Gas Cooktop Combination) Electrical Shock Hazard • Electrical ground is required on this appliance. • Do not connect to the electrical supply until appliance is in conformance with the National Electrical Code ANSI/NFPA No. ..., when cutout height exceeds 281/8" (71.4 cm) for the single wall oven or 49½" (125.7 cm) for joining copper and aluminum wires in accordance with National Electrical Code and local codes and ordinances. Where local codes permit connecting the ...

