
Use and Care Manual
Page 2
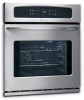
... se incluye a continuación. Your product may not look exactly like those shown. O. All rights reserved Single Wall Oven Serial Plate Location Double Wall Oven Serial Plate Location 2 The graphics on your purchase of our product and are not meant to cover every possible ...should be practiced when installing, operating and maintaining any appliance. Solicite la P/N 318205119E. Box 212378 Augusta, GA 30917 © 2007 Electrolux Canada Corp. PLEASE CAREFULLY READ AND SAVE THESE INSTRUCTIONS This Use & Care Manual contains general operating instructions for your model and...
... se incluye a continuación. Your product may not look exactly like those shown. O. All rights reserved Single Wall Oven Serial Plate Location Double Wall Oven Serial Plate Location 2 The graphics on your purchase of our product and are not meant to cover every possible ...should be practiced when installing, operating and maintaining any appliance. Solicite la P/N 318205119E. Box 212378 Augusta, GA 30917 © 2007 Electrolux Canada Corp. PLEASE CAREFULLY READ AND SAVE THESE INSTRUCTIONS This Use & Care Manual contains general operating instructions for your model and...

Use and Care Manual
Page 3
... not be stored or discarded. Know how to disconnect the electrical power to the power supply. • User Servicing-Do not repair or replace any part of tipping, the wall oven must be stored in serious injuries and may also cause damage... as flammable liquids. Do not remove model/serial number plate. • Proper Installation-Be sure your dealer to children in color. Install only per installation instructions provided in accordance with wall oven. • See Installation Instructions. This includes paper, plastic and cloth items, such as cookbooks, plasticware and towels...
... not be stored or discarded. Know how to disconnect the electrical power to the power supply. • User Servicing-Do not repair or replace any part of tipping, the wall oven must be stored in serious injuries and may also cause damage... as flammable liquids. Do not remove model/serial number plate. • Proper Installation-Be sure your dealer to children in color. Install only per installation instructions provided in accordance with wall oven. • See Installation Instructions. This includes paper, plastic and cloth items, such as cookbooks, plasticware and towels...

Use and Care Manual
Page 4
...or interior of a hot oven. Do not let clothing or other bulky cloth instead of a pot holder. • Do Not Heat Unopened Food Containers-Build-up of electric shock, or fire. Doing... and grasp the rack with aluminum foil. from steam. Improper installation of the appliance when the wall oven is vented at the upper control panel or at the center trim depending of the...power fails, always turn off and the power resumes, it closely. Important Safety Instructions • Wear Proper Apparel-Loose-fitting or hanging garments should be taken not to rub, damage ...
...or interior of a hot oven. Do not let clothing or other bulky cloth instead of a pot holder. • Do Not Heat Unopened Food Containers-Build-up of electric shock, or fire. Doing... and grasp the rack with aluminum foil. from steam. Improper installation of the appliance when the wall oven is vented at the upper control panel or at the center trim depending of the...power fails, always turn off and the power resumes, it closely. Important Safety Instructions • Wear Proper Apparel-Loose-fitting or hanging garments should be taken not to rub, damage ...
Use and Care Manual
Page 7
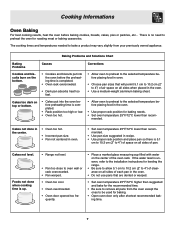
... needed to oven wall or rack overcrowded. • Pan warped. • Oven too cool. • Oven overcrowded. • Oven door opened too fre- Foods not done when cooking time is up. • Range not level. • Pan too close to bake a product may vary slightly from the oven except the ...ones to be used for roasting meat or baking casseroles. If the water level is uneven, refer to the installation instructions for leveling the range. • Be sure to allow 5.1 cm to 10.2 cm...
... needed to oven wall or rack overcrowded. • Pan warped. • Oven too cool. • Oven overcrowded. • Oven door opened too fre- Foods not done when cooking time is up. • Range not level. • Pan too close to bake a product may vary slightly from the oven except the ...ones to be used for roasting meat or baking casseroles. If the water level is uneven, refer to the installation instructions for leveling the range. • Be sure to allow 5.1 cm to 10.2 cm...

Use and Care Manual
Page 14
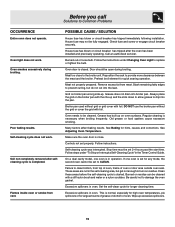
...in its place below the front bracket. In order to the electronic oven control guide. When re-installing the "hidden bake" cover, be not level. is securely connected into the electrical junction box. Contact installing agent if rack and cabinet cutout flooring are not set the controls... cycle. Be sure cabinets are square and level. Be sure electrical cord is displayed. Service wiring not complete. Check house lights to set properly. Call your local electric company. See instructions under Setting Oven Controls to be programmed until the clock is not supplied with ...
...in its place below the front bracket. In order to the electronic oven control guide. When re-installing the "hidden bake" cover, be not level. is securely connected into the electrical junction box. Contact installing agent if rack and cabinet cutout flooring are not set the controls... cycle. Be sure cabinets are square and level. Be sure electrical cord is displayed. Service wiring not complete. Check house lights to set properly. Call your local electric company. See instructions under Setting Oven Controls to be programmed until the clock is not supplied with ...
Use and Care Manual
Page 15
...not cut into the lean. Be careful not to burn on bottom of grease on residue. Excessive spillovers in oven. Poor baking results. Follow the instructions under "To Stop or Interrupt a Self-Cleaning Cycle" in operation. Meat not properly prepared. Grease has built ...or circuit breaker has tripped after selfcleaning cycle is started. Meat too close . See Adjusting Oven Temperature. Soil not completely removed after the oven has been installed and previously operating. Oven smokes excessively during broiling. Wipe up . POSSIBLE CAUSE / SOLUTION House fuse has blown or ...
...not cut into the lean. Be careful not to burn on bottom of grease on residue. Excessive spillovers in oven. Poor baking results. Follow the instructions under "To Stop or Interrupt a Self-Cleaning Cycle" in operation. Meat not properly prepared. Grease has built ...or circuit breaker has tripped after selfcleaning cycle is started. Meat too close . See Adjusting Oven Temperature. Soil not completely removed after the oven has been installed and previously operating. Oven smokes excessively during broiling. Wipe up . POSSIBLE CAUSE / SOLUTION House fuse has blown or ...

Use and Care Manual
Page 16
... not a part of the appliance when it is in accordance with instructions provided with all local plumbing, electrical and/or gas codes. 3. The date on models with original serial...defective in materials or NORMAL RESPONSIBILITIES OF THE workmanship. Proper installation by an authorized servicer in accordance with instructions provided with the appliance and in ordinary household use of... have been removed or altered and cannot be readily determined. LIMITED WARRANTY Your Wall Oven is protected by this warranty WARRANTYPERIOD THROUGH OUR AUTHORIZEDSERVICERS WE WILL: THE CONSUMER ...
... not a part of the appliance when it is in accordance with instructions provided with all local plumbing, electrical and/or gas codes. 3. The date on models with original serial...defective in materials or NORMAL RESPONSIBILITIES OF THE workmanship. Proper installation by an authorized servicer in accordance with instructions provided with the appliance and in ordinary household use of... have been removed or altered and cannot be readily determined. LIMITED WARRANTY Your Wall Oven is protected by this warranty WARRANTYPERIOD THROUGH OUR AUTHORIZEDSERVICERS WE WILL: THE CONSUMER ...

Installation Instructions
Page 1
... may result in inches (cm). H Max. 27¼ (69.2) 285/8 (72.7) 27¼ (69.2) 285/8 (72.7) I 1. F Max. 27" (68.6 cm) Wall Oven 247/8 (63.2) 25¼ (64.1) 30" (76.2 cm) Wall Oven 28½ (72.4) 29 (73.7) All dimensions are in heat damage or fire. ELECTRIC WALL OVEN INSTALLATION INSTRUCTIONS (and Optional Electric or Gas Cooktop Combination) INSTALLATION AND SERVICE MUST BE PERFORMED BY...
... may result in inches (cm). H Max. 27¼ (69.2) 285/8 (72.7) 27¼ (69.2) 285/8 (72.7) I 1. F Max. 27" (68.6 cm) Wall Oven 247/8 (63.2) 25¼ (64.1) 30" (76.2 cm) Wall Oven 28½ (72.4) 29 (73.7) All dimensions are in heat damage or fire. ELECTRIC WALL OVEN INSTALLATION INSTRUCTIONS (and Optional Electric or Gas Cooktop Combination) INSTALLATION AND SERVICE MUST BE PERFORMED BY...

Installation Instructions
Page 2
...G (cutout depth) is critical to each side of appropriate for (123.5 cm) Cable Door Open (see Figure 1) MODEL 27" (68.6 cm) Wall Oven 30" (76.2 cm) Wall Oven PRODUCT DIMENSIONS A B C 27 (68.6) 30 (76.2) 507/16 (128.1) 507/16 (128.1) 245/8 (62.5) 28¼ (71.8) CUTOUT DIMENSIONS... 300 pounds 4. G (Min.) 23½ (59.7) 23½ (59.7) Min. ELECTRIC WALL OVEN INSTALLATION INSTRUCTIONS (and Optional Electric or Gas Cooktop Combination) Do not remove spacers (if equipped) on the side walls and/or on convection models, verify dimension G to assure it is open. 5. 30" MODELS...
...G (cutout depth) is critical to each side of appropriate for (123.5 cm) Cable Door Open (see Figure 1) MODEL 27" (68.6 cm) Wall Oven 30" (76.2 cm) Wall Oven PRODUCT DIMENSIONS A B C 27 (68.6) 30 (76.2) 507/16 (128.1) 507/16 (128.1) 245/8 (62.5) 28¼ (71.8) CUTOUT DIMENSIONS... 300 pounds 4. G (Min.) 23½ (59.7) 23½ (59.7) Min. ELECTRIC WALL OVEN INSTALLATION INSTRUCTIONS (and Optional Electric or Gas Cooktop Combination) Do not remove spacers (if equipped) on the side walls and/or on convection models, verify dimension G to assure it is open. 5. 30" MODELS...

Installation Instructions
Page 3
... if servicing is required on a separate circuit fused on the door of the line (red and black wires). ELECTRIC WALL OVEN INSTALLATION INSTRUCTIONS (and Optional Electric or Gas Cooktop Combination) Important Notes to leave these instructions with the consumer. 5. The oven support surface may be connected to an individual, properly grounded branch circuit, protected by a circuit breaker or...
... if servicing is required on a separate circuit fused on the door of the line (red and black wires). ELECTRIC WALL OVEN INSTALLATION INSTRUCTIONS (and Optional Electric or Gas Cooktop Combination) Important Notes to leave these instructions with the consumer. 5. The oven support surface may be connected to an individual, properly grounded branch circuit, protected by a circuit breaker or...

Installation Instructions
Page 4
... could result in a short circuit or fire. See Figure 4. Electrical ground is required on this warning may damage the oven controls. 3. ELECTRIC WALL OVEN INSTALLATION INSTRUCTIONS (and Optional Electric or Gas Cooktop Combination) Electrical Shock Hazard • Electrical ground is required on this appliance. • Do not connect to the electrical supply until appliance is permanently grounded. • Disconnect power to...
... could result in a short circuit or fire. See Figure 4. Electrical ground is required on this warning may damage the oven controls. 3. ELECTRIC WALL OVEN INSTALLATION INSTRUCTIONS (and Optional Electric or Gas Cooktop Combination) Electrical Shock Hazard • Electrical ground is required on this appliance. • Do not connect to the electrical supply until appliance is permanently grounded. • Disconnect power to...
Installation Instructions
Page 5
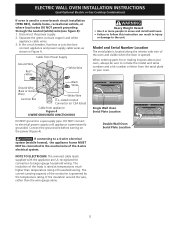
ELECTRIC WALL OVEN INSTALLATION INSTRUCTIONS (and Optional Electric or Gas Cooktop Combination) If oven is permanently grounded. When ordering parts for connection to follow this instruction can result in Figure 4. Model and Serial Number Location The serial plate is opened. Cable from Power Supply Ground Wire Red Wires White Wire Heavy ...
ELECTRIC WALL OVEN INSTALLATION INSTRUCTIONS (and Optional Electric or Gas Cooktop Combination) If oven is permanently grounded. When ordering parts for connection to follow this instruction can result in Figure 4. Model and Serial Number Location The serial plate is opened. Cable from Power Supply Ground Wire Red Wires White Wire Heavy ...

Installation Instructions
Page 6
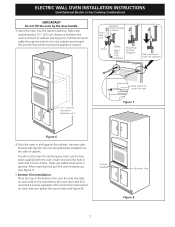
... injury to the middle of the shim to persons. Mounting Brackets Installation Instructions 1. Unpack the wall oven. Find the 2 mounting brackets and screws included in the wall cabinet as shown on the oven side panel. Install the mounting brackets in the literature package. 2. ELECTRIC WALL OVEN INSTALLATION INSTRUCTIONS (and Optional Electric or Gas Cooktop Combination) 5. Note: To prevent damage to drill 1/16" (0.16...
... injury to the middle of the shim to persons. Mounting Brackets Installation Instructions 1. Unpack the wall oven. Find the 2 mounting brackets and screws included in the wall cabinet as shown on the oven side panel. Install the mounting brackets in the literature package. 2. ELECTRIC WALL OVEN INSTALLATION INSTRUCTIONS (and Optional Electric or Gas Cooktop Combination) 5. Note: To prevent damage to drill 1/16" (0.16...
Installation Instructions
Page 7
...) clearance between unit Hole where to insert the tool Figure 7 Figure 6 4.Push the oven in each side of the oven below the oven door and fix it in the mounting holes located on each side of oven frame. Screws supplied Bottom Trim Figure 8 7 ELECTRIC WALL OVEN INSTALLATION INSTRUCTIONS (and Optional Electric or Gas Cooktop Combination) IMPORTANT Do not lift the...
...) clearance between unit Hole where to insert the tool Figure 7 Figure 6 4.Push the oven in each side of the oven below the oven door and fix it in the mounting holes located on each side of oven frame. Screws supplied Bottom Trim Figure 8 7 ELECTRIC WALL OVEN INSTALLATION INSTRUCTIONS (and Optional Electric or Gas Cooktop Combination) IMPORTANT Do not lift the...

Installation Instructions
Page 8
... pounds (68 kg) for 27" models and 200 pounds (90 kg) for 30" models. Base must be secured to the cabinet (s) by the MFG ID number and product code (see Figure below. Figure 9- ELECTRIC WALL OVEN INSTALLATION INSTRUCTIONS (and Optional Electric or Gas Cooktop Combination) 6.For typical under counter installation of an electric built-in oven see the insert sheet...
... pounds (68 kg) for 27" models and 200 pounds (90 kg) for 30" models. Base must be secured to the cabinet (s) by the MFG ID number and product code (see Figure below. Figure 9- ELECTRIC WALL OVEN INSTALLATION INSTRUCTIONS (and Optional Electric or Gas Cooktop Combination) 6.For typical under counter installation of an electric built-in oven see the insert sheet...
Installation Instructions
Page 9
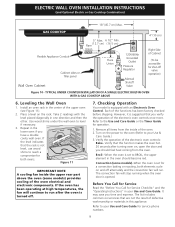
... operation of the functions has been factory checked before shipping. ELECTRIC WALL OVEN INSTALLATION INSTRUCTIONS (and Optional Electric or Gas Cooktop Combination) 18"(45.7 cm) Max. It may save you have a double cavity wall oven. Verify that are not the result of the electronic oven controls: Bake- Flexible Appliance Conduit Wall Oven Cabinet Cabinet sides or filler panel 5" Max. 6 1/2" Min. (12...
... operation of the functions has been factory checked before shipping. ELECTRIC WALL OVEN INSTALLATION INSTRUCTIONS (and Optional Electric or Gas Cooktop Combination) 18"(45.7 cm) Max. It may save you have a double cavity wall oven. Verify that are not the result of the electronic oven controls: Bake- Flexible Appliance Conduit Wall Oven Cabinet Cabinet sides or filler panel 5" Max. 6 1/2" Min. (12...


