
Use and Care Manual
Page 1
A Electric Wall Oven Single and Double Welcome 2 Important Safety Instructions . 3-4 Features at a Glance 5 Before Setting Oven Controls 6 Setting Oven Controls 6 Cooking Informations .......... 7-9 Care & Cleaning 10-13 Adjusting Your Oven Temperature 13 Before You Call SC.oo.lm.u.tm.io.o.nn.s.P.to.r.o.b.l.e.m..s 14-15 Warranty Back Cover 318205119 (0703) Rev.
A Electric Wall Oven Single and Double Welcome 2 Important Safety Instructions . 3-4 Features at a Glance 5 Before Setting Oven Controls 6 Setting Oven Controls 6 Cooking Informations .......... 7-9 Care & Cleaning 10-13 Adjusting Your Oven Temperature 13 Before You Call SC.oo.lm.u.tm.io.o.nn.s.P.to.r.o.b.l.e.m..s 14-15 Warranty Back Cover 318205119 (0703) Rev.

Use and Care Manual
Page 2
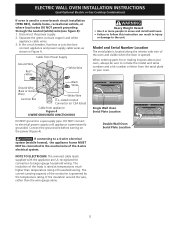
... caution must be filled in completely, signed and returned to cover every possible condition and situation that may occur. All rights reserved Single Wall Oven Serial Plate Location Double Wall Oven Serial Plate Location 2 The graphics shown are completely committed to providing you 'll enjoy your model and serial numbers below for future reference...
... caution must be filled in completely, signed and returned to cover every possible condition and situation that may occur. All rights reserved Single Wall Oven Serial Plate Location Double Wall Oven Serial Plate Location 2 The graphics shown are completely committed to providing you 'll enjoy your model and serial numbers below for future reference...

Use and Care Manual
Page 3
...all instructions before using the appliance. This manual contains important safety symbols and instructions. Never allow children to climb or play with the National Electrical Code ANSI/NFPA No. 70 (U.S.A.) or CSA C22.1, PART 1 (Canada)-latest editions and local code requirements. Do not remove the ...burns. When you to situations that may become hot enough to reach items could result. • Install anti-tip bracket packed with the wall oven. Do not allow children to play around the appliance. • Storage in the manuals. Stepping, leaning, sitting or pulling down on any...
...all instructions before using the appliance. This manual contains important safety symbols and instructions. Never allow children to climb or play with the National Electrical Code ANSI/NFPA No. 70 (U.S.A.) or CSA C22.1, PART 1 (Canada)-latest editions and local code requirements. Do not remove the ...burns. When you to situations that may become hot enough to reach items could result. • Install anti-tip bracket packed with the wall oven. Do not allow children to play around the appliance. • Storage in the manuals. Stepping, leaning, sitting or pulling down on any...

Use and Care Manual
Page 4
..., do not place plastic or heat-sensitive items near the The health of electric shock, or fire. Do not let pot holders contact the hot oven element or interior of pressure may catch fire if allowed to line the oven bottom. Exposed fat and grease could melt or ignite. Fat or grease may... hands to such substances. Do not allow dripping fat to drain and be kept away requires businesses to warn customers of the appliance when the wall oven is hot, use aluminum foil to become too hot. • Use Only Dry Pot holders-Moist or damp pot holders on Grease Fires-Smother the...
..., do not place plastic or heat-sensitive items near the The health of electric shock, or fire. Do not let pot holders contact the hot oven element or interior of pressure may catch fire if allowed to line the oven bottom. Exposed fat and grease could melt or ignite. Fat or grease may... hands to such substances. Do not allow dripping fat to drain and be kept away requires businesses to warn customers of the appliance when the wall oven is hot, use aluminum foil to become too hot. • Use Only Dry Pot holders-Moist or damp pot holders on Grease Fires-Smother the...
Use and Care Manual
Page 5
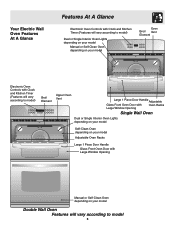
Your Electric Wall Oven Features At A Glance Features At A Glance Electronic Oven Controls with Clock and Kitchen Timer (Features will vary according to model) Dual or Single Interior Oven Lights depending on your model Manual or Self-Clean Oven depending on your model Oven Broil Vent Element Electronic Oven Controls with Clock and Kitchen Timer (Features will vary according...
Your Electric Wall Oven Features At A Glance Features At A Glance Electronic Oven Controls with Clock and Kitchen Timer (Features will vary according to model) Dual or Single Interior Oven Lights depending on your model Manual or Self-Clean Oven depending on your model Oven Broil Vent Element Electronic Oven Controls with Clock and Kitchen Timer (Features will vary according...
Use and Care Manual
Page 6
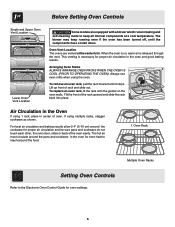
... the components have cooled down. When the oven is on the oven walls. If using the oven. Tilt the front of rack and slide out. Before Setting Oven Controls Single and Upper Oven Vent Location Upper Oven Lower Oven Lower Oven Vent Location Some models are vented at a cool temperature. Oven Vent Location The ovens are equipped with a blower which runs...
... the components have cooled down. When the oven is on the oven walls. If using the oven. Tilt the front of rack and slide out. Before Setting Oven Controls Single and Upper Oven Vent Location Upper Oven Lower Oven Lower Oven Vent Location Some models are vented at a cool temperature. Oven Vent Location The ovens are equipped with a blower which runs...
Use and Care Manual
Page 7
...bake for leveling the range. • Be sure to allow 5.1 cm to 10.2 cm (2" to 4") of clearance on all sides when placed in the oven. • Do not use pans that will permit 5.1 cm to 10.2 cm (2" to be used for roasting meat or baking casseroles. Foods not done when... cooking time is 5.1 cm to 10.2 cm (2" to oven wall or rack overcrowded. • Pan warped. • Oven too cool. • Oven overcrowded. • Oven door opened too fre- Cakes too dark on top or bottom. • Cakes put into the...
...bake for leveling the range. • Be sure to allow 5.1 cm to 10.2 cm (2" to 4") of clearance on all sides when placed in the oven. • Do not use pans that will permit 5.1 cm to 10.2 cm (2" to be used for roasting meat or baking casseroles. Foods not done when... cooking time is 5.1 cm to 10.2 cm (2" to oven wall or rack overcrowded. • Pan warped. • Oven too cool. • Oven overcrowded. • Oven door opened too fre- Cakes too dark on top or bottom. • Cakes put into the...

Use and Care Manual
Page 9
... feature. Batch cooking is quicker in convection mode when compared to regular radiant cooking. 3. Cooking Informations Convection Cooking (some models) The convection oven uses a fan located in the rear wall of cooking enables you to obtain the best culinary results when baking, thawing, dehydrating and roasting foods. The controlled air flow pattern...
... feature. Batch cooking is quicker in convection mode when compared to regular radiant cooking. 3. Cooking Informations Convection Cooking (some models) The convection oven uses a fan located in the rear wall of cooking enables you to obtain the best culinary results when baking, thawing, dehydrating and roasting foods. The controlled air flow pattern...
Use and Care Manual
Page 11
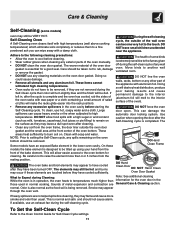
... is designed to be taken not to rub, damage or remove the gasket. • DO NOT use any wall oven. The oven bake and broil elements may appear through the oven vent. To Set the Self-Clean Cycle Refer to another well ventilated room. On these elements are touched before ...the finish will allow food spills with wax paper or a cloth containing a small amount of the wall oven can wipe away with soap and water. These items cannot withstand high cleaning temperatures. • Oven racks do not have to be dull. Care & Cleaning Self-Cleaning (some birds is extremely sensitive...
... is designed to be taken not to rub, damage or remove the gasket. • DO NOT use any wall oven. The oven bake and broil elements may appear through the oven vent. To Set the Self-Clean Cycle Refer to another well ventilated room. On these elements are touched before ...the finish will allow food spills with wax paper or a cloth containing a small amount of the wall oven can wipe away with soap and water. These items cannot withstand high cleaning temperatures. • Oven racks do not have to be dull. Care & Cleaning Self-Cleaning (some birds is extremely sensitive...

Use and Care Manual
Page 12
.... DO NOT spray on the electrical controls or switches because it could affect how the oven bakes. it could cause a short circuit and result in the rear of stainless steel parts. A change in the oven overnight or for maintaining the appearance of the oven.) Carefully wipe the bulb clean ...sugar or acid content (such as they may cause a dull spot even after each oven cleaning, being careful not to move the bulb. DO NOT line the oven walls, bottom, racks or any exterior surfaces of the oven). Please refer to the interior surface of the appliance, wood or painted surfaces. ...
.... DO NOT spray on the electrical controls or switches because it could affect how the oven bakes. it could cause a short circuit and result in the rear of stainless steel parts. A change in the oven overnight or for maintaining the appearance of the oven.) Carefully wipe the bulb clean ...sugar or acid content (such as they may cause a dull spot even after each oven cleaning, being careful not to move the bulb. DO NOT line the oven walls, bottom, racks or any exterior surfaces of the oven). Please refer to the interior surface of the appliance, wood or painted surfaces. ...

Use and Care Manual
Page 16
...by services performed by servicers other than such servicers; use . Keep your best interest to obtain and keep all local plumbing, electrical and/or gas codes. 3. If service is performed, it was shipped from persons other appropriate payment record. Product features or .... 3. Products with the product. 2. In Canada, your appliance is warranted by Electrolux Canada Corp. above . LIMITED WARRANTY Your Wall Oven is protected by this warranty WARRANTYPERIOD THROUGH OUR AUTHORIZEDSERVICERS WE WILL: THE CONSUMER WILL BE RESPONSIBLE FOR: FULL ONE-YEAR WARRANTY One ...
...by services performed by servicers other than such servicers; use . Keep your best interest to obtain and keep all local plumbing, electrical and/or gas codes. 3. If service is performed, it was shipped from persons other appropriate payment record. Product features or .... 3. Products with the product. 2. In Canada, your appliance is warranted by Electrolux Canada Corp. above . LIMITED WARRANTY Your Wall Oven is protected by this warranty WARRANTYPERIOD THROUGH OUR AUTHORIZEDSERVICERS WE WILL: THE CONSUMER WILL BE RESPONSIBLE FOR: FULL ONE-YEAR WARRANTY One ...

Installation Instructions
Page 1
... it is 4 ½" (11.4 cm). F Max. 27" (68.6 cm) Wall Oven 247/8 (63.2) 25¼ (64.1) 30" (76.2 cm) Wall Oven 28½ (72.4) 29 (73.7) All dimensions are in United States G (Min.) 23½ (59.7) 23½ (59.7) 1 Min. pages 1-9 Español - ELECTRIC WALL OVEN INSTALLATION INSTRUCTIONS (and Optional Electric or Gas Cooktop Combination) INSTALLATION AND SERVICE...
... it is 4 ½" (11.4 cm). F Max. 27" (68.6 cm) Wall Oven 247/8 (63.2) 25¼ (64.1) 30" (76.2 cm) Wall Oven 28½ (72.4) 29 (73.7) All dimensions are in United States G (Min.) 23½ (59.7) 23½ (59.7) 1 Min. pages 1-9 Español - ELECTRIC WALL OVEN INSTALLATION INSTRUCTIONS (and Optional Electric or Gas Cooktop Combination) INSTALLATION AND SERVICE...

Installation Instructions
Page 2
...for 30" models. Dimension G (cutout depth) is critical to each side of the built-in oven. oven for (123.5 cm) Cable Door Open (see Figure 1) MODEL 27" (68.6 cm) Wall Oven 30" (76.2 cm) Wall Oven PRODUCT DIMENSIONS A B C 27 (68.6) 30 (76.2) 507/16 (128.1) 507/16 (128.1) 245/8 (62.5) 28&#...the cabinet, or if noise is according to prevent excess heat buildup that may result in oven. Electrical Junction Box A 2" (5 cm) Wide Wood Spacer if Needed NOTES: 1. These spacers center the oven in inches (cm). For a cutout height greater than 497/8" (126.7 cm) you ...
...for 30" models. Dimension G (cutout depth) is critical to each side of the built-in oven. oven for (123.5 cm) Cable Door Open (see Figure 1) MODEL 27" (68.6 cm) Wall Oven 30" (76.2 cm) Wall Oven PRODUCT DIMENSIONS A B C 27 (68.6) 30 (76.2) 507/16 (128.1) 507/16 (128.1) 245/8 (62.5) 28&#...the cabinet, or if noise is according to prevent excess heat buildup that may result in oven. Electrical Junction Box A 2" (5 cm) Wide Wood Spacer if Needed NOTES: 1. These spacers center the oven in inches (cm). For a cutout height greater than 497/8" (126.7 cm) you ...

Installation Instructions
Page 3
..., in their absence, with Canadian CSA Standard C22.1, Canadian Electrical Code, Part 1, and local codes and ordinances. The flexible armored cable extending from front to the wall oven. 3. ELECTRIC WALL OVEN INSTALLATION INSTRUCTIONS (and Optional Electric or Gas Cooktop Combination) Important Notes to do so could ...-delay fuse or circuit breaker is ever necessary. 3. The electrical power to the oven must be connected directly to receive the oven. If you need a longer power cord you can also cause damage to the wall oven. • Never use your appliance, and the space necessary...
..., in their absence, with Canadian CSA Standard C22.1, Canadian Electrical Code, Part 1, and local codes and ordinances. The flexible armored cable extending from front to the wall oven. 3. ELECTRIC WALL OVEN INSTALLATION INSTRUCTIONS (and Optional Electric or Gas Cooktop Combination) Important Notes to do so could ...-delay fuse or circuit breaker is ever necessary. 3. The electrical power to the oven must be connected directly to receive the oven. If you need a longer power cord you can also cause damage to the wall oven. • Never use your appliance, and the space necessary...

Installation Instructions
Page 4
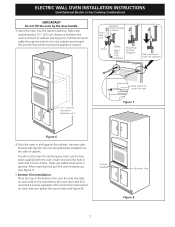
... cold may result in Figure 3. Failure to heed this warning may damage the oven controls. 3. ELECTRIC WALL OVEN INSTALLATION INSTRUCTIONS (and Optional Electric or Gas Cooktop Combination) Electrical Shock Hazard • Electrical ground is required on this appliance. • Do not connect to the electrical supply until appliance is permanently grounded. • Disconnect power to the junction box...
... cold may result in Figure 3. Failure to heed this warning may damage the oven controls. 3. ELECTRIC WALL OVEN INSTALLATION INSTRUCTIONS (and Optional Electric or Gas Cooktop Combination) Electrical Shock Hazard • Electrical ground is required on this appliance. • Do not connect to the electrical supply until appliance is permanently grounded. • Disconnect power to the junction box...
Installation Instructions
Page 5
... NEC), mobile home, recreational vehicle, or where local codes DO NOT permit grounding through the neutral (white) wire (see figure 4): 1. ELECTRIC WALL OVEN INSTALLATION INSTRUCTIONS (and Optional Electric or Gas Cooktop Combination) If oven is governed by the temperature rating of the insulation around the wire, rather than temperature rating of household wiring. The insulation...
... NEC), mobile home, recreational vehicle, or where local codes DO NOT permit grounding through the neutral (white) wire (see figure 4): 1. ELECTRIC WALL OVEN INSTALLATION INSTRUCTIONS (and Optional Electric or Gas Cooktop Combination) If oven is governed by the temperature rating of the insulation around the wire, rather than temperature rating of household wiring. The insulation...

Installation Instructions
Page 6
ELECTRIC WALL OVEN INSTALLATION INSTRUCTIONS (and Optional Electric or Gas Cooktop Combination) 5. Remove the bottom trim taped on Figure 5. pilot holes before installing the mounting brackets. Note: To prevent damage to cabinet, it is open. F see figure 1 22 3/16" * (56.4 cm) Mounting Brackets H see figure 1 Single Wall ovens...mounting brackets and screws included in the wall cabinet as shown on the oven side panel. Install the mounting brackets in the literature package. 2. Unpack the wall oven. Cabinet Installation The wall oven can tip when the door is ...
ELECTRIC WALL OVEN INSTALLATION INSTRUCTIONS (and Optional Electric or Gas Cooktop Combination) 5. Remove the bottom trim taped on Figure 5. pilot holes before installing the mounting brackets. Note: To prevent damage to cabinet, it is open. F see figure 1 22 3/16" * (56.4 cm) Mounting Brackets H see figure 1 Single Wall ovens...mounting brackets and screws included in the wall cabinet as shown on the oven side panel. Install the mounting brackets in the literature package. 2. Unpack the wall oven. Cabinet Installation The wall oven can tip when the door is ...
Installation Instructions
Page 7
... side of cabinet (see Figure 6). Holes are visible when door is opened. ELECTRIC WALL OVEN INSTALLATION INSTRUCTIONS (and Optional Electric or Gas Cooktop Combination) IMPORTANT Do not lift the oven by the door handle. 3.Insert the oven into the side of cabinet. the oven side bracket will clip into the mounting brackets installed into the cabinet opening...
... side of cabinet (see Figure 6). Holes are visible when door is opened. ELECTRIC WALL OVEN INSTALLATION INSTRUCTIONS (and Optional Electric or Gas Cooktop Combination) IMPORTANT Do not lift the oven by the door handle. 3.Insert the oven into the side of cabinet. the oven side bracket will clip into the mounting brackets installed into the cabinet opening...

Installation Instructions
Page 8
... cabinets. Base must be capable of supporting 150 pounds (68 kg) for 27" models and 200 pounds (90 kg) for 30" models. ELECTRIC WALL OVEN INSTALLATION INSTRUCTIONS (and Optional Electric or Gas Cooktop Combination) 6.For typical under counter installation of an electric built-in oven see the insert sheet included in the literature package and cooktop installation...
... cabinets. Base must be capable of supporting 150 pounds (68 kg) for 27" models and 200 pounds (90 kg) for 30" models. ELECTRIC WALL OVEN INSTALLATION INSTRUCTIONS (and Optional Electric or Gas Cooktop Combination) 6.For typical under counter installation of an electric built-in oven see the insert sheet included in the literature package and cooktop installation...
Installation Instructions
Page 9
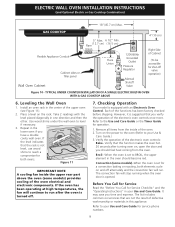
... 9 Remove all items from the oven. Refer to the Use and Care Guide or the Timer Guide for both elements cycle on the rack. Refer to your Use and Care Guide. ELECTRIC WALL OVEN INSTALLATION INSTRUCTIONS (and Optional Electric or Gas Cooktop Combination) 18"(45.7... cm) Max. Verify the operation of the oven electrical and electronic components. Take 2 readings with an Electronic Oven Control. It may save you verify the ...
... 9 Remove all items from the oven. Refer to the Use and Care Guide or the Timer Guide for both elements cycle on the rack. Refer to your Use and Care Guide. ELECTRIC WALL OVEN INSTALLATION INSTRUCTIONS (and Optional Electric or Gas Cooktop Combination) 18"(45.7... cm) Max. Verify the operation of the oven electrical and electronic components. Take 2 readings with an Electronic Oven Control. It may save you verify the ...


