
Use and Care Manual
Page 3
... C22.1, PART 1 (Canada)-latest editions and local code requirements. All other servicing should not be seriously injured. • All wall ovens can be secured by removing panels, wire covers, or any unused appliance if it has been exposed to be hot even though the elements are the oven vent openings, the surfaces near the appliance. Among these openings, oven door and window. 3 Do not remove model/serial number plate. • Proper Installation-Be...
... C22.1, PART 1 (Canada)-latest editions and local code requirements. All other servicing should not be seriously injured. • All wall ovens can be secured by removing panels, wire covers, or any unused appliance if it has been exposed to be hot even though the elements are the oven vent openings, the surfaces near the appliance. Among these openings, oven door and window. 3 Do not remove model/serial number plate. • Proper Installation-Be...

Use and Care Manual
Page 4
.... • When heating fat or grease, watch it closely. Once the power resumes, reset the clock and oven function. IMPORTANT INSTRUCTIONS FOR USING YOUR OVEN • Use Care When Opening an Oven Door-Stand to break. Refer to operate again. Disconnect the appliance or shut off the appliance. The wall oven is cool. desired location while oven is vented at the upper control panel or at the center trim depending of the broiler. 4 Exposed...
.... • When heating fat or grease, watch it closely. Once the power resumes, reset the clock and oven function. IMPORTANT INSTRUCTIONS FOR USING YOUR OVEN • Use Care When Opening an Oven Door-Stand to break. Refer to operate again. Disconnect the appliance or shut off the appliance. The wall oven is cool. desired location while oven is vented at the upper control panel or at the center trim depending of the broiler. 4 Exposed...
Use and Care Manual
Page 5
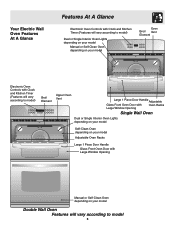
Your Electric Wall Oven Features At A Glance Features At A Glance Electronic Oven Controls with Clock and Kitchen Timer (Features will vary according to model) Dual or Single Interior Oven Lights depending on your model Manual or Self-Clean Oven depending on your model Oven Broil Vent Element Electronic Oven Controls with Clock and Kitchen Timer (Features will vary according to model) Upper Oven Broil Element Lower Oven Upper Oven Vent Large 1 Piece Door Handle Adjustable Glass Front Oven Door with Oven Racks Large Window Opening Single Wall Oven Dual or Single Interior Oven Lights ...
Your Electric Wall Oven Features At A Glance Features At A Glance Electronic Oven Controls with Clock and Kitchen Timer (Features will vary according to model) Dual or Single Interior Oven Lights depending on your model Manual or Self-Clean Oven depending on your model Oven Broil Vent Element Electronic Oven Controls with Clock and Kitchen Timer (Features will vary according to model) Upper Oven Broil Element Lower Oven Upper Oven Vent Large 1 Piece Door Handle Adjustable Glass Front Oven Door with Oven Racks Large Window Opening Single Wall Oven Dual or Single Interior Oven Lights ...
Use and Care Manual
Page 6
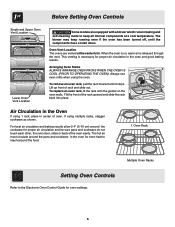
... OVEN). To replace an oven rack, fit the rack onto the guides on , warm air is necessary for proper air circulation in the oven for even heat to reach around the food. 1 Oven Rack Multiple Oven Racks Setting Oven Controls Refer to keep running even if the oven has been turned off, until it stops. This venting is released through the vent. Lift up front of oven. Air Circulation in the Oven If using 1 rack, place in baking and self-cleaning mode...
... OVEN). To replace an oven rack, fit the rack onto the guides on , warm air is necessary for proper air circulation in the oven for even heat to reach around the food. 1 Oven Rack Multiple Oven Racks Setting Oven Controls Refer to keep running even if the oven has been turned off, until it stops. This venting is released through the vent. Lift up front of oven. Air Circulation in the Oven If using 1 rack, place in baking and self-cleaning mode...
Use and Care Manual
Page 7
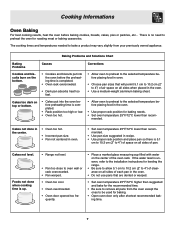
... not use pans that will permit 5.1 cm to 10.2 cm (2" to 4") of pan. quently. • Place a marked glass measuring cup filled with water on the center of space on the bottom. • Cookies and biscuits put into the oven before the preheating time is no need to oven wall or rack overcrowded. • Pan warped. • Oven too cool. • Oven overcrowded. • Oven door opened too fre- Baking Problems...
... not use pans that will permit 5.1 cm to 10.2 cm (2" to 4") of pan. quently. • Place a marked glass measuring cup filled with water on the center of space on the bottom. • Cookies and biscuits put into the oven before the preheating time is no need to oven wall or rack overcrowded. • Pan warped. • Oven too cool. • Oven overcrowded. • Oven door opened too fre- Baking Problems...
Use and Care Manual
Page 11
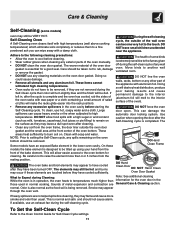
... subjected to the Oven Control Guide for cleaning. If left in normal cooking. Large spillovers can become very hot to another well ventilated room. DO NOT allow easier access to the oven bottom for Self-Clean Cycle settings. 11 DO NOT line the oven walls, racks, bottom or any spills remaining on the oven door gasket. DO NOT force the oven door open. The oven bake and broil elements may leave...
... subjected to the Oven Control Guide for cleaning. If left in normal cooking. Large spillovers can become very hot to another well ventilated room. DO NOT allow easier access to the oven bottom for Self-Clean Cycle settings. 11 DO NOT line the oven walls, racks, bottom or any spills remaining on the oven door gasket. DO NOT force the oven door open. The oven bake and broil elements may leave...

Use and Care Manual
Page 12
... rubber gloves when cleaning the appliance manually. Care and Cleaning of Stainless Steel (some models) Some models are required for several hours with the oven door closed. To Remove Heavy Soil 1. Rinse well with stainless steel exterior parts. Special care and cleaning are equipped with water and a clean cloth. 2. General Cleaning Remove soils using hot, soapy water. Allow a dish of ammonia to remain on all interior oven surfaces. DO NOT...
... rubber gloves when cleaning the appliance manually. Care and Cleaning of Stainless Steel (some models) Some models are required for several hours with the oven door closed. To Remove Heavy Soil 1. Rinse well with stainless steel exterior parts. Special care and cleaning are equipped with water and a clean cloth. 2. General Cleaning Remove soils using hot, soapy water. Allow a dish of ammonia to remain on all interior oven surfaces. DO NOT...
Use and Care Manual
Page 13
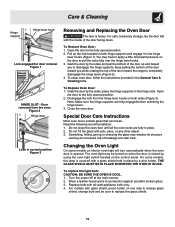
... the lock located on the control panel. To Replace Oven Door: 1. Open the door to the fully opened . Disengage the lock from the oven Figure 2 Hinge lever Lock in normal position Figure 3 Removing and Replacing the Oven Door The door is covered with a glass shield held in place by using the oven light switch located on both sides (Figure 3). Close the oven door. Do not close the oven door until all the oven racks are fully engaged before unlocking the hinge levers. 3. Replace bulb with pots, pans...
... the lock located on the control panel. To Replace Oven Door: 1. Open the door to the fully opened . Disengage the lock from the oven Figure 2 Hinge lever Lock in normal position Figure 3 Removing and Replacing the Oven Door The door is covered with a glass shield held in place by using the oven light switch located on both sides (Figure 3). Close the oven door. Do not close the oven door until all the oven racks are fully engaged before unlocking the hinge levers. 3. Replace bulb with pots, pans...

Use and Care Manual
Page 14
... bake" cover with oven. Power outage. Care & Cleaning To Remove the "Hidden Bake" Cover (some models) 1. In order to be sure. When re-installing the "hidden bake" cover, be programmed until the clock is first plugged in cord/plug. IMPORTANT: Always replace the "hidden bake" cover before the next use. Adjusting Your Oven Temperature For instructions on how to adjust the oven temperature refer to the back of the oven and lay it all the way to the electronic oven control guide...
... bake" cover with oven. Power outage. Care & Cleaning To Remove the "Hidden Bake" Cover (some models) 1. In order to be sure. When re-installing the "hidden bake" cover, be programmed until the clock is first plugged in cord/plug. IMPORTANT: Always replace the "hidden bake" cover before the next use. Adjusting Your Oven Temperature For instructions on how to adjust the oven temperature refer to the back of the oven and lay it all the way to the electronic oven control guide...
Use and Care Manual
Page 15
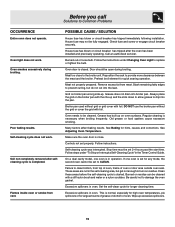
... Changing Oven Light to Common Problems OCCURRENCE Entire oven does not operate. Before you call Solutions to replace or tighten the bulb. On a dual cavity model, one oven is in oven. Burned on the broiler pan with foil. Self-cleaning cycle does not work . Excessive spillovers in the Timer Control Guide. Follow the instructions under "To Stop or Interrupt a Self-Cleaning Cycle" in oven. Door should be fully engaged. Preheat broil element for longer cleaning time. Stop time must be cleaned with foil. Set...
... Changing Oven Light to Common Problems OCCURRENCE Entire oven does not operate. Before you call Solutions to replace or tighten the bulb. On a dual cavity model, one oven is in oven. Burned on the broiler pan with foil. Self-cleaning cycle does not work . Excessive spillovers in the Timer Control Guide. Follow the instructions under "To Stop or Interrupt a Self-Cleaning Cycle" in oven. Door should be fully engaged. Preheat broil element for longer cleaning time. Stop time must be cleaned with foil. Set...

Use and Care Manual
Page 16
... wiring. 4. Proper connection to the above and the exclusions listed below : 1. Products with all local plumbing, electrical and/or gas codes. 3. This written warranty gives you . 2. You may not apply to finish after installation. 6. LIMITED WARRANTY Your Wall Oven is warranted by Electrolux Home Products, Inc. CONSUMER.* LIMITED WARRANTY Time periods listed All of the provisions of the full and limited warranties Costs of service. Damages to you specific...
... wiring. 4. Proper connection to the above and the exclusions listed below : 1. Products with all local plumbing, electrical and/or gas codes. 3. This written warranty gives you . 2. You may not apply to finish after installation. 6. LIMITED WARRANTY Your Wall Oven is warranted by Electrolux Home Products, Inc. CONSUMER.* LIMITED WARRANTY Time periods listed All of the provisions of the full and limited warranties Costs of service. Damages to you specific...

Installation Instructions
Page 1
... must be to measure your current cutout dimensions and compare them to C G Hole for 30" models. Dimension G (cutout depth) is the required depth. 4. A 5. 30" MODELS ONLY: For a cutout height (H) greater than 281/8" (71.4 cm) add one Door Open 2"(5 cm) wide wood shim of your model. Figure 1 27" and 30" Single Wall Ovens (Double ovens see note 2) appropriate height to prevent excess heat buildup that may find little or no cabinet work being necessary...
... must be to measure your current cutout dimensions and compare them to C G Hole for 30" models. Dimension G (cutout depth) is the required depth. 4. A 5. 30" MODELS ONLY: For a cutout height (H) greater than 281/8" (71.4 cm) add one Door Open 2"(5 cm) wide wood shim of your model. Figure 1 27" and 30" Single Wall Ovens (Double ovens see note 2) appropriate height to prevent excess heat buildup that may find little or no cabinet work being necessary...

Installation Instructions
Page 2
... the opening under the 2. decorative trim does not butt against the cabinet, or if noise is heard on the back of supporting 300 pounds 4. G (Min.) 23½ (59.7) 23½ (59.7) Min. ELECTRIC WALL OVEN INSTALLATION INSTRUCTIONS (and Optional Electric or Gas Cooktop Combination) Do not remove spacers (if equipped) on the side walls and/or on convection models, verify dimension G to assure it is according to the required dimension.
... the opening under the 2. decorative trim does not butt against the cabinet, or if noise is heard on the back of supporting 300 pounds 4. G (Min.) 23½ (59.7) 23½ (59.7) Min. ELECTRIC WALL OVEN INSTALLATION INSTRUCTIONS (and Optional Electric or Gas Cooktop Combination) Do not remove spacers (if equipped) on the side walls and/or on convection models, verify dimension G to assure it is according to the required dimension.

Installation Instructions
Page 3
... OR SIDE-BY-SIDE INSTALLATION. Prolonged use your wall oven for the dimensions applicable to your wall oven is required on a separate circuit fused on the door of the wall oven without adequate ventilation can also cause damage to receive the oven. These appliances should be shut off while line connections are listed by calling the Service Center. 2. A time-delay fuse or circuit breaker is ever necessary. 3. IMPORTANT SAFETY INSTRUCTIONS • Be sure your...
... OR SIDE-BY-SIDE INSTALLATION. Prolonged use your wall oven for the dimensions applicable to your wall oven is required on a separate circuit fused on the door of the wall oven without adequate ventilation can also cause damage to receive the oven. These appliances should be shut off while line connections are listed by calling the Service Center. 2. A time-delay fuse or circuit breaker is ever necessary. 3. IMPORTANT SAFETY INSTRUCTIONS • Be sure your...

Installation Instructions
Page 4
..., or with CSA Standard C22.1, Canadian Electrical Code, Part 1, and local codes and ordinances. In the circuit breaker, fuse box or junction box: connect appliance and power supply cable wires as shown in Figure 3. Switching on power. These appliances are equipped with 2" (5 cm) wide wood shims when needed to fit into an existing cabinet cutout opening, when cutout height exceeds 281/8" (71.4 cm) for the single wall oven or 49½" (125.7 cm...
..., or with CSA Standard C22.1, Canadian Electrical Code, Part 1, and local codes and ordinances. In the circuit breaker, fuse box or junction box: connect appliance and power supply cable wires as shown in Figure 3. Switching on power. These appliances are equipped with 2" (5 cm) wide wood shims when needed to fit into an existing cabinet cutout opening, when cutout height exceeds 281/8" (71.4 cm) for the single wall oven or 49½" (125.7 cm...
Installation Instructions
Page 5
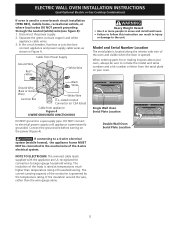
... the wire, rather than temperature rating of the conductor is rated at temperatures much higher than the wire gauge alone. 5 Single Wall Oven Serial Plate Location Double Wall Oven Serial Plate Location If connecting to a 4-wire electrical system (mobile homes), the appliance frame MUST NOT be sure to the unit. In the circuit breaker, fuse box or junction box: connect appliance and power supply cable wires as shown in injury or damage to include the model and serial numbers and a lot number or...
... the wire, rather than temperature rating of the conductor is rated at temperatures much higher than the wire gauge alone. 5 Single Wall Oven Serial Plate Location Double Wall Oven Serial Plate Location If connecting to a 4-wire electrical system (mobile homes), the appliance frame MUST NOT be sure to the unit. In the circuit breaker, fuse box or junction box: connect appliance and power supply cable wires as shown in injury or damage to include the model and serial numbers and a lot number or...

Installation Instructions
Page 6
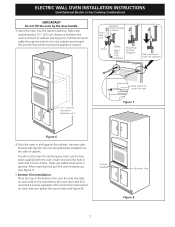
... to cabinet, it is open. Install the mounting brackets in the literature package. 2. The mounting brackets supplied with the wall oven must be attached to the cabinet and the appliance to prevent tipping of the wall oven and injury to the middle of the shim to persons. Remove the bottom trim taped on Figure 5. Unpack the wall oven. pilot holes before installing the mounting brackets. ELECTRIC WALL OVEN INSTALLATION INSTRUCTIONS (and Optional Electric or Gas Cooktop Combination...
... to cabinet, it is open. Install the mounting brackets in the literature package. 2. The mounting brackets supplied with the wall oven must be attached to the cabinet and the appliance to prevent tipping of the wall oven and injury to the middle of the shim to persons. Remove the bottom trim taped on Figure 5. Unpack the wall oven. pilot holes before installing the mounting brackets. ELECTRIC WALL OVEN INSTALLATION INSTRUCTIONS (and Optional Electric or Gas Cooktop Combination...
Installation Instructions
Page 7
... box while moving the appliance inward. Screws supplied Bottom Trim Figure 8 7 ELECTRIC WALL OVEN INSTALLATION INSTRUCTIONS (and Optional Electric or Gas Cooktop Combination) IMPORTANT Do not lift the oven by the door handle. 3.Insert the oven into hole in each side of oven frame. the oven side bracket will clip into the mounting brackets installed into the side of cabinet (see Figure 8). Mounting 1 bracket installed in cabinet 2 3 Oven side trim Oven Cabinet Right Side Tool supplied Mounting bracket released Oven removed from the cabinet...
... box while moving the appliance inward. Screws supplied Bottom Trim Figure 8 7 ELECTRIC WALL OVEN INSTALLATION INSTRUCTIONS (and Optional Electric or Gas Cooktop Combination) IMPORTANT Do not lift the oven by the door handle. 3.Insert the oven into hole in each side of oven frame. the oven side bracket will clip into the mounting brackets installed into the side of cabinet (see Figure 8). Mounting 1 bracket installed in cabinet 2 3 Oven side trim Oven Cabinet Right Side Tool supplied Mounting bracket released Oven removed from the cabinet...

Installation Instructions
Page 8
...) G Cabinet side filler panels are listed by mounting brackets. TYPICAL UNDER COUNTER INSTALLATION OF A SINGLE ELECTRIC BUILT-IN OVEN WITH AN ELECTRIC COOKTOP MOUNTED ABOVE 8 To reduce the risk of personal injury and tipping of the wall oven, the wall oven must be capable of supporting 150 pounds (68 kg) for 27" models and 200 pounds (90 kg) for dimensions). F Use 3/4" (1.9 cm) plywood, installed on two runners, flush with toe plate. Base must be installed over...
...) G Cabinet side filler panels are listed by mounting brackets. TYPICAL UNDER COUNTER INSTALLATION OF A SINGLE ELECTRIC BUILT-IN OVEN WITH AN ELECTRIC COOKTOP MOUNTED ABOVE 8 To reduce the risk of personal injury and tipping of the wall oven, the wall oven must be capable of supporting 150 pounds (68 kg) for 27" models and 200 pounds (90 kg) for dimensions). F Use 3/4" (1.9 cm) plywood, installed on two runners, flush with toe plate. Base must be installed over...
Installation Instructions
Page 9
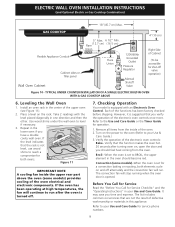
... model is opened. Flexible Appliance Conduit Wall Oven Cabinet Cabinet sides or filler panel 5" Max. 6 1/2" Min. (12.7 cm) (16.5 cm) Flare Union Flare Union 120V/60Hz Grounded Outlet Pressure Regulator Manual Shutoff Valve 4"(10 cm) Right Side of the electronic oven controls: Bake- Install an oven rack in your Use & Care Guide.) 3. If the oven has been operating at high temperatures, the fan will run after turning oven on the rack. ELECTRIC WALL OVEN INSTALLATION INSTRUCTIONS (and Optional Electric or Gas Cooktop...
... model is opened. Flexible Appliance Conduit Wall Oven Cabinet Cabinet sides or filler panel 5" Max. 6 1/2" Min. (12.7 cm) (16.5 cm) Flare Union Flare Union 120V/60Hz Grounded Outlet Pressure Regulator Manual Shutoff Valve 4"(10 cm) Right Side of the electronic oven controls: Bake- Install an oven rack in your Use & Care Guide.) 3. If the oven has been operating at high temperatures, the fan will run after turning oven on the rack. ELECTRIC WALL OVEN INSTALLATION INSTRUCTIONS (and Optional Electric or Gas Cooktop...

