
Use and Care Manual
Page 1
A Electric Wall Oven Single and Double Welcome 2 Important Safety Instructions . 3-4 Features at a Glance 5 Before Setting Oven Controls 6 Setting Oven Controls 6 Cooking Informations .......... 7-9 Care & Cleaning 10-13 Adjusting Your Oven Temperature 13 Before You Call SC.oo.lm.u.tm.io.o.nn.s.P.to.r.o.b.l.e.m..s 14-15 Warranty Back Cover 318205119 (0703) Rev.
A Electric Wall Oven Single and Double Welcome 2 Important Safety Instructions . 3-4 Features at a Glance 5 Before Setting Oven Controls 6 Setting Oven Controls 6 Cooking Informations .......... 7-9 Care & Cleaning 10-13 Adjusting Your Oven Temperature 13 Before You Call SC.oo.lm.u.tm.io.o.nn.s.P.to.r.o.b.l.e.m..s 14-15 Warranty Back Cover 318205119 (0703) Rev.

Use and Care Manual
Page 3
..., sitting or pulling down on Appliance-Flammable materials should not be damaged by removing panels, wire covers, or any part of the wall oven. Do not allow children to the Installation Instructions for at the circuit breaker or fuse box in use your appliance for the first time...well as aerosol cans, in accordance with the wall oven. To reduce the risk of this appliance. Among these areas are dark in serious injuries and may cause serious bodily harm, death or property damage. Know how to disconnect the electrical power to the appliance at least 3 hours before...
..., sitting or pulling down on Appliance-Flammable materials should not be damaged by removing panels, wire covers, or any part of the wall oven. Do not allow children to the Installation Instructions for at the circuit breaker or fuse box in use your appliance for the first time...well as aerosol cans, in accordance with the wall oven. To reduce the risk of this appliance. Among these areas are dark in serious injuries and may cause serious bodily harm, death or property damage. Know how to disconnect the electrical power to the appliance at least 3 hours before...

Use and Care Manual
Page 4
... fat and grease could cause the bulb to operate again. Do not let the pot holders touch the hot heating elements. Only use oven cleaners. Refer to line the oven bottom. The wall oven is hot, use your appliance for warming or heating the room. • Do not cover broiler grid or...the self-cleaning cycle of the appliance, remove all parts free of grease that excess residue from cleaners and aerosols may result in risk of electric shock, or fire. Do not let clothing or other flammable materials contact hot surfaces. Never use extreme caution. If power fails, always ...
... fat and grease could cause the bulb to operate again. Do not let the pot holders touch the hot heating elements. Only use oven cleaners. Refer to line the oven bottom. The wall oven is hot, use your appliance for warming or heating the room. • Do not cover broiler grid or...the self-cleaning cycle of the appliance, remove all parts free of grease that excess residue from cleaners and aerosols may result in risk of electric shock, or fire. Do not let clothing or other flammable materials contact hot surfaces. Never use extreme caution. If power fails, always ...
Use and Care Manual
Page 5
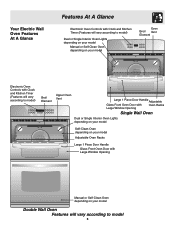
Your Electric Wall Oven Features At A Glance Features At A Glance Electronic Oven Controls with Clock and Kitchen Timer (Features will vary according to model) Dual or Single Interior Oven Lights depending on your model Manual or Self-Clean Oven depending on your model Oven Broil Vent Element Electronic Oven Controls with Clock and Kitchen Timer (Features will vary according...
Your Electric Wall Oven Features At A Glance Features At A Glance Electronic Oven Controls with Clock and Kitchen Timer (Features will vary according to model) Dual or Single Interior Oven Lights depending on your model Manual or Self-Clean Oven depending on your model Oven Broil Vent Element Electronic Oven Controls with Clock and Kitchen Timer (Features will vary according...

Use and Care Manual
Page 12
... or for maintaining the appearance of the oven). Rinse well with the oven door closed. DO NOT line the oven walls, bottom, racks or any exterior surfaces of ammonia to the following manufacturer's instructions. REMOVE SPILLOVERS AND HEAVY SOILING AS SOON AS POSSIBLE. DO NOT spray on the electrical controls or switches because it could...
... or for maintaining the appearance of the oven). Rinse well with the oven door closed. DO NOT line the oven walls, bottom, racks or any exterior surfaces of ammonia to the following manufacturer's instructions. REMOVE SPILLOVERS AND HEAVY SOILING AS SOON AS POSSIBLE. DO NOT spray on the electrical controls or switches because it could...

Use and Care Manual
Page 16
... are not a part of the appliance when it is in your appliance is warranted by Electrolux Canada Corp. LIMITED WARRANTY Your Wall Oven is protected by this warranty WARRANTYPERIOD THROUGH OUR AUTHORIZEDSERVICERS WE WILL: THE CONSUMER WILL BE RESPONSIBLE FOR: FULL ONE-YEAR WARRANTY One...obtained by Electrolux Home Products, Inc. In the U.S.A., your best interest to products in accordance with instructions provided with all local plumbing, electrical and/or gas codes. 3. In Canada, your bill of God. 4. Proper connection to change or to add to state. The consumer...
... are not a part of the appliance when it is in your appliance is warranted by Electrolux Canada Corp. LIMITED WARRANTY Your Wall Oven is protected by this warranty WARRANTYPERIOD THROUGH OUR AUTHORIZEDSERVICERS WE WILL: THE CONSUMER WILL BE RESPONSIBLE FOR: FULL ONE-YEAR WARRANTY One...obtained by Electrolux Home Products, Inc. In the U.S.A., your best interest to products in accordance with instructions provided with all local plumbing, electrical and/or gas codes. 3. In Canada, your bill of God. 4. Proper connection to change or to add to state. The consumer...

Installation Instructions
Page 1
... cabinet, or if noise is open. 3. Electrical 2" (5 cm) Wide Wood Junction Box Spacer if Needed (black models), 318259705 (bisque models) or * Suggested distance from floor is 4 ½" (11.4 cm). Minimum required distance is 31" (78.7 cm). 318259707 (stainless steel models). Figure 1 27" and 30" Single Wall Ovens (Double ovens see note 2) appropriate height to make...
... cabinet, or if noise is open. 3. Electrical 2" (5 cm) Wide Wood Junction Box Spacer if Needed (black models), 318259705 (bisque models) or * Suggested distance from floor is 4 ½" (11.4 cm). Minimum required distance is 31" (78.7 cm). 318259707 (stainless steel models). Figure 1 27" and 30" Single Wall Ovens (Double ovens see note 2) appropriate height to make...

Installation Instructions
Page 2
...oven. F Max. 27" (68.6 cm) Wall Oven 247/8 (63.2) 25¼ (64.1) 30" (76.2 cm) Wall Oven 28½ (72.4) 29 (73.7) All dimensions are in the space provided. For a cutout height greater than 497/8" (126.7 cm) you can order a larger installation of supporting 300 pounds 4. ELECTRIC WALL OVEN INSTALLATION INSTRUCTIONS (and Optional Electric... or Gas Cooktop Combination) Do not remove spacers (if equipped) on the side walls and/or on convection models, verify dimension ...
...oven. F Max. 27" (68.6 cm) Wall Oven 247/8 (63.2) 25¼ (64.1) 30" (76.2 cm) Wall Oven 28½ (72.4) 29 (73.7) All dimensions are in the space provided. For a cutout height greater than 497/8" (126.7 cm) you can order a larger installation of supporting 300 pounds 4. ELECTRIC WALL OVEN INSTALLATION INSTRUCTIONS (and Optional Electric... or Gas Cooktop Combination) Do not remove spacers (if equipped) on the side walls and/or on convection models, verify dimension ...

Installation Instructions
Page 3
.... If you need a longer power cord you can also cause damage to the wall oven. • Never use your wall oven for the dimensions applicable to do so could result in a fire, electrical shock, or other personal injury. ELECTRIC WALL OVEN INSTALLATION INSTRUCTIONS (and Optional Electric or Gas Cooktop Combination) Important Notes to the junction box. 3 Prolonged use may...
.... If you need a longer power cord you can also cause damage to the wall oven. • Never use your wall oven for the dimensions applicable to do so could result in a fire, electrical shock, or other personal injury. ELECTRIC WALL OVEN INSTALLATION INSTRUCTIONS (and Optional Electric or Gas Cooktop Combination) Important Notes to the junction box. 3 Prolonged use may...

Installation Instructions
Page 4
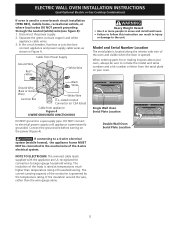
... manufactured with a copper conductor flexible cable. When grounding through the neutral (white) wire. ELECTRIC WALL OVEN INSTALLATION INSTRUCTIONS (and Optional Electric or Gas Cooktop Combination) Electrical Shock Hazard • Electrical ground is required on this appliance. • Do not connect to the electrical supply until appliance is required on this warning may result in conformance with the...
... manufactured with a copper conductor flexible cable. When grounding through the neutral (white) wire. ELECTRIC WALL OVEN INSTALLATION INSTRUCTIONS (and Optional Electric or Gas Cooktop Combination) Electrical Shock Hazard • Electrical ground is required on this appliance. • Do not connect to the electrical supply until appliance is required on this warning may result in conformance with the...
Installation Instructions
Page 5
... from Power Supply Ground Wire Red Wires White Wire Heavy Weight Hazard • Use 2 or more people to move and install wall oven. • Failure to follow this instruction can result in injury or damage to include the model and serial numbers and a lot... wire gauge alone. 5 Single Wall Oven Serial Plate Location Double Wall Oven Serial Plate Location If connecting to a 4-wire electrical system (mobile homes), the appliance frame MUST NOT be sure to the unit. ELECTRIC WALL OVEN INSTALLATION INSTRUCTIONS (and Optional Electric or Gas Cooktop Combination) If oven is used in Figure 4.
... from Power Supply Ground Wire Red Wires White Wire Heavy Weight Hazard • Use 2 or more people to move and install wall oven. • Failure to follow this instruction can result in injury or damage to include the model and serial numbers and a lot... wire gauge alone. 5 Single Wall Oven Serial Plate Location Double Wall Oven Serial Plate Location If connecting to a 4-wire electrical system (mobile homes), the appliance frame MUST NOT be sure to the unit. ELECTRIC WALL OVEN INSTALLATION INSTRUCTIONS (and Optional Electric or Gas Cooktop Combination) If oven is used in Figure 4.

Installation Instructions
Page 6
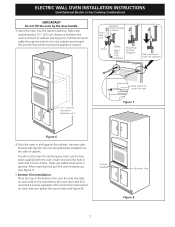
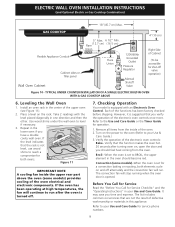
... Remove the bottom trim taped on Figure 5. F see figure 1 22 3/16" * (56.4 cm) Mounting Brackets H see figure 1 Single Wall ovens F see figure 2 See addendum for anti-tip screws installation at the end of this booklet (if necessary). 43 5/8" * (110.8 cm) ...wall oven can tip when the door is recommended to drill 1/16" (0.16 cm) dia. Figure 5 6 Mounting Brackets Installation Instructions 1. Note: To prevent damage to cabinet, it is open. Unpack the wall oven. pilot holes before installing the mounting brackets. ELECTRIC WALL OVEN INSTALLATION INSTRUCTIONS (and Optional Electric...
... Remove the bottom trim taped on Figure 5. F see figure 1 22 3/16" * (56.4 cm) Mounting Brackets H see figure 1 Single Wall ovens F see figure 2 See addendum for anti-tip screws installation at the end of this booklet (if necessary). 43 5/8" * (110.8 cm) ...wall oven can tip when the door is recommended to drill 1/16" (0.16 cm) dia. Figure 5 6 Mounting Brackets Installation Instructions 1. Note: To prevent damage to cabinet, it is open. Unpack the wall oven. pilot holes before installing the mounting brackets. ELECTRIC WALL OVEN INSTALLATION INSTRUCTIONS (and Optional Electric...
Installation Instructions
Page 7
...door is opened. After inserting tools pull the oven towards you must use the two tools supplied with the oven. Pull the armored cable through the hole for servicing you (see Figure 6). ELECTRIC WALL OVEN INSTALLATION INSTRUCTIONS (and Optional Electric or Gas Cooktop Combination) IMPORTANT Do not ...lift the oven by the door handle. 3.Insert the oven into the side of cabinet. To pull out the oven for it in each side trim below the oven door and fix ...
...door is opened. After inserting tools pull the oven towards you must use the two tools supplied with the oven. Pull the armored cable through the hole for servicing you (see Figure 6). ELECTRIC WALL OVEN INSTALLATION INSTRUCTIONS (and Optional Electric or Gas Cooktop Combination) IMPORTANT Do not ...lift the oven by the door handle. 3.Insert the oven into the side of cabinet. To pull out the oven for it in each side trim below the oven door and fix ...

Installation Instructions
Page 8
...) Min. To reduce the risk of personal injury and tipping of supporting 150 pounds (68 kg) for 27" models and 200 pounds (90 kg) for installation of an electric built-in oven. ELECTRIC WALL OVEN INSTALLATION INSTRUCTIONS (and Optional Electric or Gas Cooktop Combination) 6.For typical under counter installation of approved cooktop models 36" Min. (91.4 cm...
...) Min. To reduce the risk of personal injury and tipping of supporting 150 pounds (68 kg) for 27" models and 200 pounds (90 kg) for installation of an electric built-in oven. ELECTRIC WALL OVEN INSTALLATION INSTRUCTIONS (and Optional Electric or Gas Cooktop Combination) 6.For typical under counter installation of approved cooktop models 36" Min. (91.4 cm...
Installation Instructions
Page 9
... reach a compromise for a convection baking or roasting, both ovens. Refer to level if necessary. 3. TYPICAL UNDER COUNTER INSTALLATION OF A SINGLE ELECTRIC BUILT-IN OVEN WITH A GAS COOKTOP ABOVE 6. ELECTRIC WALL OVEN INSTALLATION INSTRUCTIONS (and Optional Electric or Gas Cooktop Combination) 18"(45.7 cm) Max. Install an oven rack in the oven should feel heat coming from the inside the...
... reach a compromise for a convection baking or roasting, both ovens. Refer to level if necessary. 3. TYPICAL UNDER COUNTER INSTALLATION OF A SINGLE ELECTRIC BUILT-IN OVEN WITH A GAS COOKTOP ABOVE 6. ELECTRIC WALL OVEN INSTALLATION INSTRUCTIONS (and Optional Electric or Gas Cooktop Combination) 18"(45.7 cm) Max. Install an oven rack in the oven should feel heat coming from the inside the...

