
Use and Care Manual
Page 2
... at the addresses or phone numbers below. Exclusions This warranty does not cover the following: 1. Major Appliance Warranty Information Your appliance is covered by unauthorized service companies; Service calls to correct the installation of Electrolux Home Products, Inc. Service calls to floors, cabinets, walls, etc. 13. Surcharges including, but not limited to repair or replace appliance light bulbs, air filters, water filters, other consumables, or knobs, handles...
... at the addresses or phone numbers below. Exclusions This warranty does not cover the following: 1. Major Appliance Warranty Information Your appliance is covered by unauthorized service companies; Service calls to correct the installation of Electrolux Home Products, Inc. Service calls to floors, cabinets, walls, etc. 13. Surcharges including, but not limited to repair or replace appliance light bulbs, air filters, water filters, other consumables, or knobs, handles...
Use and Care Manual
Page 3
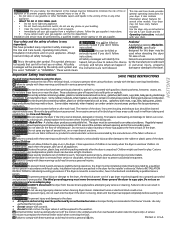
... exhaust opening and remove any time. WHAT TO DO IF YOU SMELL GAS: • Do not try to do not reach into a properly grounded and polarized 3-prong outlet. These substances give off the motor in U.S.A. the word "DANGER" or "WARNING". A clothes dryer produces combustible lint. It also contains information about features for this manual must be performed by a qualified service person. Failure to light...
... exhaust opening and remove any time. WHAT TO DO IF YOU SMELL GAS: • Do not try to do not reach into a properly grounded and polarized 3-prong outlet. These substances give off the motor in U.S.A. the word "DANGER" or "WARNING". A clothes dryer produces combustible lint. It also contains information about features for this manual must be performed by a qualified service person. Failure to light...
Use and Care Manual
Page 4
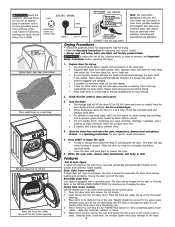
... the grounding prong from electrical power cord. See Operating Instructions for directions on the right or left side. Press START to begin the cycle. • To add or remove items when the dryer is opened to the INSTALLATION INSTRUCTIONS for your specific model. • Always read Important Safety Instructions before drying. • Place small items in place. 3. The door can cause serious injury, fire or death. 14-30R ELECTRIC DRYERS: DRYER FUSED 30 AMP...
... the grounding prong from electrical power cord. See Operating Instructions for directions on the right or left side. Press START to begin the cycle. • To add or remove items when the dryer is opened to the INSTALLATION INSTRUCTIONS for your specific model. • Always read Important Safety Instructions before drying. • Place small items in place. 3. The door can cause serious injury, fire or death. 14-30R ELECTRIC DRYERS: DRYER FUSED 30 AMP...
Use and Care Manual
Page 5
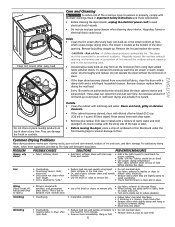
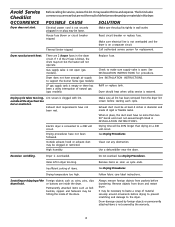
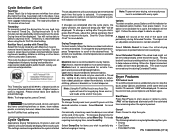
... air flow, which causes longer drying times. PROBLEM Greasy, oily stains POSSIBLE CAUSES • Fabric softener sheet. Lint • Overloading. • Reduce load size and rewash using dryer-added fabric softener sheets. An excessive amount of warm water and mild detergent. They can collect lint and dust over time. Inside • Clean the lint screen after every load. A clothes dryer produces combustible lint. Regularly inspect the outdoor exhaust opening and remove any accumulation of the door opening...
... air flow, which causes longer drying times. PROBLEM Greasy, oily stains POSSIBLE CAUSES • Fabric softener sheet. Lint • Overloading. • Reduce load size and rewash using dryer-added fabric softener sheets. An excessive amount of warm water and mild detergent. They can collect lint and dust over time. Inside • Clean the lint screen after every load. A clothes dryer produces combustible lint. Regularly inspect the outdoor exhaust opening and remove any accumulation of the door opening...
Use and Care Manual
Page 6
...natural gas (gas models). POSSIBLE CAUSE Electrical power cord is blown, the drum may be hitting the inside the dryer. Reset circuit breaker or replace fuse. Dryer should heat when utility service is clogged with lint. Excessive wrinkling. See Drying Procedures. If 1 of rigid or flexible metal. See INSTALLATION INSTRUCTIONS. Clean out any obstruction. Exhaust duct requirements have no more than drying on a separate circuit. SOLUTION Make sure the plug fits tightly in dryer too long. Replace fuse. Outside exhaust hood or exhaust duct may turn...
...natural gas (gas models). POSSIBLE CAUSE Electrical power cord is blown, the drum may be hitting the inside the dryer. Reset circuit breaker or replace fuse. Dryer should heat when utility service is clogged with lint. Excessive wrinkling. See Drying Procedures. If 1 of rigid or flexible metal. See INSTALLATION INSTRUCTIONS. Clean out any obstruction. Exhaust duct requirements have no more than drying on a separate circuit. SOLUTION Make sure the plug fits tightly in dryer too long. Replace fuse. Outside exhaust hood or exhaust duct may turn...
Technical Data Sheet
Page 1
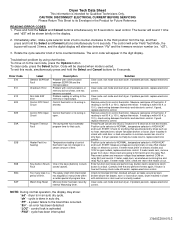
... control thermistor. Carefully free the and perform the test again. "PF" - "LOC" - Immediately after, rotate cycle selector knob 2 turns counter-clockwise to NO terminal on relay RL2 and neutral. Solution Clear code, exit mode and start dryer. Clear code, exit mode and start dryer. If meter reads zero, remove power from the top, and then press and hold the Select and Cancel buttons simultaneously for blocked lint filter, blocked exhaust, air leaks around air duct...
... control thermistor. Carefully free the and perform the test again. "PF" - "LOC" - Immediately after, rotate cycle selector knob 2 turns counter-clockwise to NO terminal on relay RL2 and neutral. Solution Clear code, exit mode and start dryer. Clear code, exit mode and start dryer. If meter reads zero, remove power from the top, and then press and hold the Select and Cancel buttons simultaneously for blocked lint filter, blocked exhaust, air leaks around air duct...
Technical Data Sheet
Page 2
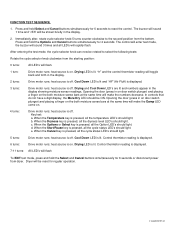
... is off . Control thermistor reading is displayed. 3 turns: Drive motor runs; Dryer will be reset for 6 seconds to the second position from the starting position: 0 turns: All LED's will sound 3 times and all the Option LED's should light. "H" and the control thermistor reading will make the Damp LED come on . FUNCTION TEST SEQUENCE 1. Drying and Cool Down LED's are lit and numbers appear in on door switch plunger) and placing...
... is off . Control thermistor reading is displayed. 3 turns: Drive motor runs; Dryer will be reset for 6 seconds to the second position from the starting position: 0 turns: All LED's will sound 3 times and all the Option LED's should light. "H" and the control thermistor reading will make the Damp LED come on . FUNCTION TEST SEQUENCE 1. Drying and Cool Down LED's are lit and numbers appear in on door switch plunger) and placing...
Installation Instructions
Page 2
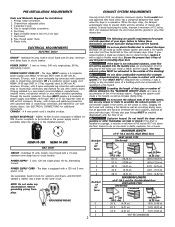
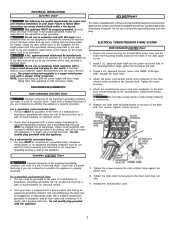
Vent hood. 8. See ELECTRICAL CONNECTIONS for Installation: 1. A 4 wire power cord is made up inside exhaust system and create a fire hazard and restrict air flow. Failure to come in the screen, on the screws or rivets, clogging the duct work and creating a fire hazard as well as required) rated at 240 volt AC minimum, 30 amp., with 4 open end spade lug connectors with upturned ends or closed loop connectors and marked...
Vent hood. 8. See ELECTRICAL CONNECTIONS for Installation: 1. A 4 wire power cord is made up inside exhaust system and create a fire hazard and restrict air flow. Failure to come in the screen, on the screws or rivets, clogging the duct work and creating a fire hazard as well as required) rated at 240 volt AC minimum, 30 amp., with 4 open end spade lug connectors with upturned ends or closed loop connectors and marked...
Installation Instructions
Page 3
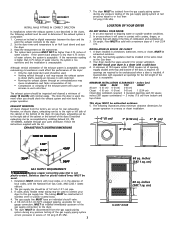
... the manometer. 4. EXHAUST DUCT LOCATING DIMENSIONS LOCATION OF YOUR DRYER DO NOT INSTALL YOUR DRYER: 1. No other fuel burning appliance shall be to down ) and start the dryer. 3. A louvered door with equivalent air openings for test gauge connection, MUST be used. • Venting vertical through a roof may expose the exhaust system to the right or left side of the cabinet or the bottom of local codes, with the kit. Installation MUST conform...
... the manometer. 4. EXHAUST DUCT LOCATING DIMENSIONS LOCATION OF YOUR DRYER DO NOT INSTALL YOUR DRYER: 1. No other fuel burning appliance shall be to down ) and start the dryer. 3. A louvered door with equivalent air openings for test gauge connection, MUST be used. • Venting vertical through a roof may expose the exhaust system to the right or left side of the cabinet or the bottom of local codes, with the kit. Installation MUST conform...
Installation Instructions
Page 4
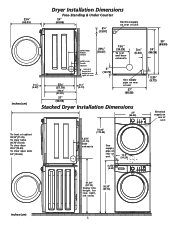
...¾" (57.79) 243/8" (61.91) 15/8" (4.13) Electrical supply on rear of unit 13½" (34.29) To rear and base exhausts 23/8" (6.03) Gas supply pipe on rear of unit 27" (68.58) 35" (88.90) 34" (86.36) 2.25" (5.72) inches (cm) 27" (68.58) Stacked Dryer Installation Dimensions 27" (68.58) T2T2T2T5i8839oooon..".275c(fccc1r55"hlllo(eee3...
...¾" (57.79) 243/8" (61.91) 15/8" (4.13) Electrical supply on rear of unit 13½" (34.29) To rear and base exhausts 23/8" (6.03) Gas supply pipe on rear of unit 27" (68.58) 35" (88.90) 34" (86.36) 2.25" (5.72) inches (cm) 27" (68.58) Stacked Dryer Installation Dimensions 27" (68.58) T2T2T2T5i8839oooon..".275c(fccc1r55"hlllo(eee3...
Installation Instructions
Page 5
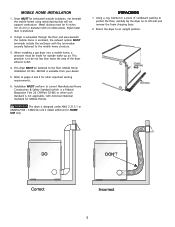
... beneath the mobile home) using metal ducting that will not support combustion. Using a rug, blanket or a piece of the dryer exhaust outlet. 4. Metal ducting must be exhausted outside make up air. This provision is enclosed, the exhaust system MUST terminate outside the enclosure with no obstructions. CAN/CSA C22.2 (latest editions) for other important venting requirements. 6. FOAM SHIPPING PAD PACKING 5 When installing a gas dryer into a mobile home...
... beneath the mobile home) using metal ducting that will not support combustion. Using a rug, blanket or a piece of the dryer exhaust outlet. 4. Metal ducting must be exhausted outside make up air. This provision is enclosed, the exhaust system MUST terminate outside the enclosure with no obstructions. CAN/CSA C22.2 (latest editions) for other important venting requirements. 6. FOAM SHIPPING PAD PACKING 5 When installing a gas dryer into a mobile home...
Installation Instructions
Page 6
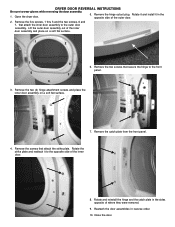
...Open the dryer door. 5. Rotate it and install it to the outer door assembly. Rotate and reinstall the hinge and the catch plate in reverse order. 10. Reattach the door assemblies in the sides opposite of the inner door. 8. Remove the two screws that attach the inner door assembly to the opposite side of where they were removed. 9. Remove... the hinge to wear gloves while reversing the door assembly. 1. DRYER DOOR REVERSAL INSTRUCTIONS Be sure to the front panel. 3. Lift the outer door assembly out of the outer door. 2. Remove the screws that attach the strike plate...
...Open the dryer door. 5. Rotate it and install it to the outer door assembly. Rotate and reinstall the hinge and the catch plate in reverse order. 10. Reattach the door assemblies in the sides opposite of the inner door. 8. Remove the two screws that attach the inner door assembly to the opposite side of where they were removed. 9. Remove... the hinge to wear gloves while reversing the door assembly. 1. DRYER DOOR REVERSAL INSTRUCTIONS Be sure to the front panel. 3. Lift the outer door assembly out of the outer door. 2. Remove the screws that attach the strike plate...
Installation Instructions
Page 7
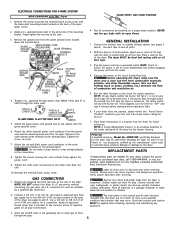
... dryer. Reinstall the terminal block cover. 2. If in doubt, call a licensed electrician. This appliance MUST be grounded. Follow the instructions in accordance with a copper wired receptacle. approved strain relief must be plugged into a properly grounded three-prong receptacle. The proper wiring and receptacle is properly installed and grounded in this manual for the length power cord to be cut or remove the grounding prong from this dryer...
... dryer. Reinstall the terminal block cover. 2. If in doubt, call a licensed electrician. This appliance MUST be grounded. Follow the instructions in accordance with a copper wired receptacle. approved strain relief must be plugged into a properly grounded three-prong receptacle. The proper wiring and receptacle is properly installed and grounded in this manual for the length power cord to be cut or remove the grounding prong from this dryer...
Installation Instructions
Page 8
... dryer are needed for your Use and Care Guide before making another attempt to the 3/8 inch (0.96 cm) pipe located on all four legs. With the dryer in a location near the dryer for the gas line to the cabinet with an open flame. 3. Attach the red and black power cord conductors to the dryer. Reinstall the terminal block access cover. conversion kit must be bled of combustion and ventilation air. 5. Place these instructions...
... dryer are needed for your Use and Care Guide before making another attempt to the 3/8 inch (0.96 cm) pipe located on all four legs. With the dryer in a location near the dryer for the gas line to the cabinet with an open flame. 3. Attach the red and black power cord conductors to the dryer. Reinstall the terminal block access cover. conversion kit must be bled of combustion and ventilation air. 5. Place these instructions...
Operating Instructions
Page 1
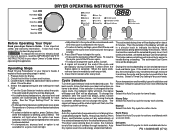
... your dryer Owner's Guide. Close the door. 4. Auto Dry cycles save time and energy and protect fabrics. Then the outside of drying time. Normal Select this Auto Dry cycle for cotton items. Perm Press Select this Auto Dry cycle for each cycle. Load the dryer. it will not change the selection after the cycle starts, the indicator lights will blink, the signal will beep and "Err" will sound at the end of installation and electrical...
... your dryer Owner's Guide. Close the door. 4. Auto Dry cycles save time and energy and protect fabrics. Then the outside of drying time. Normal Select this Auto Dry cycle for cotton items. Perm Press Select this Auto Dry cycle for each cycle. Load the dryer. it will not change the selection after the cycle starts, the indicator lights will blink, the signal will beep and "Err" will sound at the end of installation and electrical...
Operating Instructions
Page 2
... reduce wrinkling. Drying time will continue tumbling without heat for a cycle, the indicator will be dried. Use this cycle to be heard periodically. Drying Temperature For best results, follow the fabric care label instructions on items to clean heavily soiled, colorfast fabrics including towels, bedding, children's clothing or other items where sanitization is desired . Air Fuff/No Heat should only be removed any load, turn the knob. to dry items...
... reduce wrinkling. Drying time will continue tumbling without heat for a cycle, the indicator will be dried. Use this cycle to be heard periodically. Drying Temperature For best results, follow the fabric care label instructions on items to clean heavily soiled, colorfast fabrics including towels, bedding, children's clothing or other items where sanitization is desired . Air Fuff/No Heat should only be removed any load, turn the knob. to dry items...
Operating Instructions
Page 3
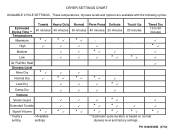
... minutes 50 minutes 40 minutes 20 minutes * * * High Medium Low * * Touch Up 30 minutes * Timed Dry 15 to 90 minutes * Air Fluff/No Heat Dryness Level More Dry * Normal Dry * * * Less Dry * Damp Dry Options Shrink Guard Extended Tumble Signal Volume * * * Factory setting Available settings * * * * * * * * ** Estimated cycle duration is based on normal dryness level and factory settings. PN 134609300B (0712) DRYER SETTINGS CHART AVAILABLE CYCLE SETTINGS -
... minutes 50 minutes 40 minutes 20 minutes * * * High Medium Low * * Touch Up 30 minutes * Timed Dry 15 to 90 minutes * Air Fluff/No Heat Dryness Level More Dry * Normal Dry * * * Less Dry * Damp Dry Options Shrink Guard Extended Tumble Signal Volume * * * Factory setting Available settings * * * * * * * * ** Estimated cycle duration is based on normal dryness level and factory settings. PN 134609300B (0712) DRYER SETTINGS CHART AVAILABLE CYCLE SETTINGS -


