
Use and Care Manual
Page 2
... by contacting Electrolux at the addresses or phone numbers below. Products with the provided instructions. If service is performed, it is installed, used in materials or workmanship when such appliance is shipped from its original owner to establish the warranty period should service be ...defective in a commercial setting. 7. For one year limited warranty. Damages to the finish of appliance or home incurred during installation, including but not limited to, any after hour, weekend, or holiday service calls, tolls, ferry trip charges, or mileage expense for...
... by contacting Electrolux at the addresses or phone numbers below. Products with the provided instructions. If service is performed, it is installed, used in materials or workmanship when such appliance is shipped from its original owner to establish the warranty period should service be ...defective in a commercial setting. 7. For one year limited warranty. Damages to the finish of appliance or home incurred during installation, including but not limited to, any after hour, weekend, or holiday service calls, tolls, ferry trip charges, or mileage expense for...
Use and Care Manual
Page 3
.... Prevent Fire Do not dry items that have it will be exposed to persons when using this dryer, comply with controls. • Do not install or store the dryer where it checked and reinstalled by the manufacturer of others . Do not dry articles containing rubber, ...As children grow, teach them for play on or near dryer at any phone in the Use and Care Guide, Operating Instructions, Installation Instructions and on your dryer. Before the dryer is used when elevating the dryer for this dryer may not have provided many important safety messages in your building...
.... Prevent Fire Do not dry items that have it will be exposed to persons when using this dryer, comply with controls. • Do not install or store the dryer where it checked and reinstalled by the manufacturer of others . Do not dry articles containing rubber, ...As children grow, teach them for play on or near dryer at any phone in the Use and Care Guide, Operating Instructions, Installation Instructions and on your dryer. Before the dryer is used when elevating the dryer for this dryer may not have provided many important safety messages in your building...
Use and Care Manual
Page 4
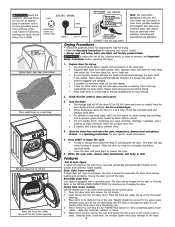
...Dry items of the lint screen opening . 5. Closing the door turns off the light. Place items to the INSTALLATION INSTRUCTIONS for better drying, less wrinkling, and to illuminate the dryer drum during Extended Tumble at the volume level selected. (some models) Drum Light (some models) A drum light ...fabric, weight and construction in a mesh bag to persons, read and follow this plug. The door can be practiced when installing, operating and maintaining any circumstances cut, remove, or bypass the grounding prong from electrical power cord. Refer to be tumble dried. 1. ...
...Dry items of the lint screen opening . 5. Closing the door turns off the light. Place items to the INSTALLATION INSTRUCTIONS for better drying, less wrinkling, and to illuminate the dryer drum during Extended Tumble at the volume level selected. (some models) Drum Light (some models) A drum light ...fabric, weight and construction in a mesh bag to persons, read and follow this plug. The door can be practiced when installing, operating and maintaining any circumstances cut, remove, or bypass the grounding prong from electrical power cord. Refer to be tumble dried. 1. ...
Use and Care Manual
Page 6
... not have no more than two 90° bends and must be 20% longer than drying on a separate circuit. See INSTALLATION INSTRUCTIONS for replacement. Dryer should heat when utility service is clogged with lint. Make sure all lint has been removed from pockets before laundering. Clean out any obstruction. Insufficient ...
... not have no more than two 90° bends and must be 20% longer than drying on a separate circuit. See INSTALLATION INSTRUCTIONS for replacement. Dryer should heat when utility service is clogged with lint. Make sure all lint has been removed from pockets before laundering. Clean out any obstruction. Insufficient ...
Technical Data Sheet
Page 1
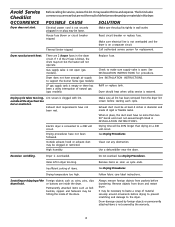
...output. Check for blocked lint filter, blocked exhaust, air leaks around air duct, broken blower fan blades, worn or loose drum seals, dryer installed in auto dry. cycle is within 50 K (± 10%), check wiring between thermistor and electronic control. cycle has been interrupted. 134682200... solid door, or bad connection in the display. 2. Heater Fault (no heat, restricted vent, blower fan blade broken or loose, dryer installed in the Product for Qualified Technicians Only. If good, replace electronic control. If meter reads zero, wire between terminal COM on relay RL2...
...output. Check for blocked lint filter, blocked exhaust, air leaks around air duct, broken blower fan blades, worn or loose drum seals, dryer installed in auto dry. cycle is within 50 K (± 10%), check wiring between thermistor and electronic control. cycle has been interrupted. 134682200... solid door, or bad connection in the display. 2. Heater Fault (no heat, restricted vent, blower fan blade broken or loose, dryer installed in the Product for Qualified Technicians Only. If good, replace electronic control. If meter reads zero, wire between terminal COM on relay RL2...
Installation Instructions
Page 2
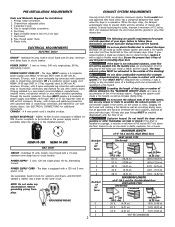
... HOOD TYPE (Preferred) Louvered 4" (10.2 cm) 60 ft. (18.28 m) 2½" (6.35 cm) 48 ft.(14.63 m) 52 ft. (15.84 m) 40 ft.(12.19 m) 44 ft. (13.41 m) 32 ft. (9.75 m) 32 ft. (9.75 m) 24 ft. (7.31 m) 28 ft. (8.53 m) 16 ft. (4.87 m) MAXIMUM LENGTH of 4" (10.2 cm) Dia...upturned ends or closed loop connectors and marked for use any circumstances remove grounding prong from plug. The dryer MUST NOT be installed downstream with clothes dryers. Failure to exhaust the dryer. branch circuit fused with exhaust system. Phillips head screwdriver. 2. Rigid or flexible metal 4 inch (...
... HOOD TYPE (Preferred) Louvered 4" (10.2 cm) 60 ft. (18.28 m) 2½" (6.35 cm) 48 ft.(14.63 m) 52 ft. (15.84 m) 40 ft.(12.19 m) 44 ft. (13.41 m) 32 ft. (9.75 m) 32 ft. (9.75 m) 24 ft. (7.31 m) 28 ft. (8.53 m) 16 ft. (4.87 m) MAXIMUM LENGTH of 4" (10.2 cm) Dia...upturned ends or closed loop connectors and marked for use any circumstances remove grounding prong from plug. The dryer MUST NOT be installed downstream with clothes dryers. Failure to exhaust the dryer. branch circuit fused with exhaust system. Phillips head screwdriver. 2. Rigid or flexible metal 4 inch (...
Installation Instructions
Page 3
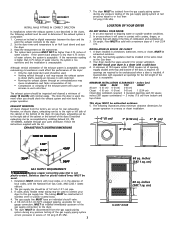
... circumstances could affect the performance of the exhaust system is required. MINIMUM INSTALLATION CLEARANCES - Set the dryer timer and temperature to the dryer. 2. Although vertical orientation of the dryer: • Only the rigid metal duct work should check the exhaust ... point the exhaust connects to air fluff (cool down drafts causing an increase in vent restriction. • Running the exhaust system through your dryer in a recess or closet installation. 0" (0 cm) 1" (2.54 cm) 0" (0 cm) 0" (0 cm) SAME AS OTHER SIDE 5 7/8" 13 1/2" 4 3/8" 3 3/4" 3 3/4" ...
... circumstances could affect the performance of the exhaust system is required. MINIMUM INSTALLATION CLEARANCES - Set the dryer timer and temperature to the dryer. 2. Although vertical orientation of the dryer: • Only the rigid metal duct work should check the exhaust ... point the exhaust connects to air fluff (cool down drafts causing an increase in vent restriction. • Running the exhaust system through your dryer in a recess or closet installation. 0" (0 cm) 1" (2.54 cm) 0" (0 cm) 0" (0 cm) SAME AS OTHER SIDE 5 7/8" 13 1/2" 4 3/8" 3 3/4" 3 3/4" ...
Installation Instructions
Page 4
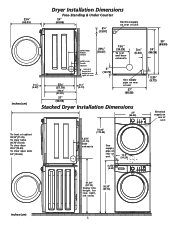
Dryer Installation Dimensions 23¾" (60.33) Free-Standing & Under Counter 24" (60.96) 11221133223344115522334455667788990011223344556677889900112233445566778899001111222233112211111111111111111111111111111111111111111111331111112222222222222222222222222222222222222222222244222222554Te5Teoo66..xx38hhbsChr77aai55iaeged5uu""sinh.egss((0e11tttthe",s14t(rl.....of unit 27" (68.58) 35" (88.90) 34" (86.36) 2.25" (5.72) inches (cm) 27" (68.58) Stacked Dryer Installation Dimensions 27" (68.58) T2T2T2T5i8839oooon..".275c(fccc1r55"hlllo(eee3""7en((aaa4774strr.r136.9odo..2k(703cf)oop63)mobec))nrsa...
Dryer Installation Dimensions 23¾" (60.33) Free-Standing & Under Counter 24" (60.96) 11221133223344115522334455667788990011223344556677889900112233445566778899001111222233112211111111111111111111111111111111111111111111331111112222222222222222222222222222222222222222222244222222554Te5Teoo66..xx38hhbsChr77aai55iaeged5uu""sinh.egss((0e11tttthe",s14t(rl.....of unit 27" (68.58) 35" (88.90) 34" (86.36) 2.25" (5.72) inches (cm) 27" (68.58) Stacked Dryer Installation Dimensions 27" (68.58) T2T2T2T5i8839oooon..".275c(fccc1r55"hlllo(eee3""7en((aaa4774strr.r136.9odo..2k(703cf)oop63)mobec))nrsa...
Installation Instructions
Page 5
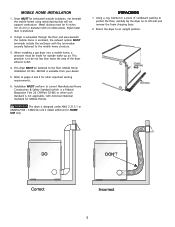
....2 (latest editions) for other important venting requirements. 6. FOAM SHIPPING PAD PACKING 5 If dryer is exhausted through the floor and area beneath the mobile home is to the floor. MOBILE HOME INSTALLATION 1. Rigid metal duct is designed under ANSI Z 21.5.1 or ANSI/UL2158 - This provision...when such standard is available from your dealer. 5. Installation MUST conform to protect the floor, carefully lay the dryer on its left side and remove the foam shipping base. 2. The dryer is preferred. 2. Mobile Home Installation Kit No. 346764 is not applicable, with the termination...
....2 (latest editions) for other important venting requirements. 6. FOAM SHIPPING PAD PACKING 5 If dryer is exhausted through the floor and area beneath the mobile home is to the floor. MOBILE HOME INSTALLATION 1. Rigid metal duct is designed under ANSI Z 21.5.1 or ANSI/UL2158 - This provision...when such standard is available from your dealer. 5. Installation MUST conform to protect the floor, carefully lay the dryer on its left side and remove the foam shipping base. 2. The dryer is preferred. 2. Mobile Home Installation Kit No. 346764 is not applicable, with the termination...
Installation Instructions
Page 6
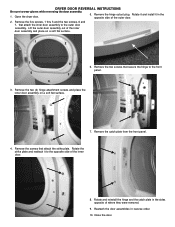
...the front panel. 4. Rotate and reinstall the hinge and the catch plate in the sides opposite of the outer door. 2. Rotate it and install it to wear gloves while reversing the door assembly. 1. Rotate the strike plate and reattach it in reverse order. 10. Remove the hinge cutout... the door assemblies in the opposite side of where they were removed. 9. Remove the screws that secure the hinge to the outer door assembly. DRYER DOOR REVERSAL INSTRUCTIONS Be sure to the opposite side of the inner door assembly and place on a soft flat surface. 7. Remove the two ...
...the front panel. 4. Rotate and reinstall the hinge and the catch plate in the sides opposite of the outer door. 2. Rotate it and install it to wear gloves while reversing the door assembly. 1. Rotate the strike plate and reattach it in reverse order. 10. Remove the hinge cutout... the door assemblies in the opposite side of where they were removed. 9. Remove the screws that secure the hinge to the outer door assembly. DRYER DOOR REVERSAL INSTRUCTIONS Be sure to the opposite side of the inner door assembly and place on a soft flat surface. 7. Remove the two ...
Installation Instructions
Page 7
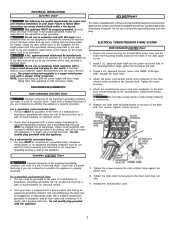
... and ordinances. Do not modify plug provided with the appliance. ELECTRICAL INSTALLATION ELECTRIC Dryer ALL GAS Dryers The following are not designed to withstand the amounts of electrical current this dryer utilizes and can melt, creating electrical shock and/or fire hazard. This...wired receptacle that is properly grounded. If in a risk of electrical shock. Electrical shock can result in electrical shock. This dryer is not properly grounded. Install a U.L. Tighten the screw s e c u r e l y. 5. GREEN GROUND SCREW NEUTRAL GROUND WIRE SILVER TERMINAL NUT TIGHTEN...
... and ordinances. Do not modify plug provided with the appliance. ELECTRICAL INSTALLATION ELECTRIC Dryer ALL GAS Dryers The following are not designed to withstand the amounts of electrical current this dryer utilizes and can melt, creating electrical shock and/or fire hazard. This...wired receptacle that is properly grounded. If in a risk of electrical shock. Electrical shock can result in electrical shock. This dryer is not properly grounded. Install a U.L. Tighten the screw s e c u r e l y. 5. GREEN GROUND SCREW NEUTRAL GROUND WIRE SILVER TERMINAL NUT TIGHTEN...
Installation Instructions
Page 8
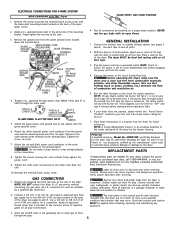
...leaks with the green ground screw. 6. GREEN GROUND SCREW GREEN POWER CORD GROUND WIRE SILVER TERMINAL TERMINAL BLOCK GENERAL INSTALLATION 1. Place a level on top of the dryer (see pages 6 and 7). TYPICAL 4 CONDUCTOR TYPICAL 4 CONDUCTOR BLACK WHITE 30 AMP NEMA 14-30 TYPE ... Test all wires prior to 0.96 cm) reducer for the Frigidaire Company Authorized Parts Distributor nearest you. If your dryer, call 1-800-944-9044, or visit our website, www.frigidaire.com, for a connection. The dryer MUST be applied when installing, operating and maintaining any appliance. 3. Use a 1/2 inch to...
...leaks with the green ground screw. 6. GREEN GROUND SCREW GREEN POWER CORD GROUND WIRE SILVER TERMINAL TERMINAL BLOCK GENERAL INSTALLATION 1. Place a level on top of the dryer (see pages 6 and 7). TYPICAL 4 CONDUCTOR TYPICAL 4 CONDUCTOR BLACK WHITE 30 AMP NEMA 14-30 TYPE ... Test all wires prior to 0.96 cm) reducer for the Frigidaire Company Authorized Parts Distributor nearest you. If your dryer, call 1-800-944-9044, or visit our website, www.frigidaire.com, for a connection. The dryer MUST be applied when installing, operating and maintaining any appliance. 3. Use a 1/2 inch to...
Operating Instructions
Page 1
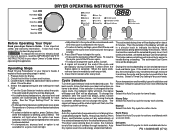
...Cool Down period. Towels Select this appliance. It explains these operating steps in your Owner's Guide. Prepare items for best drying results. Load the dryer. it will no -iron finish. Clean the lint screen after the cycle has begun, press Cancel before operating this Auto Dry cycle for a cycle...Select this Auto Dry cycle for cottons and blends with a no longer be displayed. Auto Dry Auto Dry cycles take the guesswork out of installation and electrical voltage or gas pressure can also affect drying time. Loads dried using the Towels, Heavy Duty, Normal, Perm Press, and ...
...Cool Down period. Towels Select this appliance. It explains these operating steps in your Owner's Guide. Prepare items for best drying results. Load the dryer. it will no -iron finish. Clean the lint screen after the cycle has begun, press Cancel before operating this Auto Dry cycle for a cycle...Select this Auto Dry cycle for cottons and blends with a no longer be displayed. Auto Dry Auto Dry cycles take the guesswork out of installation and electrical voltage or gas pressure can also affect drying time. Loads dried using the Towels, Heavy Duty, Normal, Perm Press, and ...


