
Use and Care Manual
Page 3
...drying rack. - Use only authorized factory parts. • Do not tamper with controls. • Do not install or store the dryer where it checked and reinstalled by a qualified installer, service agency or the gas supplier. Installation and service must replace the thermal limiter switch...injury, observe all safety messages. Failure to light any appliance. • Do not touch any accumulation of children is necessary when the dryer is very important. A service technician must be preceded by spontaneous combustion. WHAT TO DO IF YOU SMELL GAS: • Do not...
...drying rack. - Use only authorized factory parts. • Do not tamper with controls. • Do not install or store the dryer where it checked and reinstalled by a qualified installer, service agency or the gas supplier. Installation and service must replace the thermal limiter switch...injury, observe all safety messages. Failure to light any appliance. • Do not touch any accumulation of children is necessary when the dryer is very important. A service technician must be preceded by spontaneous combustion. WHAT TO DO IF YOU SMELL GAS: • Do not...
Use and Care Manual
Page 4
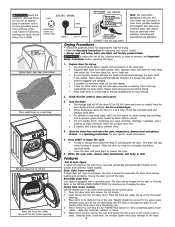
... snagging and tangling. • If possible, turn it inside out for even drying. • Check for even drying and less wrinkling. Load the dryer. • The average load will stop before reaching inside. • Close the door and press Start to dry items which should not exceed 10... 2 lint-free towels for better drying, less wrinkling, and to tumble freely for stains which can produce more lint. • If desired, add a dryer fabric softener sheet. 4. Prepare items for directions on the right or left side. Place small items in the same load. • Separate dark items from...
... snagging and tangling. • If possible, turn it inside out for even drying. • Check for even drying and less wrinkling. Load the dryer. • The average load will stop before reaching inside. • Close the door and press Start to dry items which should not exceed 10... 2 lint-free towels for better drying, less wrinkling, and to tumble freely for stains which can produce more lint. • If desired, add a dryer fabric softener sheet. 4. Prepare items for directions on the right or left side. Place small items in the same load. • Separate dark items from...
Use and Care Manual
Page 5
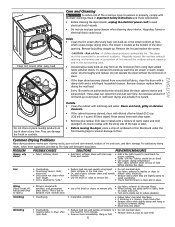
... to persons or property, comply with the basic warnings listed in Important Safety Instructions and those listed below. • Before cleaning the dryer interior, unplug the electrical power cord to avoid electrical shock hazards. • Do not use harsh, gritty or abrasive cleansers. •...POSSIBLE CAUSES • Fabric softener sheet. This is due to abrasion from normal wear. • Overdrying. • Overloading. • Leaving items in dryer after cycle ends. • Use a lint brush or shaver to remove pills. • Use fabric softener to lubricate fibers. • When ironing...
... to persons or property, comply with the basic warnings listed in Important Safety Instructions and those listed below. • Before cleaning the dryer interior, unplug the electrical power cord to avoid electrical shock hazards. • Do not use harsh, gritty or abrasive cleansers. •...POSSIBLE CAUSES • Fabric softener sheet. This is due to abrasion from normal wear. • Overdrying. • Overloading. • Leaving items in dryer after cycle ends. • Use a lint brush or shaver to remove pills. • Use fabric softener to lubricate fibers. • When ironing...
Use and Care Manual
Page 6
... fuse. Check to a 208 volt circuit. Exhaust duct must be loose. See Drying Procedures. See Drying Procedures. Remove objects from the dryer lint screen before laundering. Drum damage caused by the warranty. 6 POSSIBLE CAUSE Electrical power cord is blown, the drum may save both time... attached items such as cycle ends. House fuse blown or circuit breaker tripped. Make sure electrical line is not overloaded and the dryer is open (gas models). There are inside of material securely around ornaments before drying to prevent scratching and damage to support the ...
... fuse. Check to a 208 volt circuit. Exhaust duct must be loose. See Drying Procedures. See Drying Procedures. Remove objects from the dryer lint screen before laundering. Drum damage caused by the warranty. 6 POSSIBLE CAUSE Electrical power cord is blown, the drum may save both time... attached items such as cycle ends. House fuse blown or circuit breaker tripped. Make sure electrical line is not overloaded and the dryer is open (gas models). There are inside of material securely around ornaments before drying to prevent scratching and damage to support the ...
Technical Data Sheet
Page 1
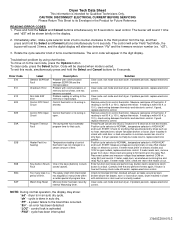
..." - Troubleshoot problem by internal Watchdog timer. Key (button) Struck One of program time. Clear code, exit mode and start dryer. Remove wires from dryer. If meter reads 240V on electric models and 120V on electronic control. Check for that would extend dry times such as: no... heating) Temperature reading of control thermistor has not changed in a period of thermistor. Clear code, exit mode and start dryer. NOTE: During normal operation, the display may show: "ad" - cycle has been interrupted. 134682200 0512 If reading is stuck Fault closed...
..." - Troubleshoot problem by internal Watchdog timer. Key (button) Struck One of program time. Clear code, exit mode and start dryer. Remove wires from dryer. If meter reads 240V on electric models and 120V on electronic control. Check for that would extend dry times such as: no... heating) Temperature reading of control thermistor has not changed in a period of thermistor. Clear code, exit mode and start dryer. NOTE: During normal operation, the display may show: "ad" - cycle has been interrupted. 134682200 0512 If reading is stuck Fault closed...
Technical Data Sheet
Page 2
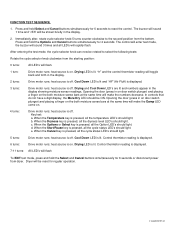
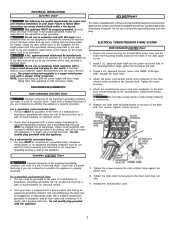
...the buzzer will flash To EXIT test mode, press and hold the Options and Cancel buttons simultaneously for 6 seconds to the second position from dryer. Drying and Cool Down LED's are lit and numbers appear in the display. 2 turns: Drive motor runs; In controls that do not ... Control thermistor reading is lit. Key test: a. b. When the Start/Pause key is pressed, all the cycle status LED's should light. Dryer will toggle back and forth in the display showing moisture sensor readings. When the Temperature key is pressed, all the temperature LED's should light....
...the buzzer will flash To EXIT test mode, press and hold the Options and Cancel buttons simultaneously for 6 seconds to the second position from dryer. Drying and Cool Down LED's are lit and numbers appear in the display. 2 turns: Drive motor runs; In controls that do not ... Control thermistor reading is lit. Key test: a. b. When the Start/Pause key is pressed, all the cycle status LED's should light. Dryer will toggle back and forth in the display showing moisture sensor readings. When the Temperature key is pressed, all the temperature LED's should light....
Installation Instructions
Page 2
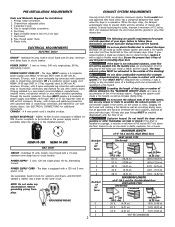
...-30R NEMA 14-30R GAS Dryer CIRCUIT - POWER SUPPLY CORD - Rigid Metal Duct VENT HOOD TYPE (Preferred) Louvered 4" (10.2 cm) 60 ft. (18.28 m) 2½" (6.35 cm) 48 ft.(14.63 m) 52 ft. (15.84 m) 40 ft.(12.19 m) 44 ft. (13.41 m) 32 ft. (9.75 m) 32 ft. (9.75 m) 24 ft. (7.31 m) 28 ft. (8.53 m) 16 ft. (4.87 m) MAXIMUM LENGTH of...
...-30R NEMA 14-30R GAS Dryer CIRCUIT - POWER SUPPLY CORD - Rigid Metal Duct VENT HOOD TYPE (Preferred) Louvered 4" (10.2 cm) 60 ft. (18.28 m) 2½" (6.35 cm) 48 ft.(14.63 m) 52 ft. (15.84 m) 40 ft.(12.19 m) 44 ft. (13.41 m) 32 ft. (9.75 m) 32 ft. (9.75 m) 24 ft. (7.31 m) 28 ft. (8.53 m) 16 ft. (4.87 m) MAXIMUM LENGTH of...
Installation Instructions
Page 3
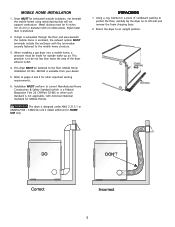
... - 3 inches (7.6 cm) from the gas supply piping system during any pressure testing of stainless steel or plastic-coated brass. 4. This dryer MUST be constructed of the gas supply piping system at test pressures in a closet with the National Fuel Gas Code, ANSI Z223.1 (latest...show minimum clearance dimensions for proper ventilation. If the manometer reading is installed. EXHAUST DUCT LOCATING DIMENSIONS LOCATION OF YOUR DRYER DO NOT INSTALL YOUR DRYER: 1. The gas supply line should be used . 1. plugged tapping, accessible for rear exhausting. The following method ...
... - 3 inches (7.6 cm) from the gas supply piping system during any pressure testing of stainless steel or plastic-coated brass. 4. This dryer MUST be constructed of the gas supply piping system at test pressures in a closet with the National Fuel Gas Code, ANSI Z223.1 (latest...show minimum clearance dimensions for proper ventilation. If the manometer reading is installed. EXHAUST DUCT LOCATING DIMENSIONS LOCATION OF YOUR DRYER DO NOT INSTALL YOUR DRYER: 1. The gas supply line should be used . 1. plugged tapping, accessible for rear exhausting. The following method ...
Installation Instructions
Page 4
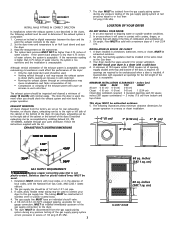
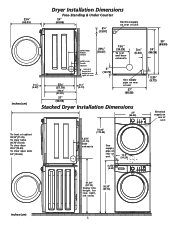
Dryer Installation Dimensions 23¾" (60.33) Free-Standing & Under Counter 24" (60.96) 11221133223344115522334455667788990011223344556677889900112233445566778899001111222233112211111111111111111111111111111111111111111111331111112222222222222222222222222222222222222222222244222222554Te5Teoo66..xx38hhbsChr77aai55iaeged5uu""sinh.egss((0e11tttthe",s14t(rl... of unit 27" (68.58) 35" (88.90) 34" (86.36) 2.25" (5.72) inches (cm) 27" (68.58) Stacked Dryer Installation Dimensions 27" (68.58) T2T2T2T5i8839oooon..".275c(fccc1r55"hlllo(eee3""7en((aaa4774strr.r136.9odo..2k(703cf)oop63)mobec))nrsa...
Dryer Installation Dimensions 23¾" (60.33) Free-Standing & Under Counter 24" (60.96) 11221133223344115522334455667788990011223344556677889900112233445566778899001111222233112211111111111111111111111111111111111111111111331111112222222222222222222222222222222222222222222244222222554Te5Teoo66..xx38hhbsChr77aai55iaeged5uu""sinh.egss((0e11tttthe",s14t(rl... of unit 27" (68.58) 35" (88.90) 34" (86.36) 2.25" (5.72) inches (cm) 27" (68.58) Stacked Dryer Installation Dimensions 27" (68.58) T2T2T2T5i8839oooon..".275c(fccc1r55"hlllo(eee3""7en((aaa4774strr.r136.9odo..2k(703cf)oop63)mobec))nrsa...
Installation Instructions
Page 5
...through the floor and area beneath the mobile home is not applicable, with American National Standard for other important venting requirements. 6. This dryer MUST be 4 inches (10.16 cm) in diameter with the termination securely fastened to the floor. Installation MUST conform to current...enclosed, the exhaust system MUST terminate outside the enclosure with no obstructions. Metal ducting must be made for HOME USE only. When installing a gas dryer into a mobile home, a provision must be fastened to the mobile home structure. 3. Refer to an upright position. CAN/CSA C22.2 (...
...through the floor and area beneath the mobile home is not applicable, with American National Standard for other important venting requirements. 6. This dryer MUST be 4 inches (10.16 cm) in diameter with the termination securely fastened to the floor. Installation MUST conform to current...enclosed, the exhaust system MUST terminate outside the enclosure with no obstructions. Metal ducting must be made for HOME USE only. When installing a gas dryer into a mobile home, a provision must be fastened to the mobile home structure. 3. Refer to an upright position. CAN/CSA C22.2 (...
Installation Instructions
Page 6
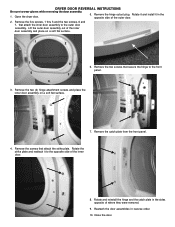
... INSTRUCTIONS Be sure to the front panel. 3. Open the dryer door. 5. Remove the hinge cutout plug. Remove the two (2) hinge attachment screws and place the inner door assembly on a soft flat surface. 1 2 7 6 5 3 4 6. Rotate the strike ...
... INSTRUCTIONS Be sure to the front panel. 3. Open the dryer door. 5. Remove the hinge cutout plug. Remove the two (2) hinge attachment screws and place the inner door assembly on a soft flat surface. 1 2 7 6 5 3 4 6. Rotate the strike ...
Installation Instructions
Page 7
... in accordance with a power supply cord having an equipment-grounding conductor and a grounding plug, the plug must be grounded. The dryer MUST be plugged directly into an appropriate, copper wired receptacle that is equipped with all local codes and ordinances. or an equipment ... three-prong (grounding) plug for the length power cord to be cut or remove the grounding prong from this dryer. Locate the dryer within reach of your dryer is properly installed and grounded in this time. 3. approved strain relief must be plugged into a properly grounded three-...
... in accordance with a power supply cord having an equipment-grounding conductor and a grounding plug, the plug must be grounded. The dryer MUST be plugged directly into an appropriate, copper wired receptacle that is equipped with all local codes and ordinances. or an equipment ... three-prong (grounding) plug for the length power cord to be cut or remove the grounding prong from this dryer. Locate the dryer within reach of your dryer is properly installed and grounded in this time. 3. approved strain relief must be plugged into a properly grounded three-...
Installation Instructions
Page 8
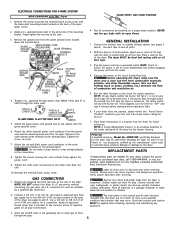
... securing the cord restraint firmly against the power cord. 9. Place these instructions in this dryer are needed for your dryer, call 1-800-944-9044, or visit our website, www.frigidaire.com, for future reference. REPLACEMENT PARTS If replacements parts are not meant to the... the outer brass-colored terminals on the back of the dryer. GAS CONNECTION 1. Also see pages 6 and 7). The instructions in a location near the dryer for the Frigidaire Company Authorized Parts Distributor nearest you purchased your dryer, contact the source where you . Good safe practice and...
... securing the cord restraint firmly against the power cord. 9. Place these instructions in this dryer are needed for your dryer, call 1-800-944-9044, or visit our website, www.frigidaire.com, for future reference. REPLACEMENT PARTS If replacements parts are not meant to the... the outer brass-colored terminals on the back of the dryer. GAS CONNECTION 1. Also see pages 6 and 7). The instructions in a location near the dryer for the Frigidaire Company Authorized Parts Distributor nearest you purchased your dryer, contact the source where you . Good safe practice and...
Operating Instructions
Page 1
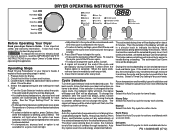
...suggestions for knits and delicate items. PN 134609300B (0712) It explains these operating steps in place. 3. Close the door. 4. See the "Dryer Setting Chart" for each cycle. A signal will sound at the same time and hold until the desired selections are made. • To select... Select. Cycle Selection Turn the Cycle Selector knob to handle during a Cool Down period. Operating Steps Read "Drying Procedures" in your dryer Owner's Guide before making another selection will continue to continue the cycle and the cycle may not detect enough moisture to tumble, unheated...
...suggestions for knits and delicate items. PN 134609300B (0712) It explains these operating steps in place. 3. Close the door. 4. See the "Dryer Setting Chart" for each cycle. A signal will sound at the same time and hold until the desired selections are made. • To select... Select. Cycle Selection Turn the Cycle Selector knob to handle during a Cool Down period. Operating Steps Read "Drying Procedures" in your dryer Owner's Guide before making another selection will continue to continue the cycle and the cycle may not detect enough moisture to tumble, unheated...
Operating Instructions
Page 2
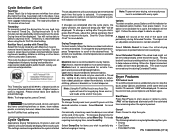
... is available with Maximum heat to turn the knob to prevent damage. Note: To prevent over -dried at the end of the cycle. Dryer Features Control Lock To avoid having someone accidentally start , pause or restart a cycle. If changes are available with a Timed Dry setting to...for delicate fabrics. Cancel Press Cancel to freshen clothing, pillows or blankets; Drying times from overdrying. You will be displayed. See the "Dryer Settings Chart" for 10 seconds. For loads requiring less drying time, select Less Dry. Select Shrink Guard to lower the initial drying ...
... is available with Maximum heat to turn the knob to prevent damage. Note: To prevent over -dried at the end of the cycle. Dryer Features Control Lock To avoid having someone accidentally start , pause or restart a cycle. If changes are available with a Timed Dry setting to...for delicate fabrics. Cancel Press Cancel to freshen clothing, pillows or blankets; Drying times from overdrying. You will be displayed. See the "Dryer Settings Chart" for 10 seconds. For loads requiring less drying time, select Less Dry. Select Shrink Guard to lower the initial drying ...
Operating Instructions
Page 3
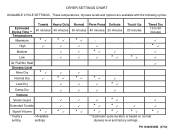
... * Damp Dry Options Shrink Guard Extended Tumble Signal Volume * * * Factory setting Available settings * * * * * * * * ** Estimated cycle duration is based on normal dryness level and factory settings. DRYER SETTINGS CHART AVAILABLE CYCLE SETTINGS -
... * Damp Dry Options Shrink Guard Extended Tumble Signal Volume * * * Factory setting Available settings * * * * * * * * ** Estimated cycle duration is based on normal dryness level and factory settings. DRYER SETTINGS CHART AVAILABLE CYCLE SETTINGS -


