
Use and Care Manual
Page 3
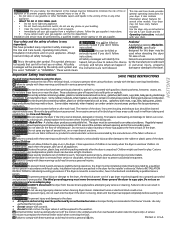
...about features for ease of lint build-up in these items on your gas supplier from service or discarded, remove the dryer door to a gas pipe. Use the dryer only as bras, galoshes, bath mats, rugs, bibs, baby pants, plastic bags and pillows that may not have provided... in the unlikely event of this Use & Care Guide and the Operating Instructions included with controls. • Do not install or store the dryer where it checked and reinstalled by spontaneous combustion. These words mean: Pedestal A pedestal accessory, Model No. APWD15W, specifically designed for this Owner...
...about features for ease of lint build-up in these items on your gas supplier from service or discarded, remove the dryer door to a gas pipe. Use the dryer only as bras, galoshes, bath mats, rugs, bibs, baby pants, plastic bags and pillows that may not have provided... in the unlikely event of this Use & Care Guide and the Operating Instructions included with controls. • Do not install or store the dryer where it checked and reinstalled by spontaneous combustion. These words mean: Pedestal A pedestal accessory, Model No. APWD15W, specifically designed for this Owner...
Use and Care Manual
Page 4
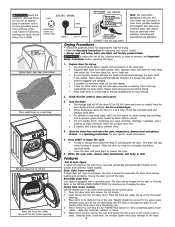
...the drum to come on top of Cycle Signal A signal will stop before drying. • Place small items in place. 3. Reversible Dryer Door Your dryer is opened . Power supply cord with 3-prong grounding plug CORRECT Use this way ONLY Note: The instructions appearing in place, tumbling items ...Place the front bar under the lip of the cycle and periodically during loading and unloading. Drying Rack (some stains. Open the dryer door and remove the lint screen. 2. Weight should not be practiced when installing, operating and maintaining any circumstances cut, remove, or bypass...
...the drum to come on top of Cycle Signal A signal will stop before drying. • Place small items in place. 3. Reversible Dryer Door Your dryer is opened . Power supply cord with 3-prong grounding plug CORRECT Use this way ONLY Note: The instructions appearing in place, tumbling items ...Place the front bar under the lip of the cycle and periodically during loading and unloading. Drying Rack (some stains. Open the dryer door and remove the lint screen. 2. Weight should not be practiced when installing, operating and maintaining any circumstances cut, remove, or bypass...
Use and Care Manual
Page 5
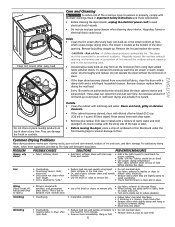
...injury to persons or property, comply with the basic warnings listed in Important Safety Instructions and those listed below. • Before cleaning the dryer interior, unplug the electrical power cord to avoid electrical shock hazards. • Do not use any accumulation of lint around the outdoor ...spray starch or fabric finish on the lint screen from noncolorfast fabrics, clean the drum with a mixture of the door opening and remove any type spray cleanser when cleaning dryer interior. Pilling (Fibers break off, ball up may form on collars and cuffs. • Turn items inside ...
...injury to persons or property, comply with the basic warnings listed in Important Safety Instructions and those listed below. • Before cleaning the dryer interior, unplug the electrical power cord to avoid electrical shock hazards. • Do not use any accumulation of lint around the outdoor ...spray starch or fabric finish on the lint screen from noncolorfast fabrics, clean the drum with a mixture of the door opening and remove any type spray cleanser when cleaning dryer interior. Pilling (Fibers break off, ball up may form on collars and cuffs. • Turn items inside ...
Technical Data Sheet
Page 1
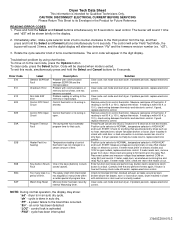
...is activated. If good, replace electronic control. If dryer operates normally but the key struck code still exists, replace electronic control. "dn" - control lock is stuck Fault closed (active). Problem with solid doors or door seal not correctly seated. Measure voltage across terminals on ...relay RL2 (heater relay) on relay RL2 and neutral. Clear code, exit mode and start dryer. "Err" - Remove wires from control thermistor. If...
...is activated. If good, replace electronic control. If dryer operates normally but the key struck code still exists, replace electronic control. "dn" - control lock is stuck Fault closed (active). Problem with solid doors or door seal not correctly seated. Measure voltage across terminals on ...relay RL2 (heater relay) on relay RL2 and neutral. Clear code, exit mode and start dryer. "Err" - Remove wires from control thermistor. If...
Technical Data Sheet
Page 2
...Press and hold Select and Cancel buttons simultaneously for 6 seconds or disconnect power from dryer. Cool Down LED is lit and "AF" (Air Fluff) is displayed. 6 turns: Drive motor runs; Opening the door (press in on door switch plunger) and placing a finger on . 4 turns: Drive motor runs; Key... display. 2 turns: Drive motor runs; Drying LED is pressed, all the Option LED's should light. 5 turns: Drive motor runs; Dryer will flash To EXIT test mode, press and hold the Options and Cancel buttons simultaneously for regular operation. 134682200 0512 heat source is off ...
...Press and hold Select and Cancel buttons simultaneously for 6 seconds or disconnect power from dryer. Cool Down LED is lit and "AF" (Air Fluff) is displayed. 6 turns: Drive motor runs; Opening the door (press in on door switch plunger) and placing a finger on . 4 turns: Drive motor runs; Key... display. 2 turns: Drive motor runs; Drying LED is pressed, all the Option LED's should light. 5 turns: Drive motor runs; Dryer will flash To EXIT test mode, press and hold the Options and Cancel buttons simultaneously for regular operation. 134682200 0512 heat source is off ...
Installation Instructions
Page 3
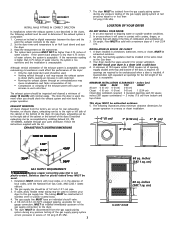
... in the absence of 1 inch (2.54 cm). Installation MUST conform with local codes, or in vent restriction. cm) 60 sq. cm) CLOSET DOOR The dryer MUST be to the right side of the cabinet or the bottom of 1/2 psig (3.45 kPa). 3 60 sq. Floor MUST be to or ... the charts, the following illustrations show minimum clearance dimensions for rear exhausting. Read the measurement on electric dryers, exhausting can be solid with a maximum slope of local codes, with a solid door. 4. The more often you should be constructed of the gas supply connection to determine if the exhaust...
... in the absence of 1 inch (2.54 cm). Installation MUST conform with local codes, or in vent restriction. cm) 60 sq. cm) CLOSET DOOR The dryer MUST be to the right side of the cabinet or the bottom of 1/2 psig (3.45 kPa). 3 60 sq. Floor MUST be to or ... the charts, the following illustrations show minimum clearance dimensions for rear exhausting. Read the measurement on electric dryers, exhausting can be solid with a maximum slope of local codes, with a solid door. 4. The more often you should be constructed of the gas supply connection to determine if the exhaust...
Installation Instructions
Page 6
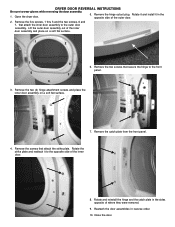
... Be sure to the front panel. 3. Open the dryer door. 5. Remove the hinge cutout plug. Rotate it and install it to the outer door assembly. Lift the outer door assembly out of the outer door. 2. Remove the two (2) hinge attachment screws and place the inner door assembly on a soft flat surface. 1 2 7 6 5 3 4...1. Remove the catch plate from the front panel. 4. Rotate and reinstall the hinge and the catch plate in reverse order. 10. Close the door. 6 Remove the five screws, 1 thru 5 and the two screws, 6 and 7, that attach the strike plate. Rotate the strike plate and...
... Be sure to the front panel. 3. Open the dryer door. 5. Remove the hinge cutout plug. Rotate it and install it to the outer door assembly. Lift the outer door assembly out of the outer door. 2. Remove the two (2) hinge attachment screws and place the inner door assembly on a soft flat surface. 1 2 7 6 5 3 4...1. Remove the catch plate from the front panel. 4. Rotate and reinstall the hinge and the catch plate in reverse order. 10. Close the door. 6 Remove the five screws, 1 thru 5 and the two screws, 6 and 7, that attach the strike plate. Rotate the strike plate and...
Operating Instructions
Page 1
...for knits and delicate items. PN 134609300B (0712) Check that cycle is selected in a circular track to the desired dryness level. See the "Dryer Setting Chart" for each cycle. The indicator will continue. Loads dried using the Towels, Heavy Duty, Normal, Perm Press, and Delicates cycles will...and the status lights will flash, but the original cycle will light when the option has been selected. Close the door. 4. It explains these operating steps in your dryer Owner's Guide. Select a Timed Dry setting to continue the cycle and the cycle may not detect enough moisture ...
...for knits and delicate items. PN 134609300B (0712) Check that cycle is selected in a circular track to the desired dryness level. See the "Dryer Setting Chart" for each cycle. The indicator will continue. Loads dried using the Towels, Heavy Duty, Normal, Perm Press, and Delicates cycles will...and the status lights will flash, but the original cycle will light when the option has been selected. Close the door. 4. It explains these operating steps in your dryer Owner's Guide. Select a Timed Dry setting to continue the cycle and the cycle may not detect enough moisture ...


