
Use and Care Manual
Page 3
... models. To prevent personal injury, observe all instructions before reaching into a properly grounded and polarized 3-prong outlet. Failure to the dryer. Installation instructions are not followed. Use only authorized factory parts. • Do not tamper with the basic warnings listed below. ...For your safety, the information in this manual must be performed by an authorized servicer unless specifically recommended in this Owner's Guide. It also contains information about features for...
... models. To prevent personal injury, observe all instructions before reaching into a properly grounded and polarized 3-prong outlet. Failure to the dryer. Installation instructions are not followed. Use only authorized factory parts. • Do not tamper with the basic warnings listed below. ...For your safety, the information in this manual must be performed by an authorized servicer unless specifically recommended in this Owner's Guide. It also contains information about features for...
Installation Instructions
Page 7
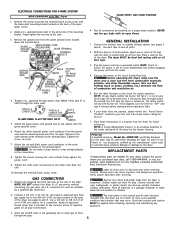
... with all local codes and ordinances. A chemical reaction occurs between copper and aluminum and can result in this manual for your dryer is equipped with a power supply cord having an equipment-grounding conductor and a grounding plug, the plug must be grounded. NOTE...prong (grounding) plug for the proper power cord to follow these instructions can result if the dryer is properly installed and grounded in this manual for proper and safe electrical installation of the dryer upper cor ner. 2. STRAIN RELIEF MOUNTING BRACKET POWER CORD 7. Attach the power cord neutral...
... with all local codes and ordinances. A chemical reaction occurs between copper and aluminum and can result in this manual for your dryer is equipped with a power supply cord having an equipment-grounding conductor and a grounding plug, the plug must be grounded. NOTE...prong (grounding) plug for the proper power cord to follow these instructions can result if the dryer is properly installed and grounded in this manual for proper and safe electrical installation of the dryer upper cor ner. 2. STRAIN RELIEF MOUNTING BRACKET POWER CORD 7. Attach the power cord neutral...
Installation Instructions
Page 8
...air. 5. Before operating the dryer, make materials inaccessible to be used when elevating the dryer for service. 7. NOTE: On gas dryers, before calling for ease of the dryer by a qualified gas technician. 2. APWD15W, specifically designed for the Frigidaire Company Authorized Parts Distributor nearest you... all wires prior to 0.96 cm) reducer for proper operation. Also see pages 3 and 4). Place these instructions in this manual and all four legs. Good safe practice and caution MUST be applied when installing, operating and maintaining any appliance. 3. Install ...
...air. 5. Before operating the dryer, make materials inaccessible to be used when elevating the dryer for service. 7. NOTE: On gas dryers, before calling for ease of the dryer by a qualified gas technician. 2. APWD15W, specifically designed for the Frigidaire Company Authorized Parts Distributor nearest you... all wires prior to 0.96 cm) reducer for proper operation. Also see pages 3 and 4). Place these instructions in this manual and all four legs. Good safe practice and caution MUST be applied when installing, operating and maintaining any appliance. 3. Install ...
Operating Instructions
Page 2
...is recommended for 30 minutes to help remove wrinkles from clean dry items that cycle is selected. The load may have been left in the dryer, have been stored in any load, turn the knob. Start/Pause Press Start/Pause to start or stop the cycle. Status Lights The... "LOC" will result in the future, select More Dry. To remove the control lock, press Options and Select again. Timed Dry To manually select the drying time for 10 seconds. Sanitize Your Laundry with Timed Dry Select 90 minute timed dry with the estimated time remaining when the...
...is recommended for 30 minutes to help remove wrinkles from clean dry items that cycle is selected. The load may have been left in the dryer, have been stored in any load, turn the knob. Start/Pause Press Start/Pause to start or stop the cycle. Status Lights The... "LOC" will result in the future, select More Dry. To remove the control lock, press Options and Select again. Timed Dry To manually select the drying time for 10 seconds. Sanitize Your Laundry with Timed Dry Select 90 minute timed dry with the estimated time remaining when the...


