
English Manual.
Page 1
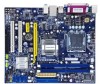
G31MX 2.0 Series Motherboard User's Manual
G31MX 2.0 Series Motherboard User's Manual
English Manual.
Page 2
... be treated as household waste. By ensuring this product is the intellectual property of Foxconn, Inc. More information: If you want more detailed information about our products, please visit Foxconn's website: http://www.foxconnchannel.com © All rights reserved. WEEE: The use... 3A2214A00-000-G Symbol description: ! All images are for reference only, please refer to the physical motherboard for G31MX 2.0 Series motherboard. CAUTION Statement: This manual is disposed of correctly, you will help you to use of this symbol indicates that can help prevent potential ...
... be treated as household waste. By ensuring this product is the intellectual property of Foxconn, Inc. More information: If you want more detailed information about our products, please visit Foxconn's website: http://www.foxconnchannel.com © All rights reserved. WEEE: The use... 3A2214A00-000-G Symbol description: ! All images are for reference only, please refer to the physical motherboard for G31MX 2.0 Series motherboard. CAUTION Statement: This manual is disposed of correctly, you will help you to use of this symbol indicates that can help prevent potential ...
English Manual.
Page 20
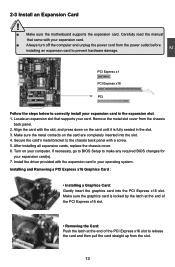
... x16 slot to the chassis back panel with your expansion card(s). 7. Make sure the graphics card is fully seated in your card. Carefully read the manual that supports your operating system. Locate an expansion slot that came with a screw. 5.
... x16 slot to the chassis back panel with your expansion card(s). 7. Make sure the graphics card is fully seated in your card. Carefully read the manual that supports your operating system. Locate an expansion slot that came with a screw. 5.
English Manual.
Page 25
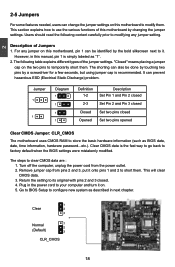
... a screwdriver for a few seconds, but using jumper cap is recommended. Clear CMOS data is simply labeled as "1". 2. This will clear CMOS data. 3. However, in this manual, pin 1 is the fast way to go back to configure new system as BIOS data, date, time information, hardware password...etc.). Remove jumper cap from...
... a screwdriver for a few seconds, but using jumper cap is recommended. Clear CMOS data is simply labeled as "1". 2. This will clear CMOS data. 3. However, in this manual, pin 1 is the fast way to go back to configure new system as BIOS data, date, time information, hardware password...etc.). Remove jumper cap from...
English Manual.
Page 27
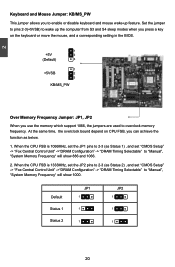
... CPU FSB is 1066MHz, set the JP1 pins to 2-3 (as Status 2) , and set "CMOS Setup" -> "Fox Central Control Unit" ->"DRAM Configuration" -> "DRAM Timing Selectable" to "Manual", "System Memory Frequency" will show 886 and 1066. 2. When the CPU FSB is 1333MHz, set the JP2 pins to 2-3 (as Status 1) , and set "CMOS Setup... from S3 and S4 sleep modes when you press a key on CPU FSB, you use the memory which support 1066, the jumpers are used to "Manual", "System Memory Frequency" will show 1000.
... CPU FSB is 1066MHz, set the JP1 pins to 2-3 (as Status 2) , and set "CMOS Setup" -> "Fox Central Control Unit" ->"DRAM Configuration" -> "DRAM Timing Selectable" to "Manual", "System Memory Frequency" will show 886 and 1066. 2. When the CPU FSB is 1333MHz, set the JP2 pins to 2-3 (as Status 1) , and set "CMOS Setup... from S3 and S4 sleep modes when you press a key on CPU FSB, you use the memory which support 1066, the jumpers are used to "Manual", "System Memory Frequency" will show 1000.
English Manual.
Page 28
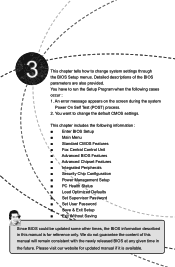
...; Set User Password ■ Save & Exit Setup ■ Exit Without Saving Since BIOS could be updated some other times, the BIOS information described in this manual will remain consistent with the newly released BIOS at any given time in the future. This chapter includes the following cases occur : 1. You have to... change system settings through the BIOS Setup menus. This chapter tells how to change the default CMOS settings. Detailed descriptions of this manual is for updated manual if it is available.
...; Set User Password ■ Save & Exit Setup ■ Exit Without Saving Since BIOS could be updated some other times, the BIOS information described in this manual will remain consistent with the newly released BIOS at any given time in the future. This chapter includes the following cases occur : 1. You have to... change system settings through the BIOS Setup menus. This chapter tells how to change the default CMOS settings. Detailed descriptions of this manual is for updated manual if it is available.
English Manual.
Page 30
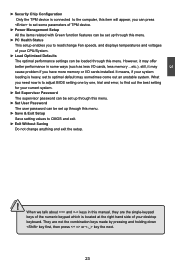
... you have more memory or I /O cards, less memory ...etc.), still, it may cause problem if you to optimal default may offer better performance in this manual, they are not the combination keys made by one by pressing and holding down key first, then press or key the next. 23 CAUTION They...
... you have more memory or I /O cards, less memory ...etc.), still, it may cause problem if you to optimal default may offer better performance in this manual, they are not the combination keys made by one by pressing and holding down key first, then press or key the next. 23 CAUTION They...
English Manual.
Page 33
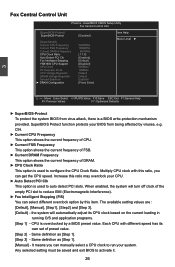
... speed has its CPU clock based on the current loading in running O/S and application programs. [Step 1] - The available setting values are : [Default], [Manual], [Step1], [Step2] and [Step 3]. [Default] - Any selected setting must be saved and exit BIOS to auto detect PCI slots. the system will ...turn off clock of preset value. [Step 2] - Same definition as [Step 1]. [Step 3] - Same definition as [Step 1]. [Manual] - When enabled, the system will automatically adjust its own set of the empty PCI slot to configure the CPU Clock Ratio. Each CPU with this...
... speed has its CPU clock based on the current loading in running O/S and application programs. [Step 1] - The available setting values are : [Default], [Manual], [Step1], [Step2] and [Step 3]. [Default] - Any selected setting must be saved and exit BIOS to auto detect PCI slots. the system will ...turn off clock of preset value. [Step 2] - Same definition as [Step 1]. [Step 3] - Same definition as [Step 1]. [Manual] - When enabled, the system will automatically adjust its own set of the empty PCI slot to configure the CPU Clock Ratio. Each CPU with this...
English Manual.
Page 34
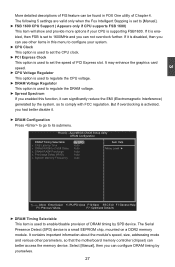
...Selectable x CAS Latency Time x DRAM RAS# to its submenu. The following 5 settings are valid only when the Fox Intelligent Stepping is set to [Manual]. ► FSB 1600 CPU Support ( Appears only if CPU supports FSB 1600) This item will show and provide more options if your system. ... a small EEPROM chip, mounted on a DDR2 memory module. 3 More detailed descriptions of FIS feature can better access the memory device. Select [Manual], then you had better disable it can significantly reduce the EMI (Electromagnetic Interference) generated by yourselves. 27 If it is used to comply with...
...Selectable x CAS Latency Time x DRAM RAS# to its submenu. The following 5 settings are valid only when the Fox Intelligent Stepping is set to [Manual]. ► FSB 1600 CPU Support ( Appears only if CPU supports FSB 1600) This item will show and provide more options if your system. ... a small EEPROM chip, mounted on a DDR2 memory module. 3 More detailed descriptions of FIS feature can better access the memory device. Select [Manual], then you had better disable it can significantly reduce the EMI (Electromagnetic Interference) generated by yourselves. 27 If it is used to comply with...

English Manual.
Page 35
3 The following 5 settings are valid only when the DRAM Timing Selectable is set to [Manual]. ► CAS Latency Time (tCL) This item controls the CAS latency The CAS Latency is the number of clock cycles that elapse from the time ...; Precharge Delay (tRAS) This item allows you to set the precharge delay time (in clock cycles). ► System Memory Frequency This item is used to manually select a DRAM speed. 28
3 The following 5 settings are valid only when the DRAM Timing Selectable is set to [Manual]. ► CAS Latency Time (tCL) This item controls the CAS latency The CAS Latency is the number of clock cycles that elapse from the time ...; Precharge Delay (tRAS) This item allows you to set the precharge delay time (in clock cycles). ► System Memory Frequency This item is used to manually select a DRAM speed. 28

English Manual.
Page 54
After that, you can click "One Click Setup" to install all the other drivers left, or you can select the specific utility to install. Exit the program Drop to Browse CD Foxconn's Utilities Install Drivers website 2. Click to visit Select to Install Select to System Tray 4 47 Install Utility You can click on each individual driver to install it manually. Install driver and utility 1. Install Driver You must click "Intel Chipset Driver" to install it first. Manual Installation Step by Step Automatic Installation by One Click.
After that, you can click "One Click Setup" to install all the other drivers left, or you can select the specific utility to install. Exit the program Drop to Browse CD Foxconn's Utilities Install Drivers website 2. Click to visit Select to Install Select to System Tray 4 47 Install Utility You can click on each individual driver to install it manually. Install driver and utility 1. Install Driver You must click "Intel Chipset Driver" to install it first. Manual Installation Step by Step Automatic Installation by One Click.
English Manual.
Page 60
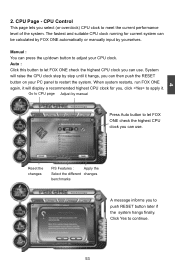
... the system. Auto : Click this button to let FOX ONE check the highest CPU clock you can be calculated by FOX ONE automatically or manually input by manual Press Auto button to push RESET button later if the system hangs finally. System will display a recommended highest CPU clock for current system can...
... the system. Auto : Click this button to let FOX ONE check the highest CPU clock you can be calculated by FOX ONE automatically or manually input by manual Press Auto button to push RESET button later if the system hangs finally. System will display a recommended highest CPU clock for current system can...
English Manual.
Page 62
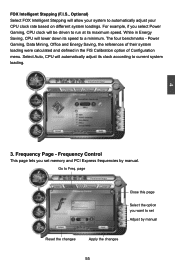
...CPU will lower down its speed to a minimum. Frequency Control This page lets you want to set memory and PCI Express frequencies by manual Reset the changes Apply the changes 55 Power Gaming, Data Mining, Office and Energy Saving, the references of Configuration menu. page Close... this page Select the option you set Adjust by manual. The four benchmarks - Frequency Page - FOX Intelligent Stepping (F.I.S., Optional) Select FOX Intelligent Stepping will be driven to run at its ...
...CPU will lower down its speed to a minimum. Frequency Control This page lets you want to set memory and PCI Express frequencies by manual Reset the changes Apply the changes 55 Power Gaming, Data Mining, Office and Energy Saving, the references of Configuration menu. page Close... this page Select the option you set Adjust by manual. The four benchmarks - Frequency Page - FOX Intelligent Stepping (F.I.S., Optional) Select FOX Intelligent Stepping will be driven to run at its ...

English Manual.
Page 65
FAN1 Fan This page lets you to set CPU voltage, memory voltage and North Bridge voltage manually. Voltage Control (Optional) This page lets you want to Voltage page Select the option you set FAN1 fan low limit rpm and enable the alert ... set Adjust by dragging the lever 5. Voltage Page - CPU voltage can be stepped up/down by a unit of FAN1 fan Set low limit rpm by manual Reset the changes Apply the changes 58 4 4.5 Limit Setting -
FAN1 Fan This page lets you to set CPU voltage, memory voltage and North Bridge voltage manually. Voltage Control (Optional) This page lets you want to Voltage page Select the option you set FAN1 fan low limit rpm and enable the alert ... set Adjust by dragging the lever 5. Voltage Page - CPU voltage can be stepped up/down by a unit of FAN1 fan Set low limit rpm by manual Reset the changes Apply the changes 58 4 4.5 Limit Setting -
English Manual.
Page 66
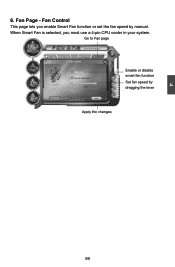
When Smart Fan is selected, you enable Smart Fan function or set the fan speed by dragging the lever Apply the changes 59 Fan Page - 4 6. Fan Control This page lets you must use a 4-pin CPU cooler in your system. Go to Fan page Enable or disable smart fan function Set fan speed by manual.
When Smart Fan is selected, you enable Smart Fan function or set the fan speed by dragging the lever Apply the changes 59 Fan Page - 4 6. Fan Control This page lets you must use a 4-pin CPU cooler in your system. Go to Fan page Enable or disable smart fan function Set fan speed by manual.


