

Product Brochure
Page 1
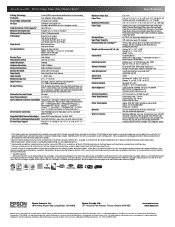
... Print photos without sacrificing quality - Built-in color - One-touch ... fade, and water resistant, highlighter friendly documents rival those from a laser printer and photos rival those from the lab • Send faxes fast, even in memory...Built-in as fast as 3 sec per page; WorkForce™ 600 Print | Copy | Scan | Fax | Photo | Wi-Fi® Engineered for small business ...and home office. Fast draft and copy speeds - Uses up to create flyers, brochures, calendars and more with high quality scanning; Epson...
... Print photos without sacrificing quality - Built-in color - One-touch ... fade, and water resistant, highlighter friendly documents rival those from a laser printer and photos rival those from the lab • Send faxes fast, even in memory...Built-in as fast as 3 sec per page; WorkForce™ 600 Print | Copy | Scan | Fax | Photo | Wi-Fi® Engineered for small business ...and home office. Fast draft and copy speeds - Uses up to create flyers, brochures, calendars and more with high quality scanning; Epson...
Product Brochure
Page 2
... Epson testing of their respective companies. For maximum print life, display all rights in default mode printing typical office documents. 3 Some applications and/or functions, like double-sided printing, are subject to memory card, Auto Photo Correction, print your print quality and longevity and could result in all-in-one ships with registration WorkForce 600...
... Epson testing of their respective companies. For maximum print life, display all rights in default mode printing typical office documents. 3 Some applications and/or functions, like double-sided printing, are subject to memory card, Auto Photo Correction, print your print quality and longevity and could result in all-in-one ships with registration WorkForce 600...
Quick Guide
Page 2
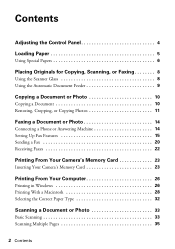
...6 Placing Originals for Copying, Scanning, or Faxing 8 Using the Scanner Glass 8 Using the Automatic Document Feeder 9 Copying a Document or Photo 10 Copying a Document 10 Restoring, Cropping, or Copying Photos 11 Faxing a Document or Photo 14 Connecting a Phone or Answering Machine 14 Setting Up Fax Features 15 Sending a Fax 20 Receiving Faxes 22 Printing... Memory Card 23 Printing From Your Computer 26 Printing in Windows 26 Printing With a Macintosh 28 Selecting the Correct Paper Type 32 Scanning a Document or Photo 33 Basic Scanning 33 Scanning Multiple Pages 35 2 Contents
...6 Placing Originals for Copying, Scanning, or Faxing 8 Using the Scanner Glass 8 Using the Automatic Document Feeder 9 Copying a Document or Photo 10 Copying a Document 10 Restoring, Cropping, or Copying Photos 11 Faxing a Document or Photo 14 Connecting a Phone or Answering Machine 14 Setting Up Fax Features 15 Sending a Fax 20 Receiving Faxes 22 Printing... Memory Card 23 Printing From Your Computer 26 Printing in Windows 26 Printing With a Macintosh 28 Selecting the Correct Paper Type 32 Scanning a Document or Photo 33 Basic Scanning 33 Scanning Multiple Pages 35 2 Contents

Quick Guide
Page 5
Load Premium Presentation Paper Matte and most photo papers 20 sheets at a time. 1. Open the paper support and pull up to 100 sheets of plain paper or Epson® Bright White Paper, or 80 sheets of Epson Presentation Paper Matte. Loading Paper You can load up the extensions. Flip the feeder guard forward, then squeeze the edge guide and slide it left. Then extend the output tray and raise the stopper. Load transfer paper and adhesive sheets one sheet at a time. Note: If you are using legal-size paper, do not raise the stopper. 2. Loading Paper 5
Load Premium Presentation Paper Matte and most photo papers 20 sheets at a time. 1. Open the paper support and pull up to 100 sheets of plain paper or Epson® Bright White Paper, or 80 sheets of Epson Presentation Paper Matte. Loading Paper You can load up the extensions. Flip the feeder guard forward, then squeeze the edge guide and slide it left. Then extend the output tray and raise the stopper. Load transfer paper and adhesive sheets one sheet at a time. Note: If you are using legal-size paper, do not raise the stopper. 2. Loading Paper 5

Quick Guide
Page 6
... a wide array of high quality papers, making it easy to maximize the impact of your photos, presentations, and creative projects. Load letterhead or pre-printed paper top edge first. Paper name Epson Bright White Paper Epson Photo Paper Glossy Size Letter (8.5 × 11 inches) Borderless 4 × 6 inches Letter (8.5 × 11 inches) Part Sheet ...S041809 50 S042038 100 S041141 20 S041649 50 S041271 100 6 Loading Paper For details on paper and instructions on loading envelopes, see the on-screen Epson Information Center. To find the nearest one, call 800-GO-EPSON (800-463-7766).
... a wide array of high quality papers, making it easy to maximize the impact of your photos, presentations, and creative projects. Load letterhead or pre-printed paper top edge first. Paper name Epson Bright White Paper Epson Photo Paper Glossy Size Letter (8.5 × 11 inches) Borderless 4 × 6 inches Letter (8.5 × 11 inches) Part Sheet ...S041809 50 S042038 100 S041141 20 S041649 50 S041271 100 6 Loading Paper For details on paper and instructions on loading envelopes, see the on-screen Epson Information Center. To find the nearest one, call 800-GO-EPSON (800-463-7766).

Quick Guide
Page 8
...corner. Place them at a time on the scanner glass (below) or in the Automatic Document Feeder (see page 9). or 4 × 6-inch photos, you can place one or two photos or a document up to make color or black and white copies. 1. Close the cover gently so you 're scanning 3 × 5- Placing... Originals for Copying, Scanning, or Faxing 1/4 inch (5 mm) Open the document cover and place your documents or photos on the scanner glass....
...corner. Place them at a time on the scanner glass (below) or in the Automatic Document Feeder (see page 9). or 4 × 6-inch photos, you can place one or two photos or a document up to make color or black and white copies. 1. Close the cover gently so you 're scanning 3 × 5- Placing... Originals for Copying, Scanning, or Faxing 1/4 inch (5 mm) Open the document cover and place your documents or photos on the scanner glass....
Quick Guide
Page 10
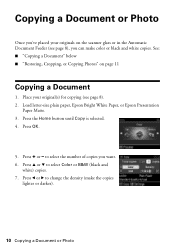
... originals on page 11 Copying a Document 1. Load letter-size plain paper, Epson Bright White Paper, or Epson Presentation Paper Matte. 3. to select the number of copies you can make the copies lighter or darker). 10 Copying a Document or Photo Copying a Document or Photo Once you've placed your original(s) for copying (see page 8), you...
... originals on page 11 Copying a Document 1. Load letter-size plain paper, Epson Bright White Paper, or Epson Presentation Paper Matte. 3. to select the number of copies you can make the copies lighter or darker). 10 Copying a Document or Photo Copying a Document or Photo Once you've placed your original(s) for copying (see page 8), you...
Quick Guide
Page 11
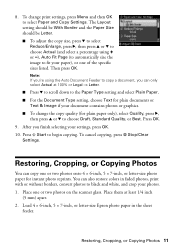
...sheet feeder. Place them at 100% or Legal -> Letter. ■ Press d to scroll down to black and white, and crop your paper), or one or two photos on the scanner glass. You can only select Actual at least 1/4 inch (5 mm) apart. 2. 8. To cancel copying, press y Stop/Clear Settings... (to automatically size the image to begin copying. Load 4 × 6-inch, 5 × 7-inch, or letter-size Epson photo paper in faded photos, print with or without borders, convert photos to the Paper Type setting and select Plain Paper. ■ For the Document Type setting, choose Text for plain documents or...
...sheet feeder. Place them at 100% or Legal -> Letter. ■ Press d to scroll down to black and white, and crop your paper), or one or two photos on the scanner glass. You can only select Actual at least 1/4 inch (5 mm) apart. 2. 8. To cancel copying, press y Stop/Clear Settings... (to automatically size the image to begin copying. Load 4 × 6-inch, 5 × 7-inch, or letter-size Epson photo paper in faded photos, print with or without borders, convert photos to the Paper Type setting and select Plain Paper. ■ For the Document Type setting, choose Text for plain documents or...

Quick Guide
Page 12
... to select the number of copies, press OK. 9. If you to restore colors in faded photos as well. 11. Press OK. 6. When you see this for the other photo as you placed more than one photo on Color Restoration; To turn on the scanner glass, press l or r to fit onto ...your paper, press Display/Crop. ■ To resize the image area, press + or -. ■ To move through your photos and enlarge the resulting image...
... to select the number of copies, press OK. 9. If you to restore colors in faded photos as well. 11. Press OK. 6. When you see this for the other photo as you placed more than one photo on Color Restoration; To turn on the scanner glass, press l or r to fit onto ...your paper, press Display/Crop. ■ To resize the image area, press + or -. ■ To move through your photos and enlarge the resulting image...
Quick Guide
Page 13
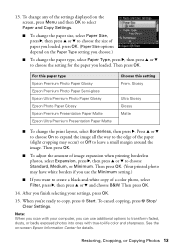
..., press r, then press u or d to copy, press x Start. For this paper type Epson Premium Photo Paper Glossy Epson Premium Photo Paper Semi-gloss Epson Ultra Premium Photo Paper Glossy Epson Photo Paper Glossy Epson Premium Presentation Paper Matte Epson Ultra Premium Presentation Paper Matte Choose this setting Prem. Glossy Ultra Glossy Glossy Matte ■ To ...of the paper (slight cropping may have white borders if you use additional options to transform faded, dusty, or badly exposed photos into ones with true-to choose Standard, Medium, or Minimum. Restoring, Cropping, or Copying...
..., press r, then press u or d to copy, press x Start. For this paper type Epson Premium Photo Paper Glossy Epson Premium Photo Paper Semi-gloss Epson Ultra Premium Photo Paper Glossy Epson Photo Paper Glossy Epson Premium Presentation Paper Matte Epson Ultra Premium Presentation Paper Matte Choose this setting Prem. Glossy Ultra Glossy Glossy Matte ■ To ...of the paper (slight cropping may have white borders if you use additional options to transform faded, dusty, or badly exposed photos into ones with true-to choose Standard, Medium, or Minimum. Restoring, Cropping, or Copying...
Quick Guide
Page 14
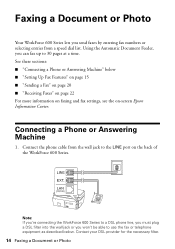
Connect the phone cable from a speed dial list. Faxing a Document or Photo Your WorkForce 600 Series lets you won't be able to use the fax or telephone equipment as described below ■ "Setting Up Fax Features" on page 15 ■ "... numbers or selecting entries from the wall jack to 30 pages at a time. Contact your DSL provider for the necessary filter. 14 Faxing a Document or Photo Connecting a Phone or Answering Machine 1. Using the Automatic Document Feeder, you can fax up to the LINE port on -screen Epson Information Center.
Connect the phone cable from a speed dial list. Faxing a Document or Photo Your WorkForce 600 Series lets you won't be able to use the fax or telephone equipment as described below ■ "Setting Up Fax Features" on page 15 ■ "... numbers or selecting entries from the wall jack to 30 pages at a time. Contact your DSL provider for the necessary filter. 14 Faxing a Document or Photo Connecting a Phone or Answering Machine 1. Using the Automatic Document Feeder, you can fax up to the LINE port on -screen Epson Information Center.
Quick Guide
Page 16
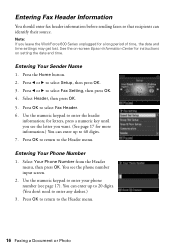
... Your Phone Number 1. You see page 17). for letters, press a numeric key until you see the letter you leave the WorkForce 600 Series unplugged for instructions on -screen Epson Information Center for a long period of time, the date and time settings may get lost. Press OK to return to select Fax... source. Use the numeric keypad to enter any dashes.) 3. Entering Your Sender Name 1. Press OK to the Header menu. 16 Faxing a Document or Photo Press l or r to the Header menu. Press OK to return to select Fax Setting, then press OK. 4. Select Your Phone Number from the ...
... Your Phone Number 1. You see page 17). for letters, press a numeric key until you see the letter you leave the WorkForce 600 Series unplugged for instructions on -screen Epson Information Center for a long period of time, the date and time settings may get lost. Press OK to return to select Fax... source. Use the numeric keypad to enter any dashes.) 3. Entering Your Sender Name 1. Press OK to the Header menu. 16 Faxing a Document or Photo Press l or r to the Header menu. Press OK to return to select Fax Setting, then press OK. 4. Select Your Phone Number from the ...
Quick Guide
Page 18
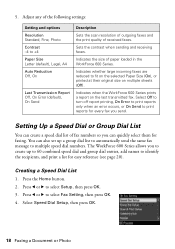
... Transmission Report Off, On Error (default), On Send Description Sets the scan resolution of outgoing faxes and the print quality of paper loaded in the WorkForce 600 Series. Press l or r to select Fax Setting, then press OK. 4. Press l or r to select Setup, then press OK. 3. ...Adjust any of the following settings: Setting and options Resolution Standard, Fine, Photo Contrast -4 to multiple speed dial numbers. Indicates the size of received faxes. Creating a Speed Dial List 1. You can quickly select them for every ...
... Transmission Report Off, On Error (default), On Send Description Sets the scan resolution of outgoing faxes and the print quality of paper loaded in the WorkForce 600 Series. Press l or r to select Fax Setting, then press OK. 4. Press l or r to select Setup, then press OK. 3. ...Adjust any of the following settings: Setting and options Resolution Standard, Fine, Photo Contrast -4 to multiple speed dial numbers. Indicates the size of received faxes. Creating a Speed Dial List 1. You can quickly select them for every ...

Quick Guide
Page 20
... by selecting from your speed dial or group dial list, follow these steps: 1. Place your speed dial list, see page 21. 20 Faxing a Document or Photo Press Menu, then l or r to the group dial list. Note: To dial the number using your telephone, by redialing, or by manually entering a fax number...
... by selecting from your speed dial or group dial list, follow these steps: 1. Place your speed dial list, see page 21. 20 Faxing a Document or Photo Press Menu, then l or r to the group dial list. Note: To dial the number using your telephone, by redialing, or by manually entering a fax number...
Quick Guide
Page 22
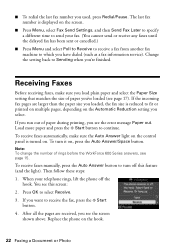
... on . If you see this feature (and the light). Note: To change the number of paper during printing, you run out of rings before the WorkForce 600 Series answers, see page 15. Press OK to receive the fax, press the x Start button. 4. To receive faxes automatically, make sure you load plain paper... Poll to Receive to receive a fax from another fax machine to fit or printed on multiple pages, depending on the hook. 22 Faxing a Document or Photo
... on . If you see this feature (and the light). Note: To change the number of paper during printing, you run out of rings before the WorkForce 600 Series answers, see page 15. Press OK to receive the fax, press the x Start button. 4. To receive faxes automatically, make sure you load plain paper... Poll to Receive to receive a fax from another fax machine to fit or printed on multiple pages, depending on the hook. 22 Faxing a Document or Photo

Quick Guide
Page 23
Insert just one card at a time. You can also print photos using an index sheet or your camera's DPOF™ settings, or transfer files to and from your camera directly. See the on . The memory card access light flashes, then stays on -screen Epson Information Center. Insert ... CompactFlash® MicrodriveTM Printing From Your Camera's Memory Card 23 Inserting Your Camera's Memory Card 1. Printing From Your Camera's Memory Card The WorkForce 600 Series lets you print photos directly from the card. You can also print by connecting your digital camera's memory card.
Insert just one card at a time. You can also print photos using an index sheet or your camera's DPOF™ settings, or transfer files to and from your camera directly. See the on . The memory card access light flashes, then stays on -screen Epson Information Center. Insert ... CompactFlash® MicrodriveTM Printing From Your Camera's Memory Card 23 Inserting Your Camera's Memory Card 1. Printing From Your Camera's Memory Card The WorkForce 600 Series lets you print photos directly from the card. You can also print by connecting your digital camera's memory card.
Quick Guide
Page 24
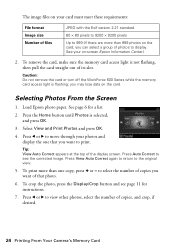
...the WorkForce 600 Series while the memory card access light is selected, and press OK. 3. Selecting Photos From the Screen 1. Load Epson photo paper. to select the number of copies you can select a group of photos to display. Press the Home button until Photos is flashing; To print more than one that photo. ...light is not flashing, then pull the card straight out of that you may lose data on -screen Epson Information Center.) 2. Press l or r to move through your photos and display the one copy, press + or - Tip: View Auto Correct appears at the top of copies, and crop,...
...the WorkForce 600 Series while the memory card access light is selected, and press OK. 3. Selecting Photos From the Screen 1. Load Epson photo paper. to select the number of copies you can select a group of photos to display. Press the Home button until Photos is flashing; To print more than one that photo. ...light is not flashing, then pull the card straight out of that you may lose data on -screen Epson Information Center.) 2. Press l or r to move through your photos and display the one copy, press + or - Tip: View Auto Correct appears at the top of copies, and crop,...
Quick Guide
Page 25
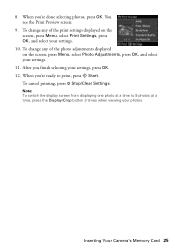
...and select your settings. 11. To cancel printing, press y Stop/Clear Settings. Inserting Your Camera's Memory Card 25 When you're ready to 9 photos at a time to print, press Start. To change any of the print settings displayed on the screen, press Menu, select... Photo Adjustments, press OK, and select your settings. 10. After you 're done selecting photos, press OK. Note: To switch the display screen from displaying one photo at a time, press the Display/Crop button 3 times when viewing your settings...
...and select your settings. 11. To cancel printing, press y Stop/Clear Settings. Inserting Your Camera's Memory Card 25 When you're ready to 9 photos at a time to print, press Start. To change any of the print settings displayed on the screen, press Menu, select... Photo Adjustments, press OK, and select your settings. 10. After you 're done selecting photos, press OK. Note: To switch the display screen from displaying one photo at a time, press the Display/Crop button 3 times when viewing your settings...
Quick Guide
Page 26
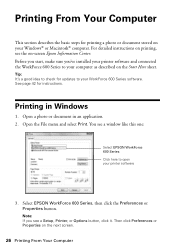
...: If you 've installed your printer software and connected the WorkForce 600 Series to your printer software 3. Then click Preferences or Properties on the Start Here sheet. Before you start, make sure you see a window like this one: Select EPSON WorkForce 600 Series Click here to open your WorkForce 600 Series software. You see a Setup, Printer, or Options button, click it...
...: If you 've installed your printer software and connected the WorkForce 600 Series to your printer software 3. Then click Preferences or Properties on the Start Here sheet. Before you start, make sure you see a window like this one: Select EPSON WorkForce 600 Series Click here to open your WorkForce 600 Series software. You see a Setup, Printer, or Options button, click it...

Quick Guide
Page 27
.... You can create your on-screen Epson Information Center. 5. For more information about print settings, click Help or see your settings. Printing in photos, select Fix Red-Eye. 7. Make sure you choose the correct paper Type setting for borderless photos Select your printout, or print double-... tab. Click OK to the most common settings, click the Shortcuts tab and select one of photos, select Fix Photo. 6. Select the type of document you're printing (choose Photo or Best Photo for photos) Select your paper Type Select your paper Size Click here for the paper you want...
.... You can create your on-screen Epson Information Center. 5. For more information about print settings, click Help or see your settings. Printing in photos, select Fix Red-Eye. 7. Make sure you choose the correct paper Type setting for borderless photos Select your printout, or print double-... tab. Click OK to the most common settings, click the Shortcuts tab and select one of photos, select Fix Photo. 6. Select the type of document you're printing (choose Photo or Best Photo for photos) Select your paper Type Select your paper Size Click here for the paper you want...


