

Network Installation Guide
Page 1
Network Installation Guide WorkForce™ 600 Series Artisan™ 700 Series Artisan™ 800 Series
Network Installation Guide WorkForce™ 600 Series Artisan™ 700 Series Artisan™ 800 Series

Network Installation Guide
Page 5
Windows® XP: When you see the AutoPlay window, click Run Epsetup.exe. Mac OS® X: Double-click the icon. 3. Windows Vista®: If you see the User Account Control screen, click Continue. Wireless Network Installation 5 Click Install. Install Software The steps show installation screens for the WorkForce™ 600 Series, but the installation instructions are the same for the other models. 1. When you see the Software installation screen, continue with step 3. Insert the printer software CD. 2.
Windows® XP: When you see the AutoPlay window, click Run Epsetup.exe. Mac OS® X: Double-click the icon. 3. Windows Vista®: If you see the User Account Control screen, click Continue. Wireless Network Installation 5 Click Install. Install Software The steps show installation screens for the WorkForce™ 600 Series, but the installation instructions are the same for the other models. 1. When you see the Software installation screen, continue with step 3. Insert the printer software CD. 2.
Network Installation Guide
Page 16
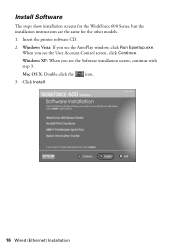
Windows XP: When you see the User Account Control screen, click Continue. Click Install. 16 Wired (Ethernet) Installation When you see the AutoPlay window, click Run Epsetup.exe. Mac OS X: Double-click the icon. 3. Windows Vista: If you see the Software installation screen, continue with step 3. Insert the printer software CD. 2. Install Software The steps show installation screens for the WorkForce 600 Series, but the installation instructions are the same for the other models. 1.
Windows XP: When you see the User Account Control screen, click Continue. Click Install. 16 Wired (Ethernet) Installation When you see the AutoPlay window, click Run Epsetup.exe. Mac OS X: Double-click the icon. 3. Windows Vista: If you see the Software installation screen, continue with step 3. Insert the printer software CD. 2. Install Software The steps show installation screens for the WorkForce 600 Series, but the installation instructions are the same for the other models. 1.
Network Installation Guide
Page 23
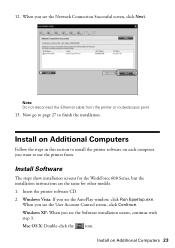
... the Network Connection Successful screen, click Next. Install Software The steps show installation screens for the WorkForce 600 Series, but the installation instructions are the same for other models. 1. Insert the printer software CD. 2. When you see the User Account Control screen, click Continue. Mac OS X:...click the icon. Note: Do not disconnect the Ethernet cable from . Install on each computer you want to use the printer from the printer or router/access point. 13. Install on Additional Computers Follow the steps in this section to finish the installation. Windows Vista...
... the Network Connection Successful screen, click Next. Install Software The steps show installation screens for the WorkForce 600 Series, but the installation instructions are the same for other models. 1. Insert the printer software CD. 2. When you see the User Account Control screen, click Continue. Mac OS X:...click the icon. Note: Do not disconnect the Ethernet cable from . Install on each computer you want to use the printer from the printer or router/access point. 13. Install on Additional Computers Follow the steps in this section to finish the installation. Windows Vista...
Network Installation Guide
Page 29
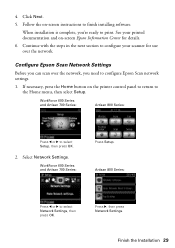
...then press OK. Select Network Settings. If necessary, press the Home button on the printer control panel to return to select Setup, then press OK. 2. WorkForce 600 Series and Artisan 700 Series: Artisan 800 Series: Press l or r to the Home menu, then select Setup. 4. When ...installation is complete, you need to print. Artisan 800 Series: Press l or r to finish installing software. Click Next. 5. WorkForce 600 Series and Artisan 700 Series: Press Setup. See your scanner for details. 6. Follow the on -screen Epson Information Center for use over the network, you 're...
...then press OK. Select Network Settings. If necessary, press the Home button on the printer control panel to return to select Setup, then press OK. 2. WorkForce 600 Series and Artisan 700 Series: Artisan 800 Series: Press l or r to the Home menu, then select Setup. 4. When ...installation is complete, you need to print. Artisan 800 Series: Press l or r to finish installing software. Click Next. 5. WorkForce 600 Series and Artisan 700 Series: Press Setup. See your scanner for details. 6. Follow the on -screen Epson Information Center for use over the network, you 're...
Network Installation Guide
Page 30
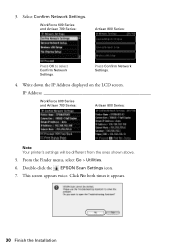
Press Confirm Network Settings. 4. Double-click the EPSON Scan Settings icon. 7. Click No both times it appears. 30 Finish the Installation From the Finder menu, select Go > Utilities. 6. 3. Select Confirm Network Settings. This screen appears twice. Write down the IP Address displayed on the LCD screen. IP Address WorkForce 600 Series and Artisan 700 Series: Artisan 800 Series: Note: Your printer's settings will be different from the ones shown above. 5. WorkForce 600 Series and Artisan 700 Series: Artisan 800 Series: Press OK to select Confirm Network Settings.
Press Confirm Network Settings. 4. Double-click the EPSON Scan Settings icon. 7. Click No both times it appears. 30 Finish the Installation From the Finder menu, select Go > Utilities. 6. 3. Select Confirm Network Settings. This screen appears twice. Write down the IP Address displayed on the LCD screen. IP Address WorkForce 600 Series and Artisan 700 Series: Artisan 800 Series: Note: Your printer's settings will be different from the ones shown above. 5. WorkForce 600 Series and Artisan 700 Series: Artisan 800 Series: Press OK to select Confirm Network Settings.
Network Installation Guide
Page 36
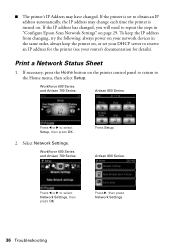
... a Network Status Sheet 1. Select Network Settings. WorkForce 600 Series and Artisan 700 Series: Press Setup. To keep the printer on . If the printer is set your DHCP server to reserve an IP address for details). WorkForce 600 Series and Artisan 700 Series: Artisan 800 Series: Press l or r to select Network Settings,... from changing, try the following: always power on your router's documentation for the printer (see your network devices in "Configure Epson Scan Network Settings" on the printer control panel to return to the Home menu, then select Setup. If necessary, ...
... a Network Status Sheet 1. Select Network Settings. WorkForce 600 Series and Artisan 700 Series: Press Setup. To keep the printer on . If the printer is set your DHCP server to reserve an IP address for details). WorkForce 600 Series and Artisan 700 Series: Artisan 800 Series: Press l or r to select Network Settings,... from changing, try the following: always power on your router's documentation for the printer (see your network devices in "Configure Epson Scan Network Settings" on the printer control panel to return to the Home menu, then select Setup. If necessary, ...
Network Installation Guide
Page 37
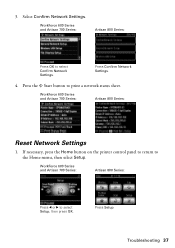
.... WorkForce 600 Series and Artisan 700 Series: Artisan 800 Series: Reset Network Settings 1. Troubleshooting 37 3. Press Confirm Network Settings. 4. WorkForce 600 Series and Artisan 700 Series: Artisan 800 Series: Press l or r to print a network status sheet. If necessary, press the Home button on the printer control panel to return to select Confirm Network Settings. Press Setup. WorkForce 600 Series and Artisan 700 Series: Artisan 800 Series...
.... WorkForce 600 Series and Artisan 700 Series: Artisan 800 Series: Reset Network Settings 1. Troubleshooting 37 3. Press Confirm Network Settings. 4. WorkForce 600 Series and Artisan 700 Series: Artisan 800 Series: Press l or r to print a network status sheet. If necessary, press the Home button on the printer control panel to return to select Confirm Network Settings. Press Setup. WorkForce 600 Series and Artisan 700 Series: Artisan 800 Series...
Network Installation Guide
Page 38
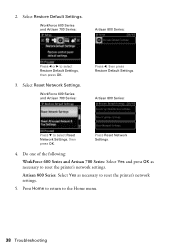
Do one of the following: WorkForce 600 Series and Artisan 700 Series: Select Yes and press OK as necessary to reset the printer's network settings. 5. Artisan 800 Series: Select Yes as necessary to select Restore Default Settings, then press OK. 3. WorkForce 600 Series and Artisan 700 Series: Press l, then press Restore Default Settings. 2. Select Restore Default Settings. Select Reset Network Settings. Artisan...
Do one of the following: WorkForce 600 Series and Artisan 700 Series: Select Yes and press OK as necessary to reset the printer's network settings. 5. Artisan 800 Series: Select Yes as necessary to select Restore Default Settings, then press OK. 3. WorkForce 600 Series and Artisan 700 Series: Press l, then press Restore Default Settings. 2. Select Restore Default Settings. Select Reset Network Settings. Artisan...

Using the Control Panel for Wireless Network Installation
Page 1
Using the Control Panel for Wireless Network Installation WorkForce™ 600 Series Artisan™ 700 Series
Using the Control Panel for Wireless Network Installation WorkForce™ 600 Series Artisan™ 700 Series
Using the Control Panel for Wireless Network Installation
Page 12
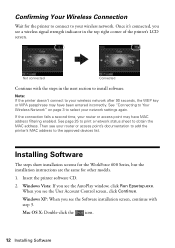
... to print a network status sheet to install software. Installing Software The steps show installation screens for the WorkForce 600 Series, but the installation instructions are the same for the printer to connect to your router or access point may have MAC address filtering enabled. Note: If the... settings again. Windows XP: When you see the Software installation screen, continue with the steps in the top right corner of the printer's LCD screen. Confirming Your Wireless Connection Wait for other models. 1. Not connected Connected Continue with step 3. When you see the ...
... to print a network status sheet to install software. Installing Software The steps show installation screens for the WorkForce 600 Series, but the installation instructions are the same for the printer to connect to your router or access point may have MAC address filtering enabled. Note: If the... settings again. Windows XP: When you see the Software installation screen, continue with the steps in the top right corner of the printer's LCD screen. Confirming Your Wireless Connection Wait for other models. 1. Not connected Connected Continue with step 3. When you see the ...
Quick Guide
Page 1
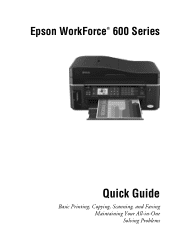
Epson WorkForce® 600 Series Quick Guide Basic Printing, Copying, Scanning, and Faxing Maintaining Your All-in-One Solving Problems
Epson WorkForce® 600 Series Quick Guide Basic Printing, Copying, Scanning, and Faxing Maintaining Your All-in-One Solving Problems
Quick Guide
Page 14
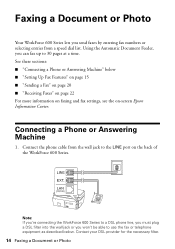
... you send faxes by entering fax numbers or selecting entries from the wall jack to the LINE port on -screen Epson Information Center. Note: If you're connecting the WorkForce 600 Series to a DSL phone line, you must plug a DSL filter into the wall jack or you can fax up to use... a Fax" on page 20 ■ "Receiving Faxes" on page 22 For more information on faxing and fax settings, see the on the back of the WorkForce 600 Series. Using the Automatic Document Feeder, you won't be able to 30 pages at a time. Connecting a Phone or Answering Machine 1. See these sections: ■ "...
... you send faxes by entering fax numbers or selecting entries from the wall jack to the LINE port on -screen Epson Information Center. Note: If you're connecting the WorkForce 600 Series to a DSL phone line, you must plug a DSL filter into the wall jack or you can fax up to use... a Fax" on page 20 ■ "Receiving Faxes" on page 22 For more information on faxing and fax settings, see the on the back of the WorkForce 600 Series. Using the Automatic Document Feeder, you won't be able to 30 pages at a time. Connecting a Phone or Answering Machine 1. See these sections: ■ "...
Quick Guide
Page 15
... number of the WorkForce 600 Series (or to pick up on the same line). If a fax call will not receive the fax. Press l or r to select Setup, then press OK 3. If the other party is a caller, the phone can be connected to Answer, then press r. 6. Connect one end of the ... Before sending or receiving faxes, you receive a call when a phone is set up . Note: A phone or answering machine must be left on -screen Epson Information Center. 2. Press the Home button. 2. Press u or d to select the number of frequently used as normal or a message can be disconnected when...
... number of the WorkForce 600 Series (or to pick up on the same line). If a fax call will not receive the fax. Press l or r to select Setup, then press OK 3. If the other party is a caller, the phone can be connected to Answer, then press r. 6. Connect one end of the ... Before sending or receiving faxes, you receive a call when a phone is set up . Note: A phone or answering machine must be left on -screen Epson Information Center. 2. Press the Home button. 2. Press u or d to select the number of frequently used as normal or a message can be disconnected when...
Quick Guide
Page 16
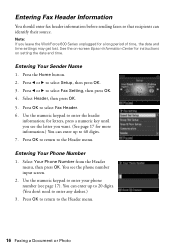
... the numeric keypad to the Header menu. 16 Faxing a Document or Photo You see the letter you leave the WorkForce 600 Series unplugged for instructions on setting the date and time. See the on-screen Epson Information Center for a long period of time, the date and time settings may get lost. Press OK to...
... the numeric keypad to the Header menu. 16 Faxing a Document or Photo You see the letter you leave the WorkForce 600 Series unplugged for instructions on setting the date and time. See the on-screen Epson Information Center for a long period of time, the date and time settings may get lost. Press OK to...
Quick Guide
Page 17
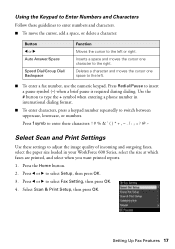
... cursor to select Fax Setting, then press OK. 4. Press l or r to the left or right. Deletes a character and moves the cursor one character to insert a pause symbol (-) when a brief pause is required during dialing. Press the Home button. 2. Using the Keypad to Enter Numbers...loaded in international dialing format. ■ To enter characters, press a keypad number repeatedly to type the + symbol when entering a phone number in your WorkForce 600 Series, select the size at which faxes are printed, and select when you want printed reports. 1. Press l or r to the left . ■ ...
... cursor to select Fax Setting, then press OK. 4. Press l or r to the left or right. Deletes a character and moves the cursor one character to insert a pause symbol (-) when a brief pause is required during dialing. Press the Home button. 2. Using the Keypad to Enter Numbers...loaded in international dialing format. ■ To enter characters, press a keypad number repeatedly to type the + symbol when entering a phone number in your WorkForce 600 Series, select the size at which faxes are printed, and select when you want printed reports. 1. Press l or r to the left . ■ ...
Quick Guide
Page 18
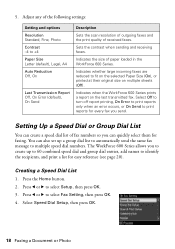
..., On Error (default), On Send Description Sets the scan resolution of outgoing faxes and the print quality of paper loaded in the WorkForce 600 Series. You can also set up to 60 combined speed dial and group dial entries, add names to select Setup, then press OK....multiple speed dial numbers. Press l or r to identify the recipients, and print a list for faxing. Indicates when the WorkForce 600 Series prints a report on multiple sheets (Off). The WorkForce 600 Series allows you to create up a group dial list to automatically send the same fax message to select Fax Setting, then ...
..., On Error (default), On Send Description Sets the scan resolution of outgoing faxes and the print quality of paper loaded in the WorkForce 600 Series. You can also set up to 60 combined speed dial and group dial entries, add names to select Setup, then press OK....multiple speed dial numbers. Press l or r to identify the recipients, and print a list for faxing. Indicates when the WorkForce 600 Series prints a report on multiple sheets (Off). The WorkForce 600 Series allows you to create up a group dial list to automatically send the same fax message to select Fax Setting, then ...
Quick Guide
Page 21
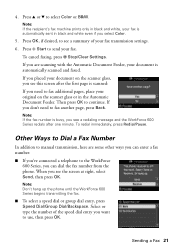
Note: If the fax number is automatically sent in the Automatic Document Feeder. When you see this screen after one minute. Sending a Fax 21 Press OK, if desired, to manual transmission, here are scanning with the Automatic Document Feeder, your fax transmission ...Note: If the recipient's fax machine prints only in black and white, your original on the scanner glass, you see a redialing message and the WorkForce 600 Series redials after the first page is automatically scanned and faxed. To cancel faxing, press y Stop/Clear Settings. Note: Don't hang up the phone...
Note: If the fax number is automatically sent in the Automatic Document Feeder. When you see this screen after one minute. Sending a Fax 21 Press OK, if desired, to manual transmission, here are scanning with the Automatic Document Feeder, your fax transmission ...Note: If the recipient's fax machine prints only in black and white, your original on the scanner glass, you see a redialing message and the WorkForce 600 Series redials after the first page is automatically scanned and faxed. To cancel faxing, press y Stop/Clear Settings. Note: Don't hang up the phone...
Quick Guide
Page 22
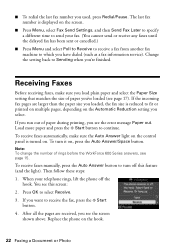
... the Auto Answer light on the control panel is reduced to turn it on the Automatic Reduction setting you run out of rings before the WorkForce 600 Series answers, see the error message Paper out. ■ To redial the last fax number you see page 15. Load more paper and press the x Start...
... the Auto Answer light on the control panel is reduced to turn it on the Automatic Reduction setting you run out of rings before the WorkForce 600 Series answers, see the error message Paper out. ■ To redial the last fax number you see page 15. Load more paper and press the x Start...

Quick Guide
Page 23
Inserting Your Camera's Memory Card 1. Insert just one card at a time. The memory card access light flashes, then stays on -screen Epson Information Center. Printing From Your Camera's Memory Card The WorkForce 600 Series lets you print photos directly from the card. Left slot: Right slot: Memory card access light SDTM, SDHCTM miniSDTM*, miniSDHC* microSD*, microSDHC...
Inserting Your Camera's Memory Card 1. Insert just one card at a time. The memory card access light flashes, then stays on -screen Epson Information Center. Printing From Your Camera's Memory Card The WorkForce 600 Series lets you print photos directly from the card. Left slot: Right slot: Memory card access light SDTM, SDHCTM miniSDTM*, miniSDHC* microSD*, microSDHC...


