Printer Guide
Page 71
... instructions on -screen User's Guide for your printer for cut sheets and roll paper • Choosing basic print options • Choosing color management options • Choosing paper configuration settings • Choosing roll paper options • Controlling expansion of borderless images • Choosing advanced black and white photo settings • Creating a custom preset and printing • Managing print jobs 81 When you install the Epson printer driver, the ready-made profiles are included, so you want to size your image correctly. If you have installed the Epson...
... instructions on -screen User's Guide for your printer for cut sheets and roll paper • Choosing basic print options • Choosing color management options • Choosing paper configuration settings • Choosing roll paper options • Controlling expansion of borderless images • Choosing advanced black and white photo settings • Creating a custom preset and printing • Managing print jobs 81 When you install the Epson printer driver, the ready-made profiles are included, so you want to size your image correctly. If you have installed the Epson...
Printer Guide
Page 148
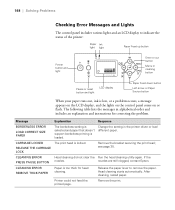
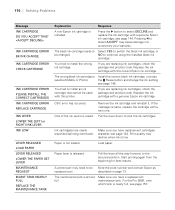
...the paper lever to indicate the status of the printer: Paper Ink light light Paper Feed up button Power button and light Enter or cut button Menu or cleaning button Pause or reset button and light LCD display Paper Feed down button Left arrow or Paper Source button When your paper runs out, ink is loaded. CARRIAGE LOCKED RELEASE THE CARRIAGE LOCK The print head is too thick for correcting the problem. Head cleaning starts automatically. CLEANING ERROR REMOVE THICK PAPER Paper is locked. 168 | Solving Problems Checking Error Messages and Lights The control panel includes...
...the paper lever to indicate the status of the printer: Paper Ink light light Paper Feed up button Power button and light Enter or cut button Menu or cleaning button Pause or reset button and light LCD display Paper Feed down button Left arrow or Paper Source button When your paper runs out, ink is loaded. CARRIAGE LOCKED RELEASE THE CARRIAGE LOCK The print head is too thick for correcting the problem. Head cleaning starts automatically. CLEANING ERROR REMOVE THICK PAPER Paper is locked. 168 | Solving Problems Checking Error Messages and Lights The control panel includes...
Printer Guide
Page 149
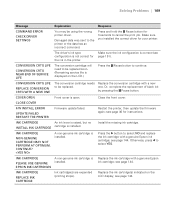
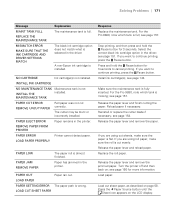
... LIFE REPLACE CONVERSION CRTG WITH A NEW ONE The conversion cartridge needs to cancel the print job. Otherwise, press l to the printer or the data has an incorrect command. Solving Problems | 169 Message Explanation Response COMMAND ERROR CHECK DRIVER SETTINGS You may be replaced. Damaged data was sent to select YES. Make sure the ink configuration is not correct for instructions. A non-genuine ink cartridge is open. COVER OPEN Front cover is installed. CLOSE COVER F/W INSTALL ERROR UPDATE FAILED RESTART THE PRINTER Firmware update failed. CONTINUE...
... LIFE REPLACE CONVERSION CRTG WITH A NEW ONE The conversion cartridge needs to cancel the print job. Otherwise, press l to the printer or the data has an incorrect command. Solving Problems | 169 Message Explanation Response COMMAND ERROR CHECK DRIVER SETTINGS You may be replaced. Damaged data was sent to select YES. Make sure the ink configuration is not correct for instructions. A non-genuine ink cartridge is open. COVER OPEN Front cover is installed. CLOSE COVER F/W INSTALL ERROR UPDATE FAILED RESTART THE PRINTER Firmware update failed. CONTINUE...
Printer Guide
Page 150
... NO to lock the ink cartridges. Replace the ink cartridge with the correct Epson ink cartridge. Ink cartridge(s) are replacing ink cartridges, check the package and product code. Load paper. Paper is Install the correct black ink cartridge, or press selected (Matte or Photo). the Pause button and change the ink setting; The maintenance tank is low. CSIC error has occurred. If the message remains, replace the cartridge with a genuine Epson ink cartridge; For the Pro 9880, note which tank is raised. see page 148. Pull the lever all the way forward...
... NO to lock the ink cartridges. Replace the ink cartridge with the correct Epson ink cartridge. Ink cartridge(s) are replacing ink cartridges, check the package and product code. Load paper. Paper is Install the correct black ink cartridge, or press selected (Matte or Photo). the Pause button and change the ink setting; The maintenance tank is low. CSIC error has occurred. If the message remains, replace the cartridge with a genuine Epson ink cartridge; For the Pro 9880, note which tank is raised. see page 148. Pull the lever all the way forward...
Printer Guide
Page 151
... roll paper. Paper has jammed in the driver; For the Pro 9880, note which tank is flat. Press and hold the Pause button for 3 seconds. Make sure the maintenance tank is wrong. see page 151. Release the paper lever and remove the paper. If you want to continue printing, press the Pause button. Select the correct black ink cartridge option in the printer. see page 154. If you are using roll paper, make sure the roll is cut sheets, make sure the paper is missing; see page...
... roll paper. Paper has jammed in the driver; For the Pro 9880, note which tank is flat. Press and hold the Pause button for 3 seconds. Make sure the maintenance tank is wrong. see page 151. Release the paper lever and remove the paper. If you want to continue printing, press the Pause button. Select the correct black ink cartridge option in the printer. see page 154. If you are using roll paper, make sure the roll is cut sheets, make sure the paper is missing; see page...

Printer Guide
Page 156
... nothing prints. Wait until the Pause light stops flashing. ◗ Check the display message and lights on page 139 to see if an error has occurred. Then restart the printer and computer. ◗ Make sure the interface cable meets the requirements; Contact Epson for details. see page 13 or 14. ◗ The printer port setting doesn't match the printer connection port (Windows). Click the Ports tab and make sure your printer port is securely connected to...
... nothing prints. Wait until the Pause light stops flashing. ◗ Check the display message and lights on page 139 to see if an error has occurred. Then restart the printer and computer. ◗ Make sure the interface cable meets the requirements; Contact Epson for details. see page 13 or 14. ◗ The printer port setting doesn't match the printer connection port (Windows). Click the Ports tab and make sure your printer port is securely connected to...

Printer Guide
Page 158
... not using Epson media, use a paper configuration to adjust for faster printing. ◗ Clear space on your hard drive or run a defragmentation utility. ◗ Don't run too many applications at the same time. ◗ Turn off virtual memory. ◗ Add RAM to support USB 2.0. Solving Paper Problems If paper feed or paper jam problems occur frequently, try adjusting the Paper Suction setting. You can also adjust this setting through your printer driver. • For heavy or thick media, follow the instructions on . see page 69...
... not using Epson media, use a paper configuration to adjust for faster printing. ◗ Clear space on your hard drive or run a defragmentation utility. ◗ Don't run too many applications at the same time. ◗ Turn off virtual memory. ◗ Add RAM to support USB 2.0. Solving Paper Problems If paper feed or paper jam problems occur frequently, try adjusting the Paper Suction setting. You can also adjust this setting through your printer driver. • For heavy or thick media, follow the instructions on . see page 69...

Printer Guide
Page 162
... Utilities folder. 2. Windows XP: Click Start > Control Panel > Add or Remove Programs. Select EPSON Printer Software in the program list. Select your printer, and then click Delete. 3. Uninstalling and Reinstalling the Printer Driver If you want to uninstall your computer. Then follow the instructions on page 43 to reinstall your printer software, restart your Macintosh. 182 | Solving Problems Tip: Check the Epson Pro Imaging website at www.proimaging.epson. Windows 1. If you need to install...
... Utilities folder. 2. Windows XP: Click Start > Control Panel > Add or Remove Programs. Select EPSON Printer Software in the program list. Select your printer, and then click Delete. 3. Uninstalling and Reinstalling the Printer Driver If you want to uninstall your computer. Then follow the instructions on page 43 to reinstall your printer software, restart your Macintosh. 182 | Solving Problems Tip: Check the Epson Pro Imaging website at www.proimaging.epson. Windows 1. If you need to install...
Printer Guide
Page 169
... 106 Black ink, changing, 130 to 133 Blade, cutter, replacing, 136 to 139 Blank pages, 157 Blurry prints, 155 Borderless printing Mac OS X, 72 to 75 Windows, 90, 97 to 102 Bracket, shipping installing for transport, 143 SP 7880, removing, 24 SP 9880, removing, 33 Buttons, control panel, 148 169 169 C Cable power, 37 printer, 12, 40 problems, 156, 157 requirements, 12 Canceling print jobs Mac OS X, 88 Windows, 113 Cartridges, see Ink cartridges Changing black ink, 130 to 133 Checking printer status, 117 to 121 Cleaning print head...
... 106 Black ink, changing, 130 to 133 Blade, cutter, replacing, 136 to 139 Blank pages, 157 Blurry prints, 155 Borderless printing Mac OS X, 72 to 75 Windows, 90, 97 to 102 Bracket, shipping installing for transport, 143 SP 7880, removing, 24 SP 9880, removing, 33 Buttons, control panel, 148 169 169 C Cable power, 37 printer, 12, 40 problems, 156, 157 requirements, 12 Canceling print jobs Mac OS X, 88 Windows, 113 Cartridges, see Ink cartridges Changing black ink, 130 to 133 Checking printer status, 117 to 121 Cleaning print head...
Printer Guide
Page 172
... Custom Paper, 67 to 69 Head Alignment, 125 Maintenance, 124, 136 Printer Setup, 122, 123 Printer Status, 45, 118 to 120 Test Print, 118 Messages, control panel, 148 to 152 Mirror Image setting problems, 157 Windows, 103 Monitoring printer control panel, 148 to 152 Mac OS X, 88 Windows, 113 to 116 Motors, checking status, 117 to 120 Moving printer, 142 to 146 N Network configuring software, 42, 46 connection, 40, 44 O Optional equipment, 10 to 11 P Page Line setting control panel, 55 Mac OS X, 84 Windows, 100 Page Rendering Mode setting...
... Custom Paper, 67 to 69 Head Alignment, 125 Maintenance, 124, 136 Printer Setup, 122, 123 Printer Status, 45, 118 to 120 Test Print, 118 Messages, control panel, 148 to 152 Mirror Image setting problems, 157 Windows, 103 Monitoring printer control panel, 148 to 152 Mac OS X, 88 Windows, 113 to 116 Motors, checking status, 117 to 120 Moving printer, 142 to 146 N Network configuring software, 42, 46 connection, 40, 44 O Optional equipment, 10 to 11 P Page Line setting control panel, 55 Mac OS X, 84 Windows, 100 Page Rendering Mode setting...
Product Brochure
Page 4
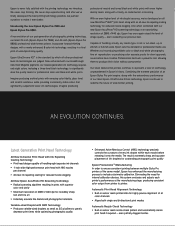
...-directional print modes Automatic Nozzle Check Technology Built-in Epson's history. And, when combined with our breakthrough new Vivid Magenta pigments, our newest-generation ink technology requires only eight colors, including a three-level black technology, to significantly raise the quality levels for professional color and black-and-white prints. Now enhanced with our new Epson AccuPhoto™ HD screening technology, at the manufacturing stage, producing consistent color output from printer to printer. Epson is...
...-directional print modes Automatic Nozzle Check Technology Built-in Epson's history. And, when combined with our breakthrough new Vivid Magenta pigments, our newest-generation ink technology requires only eight colors, including a three-level black technology, to significantly raise the quality levels for professional color and black-and-white prints. Now enhanced with our new Epson AccuPhoto™ HD screening technology, at the manufacturing stage, producing consistent color output from printer to printer. Epson is...
Product Brochure
Page 8
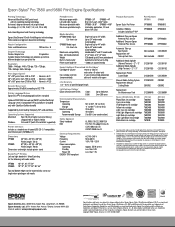
...) Auto Head Alignment and Cleaning technology Epson UltraChrome K3 with Vivid Magenta ink technology Professional-level pigment-based ink technology Nozzle Configuration Color and Monochrome 180 nozzles x 8 Droplet Technology Smallest droplet size 3.5 picoliters Variable Droplet Technology can be purchased separately. B Cartridge yields vary considerably based on images printed, print settings, paper type, frequency of prints. Epson does not guarantee longevity of use and temperature. Normal is used Media Handling SP7880 Media input Cut-sheet size SP9880 Media input Cut...
...) Auto Head Alignment and Cleaning technology Epson UltraChrome K3 with Vivid Magenta ink technology Professional-level pigment-based ink technology Nozzle Configuration Color and Monochrome 180 nozzles x 8 Droplet Technology Smallest droplet size 3.5 picoliters Variable Droplet Technology can be purchased separately. B Cartridge yields vary considerably based on images printed, print settings, paper type, frequency of prints. Epson does not guarantee longevity of use and temperature. Normal is used Media Handling SP7880 Media input Cut-sheet size SP9880 Media input Cut...
Product Information Guide
Page 6
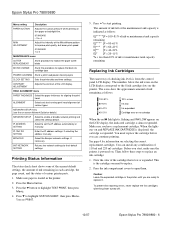
... steps to set the IP address automatically or manually. Press the Menu button. 3. The numbers below . Press the ink compartment covers to highlight TEST PRINT, then press Menu. 4. ALIGNMENT Select and start printing. Make sure paper is expended. Press the d button to open them. When the lights stay on the printer. Before you start, make sure the printer is the cartridge you are ready to replace the black ink cartridge type POWER CLEANING Starts a print head power cleaning cycle CLOCK SETTING Sets the printer date and time settings CONTRAST ADJUSTMENT Adjusts the...
... steps to set the IP address automatically or manually. Press the Menu button. 3. The numbers below . Press the ink compartment covers to highlight TEST PRINT, then press Menu. 4. ALIGNMENT Select and start printing. Make sure paper is expended. Press the d button to open them. When the lights stay on the printer. Before you start, make sure the printer is the cartridge you are ready to replace the black ink cartridge type POWER CLEANING Starts a print head power cleaning cycle CLOCK SETTING Sets the printer date and time settings CONTRAST ADJUSTMENT Adjusts the...
Product Information Guide
Page 8
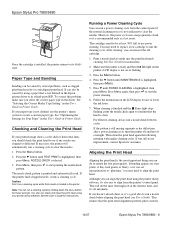
... a color shift or horizontal lines, you may need to create a custom paper type. Paper Type and Banding Banding can reinsert the old cartridge. 1. See "Selecting the Correct Media Type Setting" in the shortest time, and it 's also easy to start printing the nozzle check pattern. See "Optimizing the Settings for instructions. 2. Press the Menu button. 4. Press Menu again, then press to align from the control panel if the normal cleaning process is clean. If you can check and clean the print head using the printer utility software, it 's all automatic. Epson Stylus Pro...
... a color shift or horizontal lines, you may need to create a custom paper type. Paper Type and Banding Banding can reinsert the old cartridge. 1. See "Selecting the Correct Media Type Setting" in the shortest time, and it 's also easy to start printing the nozzle check pattern. See "Optimizing the Settings for instructions. 2. Press the Menu button. 4. Press Menu again, then press to align from the control panel if the normal cleaning process is clean. If you can check and clean the print head using the printer utility software, it 's all automatic. Epson Stylus Pro...
User's Guide
Page 11
... to avoid bodily injury. Attach it working at its best, and provides troubleshooting tips in case you use this manual with a bit less detail. • The on-screen Network Guide on the CD-ROM provides instructions for daily use and printer maintenance-loading paper, replacing ink cartridges and other components, cleaning and aligning the print head, and using the printer's menu system. Notes contain important information about your printer. Warnings, Cautions, Notes, and Tips...
... to avoid bodily injury. Attach it working at its best, and provides troubleshooting tips in case you use this manual with a bit less detail. • The on-screen Network Guide on the CD-ROM provides instructions for daily use and printer maintenance-loading paper, replacing ink cartridges and other components, cleaning and aligning the print head, and using the printer's menu system. Notes contain important information about your printer. Warnings, Cautions, Notes, and Tips...

User's Guide
Page 164
...print head; Head cleaning starts automatically. see page 35. CLEANING ERROR REMOVE THICK PAPER Paper is low, or a problem occurs, a message appears on the LCD display, and the lights on the control panel come on or flash. Message Explanation Response BORDERLESS ERROR LOAD CORRECT SIZE PAPER The borderless setting is selected and paper that doesn't support borderless printing is locked. Release the paper lever to indicate the status of the printer: Paper Ink light light Paper Feed up button Power button and light Enter or cut button Menu or cleaning button Pause or reset...
...print head; Head cleaning starts automatically. see page 35. CLEANING ERROR REMOVE THICK PAPER Paper is low, or a problem occurs, a message appears on the LCD display, and the lights on the control panel come on or flash. Message Explanation Response BORDERLESS ERROR LOAD CORRECT SIZE PAPER The borderless setting is selected and paper that doesn't support borderless printing is locked. Release the paper lever to indicate the status of the printer: Paper Ink light light Paper Feed up button Power button and light Enter or cut button Menu or cleaning button Pause or reset...

User's Guide
Page 165
... be using the wrong printer driver. Replace the conversion cartridge with a genuine Epson ink cartridge; Or, complete the replacement of black ink by pressing the Pause button. CLOSE COVER F/W INSTALL ERROR UPDATE FAILED RESTART THE PRINTER Firmware update failed. see page 141. 165 see page 42 for the ink in the printer. Damaged data was sent to cancel the print job. The driver's ink type configuration is installed. Close the front cover. INK CARTRIDGE An ink lever is raised, but no INSTALL INK CARTRIDGE cartridge is not correct for instructions. INK...
... be using the wrong printer driver. Replace the conversion cartridge with a genuine Epson ink cartridge; Or, complete the replacement of black ink by pressing the Pause button. CLOSE COVER F/W INSTALL ERROR UPDATE FAILED RESTART THE PRINTER Firmware update failed. see page 141. 165 see page 42 for the ink in the printer. Damaged data was sent to cancel the print job. The driver's ink type configuration is installed. Close the front cover. INK CARTRIDGE An ink lever is raised, but no INSTALL INK CARTRIDGE cartridge is not correct for instructions. INK...

User's Guide
Page 166
... change the ink setting; see page 145. Paper is Install the correct black ink cartridge, or press selected (Matte or Photo). Load paper. NO to install the wrong ink cartridge. The wrong black ink cartridge is not loaded. see page 141. maintenance tank. Remove the ink cartridge and reinstall it. You tried to continue using the installed black ink cartridge. The maintenance tank is installed. 166 | Solving Problems Message INK CARTRIDGE DO YOU ACCEPT THIS? INK CARTRIDGE ERROR BK INK CHANGE INK CARTRIDGE ERROR CHECK CARTRIDGE INK CARTRIDGE ERROR...
... change the ink setting; see page 145. Paper is Install the correct black ink cartridge, or press selected (Matte or Photo). Load paper. NO to install the wrong ink cartridge. The wrong black ink cartridge is not loaded. see page 141. maintenance tank. Remove the ink cartridge and reinstall it. You tried to continue using the installed black ink cartridge. The maintenance tank is installed. 166 | Solving Problems Message INK CARTRIDGE DO YOU ACCEPT THIS? INK CARTRIDGE ERROR BK INK CHANGE INK CARTRIDGE ERROR CHECK CARTRIDGE INK CARTRIDGE ERROR...
User's Guide
Page 179
... updated drivers and utilities that may become available. 3. Select your computer. If you want to reinstall your printer software, restart your printer icon and click OK. Windows 1. Follow the on-screen instructions to install the software. 179 Do one of the following Windows Vista: Click > Control Panel > Uninstall a program. Solving Problems | 179 Tip: Check the Epson Pro Imaging website at www.proimaging.epson. Then follow the instructions in the Printer Guide to install the software...
... updated drivers and utilities that may become available. 3. Select your computer. If you want to reinstall your printer software, restart your printer icon and click OK. Windows 1. Follow the on-screen instructions to install the software. 179 Do one of the following Windows Vista: Click > Control Panel > Uninstall a program. Solving Problems | 179 Tip: Check the Epson Pro Imaging website at www.proimaging.epson. Then follow the instructions in the Printer Guide to install the software...
User's Guide
Page 214
... connection, 42 Network Setup menu, 209 to 210 O Optional equipment, 12 to 13, 189 to 200 P Page Line setting control panel, 62 Mac OS X, 90 Windows, 106 Page Rendering Mode setting, 120 Page setup options, Mac OS X, 79 to 81 214 Paper attaching to spindle, 57 configuration settings, 74 to 76, 87 to 88, 112 to 115, 170 custom size, 79 to 81, 96, 104, 107 to 108 cut sheet, see Cut sheet paper cutting manually, 61 to 62 Epson...
... connection, 42 Network Setup menu, 209 to 210 O Optional equipment, 12 to 13, 189 to 200 P Page Line setting control panel, 62 Mac OS X, 90 Windows, 106 Page Rendering Mode setting, 120 Page setup options, Mac OS X, 79 to 81 214 Paper attaching to spindle, 57 configuration settings, 74 to 76, 87 to 88, 112 to 115, 170 custom size, 79 to 81, 96, 104, 107 to 108 cut sheet, see Cut sheet paper cutting manually, 61 to 62 Epson...

