

Epson Scan ICM Updater v1.20 (PSB.2008.07.001)
Page 1
... installation process. Select the Color tab and enable ICM. Page 1 of these color profiles. Description of Change: ICM module updater for Windows XP/XP x64 / Vista (32bit & 64bit) This bulletin was created to select ICM Adobe RGB, Apple RGB or ColorMatch RGB color profiles...08/2008 Originator: RY PSB.2008.07.001 Authorization: TE08-0061 Rev A Total Pages: 1 All Scanners and All-in-One's using Epson Scan Epson Scan ICM updater v.1.20 for Epson Scan-affects all driver versions up to complete the installation. Description of Problem: When Adobe's CMM is installed (available as a...
... installation process. Select the Color tab and enable ICM. Page 1 of these color profiles. Description of Change: ICM module updater for Windows XP/XP x64 / Vista (32bit & 64bit) This bulletin was created to select ICM Adobe RGB, Apple RGB or ColorMatch RGB color profiles...08/2008 Originator: RY PSB.2008.07.001 Authorization: TE08-0061 Rev A Total Pages: 1 All Scanners and All-in-One's using Epson Scan Epson Scan ICM updater v.1.20 for Epson Scan-affects all driver versions up to complete the installation. Description of Problem: When Adobe's CMM is installed (available as a...
User Manual (P.I.M Plug-in)
Page 1
...PRINT Image Matching™ (P.I.M.)-enabled digital cameras embed information in digital photo files to maximize the image quality of the print-including a wider... technology ensures that P.I .M. Image page 5 ■ Printing in Photoshop 7.0, CS, and Photoshop Elements (Windows page 5 ■ Printing in Photoshop 7.0, CS, and Photoshop Elements (Macintosh page 8 ■ Printing ...9632; Importing a P.I.M. Image page 3 ■ Printing a P.I .M.-enabled digital cameras and printers work together perfectly to consistently and easily create the best possible prints. PRINT Image Matching II ...
...PRINT Image Matching™ (P.I.M.)-enabled digital cameras embed information in digital photo files to maximize the image quality of the print-including a wider... technology ensures that P.I .M. Image page 5 ■ Printing in Photoshop 7.0, CS, and Photoshop Elements (Windows page 5 ■ Printing in Photoshop 7.0, CS, and Photoshop Elements (Macintosh page 8 ■ Printing ...9632; Importing a P.I.M. Image page 3 ■ Printing a P.I .M.-enabled digital cameras and printers work together perfectly to consistently and easily create the best possible prints. PRINT Image Matching II ...

User Manual (P.I.M Plug-in)
Page 2
... Epson Stylus® Photo R200 ■ Epson Stylus Photo R300/R300M ■ Epson Stylus Photo R320 ■ Epson Stylus Photo R800 ■ Epson Stylus Photo RX500 ■ Epson Stylus Photo RX600 ■ Epson Stylus Photo 780 ■ Epson Stylus Photo 785EPX ■ Epson Stylus Photo 820 ■ Epson Stylus Photo 825 ■ Epson Stylus Photo 890 ■ Epson Stylus Photo 900 ■ Epson Stylus Photo 925 ■ Epson Stylus Photo 960 ■ Epson Stylus Photo 1280 ■ Epson Stylus Photo 2000P* ■ Epson Stylus Photo 2200 ■ PictureMate™ by Epson * This printer...
... Epson Stylus® Photo R200 ■ Epson Stylus Photo R300/R300M ■ Epson Stylus Photo R320 ■ Epson Stylus Photo R800 ■ Epson Stylus Photo RX500 ■ Epson Stylus Photo RX600 ■ Epson Stylus Photo 780 ■ Epson Stylus Photo 785EPX ■ Epson Stylus Photo 820 ■ Epson Stylus Photo 825 ■ Epson Stylus Photo 890 ■ Epson Stylus Photo 900 ■ Epson Stylus Photo 925 ■ Epson Stylus Photo 960 ■ Epson Stylus Photo 1280 ■ Epson Stylus Photo 2000P* ■ Epson Stylus Photo 2200 ■ PictureMate™ by Epson * This printer...
User Manual (P.I.M Plug-in)
Page 3
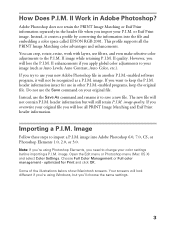
...converting the information into Adobe Photoshop 6.0, 7.0, CS, or Photoshop Elements 1.0, 2.0, or 3.0. image into the file and embedding a color space called EPSON RGB 2001. Your screens will not be recognized as Auto Levels, Auto Contrast, Auto Color, etc.). Instead, it to your original file. ...if you 'll choose the same settings. 3 Instead, use the Save command on your image (such as a P.I .M. Note: If you're using Windows, but will not contain P.I .M. Choose Full Color Management or Full color management - II Work in the header file when you will lose the P.I .M....
...converting the information into Adobe Photoshop 6.0, 7.0, CS, or Photoshop Elements 1.0, 2.0, or 3.0. image into the file and embedding a color space called EPSON RGB 2001. Your screens will not be recognized as Auto Levels, Auto Contrast, Auto Color, etc.). Instead, it to your original file. ...if you 'll choose the same settings. 3 Instead, use the Save command on your image (such as a P.I .M. Note: If you're using Windows, but will not contain P.I .M. Choose Full Color Management or Full color management - II Work in the header file when you will lose the P.I .M....
User Manual (P.I.M Plug-in)
Page 4
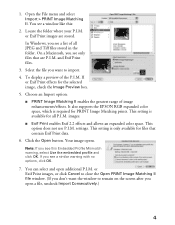
... : 2. You see only files that contain Exif Print data. 6. Note: If you don't want to remain on the screen after you see a window like this Embedded Profile Mismatch warning, select Use the embedded profile and click OK. On a Macintosh, you open additional P.I .M. This setting is available... for files that are stored. It also supports the EPSON RGB expanded color space, which is only available for all JPEG and Tiff files stored in the folder. Choose an Import option: ■ ...
... : 2. You see only files that contain Exif Print data. 6. Note: If you don't want to remain on the screen after you see a window like this Embedded Profile Mismatch warning, select Use the embedded profile and click OK. On a Macintosh, you open additional P.I .M. This setting is available... for files that are stored. It also supports the EPSON RGB expanded color space, which is only available for all JPEG and Tiff files stored in the folder. Choose an Import option: ■ ...
User Manual (P.I.M Plug-in)
Page 5
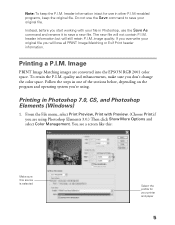
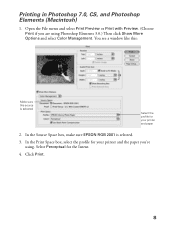
... menu, select Print Preview, Print with Preview. (Choose Print if you start working with your printer and paper 5 header information intact for your file in other P.I .M. Note: To keep the original file.... Instead, before you are converted into the EPSON RGB 2001 color space. You see a screen like this: Make sure this source... overwrite your original file. Follow the steps in Photoshop 7.0, CS, and Photoshop Elements (Windows) 1. Printing in one of the sections below, depending on the program and operating system you're using Photoshop ...
... menu, select Print Preview, Print with Preview. (Choose Print if you start working with your printer and paper 5 header information intact for your file in other P.I .M. Note: To keep the original file.... Instead, before you are converted into the EPSON RGB 2001 color space. You see a screen like this: Make sure this source... overwrite your original file. Follow the steps in Photoshop 7.0, CS, and Photoshop Elements (Windows) 1. Printing in one of the sections below, depending on the program and operating system you're using Photoshop ...

User Manual (P.I.M Plug-in)
Page 6
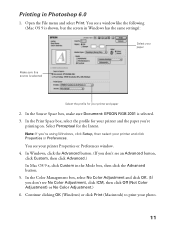
... paper Click Advanced Click Custom, then Advanced 6. Click the Advanced button. (If you 're using. Click Setup, then select your printer Properties or Preferences window: . In the Source Space box, make sure EPSON RGB 2001 is selected. 3. You see an Advanced button, click Custom, then click Advanced.) 6 Under Media Type (or Type), select...
... paper Click Advanced Click Custom, then Advanced 6. Click the Advanced button. (If you 're using. Click Setup, then select your printer Properties or Preferences window: . In the Source Space box, make sure EPSON RGB 2001 is selected. 3. You see an Advanced button, click Custom, then click Advanced.) 6 Under Media Type (or Type), select...
User Manual (P.I.M Plug-in)
Page 8
Click Print. 8 You see a window like this: Make sure this source is selected. 3. In the Source Space box, make sure EPSON RGB 2001 is selected Select the profile for your printer and paper 2. In the Print Space box, select the profile for your printer and the paper you are using . Printing in Photoshop 7.0, CS, and Photoshop Elements (Macintosh) 1. Select Perceptual for the Intent. 4. Open the File menu and select Print Preview or Print with Preview. (Choose Print if you 're using Photoshop Elements 3.0.) Then click Show More Options and select Color Management.
Click Print. 8 You see a window like this: Make sure this source is selected. 3. In the Source Space box, make sure EPSON RGB 2001 is selected Select the profile for your printer and paper 2. In the Print Space box, select the profile for your printer and the paper you are using . Printing in Photoshop 7.0, CS, and Photoshop Elements (Macintosh) 1. Select Perceptual for the Intent. 4. Open the File menu and select Print Preview or Print with Preview. (Choose Print if you 're using Photoshop Elements 3.0.) Then click Show More Options and select Color Management.
User Manual (P.I.M Plug-in)
Page 9
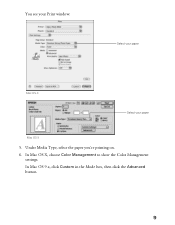
Under Media Type, select the paper you're printing on. 6. You see your paper Mac OS 9 5. In Mac OS X, choose Color Management to show the Color Management settings. In Mac OS 9.x, click Custom in the Mode box, then click the Advanced button. 9 Select your paper Mac OS X Select your Print window: .
Under Media Type, select the paper you're printing on. 6. You see your paper Mac OS 9 5. In Mac OS X, choose Color Management to show the Color Management settings. In Mac OS 9.x, click Custom in the Mode box, then click the Advanced button. 9 Select your paper Mac OS X Select your Print window: .
User Manual (P.I.M Plug-in)
Page 11
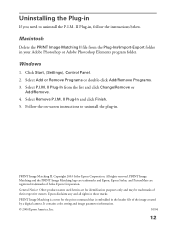
...photo. 11 Note: If you don't see No Color Adjustment, click ICM, then click Off (Not Color Adjustment) or No Color Adjustment.) 6. Continue clicking OK (Windows) or click Print (Macintosh) to print your printer Properties or Preferences window. 4. In the Source Space box, make sure Document: EPSON... RGB 2001 is selected Select the profile for your printer and paper 2. In the Color Management box,...
...photo. 11 Note: If you don't see No Color Adjustment, click ICM, then click Off (Not Color Adjustment) or No Color Adjustment.) 6. Continue clicking OK (Windows) or click Print (Macintosh) to print your printer Properties or Preferences window. 4. In the Source Space box, make sure Document: EPSON... RGB 2001 is selected Select the profile for your printer and paper 2. In the Color Management box,...
User Manual (P.I.M Plug-in)
Page 12
...Image Matching and the PRINT Image Matching logo are trademarks and Epson, Epson Stylus, and PictureMate are for the print command that is embedded in . It contains color setting and image parameter information. © 2004 Epson America, Inc. 10/04 12 Click Start, (Settings), ...for identification purposes only and may be trademarks of their respective owners. Select Remove P.I .M. PRINT Image Matching II. All rights reserved. Windows 1. General Notice: Other product names used herein are registered trademarks of the image created by a digital camera. Select P.I .M. II Plug...
...Image Matching and the PRINT Image Matching logo are trademarks and Epson, Epson Stylus, and PictureMate are for the print command that is embedded in . It contains color setting and image parameter information. © 2004 Epson America, Inc. 10/04 12 Click Start, (Settings), ...for identification purposes only and may be trademarks of their respective owners. Select Remove P.I .M. PRINT Image Matching II. All rights reserved. Windows 1. General Notice: Other product names used herein are registered trademarks of the image created by a digital camera. Select P.I .M. II Plug...
Product Brochure - Bluetooth Photo Print Adapter
Page 1
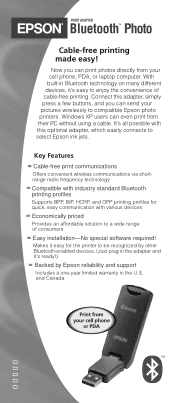
Windows XP users can even print from your cell phone, PDA, or laptop computer. and ...Connect this optional adapter, which easily connects to select Epson ink jets. With built-in Bluetooth technology on many different devices, it's easy to be recognized by Epson reliability and support Includes a one-year limited warranty in the adapter and it easy for... in the U.S. It's all possible with various devices Economically priced Provides an affordable solution to compatible Epson photo printers. PRINT ADAPTER Bluetooth™ Photo Cable-free printing made easy! Now you can print...
Windows XP users can even print from your cell phone, PDA, or laptop computer. and ...Connect this optional adapter, which easily connects to select Epson ink jets. With built-in Bluetooth technology on many different devices, it's easy to be recognized by Epson reliability and support Includes a one-year limited warranty in the adapter and it easy for... in the U.S. It's all possible with various devices Economically priced Provides an affordable solution to compatible Epson photo printers. PRINT ADAPTER Bluetooth™ Photo Cable-free printing made easy! Now you can print...
Product Information Guide
Page 3
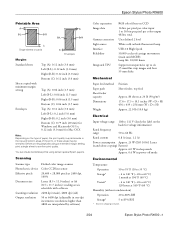
... (1.5 mm) Top (A): 0.12 inch (3.0 mm) Left (B-L): 0.2 inch (5.0 mm) Right (B-R): 0.2 inch (5.0 mm) Bottom (C): 0.79 inch (20 mm) for Windows and Macintosh OS 9.x; 0.12 inch (3.0 mm) for voltage information) Rated frequency range 50 to 60 Hz Rated current 0.8 A (max. 1.2 A) Power consumption Approx. 23... A4 (8.5 × 11.7 inches); Epson Stylus Photo RX600 Printable Area A B-L B-R C Single sheets or cards Envelopes Margins Standard sheets Sheets copied with software 2400 dpi (main), 4800 dpi (sub) 50 to 6400 dpi (adjustable in one-dpi increments; You can create borderless prints...
... (1.5 mm) Top (A): 0.12 inch (3.0 mm) Left (B-L): 0.2 inch (5.0 mm) Right (B-R): 0.2 inch (5.0 mm) Bottom (C): 0.79 inch (20 mm) for Windows and Macintosh OS 9.x; 0.12 inch (3.0 mm) for voltage information) Rated frequency range 50 to 60 Hz Rated current 0.8 A (max. 1.2 A) Power consumption Approx. 23... A4 (8.5 × 11.7 inches); Epson Stylus Photo RX600 Printable Area A B-L B-R C Single sheets or cards Envelopes Margins Standard sheets Sheets copied with software 2400 dpi (main), 4800 dpi (sub) 50 to 6400 dpi (adjustable in one-dpi increments; You can create borderless prints...

Product Information Guide
Page 5
... the Size (Windows) or Paper Size (Macintosh) setting ❏ Landscape as shown on the left Note: Do not place the envelopes in front of the sheet feeder, behind the tab. 5. For best results, press each envelope flat before loading, or load one envelope at a...output tray and flip the feeder guard forward (as the Orientation setting 2/04 Epson Stylus Photo RX600 - 5 Avoid envelopes that came with the printable side up , against the right edge of the feeder guard. Epson Stylus Photo RX600 4. Flip the feeder guard back over the paper. Insert your paper against the...
... the Size (Windows) or Paper Size (Macintosh) setting ❏ Landscape as shown on the left Note: Do not place the envelopes in front of the sheet feeder, behind the tab. 5. For best results, press each envelope flat before loading, or load one envelope at a...output tray and flip the feeder guard forward (as the Orientation setting 2/04 Epson Stylus Photo RX600 - 5 Avoid envelopes that came with the printable side up , against the right edge of the feeder guard. Epson Stylus Photo RX600 4. Flip the feeder guard back over the paper. Insert your paper against the...
Product Information Guide
Page 6
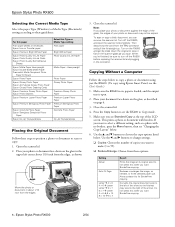
... document with no borders, press the Menu button, then see "Changing the Copy Layout" below. 6. Epson Stylus Photo RX600 Selecting the Correct Media Type Select the paper Type (Windows) or Media Type (Macintosh) setting according to these steps to position a photo or document to scan or copy: 1. Open the scanner lid. 2. Note: If you place your...
... document with no borders, press the Menu button, then see "Changing the Copy Layout" below. 6. Epson Stylus Photo RX600 Selecting the Correct Media Type Select the paper Type (Windows) or Media Type (Macintosh) setting according to these steps to position a photo or document to scan or copy: 1. Open the scanner lid. 2. Note: If you place your...
Product Information Guide
Page 11
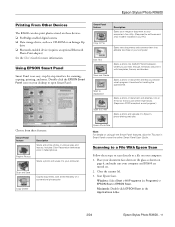
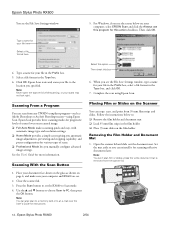
...Choose from these features: Smart Panel feature Reprint Photos Description Scans and prints photos in the Applications folder. 2/04 Epson Stylus Photo RX600 - 11 Scans a photo and saves it to an e-mail so that you can also print photos stored on these steps to scan directly to .... Copy Center Epson Photo Site Note: For details on your computer. Start Epson Scan. View and Create Scans a photo or document and lets you choose which program it to Epson's photo-sharing web site. Windows: Select Start > All Programs (or Programs) > EPSON Scan > EPSON Scan. Scan ...
...Choose from these features: Smart Panel feature Reprint Photos Description Scans and prints photos in the Applications folder. 2/04 Epson Stylus Photo RX600 - 11 Scans a photo and saves it to an e-mail so that you can also print photos stored on these steps to scan directly to .... Copy Center Epson Photo Site Note: For details on your computer. Start Epson Scan. View and Create Scans a photo or document and lets you choose which program it to Epson's photo-sharing web site. Windows: Select Start > All Programs (or Programs) > EPSON Scan > EPSON Scan. Scan ...
Product Information Guide
Page 12
... lid while scanning, or your document face-down on the glass as Adobe Photoshop or ArcSoft PhotoImpression-using Epson Scan. Note: You can copy, scan, and print from 35 mm film strips and slides. Epson Stylus Photo RX600 You see the User's Guide for this box 6. Type a name for more information. Scanning From a Program You... lid. 3. Use the u and d buttons to choose Scan to Scan mode. 4. Note: You can scan from the scanner lid. 12 - see the File Save Settings window: 5. Select this option Then check this action checkbox. Epson Stylus Photo RX600 2/04
... lid while scanning, or your document face-down on the glass as Adobe Photoshop or ArcSoft PhotoImpression-using Epson Scan. Note: You can copy, scan, and print from 35 mm film strips and slides. Epson Stylus Photo RX600 You see the User's Guide for this box 6. Type a name for more information. Scanning From a Program You... lid. 3. Use the u and d buttons to choose Scan to Scan mode. 4. Note: You can scan from the scanner lid. 12 - see the File Save Settings window: 5. Select this option Then check this action checkbox. Epson Stylus Photo RX600 2/04

Product Information Guide
Page 14
...the u and d buttons to start cleaning the print head. See the User's Guide for instructions. ❏ If your printer settings window for more than 5 minutes. 5. Epson Stylus Photo RX600 2/04 Print head cleaning uses ink, so clean it in portrait orientation (longer than it is finished, you return to clean... sure letter-size paper is turned on your preview will be solid, with portrait orientation face the front of the scanner glass. Epson Stylus Photo RX600 Placing 35 mm Slides on the LCD screen. or Help button on running the print head cleaning utility. 1. error light is in...
...the u and d buttons to start cleaning the print head. See the User's Guide for instructions. ❏ If your printer settings window for more than 5 minutes. 5. Epson Stylus Photo RX600 2/04 Print head cleaning uses ink, so clean it in portrait orientation (longer than it is finished, you return to clean... sure letter-size paper is turned on your preview will be solid, with portrait orientation face the front of the scanner glass. Epson Stylus Photo RX600 Placing 35 mm Slides on the LCD screen. or Help button on running the print head cleaning utility. 1. error light is in...
Product Support Bulletin
Page 1
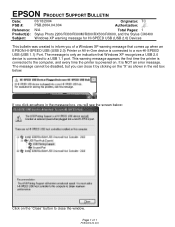
..., but you will see the screen below . EPSON PRODUCT SUPPORT BULLETIN Date: PSB #: Reference: Product(s): Subject: 03/18/2004 PSB.2004.04.004 Originator: TC Authorization: N/A Total Pages: 1 Stylus Photo 2200/R300/R300M/R800/RX500/RX600, and the Stylus CX6400 Windows XP warning message for HI-SPEED USB (USB ...004 Page 1 of a Windows XP warning message that Windows XP recognizes a USB 2.0 device is powered on the "X" as shown in -One device is NOT an error message. The message is only an indication that comes up when an EPSON HI-SPEED USB (USB 2.0) Printer or All-in the red...
..., but you will see the screen below . EPSON PRODUCT SUPPORT BULLETIN Date: PSB #: Reference: Product(s): Subject: 03/18/2004 PSB.2004.04.004 Originator: TC Authorization: N/A Total Pages: 1 Stylus Photo 2200/R300/R300M/R800/RX500/RX600, and the Stylus CX6400 Windows XP warning message for HI-SPEED USB (USB ...004 Page 1 of a Windows XP warning message that Windows XP recognizes a USB 2.0 device is powered on the "X" as shown in -One device is NOT an error message. The message is only an indication that comes up when an EPSON HI-SPEED USB (USB 2.0) Printer or All-in the red...
Start Here Card
Page 6
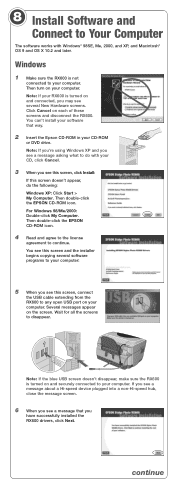
... your CD, click Cancel. 3 When you have successfully installed the RX600 drivers, click Next. continue Note: If your RX600 is not connected to your computer. Then double-click the EPSON CD-ROM icon. Note: If you're using Windows XP and you see this screen, click Install: If this screen,... connect the USB cable extending from the RX600 to your computer. Wait for all...
... your CD, click Cancel. 3 When you have successfully installed the RX600 drivers, click Next. continue Note: If your RX600 is not connected to your computer. Then double-click the EPSON CD-ROM icon. Note: If you're using Windows XP and you see this screen, click Install: If this screen,... connect the USB cable extending from the RX600 to your computer. Wait for all...

