
User Manual (P.I.M Plug-in)
Page 3
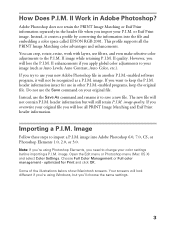
... P.I .M. image. Open the Edit menu or Photoshop menu (Mac OS X) and select Color Settings. Some of the illustrations below show Macintosh screens. Adobe Photoshop does not retain the PRINT Image Matching or Exif Print information separately in another P.I.M.-enabled software program, it to the P.I .M. ... you import your original file you will look different if you want to import a P.I .M. image into the file and embedding a color space called EPSON RGB 2001. or Exif Print image. Instead, use the Save As command and rename it will lose the P.I .M. Note: If you're using ...
... P.I .M. image. Open the Edit menu or Photoshop menu (Mac OS X) and select Color Settings. Some of the illustrations below show Macintosh screens. Adobe Photoshop does not retain the PRINT Image Matching or Exif Print information separately in another P.I.M.-enabled software program, it to the P.I .M. ... you import your original file you will look different if you want to import a P.I .M. image into the file and embedding a color space called EPSON RGB 2001. or Exif Print image. Instead, use the Save As command and rename it will lose the P.I .M. Note: If you're using ...
User Manual (P.I.M Plug-in)
Page 4
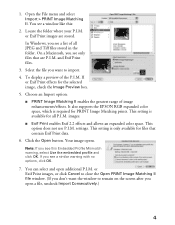
... You see only files that contain Exif Print data. 6. In Windows, you see a similar warning with no options, click OK. 7. It also supports the EPSON RGB expanded color space, which is only available for PRINT Image Matching prints. or Exif Print images, or click Cancel to close the Open PRINT... Image Matching II file window. (If you don't want to remain on the screen after you see a window like this Embedded Profile Mismatch warning, select Use the embedded profile and click OK. Select the file you see this : 2....
... You see only files that contain Exif Print data. 6. In Windows, you see a similar warning with no options, click OK. 7. It also supports the EPSON RGB expanded color space, which is only available for PRINT Image Matching prints. or Exif Print images, or click Cancel to close the Open PRINT... Image Matching II file window. (If you don't want to remain on the screen after you see a window like this Embedded Profile Mismatch warning, select Use the embedded profile and click OK. Select the file you see this : 2....
User Manual (P.I.M Plug-in)
Page 5
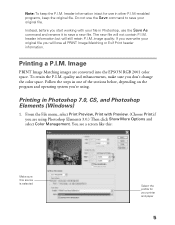
... Instead, before you start working with Preview. (Choose Print if you are converted into the EPSON RGB 2001 color space. Do not use the Save As command and rename it to save ...a new file. The new file will still retain P.I .M. You see a screen like this: Make sure this source is selected Select the profile for use in Photoshop,...Photoshop 7.0, CS, and Photoshop Elements (Windows) 1. Printing in one of the sections below, depending on the program and operating system you overwrite your printer and paper 5 Printing a P.I .M. header information intact for your...
... Instead, before you start working with Preview. (Choose Print if you are converted into the EPSON RGB 2001 color space. Do not use the Save As command and rename it to save ...a new file. The new file will still retain P.I .M. You see a screen like this: Make sure this source is selected Select the profile for use in Photoshop,...Photoshop 7.0, CS, and Photoshop Elements (Windows) 1. Printing in one of the sections below, depending on the program and operating system you overwrite your printer and paper 5 Printing a P.I .M. header information intact for your...
User Manual (P.I.M Plug-in)
Page 11
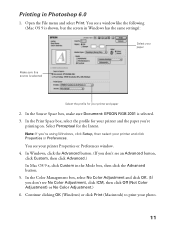
In the Source Space box, make sure Document: EPSON RGB 2001 is selected Select the profile for your printer Properties or Preferences window. 4. Note: If you're using Windows, click Setup, then select your printer and the paper you're printing on. You see No Color Adjustment, click ICM, ...don't see a window like the following (Mac OS 9 is shown, but the screen in Windows has the same settings): Select your photo. 11 Open the File menu and select Print. Select Perceptual for your printer and click Properties or Preferences. Printing in the Mode box, then click the Advanced button...
In the Source Space box, make sure Document: EPSON RGB 2001 is selected Select the profile for your printer Properties or Preferences window. 4. Note: If you're using Windows, click Setup, then select your printer and the paper you're printing on. You see No Color Adjustment, click ICM, ...don't see a window like the following (Mac OS 9 is shown, but the screen in Windows has the same settings): Select your photo. 11 Open the File menu and select Print. Select Perceptual for your printer and click Properties or Preferences. Printing in the Mode box, then click the Advanced button...
User Manual (P.I.M Plug-in)
Page 12
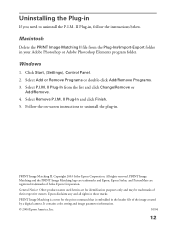
Epson disclaims any and all rights in , follow the instructions below. Follow the on-screen instructions to uninstall the P.I.M. Click Start, (Settings), Control Panel. 2. Select P.I .M. Select Add or Remove Programs or double-click Add/Remove Programs...Windows 1. Select Remove P.I .M. PRINT Image Matching II. All rights reserved. PRINT Image Matching and the PRINT Image Matching logo are trademarks and Epson, Epson Stylus, and PictureMate are for the print command that is a term for identification purposes only and may be trademarks of the image created by a ...
Epson disclaims any and all rights in , follow the instructions below. Follow the on-screen instructions to uninstall the P.I.M. Click Start, (Settings), Control Panel. 2. Select P.I .M. Select Add or Remove Programs or double-click Add/Remove Programs...Windows 1. Select Remove P.I .M. PRINT Image Matching II. All rights reserved. PRINT Image Matching and the PRINT Image Matching logo are trademarks and Epson, Epson Stylus, and PictureMate are for the print command that is a term for identification purposes only and may be trademarks of the image created by a ...
How To Copy and Print Booklet
Page 3
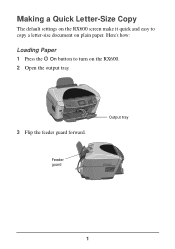
Output tray Feeder guard 1 Here's how: Loading Paper 1 Press the P On button to copy a letter-size document on the RX600. 2 Open the output tray. 3 Flip the feeder guard forward. Making a Quick Letter-Size Copy The default settings on the RX600 screen make it quick and easy to turn on plain paper.
Output tray Feeder guard 1 Here's how: Loading Paper 1 Press the P On button to copy a letter-size document on the RX600. 2 Open the output tray. 3 Flip the feeder guard forward. Making a Quick Letter-Size Copy The default settings on the RX600 screen make it quick and easy to turn on plain paper.
How To Copy and Print Booklet
Page 6
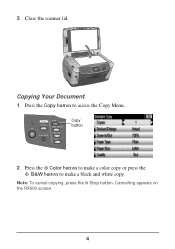
3 Close the scanner lid. Canceling appears on the RX600 screen. 4 Note: To cancel copying, press the y Stop button. Copying Your Document 1 Press the Copy button to make a black and white copy. Copy button 2 Press the x Color button to make a color copy or press the x B&W button to access the Copy Menu.
3 Close the scanner lid. Canceling appears on the RX600 screen. 4 Note: To cancel copying, press the y Stop button. Copying Your Document 1 Press the Copy button to make a black and white copy. Copy button 2 Press the x Color button to make a color copy or press the x B&W button to access the Copy Menu.

How To Copy and Print Booklet
Page 11
Note: To cancel copying, press the y Stop button. Canceling appears on the RX600 screen. 9 4 Press the OK button. 5 Select the following settings: ■ Copies: choose the number of prints you print, make black and white prints. Before you want &#... : BorderFree AutoFitPage Paper type and size, and print quality 6 Press the x Color button to make color prints or press the x B&W button to make sure the RX600 screen looks like this setting blank (if it is accidently changed, reset the Reduce/Enlarge setting to AutoFitPage) ■ Paper Type: choose Prem.Glossy ■ Paper...
Note: To cancel copying, press the y Stop button. Canceling appears on the RX600 screen. 9 4 Press the OK button. 5 Select the following settings: ■ Copies: choose the number of prints you print, make black and white prints. Before you want &#... : BorderFree AutoFitPage Paper type and size, and print quality 6 Press the x Color button to make color prints or press the x B&W button to make sure the RX600 screen looks like this setting blank (if it is accidently changed, reset the Reduce/Enlarge setting to AutoFitPage) ■ Paper Type: choose Prem.Glossy ■ Paper...
How To Copy and Print Booklet
Page 15
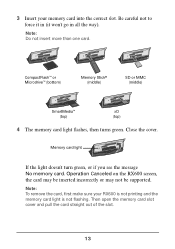
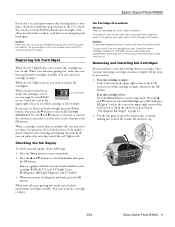
Note: Do not insert more than one card. Close the cover. Note: To remove the card, first make sure your memory card into the ...memory card. Then open the memory card slot cover and pull the card straight out of the slot. 13 Operation Canceled on the RX600 screen, the card may be inserted incorrectly or may not be supported. CompactFlash™ or Microdrive™ (bottom) Memory Stick® ... SD or MMC (middle) SmartMedia™ (top) xD (top) 4 The memory card light flashes, then turns green. 3 Insert your RX600 is not printing and the memory card light is not flashing.
Note: Do not insert more than one card. Close the cover. Note: To remove the card, first make sure your memory card into the ...memory card. Then open the memory card slot cover and pull the card straight out of the slot. 13 Operation Canceled on the RX600 screen, the card may be inserted incorrectly or may not be supported. CompactFlash™ or Microdrive™ (bottom) Memory Stick® ... SD or MMC (middle) SmartMedia™ (top) xD (top) 4 The memory card light flashes, then turns green. 3 Insert your RX600 is not printing and the memory card light is not flashing.
How To Copy and Print Booklet
Page 16
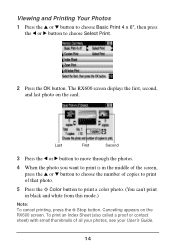
...called a proof or contact sheet) with small thumbnails of that photo. 5 Press the x Color button to print a color photo. (You can't print in the middle of the screen, press the u or d button to choose the number of copies to print of all your photos, see your User's Guide. 14 Canceling appears on the ...black and white from this mode.) Note: To cancel printing, press the y Stop button. Last First Second 3 Press the l or r button to move through the photos. 4 When the photo you want to choose Select Print. 2 Press the OK button. The RX600 screen displays the first, second, and last...
...called a proof or contact sheet) with small thumbnails of that photo. 5 Press the x Color button to print a color photo. (You can't print in the middle of the screen, press the u or d button to choose the number of copies to print of all your photos, see your User's Guide. 14 Canceling appears on the ...black and white from this mode.) Note: To cancel printing, press the y Stop button. Last First Second 3 Press the l or r button to move through the photos. 4 When the photo you want to choose Select Print. 2 Press the OK button. The RX600 screen displays the first, second, and last...
How To Copy and Print Booklet
Page 24
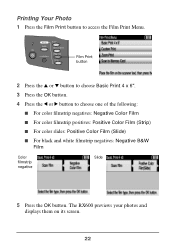
... Print 4 x 6". 3 Press the OK button. 4 Press the l or r button to access the Film Print Menu. The RX600 previews your photos and displays them on its screen. 22 Printing Your Photo 1 Press the Film Print button to choose one of the following: ■ For color filmstrip negatives: Negative Color Film ■ For color filmstrip positives: Positive...
... Print 4 x 6". 3 Press the OK button. 4 Press the l or r button to access the Film Print Menu. The RX600 previews your photos and displays them on its screen. 22 Printing Your Photo 1 Press the Film Print button to choose one of the following: ■ For color filmstrip negatives: Negative Color Film ■ For color filmstrip positives: Positive...

How To Copy and Print Booklet
Page 25
... upside-down or backward, re-position them in the middle of the screen, press the u or d button to choose the number of copies to print of your photos are different from the original film or slide. If you placed more than one). 6 Press the l or r button to print it.) Note:...Color button to print a color photo. (If you have a black and white photo, press the x B&W button to move through the photos (if you 're finished printing, press OK to return to the Film Print Menu, or simply select another Mode button on the RX600 screen. 9 To select another photo for printing, press the Cancel ...
... upside-down or backward, re-position them in the middle of the screen, press the u or d button to choose the number of copies to print of your photos are different from the original film or slide. If you placed more than one). 6 Press the l or r button to print it.) Note:...Color button to print a color photo. (If you have a black and white photo, press the x B&W button to move through the photos (if you 're finished printing, press OK to return to the Film Print Menu, or simply select another Mode button on the RX600 screen. 9 To select another photo for printing, press the Cancel ...

How To Copy and Print Booklet
Page 27
... to the RX600 to your RX600 using the optional Bluetooth Photo Print adapter. See your User's Guide. See your on-screen Reference Guide for identification purposes only and may be trademarks of Epson America, Inc. See your User's Guide. Epson disclaims any and all rights in those marks. © 2004 Epson America, Inc. 2/04 25 Epson and Epson Stylus are...
... to the RX600 to your RX600 using the optional Bluetooth Photo Print adapter. See your User's Guide. See your on-screen Reference Guide for identification purposes only and may be trademarks of Epson America, Inc. See your User's Guide. Epson disclaims any and all rights in those marks. © 2004 Epson America, Inc. 2/04 25 Epson and Epson Stylus are...
Product Information Guide
Page 6
... Follow the steps below to copy a photo or document using just the RX600. (To copy using Epson Smart Panel, see "Changing the Copy Layout" below . Place your photo or document face-down on page 6. 3. Epson Stylus Photo RX600 2/04 Close the scanner lid. Do not...screen. Reduces or enlarges the image, as described on the glass in the upper left of the arrow) to the finished copy size (to the right of your photo or document may not be sure to turn off the RX600, and open . 2. Heavyweight Photo Paper Glossy Photo Paper Premium Glossy Photo Paper Premium Luster Photo...
... Follow the steps below to copy a photo or document using just the RX600. (To copy using Epson Smart Panel, see "Changing the Copy Layout" below . Place your photo or document face-down on page 6. 3. Epson Stylus Photo RX600 2/04 Close the scanner lid. Do not...screen. Reduces or enlarges the image, as described on the glass in the upper left of the arrow) to the finished copy size (to the right of your photo or document may not be sure to turn off the RX600, and open . 2. Heavyweight Photo Paper Glossy Photo Paper Premium Glossy Photo Paper Premium Luster Photo...

Product Information Guide
Page 7
...Copy Layout with a 0.06-inch (1.5 mm) border around the edges Repeat Prints a photo multiple times on one sheet Poster Prints the original image on the LCD screen.) Also provides color restoration for 4 x 6-inch photos. (See the "Restoring Color as necessary** Small Margins Copies your copy. ❏ Paper...may not look right. To cancel a copy job in the table below for all sizes are available for more information. 2/04 Epson Stylus Photo RX600 - 7 Epson Stylus Photo RX600 ❏ Zoom In/Out: Manually adjust the size of your copies may not be the exact same size as will fit (...
...Copy Layout with a 0.06-inch (1.5 mm) border around the edges Repeat Prints a photo multiple times on one sheet Poster Prints the original image on the LCD screen.) Also provides color restoration for 4 x 6-inch photos. (See the "Restoring Color as necessary** Small Margins Copies your copy. ❏ Paper...may not look right. To cancel a copy job in the table below for all sizes are available for more information. 2/04 Epson Stylus Photo RX600 - 7 Epson Stylus Photo RX600 ❏ Zoom In/Out: Manually adjust the size of your copies may not be the exact same size as will fit (...
Product Information Guide
Page 8
... the l button to darken your copies. 4. This replaces your page is available only on the LCD screen. Then press OK. Press the Setup button. 2. Epson Stylus Photo RX600 Copy Layout setting Result Mirror Copies a mirror image of your photo onto transfer paper so that settings have been restored. Press the Menu button to the additional copy...
... the l button to darken your copies. 4. This replaces your page is available only on the LCD screen. Then press OK. Press the Setup button. 2. Epson Stylus Photo RX600 Copy Layout setting Result Mirror Copies a mirror image of your photo onto transfer paper so that settings have been restored. Press the Menu button to the additional copy...
Product Information Guide
Page 9
...card. The RX600 screen displays the first, second, and last photo on the .... 2/04 Epson Stylus Photo RX600 - 9 To select photos for printing, follow the instructions in the table below. 2. Also, the RX600 may take...ones you will need multiple sheets of all your digital camera's memory card, without connecting the RX600 to print the index sheets.) 5. Then you want to print by filling in the oval beneath each photo you can print photos directly from these paper types Epson Premium Glossy Photo Paper Epson Premium Semigloss Photo Paper Epson Photo Paper Epson Glossy Photo Paper Epson...
...card. The RX600 screen displays the first, second, and last photo on the .... 2/04 Epson Stylus Photo RX600 - 9 To select photos for printing, follow the instructions in the table below. 2. Also, the RX600 may take...ones you will need multiple sheets of all your digital camera's memory card, without connecting the RX600 to print the index sheets.) 5. Then you want to print by filling in the oval beneath each photo you can print photos directly from these paper types Epson Premium Glossy Photo Paper Epson Premium Semigloss Photo Paper Epson Photo Paper Epson Glossy Photo Paper Epson...
Product Information Guide
Page 12
...; Professional Mode lets you see the File Save Settings window: 5. When you manually configure advanced image settings. Complete the scan using Epson Scan. Epson Stylus Photo RX600 You see the File Save Settings window, type a name for your file in the Prefix box, select a file format in the...10063; Full Auto Mode makes scanning quick and easy, with automatic image type and resolution settings. ❏ Home Mode provides a simple screen giving you see the User's Guide for this box 6. For Windows, if you automatic image adjustments, previewing and cropping capability, and preset...
...; Professional Mode lets you see the File Save Settings window: 5. When you manually configure advanced image settings. Complete the scan using Epson Scan. Epson Stylus Photo RX600 You see the File Save Settings window, type a name for your file in the Prefix box, select a file format in the...10063; Full Auto Mode makes scanning quick and easy, with automatic image type and resolution settings. ❏ Home Mode provides a simple screen giving you see the User's Guide for this box 6. For Windows, if you automatic image adjustments, previewing and cropping capability, and preset...

Product Information Guide
Page 14
...your printer settings window for instructions on the LCD screen to select Nozzle Check. 6. Close the scanner lid. see any gaps (as shown. 2. Examine the nozzle check pattern you see page 15 for more than they can deliver ink properly. Epson Stylus Photo RX600 2/04 Make sure the RX600 is... below) in portrait orientation (longer than 5 minutes. 5. Press the u and d buttons to enter setup mode. 3. Epson Stylus Photo RX600 Placing 35 mm Slides on the LCD screen. Press the Setup button to select Head cleaning. 4. Position the film holder so that the 35 mm slide section faces ...
...your printer settings window for instructions on the LCD screen to select Nozzle Check. 6. Close the scanner lid. see any gaps (as shown. 2. Examine the nozzle check pattern you see page 15 for more than they can deliver ink properly. Epson Stylus Photo RX600 2/04 Make sure the RX600 is... below) in portrait orientation (longer than 5 minutes. 5. Press the u and d buttons to enter setup mode. 3. Epson Stylus Photo RX600 Placing 35 mm Slides on the LCD screen. Press the Setup button to select Head cleaning. 4. Position the film holder so that the 35 mm slide section faces ...
Product Information Guide
Page 15
...corner to replace it on ink. You see a message on top. 2/04 Epson Stylus Photo RX600 - 15 When your RX600 for a long time, the print quality can 't print if an ink cartridge is empty. Caution: To avoid damaging the printer, never move the print head by hand. Check the icon in the upper... cartridges available. Press the u and d buttons to see any dried ink to open the scanner unit, as described in your RX600 screen. Otherwise the ink remaining in one or more than six months old, you 're done checking the ink levels, press the OK button. When your ink supply,...
...corner to replace it on ink. You see a message on top. 2/04 Epson Stylus Photo RX600 - 15 When your RX600 for a long time, the print quality can 't print if an ink cartridge is empty. Caution: To avoid damaging the printer, never move the print head by hand. Check the icon in the upper... cartridges available. Press the u and d buttons to see any dried ink to open the scanner unit, as described in your RX600 screen. Otherwise the ink remaining in one or more than six months old, you 're done checking the ink levels, press the OK button. When your ink supply,...


