
Product Information Guide
Page 6
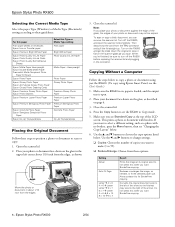
...; Letter 4 × 6 Æ 8 × 10 8 × 10 Æ 5 × 7 Result Prints the image at the top of your photo or document against the edge of the glass, the edges of the LCD screen. Epson Stylus Photo RX600 2/04 Epson Stylus Photo RX600 Selecting the Correct Media Type Select the paper Type (Windows) or Media Type (Macintosh) setting according to these guidelines...
...; Letter 4 × 6 Æ 8 × 10 8 × 10 Æ 5 × 7 Result Prints the image at the top of your photo or document against the edge of the glass, the edges of the LCD screen. Epson Stylus Photo RX600 2/04 Epson Stylus Photo RX600 Selecting the Correct Media Type Select the paper Type (Windows) or Media Type (Macintosh) setting according to these guidelines...

Product Information Guide
Page 7
... with a 0.06-inch (1.5 mm) border around the edges Repeat Prints a photo multiple times on one of the options in the sheet feeder from 25% to reduce or enlarge your original. select 4, 9, or 16 photos per sheet, or Auto to display the Copy Menu. 2. Epson Stylus Photo RX600 ❏ Zoom In/Out: Manually adjust the size of your...
... with a 0.06-inch (1.5 mm) border around the edges Repeat Prints a photo multiple times on one of the options in the sheet feeder from 25% to reduce or enlarge your original. select 4, 9, or 16 photos per sheet, or Auto to display the Copy Menu. 2. Epson Stylus Photo RX600 ❏ Zoom In/Out: Manually adjust the size of your...
Product Information Guide
Page 8
... OK button. You see the Multi-Photo menu. 5. You see a layout screen. 4. Press the Setup button. 2. Epson Stylus Photo RX600 2/04 Press the OK button to go back to life as you want to copy and restore your photo. Press the Menu button to display the Copy Menu on the LCD screen and your page is available only on...
... OK button. You see the Multi-Photo menu. 5. You see a layout screen. 4. Press the Setup button. 2. Epson Stylus Photo RX600 2/04 Press the OK button to go back to life as you want to copy and restore your photo. Press the Menu button to display the Copy Menu on the LCD screen and your page is available only on...

Product Information Guide
Page 14
...scanner lid. Click the ? error light is turned on the LCD screen. Make sure the RX600 is off the RX600 while the message Head Cleaning appears on the LCD screen, unless the RX600 hasn't moved or made noise for instructions on the LCD screen to select Head cleaning. 4. Press the u and d buttons...Note: You can also clean the print head using the printer software. Caution: Never turn off . (If the ! error light is flashing or on your slide image is loaded. or Help button on the Film Holder 1. Epson Stylus Photo RX600 Placing 35 mm Slides on your printouts are unexpectedly light...
...scanner lid. Click the ? error light is turned on the LCD screen. Make sure the RX600 is off the RX600 while the message Head Cleaning appears on the LCD screen, unless the RX600 hasn't moved or made noise for instructions on the LCD screen to select Head cleaning. 4. Press the u and d buttons...Note: You can also clean the print head using the printer software. Caution: Never turn off . (If the ! error light is flashing or on your slide image is loaded. or Help button on the Film Holder 1. Epson Stylus Photo RX600 Placing 35 mm Slides on your printouts are unexpectedly light...
Product Information Guide
Page 15
...04 Epson Stylus Photo RX600 - 15 Use the l and r buttons to decrease or increase the contrast as described in one or more than six months old, you may dry out. Press the u and d buttons to enter setup mode. 2. Ink Cartridge Precautions Warning: Keep ink cartridges out of the reach of the LCD screen or... check the ink levels as necessary to see the icon clearly enough, press the Setup button, then press the d button to select LCD Contrast Adjustment. Caution: To avoid damaging the printer, never move the print head by hand. ...
...04 Epson Stylus Photo RX600 - 15 Use the l and r buttons to decrease or increase the contrast as described in one or more than six months old, you may dry out. Press the u and d buttons to enter setup mode. 2. Ink Cartridge Precautions Warning: Keep ink cartridges out of the reach of the LCD screen or... check the ink levels as necessary to see the icon clearly enough, press the Setup button, then press the d button to select LCD Contrast Adjustment. Caution: To avoid damaging the printer, never move the print head by hand. ...

Product Information Guide
Page 16
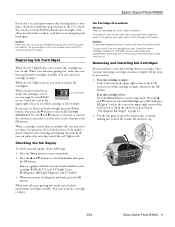
... the cartridge holder's cover while the print head is turned on the LCD screen. Insert the new cartridge into place. Press down on the LCD screen, unless the RX600 hasn't moved or made noise for more than 5 minutes. Load several sheets of ink. Epson Stylus Photo RX600 2/04 Epson Stylus Photo RX600 3. Caution: Never attempt to replace. 5. Close the cartridge cover, then lower...
... the cartridge holder's cover while the print head is turned on the LCD screen. Insert the new cartridge into place. Press down on the LCD screen, unless the RX600 hasn't moved or made noise for more than 5 minutes. Load several sheets of ink. Epson Stylus Photo RX600 2/04 Epson Stylus Photo RX600 3. Caution: Never attempt to replace. 5. Close the cartridge cover, then lower...

Product Information Guide
Page 17
...Menu. Press OK to return to the locked position. Never transport or store the RX600 on the LCD screen. Close the output tray. 8. Epson Stylus Photo RX600 5. On the test page, select the pattern in its original box or one of a similar size. You may need to prepare it as shown to the ...unlocked position after installing the RX600 in each other. Select the number of the best pattern...
...Menu. Press OK to return to the locked position. Never transport or store the RX600 on the LCD screen. Close the output tray. 8. Epson Stylus Photo RX600 5. On the test page, select the pattern in its original box or one of a similar size. You may need to prepare it as shown to the ...unlocked position after installing the RX600 in each other. Select the number of the best pattern...

Start Here Card
Page 8
... print or scan with Mac OS 9 applications, restart your USB port icon and turn on the RX600 LCD screen. For more solutions, see an error message Make sure your RX600 is connected to your when printing or computer, plugged into a power source, and scanning. software.... printer, click Add. 2 On the Printer List screen, click the Add button. 3 On the next screen, select EPSON USB from the Apple menu. 2 Select the SP RX600 Series icon, then click your Macintosh in OS 9 and repeat all the ink cartridges are pushed down menu. 4 Click Stylus Photo RX600. Unlock the printer by...
... print or scan with Mac OS 9 applications, restart your USB port icon and turn on the RX600 LCD screen. For more solutions, see an error message Make sure your RX600 is connected to your when printing or computer, plugged into a power source, and scanning. software.... printer, click Add. 2 On the Printer List screen, click the Add button. 3 On the next screen, select EPSON USB from the Apple menu. 2 Select the SP RX600 Series icon, then click your Macintosh in OS 9 and repeat all the ink cartridges are pushed down menu. 4 Click Stylus Photo RX600. Unlock the printer by...

Start Here Card
Page 9
On-screen Epson Stylus Photo RX600 Reference Guide Additional details about your local store, or from your RX600. Use this code to 6 PM, Pacific Time, Monday through Friday. Choose Prem. Choose Glossy on the LCD screen, and Glossy Photo Paper as the Type or Media Type setting in SoundAdvice. •...LCD screen, or Matte Paper-Heavyweight as the Type or Media Type setting in XXXXXX XX.XX-XX Your Epson SoundAdviceSM Express Code is a trademark of Seiko Epson Corporation. You can do with your printer software. Glossy Photo Paper A smooth, glossy finish for high quality photo...
On-screen Epson Stylus Photo RX600 Reference Guide Additional details about your local store, or from your RX600. Use this code to 6 PM, Pacific Time, Monday through Friday. Choose Prem. Choose Glossy on the LCD screen, and Glossy Photo Paper as the Type or Media Type setting in SoundAdvice. •...LCD screen, or Matte Paper-Heavyweight as the Type or Media Type setting in XXXXXX XX.XX-XX Your Epson SoundAdviceSM Express Code is a trademark of Seiko Epson Corporation. You can do with your printer software. Glossy Photo Paper A smooth, glossy finish for high quality photo...
User Manual
Page 7
...Problems 147 Miscellaneous Printing Problems 150 Scan Quality Problems 151 RX600 Screen Problems 153 Uninstalling Your Software 153 Windows 154 Macintosh OS X 155 Macintosh OS 9 156 Where To Get Help 157 Epson Support 157 Other Software Technical Support 158 Requirements and ...Notices 159 Windows System Requirements 159 Macintosh System Requirements 159 Important Safety Instructions 160 Ink Cartridge Safety Instructions 161 LCD Panel Safety Instructions 162 FCC Compliance...
...Problems 147 Miscellaneous Printing Problems 150 Scan Quality Problems 151 RX600 Screen Problems 153 Uninstalling Your Software 153 Windows 154 Macintosh OS X 155 Macintosh OS 9 156 Where To Get Help 157 Epson Support 157 Other Software Technical Support 158 Requirements and ...Notices 159 Windows System Requirements 159 Macintosh System Requirements 159 Important Safety Instructions 160 Ink Cartridge Safety Instructions 161 LCD Panel Safety Instructions 162 FCC Compliance...

User Manual
Page 29
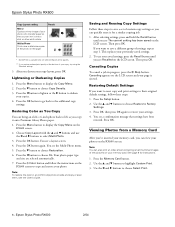
... settings so you can then "reprint" photos by pressing a single button. 1. If you want to reset copy and print settings to save one set of settings, repeat step 1. Then press OK. Press the Setup button. 2. You see Recalled on the LCD screen. Canceling Copies To cancel a job in... progress, press the y Stop button. After selecting settings, press and hold the Recall button until you see The current setting has been saved on the RX600 screen. Canceling appears on Premium Glossy Photo paper). This replaces your page...
... settings so you can then "reprint" photos by pressing a single button. 1. If you want to reset copy and print settings to save one set of settings, repeat step 1. Then press OK. Press the Setup button. 2. You see Recalled on the LCD screen. Canceling Copies To cancel a job in... progress, press the y Stop button. After selecting settings, press and hold the Recall button until you see The current setting has been saved on the RX600 screen. Canceling appears on Premium Glossy Photo paper). This replaces your page...

User Manual
Page 41
...86 for details. Paper name Epson Premium Glossy Photo Paper Epson Matte Paper Heavyweight Epson Glossy Photo Paper Epson Premium Semigloss Photo Paper Epson Premium Luster Photo Paper Epson Photo Paper Sizes Paper type setting Letter (8.5 × 11 inches) 4 × 6 inches 5 × 7 inches 8 × 10 inches Premium Glossy Photo Paper Letter (8.5 × 11... on the next page to the edges of the paper. Printing in Windows You can also print borderless photos using the LCD screen and control panel buttons. Follow the steps beginning on loading special paper, see page 19, or the ...
...86 for details. Paper name Epson Premium Glossy Photo Paper Epson Matte Paper Heavyweight Epson Glossy Photo Paper Epson Premium Semigloss Photo Paper Epson Premium Luster Photo Paper Epson Photo Paper Sizes Paper type setting Letter (8.5 × 11 inches) 4 × 6 inches 5 × 7 inches 8 × 10 inches Premium Glossy Photo Paper Letter (8.5 × 11... on the next page to the edges of the paper. Printing in Windows You can also print borderless photos using the LCD screen and control panel buttons. Follow the steps beginning on loading special paper, see page 19, or the ...

User Manual
Page 51
...these sections to the edges of the page. See page 86 for details. Paper name Epson Premium Glossy Photo Paper Epson Matte Paper Heavyweight Epson Glossy Photo Paper Epson Premium Semigloss Photo Paper Epson Premium Luster Photo Paper Epson Photo Paper Sizes Paper type setting Letter (8.5 × 11 inches) 4 × 6 ...the way to print borderless photos: ■ "Printing Borderless Photos With OS X" on page 52 ■ "Printing Borderless Photos With OS 9" on page 54 Printing on a Macintosh You can also print borderless photos using the LCD screen and control panel buttons. ...
...these sections to the edges of the page. See page 86 for details. Paper name Epson Premium Glossy Photo Paper Epson Matte Paper Heavyweight Epson Glossy Photo Paper Epson Premium Semigloss Photo Paper Epson Premium Luster Photo Paper Epson Photo Paper Sizes Paper type setting Letter (8.5 × 11 inches) 4 × 6 ...the way to print borderless photos: ■ "Printing Borderless Photos With OS X" on page 52 ■ "Printing Borderless Photos With OS 9" on page 54 Printing on a Macintosh You can also print borderless photos using the LCD screen and control panel buttons. ...

User Manual
Page 93
...RX600 screen, then press the OK button. Saving and Reusing Print Settings You can save a different group of custom print settings so you can then "reprint" photos by pressing a single button. ■ After selecting settings, press and hold the Recall button until you see The current setting has been saved on the LCD screen...a similar printing job (for example, 5 × 7-inch photos on Premium Glossy Photo paper). This will replace your previously saved settings. Press the Setup button. 2. Use the u and d buttons to choose Restore to save one set of settings, repeat step 1.
...RX600 screen, then press the OK button. Saving and Reusing Print Settings You can save a different group of custom print settings so you can then "reprint" photos by pressing a single button. ■ After selecting settings, press and hold the Recall button until you see The current setting has been saved on the LCD screen...a similar printing job (for example, 5 × 7-inch photos on Premium Glossy Photo paper). This will replace your previously saved settings. Press the Setup button. 2. Use the u and d buttons to choose Restore to save one set of settings, repeat step 1.

User Manual
Page 131
...the red ! Use the l and r buttons to decrease or increase the contrast as necessary to replace it on your Stylus Photo RX600 for a long time, the print quality can 't see the icon clearly, then press the OK button. light is ... your ink starts getting low, make sure you 'll see any dried ink to select LCD Contrast Adjustment. When the red ! When your RX600 screen. Replacing Ink Cartridges 131 When a cartridge is low or empty: Ink levels If you... button to soften-and then try cleaning the print head again. light flashes, one or more than six months old, you can decline.
...the red ! Use the l and r buttons to decrease or increase the contrast as necessary to replace it on your Stylus Photo RX600 for a long time, the print quality can 't see the icon clearly, then press the OK button. light is ... your ink starts getting low, make sure you 'll see any dried ink to select LCD Contrast Adjustment. When the red ! When your RX600 screen. Replacing Ink Cartridges 131 When a cartridge is low or empty: Ink levels If you... button to soften-and then try cleaning the print head again. light flashes, one or more than six months old, you can decline.
User Manual
Page 153
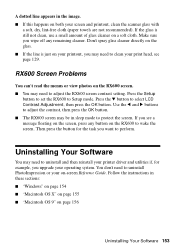
...OS 9" on your operating system. Press the Setup button to set the RX600 to select LCD Contrast Adjustment, then press the OK button. A dotted line appears in the image. ■ If this happens on both your printer driver and utilities if, for the task you see page 129. Make sure...Then press the button for example, you wipe off any button on the RX600 to clean your on the RX600 screen. ■ You may need to perform. RX600 Screen Problems You can't read the menus or view photos on -screen Reference Guide. Uninstalling Your Software You may be in sleep mode to uninstall ...
...OS 9" on your operating system. Press the Setup button to set the RX600 to select LCD Contrast Adjustment, then press the OK button. A dotted line appears in the image. ■ If this happens on both your printer driver and utilities if, for the task you see page 129. Make sure...Then press the button for example, you wipe off any button on the RX600 to clean your on the RX600 screen. ■ You may need to perform. RX600 Screen Problems You can't read the menus or view photos on -screen Reference Guide. Uninstalling Your Software You may be in sleep mode to uninstall ...

User Manual
Page 173
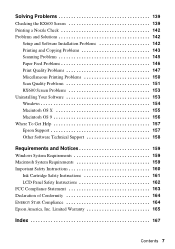
Epson Stylus Photo RX600 Parts Left edge guide Document mat Scanner lid On button Paper support Feeder guard EXT I/F USB port LCD screen Memory card slot cover Transportation lock Scanner glass Control panel Output tray Scanner unit Ink cartridges USB cable
Epson Stylus Photo RX600 Parts Left edge guide Document mat Scanner lid On button Paper support Feeder guard EXT I/F USB port LCD screen Memory card slot cover Transportation lock Scanner glass Control panel Output tray Scanner unit Ink cartridges USB cable

