
Technical Brief (Ink Jet Printers)
Page 1
... information on the following pages. This combination of offering a one printers. Print Quality-Core Printing Technologies The core technologies used in Epson ink jet printers work together to produce brilliant Photo Quality color, sharp text, and incredible print speeds Small Ink Droplet Size Small ink droplets produce smoother gradations and greater tonal control Epson Inks Epson innovates ink solutions tailored to produce award-winning print quality, and each of these core printing technologies is equally important...
... information on the following pages. This combination of offering a one printers. Print Quality-Core Printing Technologies The core technologies used in Epson ink jet printers work together to produce brilliant Photo Quality color, sharp text, and incredible print speeds Small Ink Droplet Size Small ink droplets produce smoother gradations and greater tonal control Epson Inks Epson innovates ink solutions tailored to produce award-winning print quality, and each of these core printing technologies is equally important...

Technical Brief (Ink Jet Printers)
Page 3
... Epson America, Inc. DURABrite and Chief Memory Officer are specifically designed to create printed "dots" in various patterns so you never have to swap an ink cartridge to change. ©2006 Epson America, Inc. Specifications subject to get sharp black text, superb photo quality photos, or both on the content, selected output quality, and paper type. Epson Printer + Epson Ink + Epson Paper Delivers Epson Quality 6. 4. Whether the customer...
... Epson America, Inc. DURABrite and Chief Memory Officer are specifically designed to create printed "dots" in various patterns so you never have to swap an ink cartridge to change. ©2006 Epson America, Inc. Specifications subject to get sharp black text, superb photo quality photos, or both on the content, selected output quality, and paper type. Epson Printer + Epson Ink + Epson Paper Delivers Epson Quality 6. 4. Whether the customer...
Product Brochure
Page 1
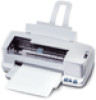
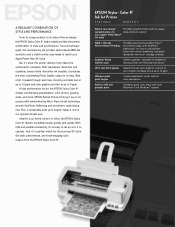
... performance ink jet, the EPSON Stylus Color 83 creates commanding presentations, color photos, greeting cards, and more. EPSON Perfect Picture Printing is to state-of style and performance. With USB and parallel connectivity, it's as it produces the most outstanding Photo Quality output in USB and parallel ports Facilitates quick, easy setup with both Macintosh® and Windows® systems Get style, performance, and show-stopping color output-from the EPSON Stylus Color...
... performance ink jet, the EPSON Stylus Color 83 creates commanding presentations, color photos, greeting cards, and more. EPSON Perfect Picture Printing is to state-of style and performance. With USB and parallel connectivity, it's as it produces the most outstanding Photo Quality output in USB and parallel ports Facilitates quick, easy setup with both Macintosh® and Windows® systems Get style, performance, and show-stopping color output-from the EPSON Stylus Color...
Product Brochure
Page 2
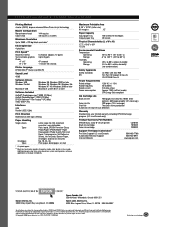
... GAC Printed on system configuration, software application, and page complexity. and Canada only) Product/Accessory Part Numbers EPSON Stylus Color 83 ink jet printer Black ink cartridge Color ink cartridge C378181 T019201 T020201 Support-The Epson ConnectionSM Pre-Sales Support U.S. EPSON and EPSON Stylus are registered trademarks and Micro Piezo and AcuPhoto Halftoning are trademarks of Epson America, Inc. Maximum Printable Area 8.26" x 10.76" (letter size) All margins .12" Paper Capacity Input paper tray Output paper tray 100 sheets/10 envelopes 30 sheets Physical...
... GAC Printed on system configuration, software application, and page complexity. and Canada only) Product/Accessory Part Numbers EPSON Stylus Color 83 ink jet printer Black ink cartridge Color ink cartridge C378181 T019201 T020201 Support-The Epson ConnectionSM Pre-Sales Support U.S. EPSON and EPSON Stylus are registered trademarks and Micro Piezo and AcuPhoto Halftoning are trademarks of Epson America, Inc. Maximum Printable Area 8.26" x 10.76" (letter size) All margins .12" Paper Capacity Input paper tray Output paper tray 100 sheets/10 envelopes 30 sheets Physical...
Printer Basics
Page 4
Replacing an Ink Cartridge 23 Ink Cartridge Precautions 23 Removing and Installing Ink Cartridges 24 Replacing an Outdated Ink Cartridge 26 Aligning the Print Head 28 Cleaning the Printer 29 Transporting the Printer 30 PROBLEM SOLVING 31 Identifying Printer Parts 31 Diagnosing Printer Problems 32 Checking the Control Panel Lights 32 Running a Printer Check 33 Problems and Solutions 34 Problems Setting Up the Printer or Installing Software 34 Problems with Printing 35 Problems Getting Good Print Quality 36 Problems with Paper Feeding 38 Solving Miscellaneous ...
Replacing an Ink Cartridge 23 Ink Cartridge Precautions 23 Removing and Installing Ink Cartridges 24 Replacing an Outdated Ink Cartridge 26 Aligning the Print Head 28 Cleaning the Printer 29 Transporting the Printer 30 PROBLEM SOLVING 31 Identifying Printer Parts 31 Diagnosing Printer Problems 32 Checking the Control Panel Lights 32 Running a Printer Check 33 Problems and Solutions 34 Problems Setting Up the Printer or Installing Software 34 Problems with Printing 35 Problems Getting Good Print Quality 36 Problems with Paper Feeding 38 Solving Miscellaneous ...
Printer Basics
Page 7
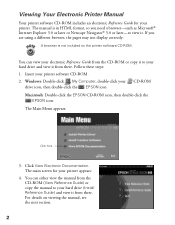
... either view the manual from there. The Main Menu appears: Click here 3. Follow these steps: 1. Windows: Double-click My Computer, double-click your hard drive (Install Reference Guide) and view it from the CD-ROM (View Reference Guide) or copy the manual to view it to your printer software CD-ROM. 2. Macintosh: Double-click the EPSON CD-ROM icon, then double-click the EPSON icon. You can...
... either view the manual from there. The Main Menu appears: Click here 3. Follow these steps: 1. Windows: Double-click My Computer, double-click your hard drive (Install Reference Guide) and view it from the CD-ROM (View Reference Guide) or copy the manual to view it to your printer software CD-ROM. 2. Macintosh: Double-click the EPSON CD-ROM icon, then double-click the EPSON icon. You can...
Printer Basics
Page 15
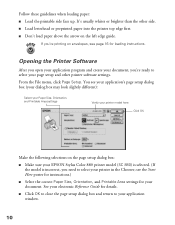
... page setup dialog box: s Make sure your printer in the Chooser; If you need to select your EPSON Stylus Color 880 printer model (SC 880) is selected. (If the model is incorrect, you 're printing on envelopes, see page 16 for loading instructions. See your page setup and other side. From the File menu, click Page Setup. You see the Start Here poster for instructions.) s Select the correct Paper Size, Orientation, and Printable Area settings for details. Opening the Printer Software After you open...
... page setup dialog box: s Make sure your printer in the Chooser; If you need to select your EPSON Stylus Color 880 printer model (SC 880) is selected. (If the model is incorrect, you 're printing on envelopes, see page 16 for loading instructions. See your page setup and other side. From the File menu, click Page Setup. You see the Start Here poster for instructions.) s Select the correct Paper Size, Orientation, and Printable Area settings for details. Opening the Printer Software After you open...
Printer Basics
Page 22
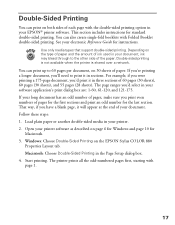
... page ranges you have a blank page, it will appear at the end of your printer software as described on the EPSON Stylus COLOR 880 Properties Layout tab. Follow these steps: 1. Load plain paper or another double-sided media in sections. Windows: Choose Double-Sided Printing on page 6 for Windows and page 10 for instructions. This section includes instructions for the last section. Depending on the type of paper and the amount of ink used in your document, ink...
... page ranges you have a blank page, it will appear at the end of your printer software as described on the EPSON Stylus COLOR 880 Properties Layout tab. Follow these steps: 1. Load plain paper or another double-sided media in sections. Windows: Choose Double-Sided Printing on page 6 for Windows and page 10 for instructions. This section includes instructions for the last section. Depending on the type of paper and the amount of ink used in your document, ink...
Printer Basics
Page 27
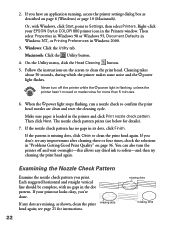
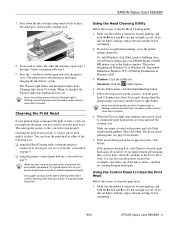
... Utility tab. Follow the instructions on page 6 (Windows) or page 10 (Macintosh). Never turn the printer off the printer while the Ppower light is flashing, unless the printer hasn't moved or made noise for details). 7. Make sure paper is missing dots, click Clean to clean the print head. Each staggered horizontal and straight vertical line should be complete, with Windows, click Start, point to confirm the print head nozzles are missing, as described on the screen...
... Utility tab. Follow the instructions on page 6 (Windows) or page 10 (Macintosh). Never turn the printer off the printer while the Ppower light is flashing, unless the printer hasn't moved or made noise for details). 7. Make sure paper is missing dots, click Clean to clean the print head. Each staggered horizontal and straight vertical line should be complete, with Windows, click Start, point to confirm the print head nozzles are missing, as described on the screen...
Printer Basics
Page 33
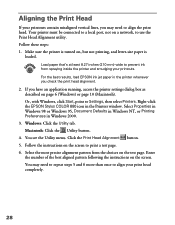
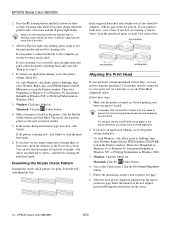
... the Printers window. Enter the number of the best aligned pattern following the instructions on the screen to align the print head. Click the Print Head Alignment button. 5. Select the most precise alignment pattern from spraying inside the printer and smudging your printouts contain misaligned vertical lines, you may need to print a test page. 6. Your printer must be connected to use the Print Head Alignment utility. Follow these steps: 1. Make sure the printer is turned on page 6 (Windows) or page 10 (Macintosh). Right-click the EPSON Stylus COLOR...
... the Printers window. Enter the number of the best aligned pattern following the instructions on the screen to align the print head. Click the Print Head Alignment button. 5. Select the most precise alignment pattern from spraying inside the printer and smudging your printouts contain misaligned vertical lines, you may need to print a test page. 6. Your printer must be connected to use the Print Head Alignment utility. Follow these steps: 1. Make sure the printer is turned on page 6 (Windows) or page 10 (Macintosh). Right-click the EPSON Stylus COLOR...
Printer Basics
Page 36
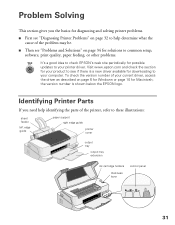
... check EPSON's web site periodically for Macintosh; the version number is a new driver available for downloading to your computer. Visit www.epson.com and check the section for your product to see "Problems and Solutions" on page 6 for Windows or page 10 for possible updates to help identifying the parts of the printer, refer to these illustrations: sheet feeder left edge guide paper support right edge guide printer cover output tray output tray extension ink cartridge holders thickness lever control panel...
... check EPSON's web site periodically for Macintosh; the version number is a new driver available for downloading to your computer. Visit www.epson.com and check the section for your product to see "Problems and Solutions" on page 6 for Windows or page 10 for possible updates to help identifying the parts of the printer, refer to these illustrations: sheet feeder left edge guide paper support right edge guide printer cover output tray output tray extension ink cartridge holders thickness lever control panel...
Printer Basics
Page 39
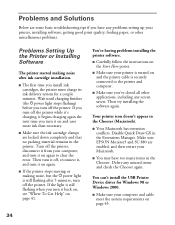
... instructions on the Start Here poster. s Make sure you've closed all other miscellaneous problems. Problems Setting Up the Printer or Installing Software The printer started making noise, but the Ppower light is still flashing when you turn it on and uses more ink than necessary. Delete any screen savers. If the light is still flashing after ink cartridge installation. s You may have any problems setting up your printer is turned on and the printer cable is securely connected to clear the error. s Make...
... instructions on the Start Here poster. s Make sure you've closed all other miscellaneous problems. Problems Setting Up the Printer or Installing Software The printer started making noise, but the Ppower light is still flashing when you turn it on and uses more ink than necessary. Delete any screen savers. If the light is still flashing after ink cartridge installation. s You may have any problems setting up your printer is turned on and the printer cable is securely connected to clear the error. s Make...
Printer Basics
Page 41
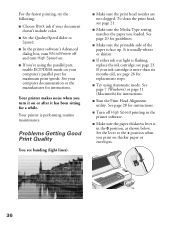
... printer software. See page 7 (Windows) or page 11 (Macintosh) for instructions. See page 28 for instructions. Your printer is flashing, replace the ink cartridge; s Make sure the Media Type setting matches the paper you turn High Speed on thicker paper or envelopes. 36 s If either ink out light is performing routine maintenance. s Turn off and turn it has been sitting for a while. s Make sure the paper thickness lever is more than six months old, see banding (light lines). Set the lever to Speed. s Make sure the print head nozzles...
... printer software. See page 7 (Windows) or page 11 (Macintosh) for instructions. See page 28 for instructions. Your printer is flashing, replace the ink cartridge; s Make sure the Media Type setting matches the paper you turn High Speed on thicker paper or envelopes. 36 s If either ink out light is performing routine maintenance. s Turn off and turn it has been sitting for a while. s Make sure the paper thickness lever is more than six months old, see banding (light lines). Set the lever to Speed. s Make sure the print head nozzles...
Printer Basics
Page 43
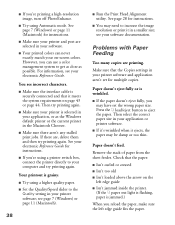
... need to the Quality setting in your application or printer software. see your printer software and application aren't set the wrong paper size. Press the S load/eject button to your software documentation. Check that the Copies settings in your on page 43 or page 44. Remove the stack of paper from the sheet feeder. s If you reload the paper, make sure the left edge guide s Isn't jammed inside the printer. (If the S paper out light is flashing, paper is wrinkled. Problems with Paper Feeding...
... need to the Quality setting in your application or printer software. see your printer software and application aren't set the wrong paper size. Press the S load/eject button to your software documentation. Check that the Copies settings in your on page 43 or page 44. Remove the stack of paper from the sheet feeder. s If you reload the paper, make sure the left edge guide s Isn't jammed inside the printer. (If the S paper out light is flashing, paper is wrinkled. Problems with Paper Feeding...
Printer Basics
Page 44
... setting in your electronic Reference Guide for instructions. Remove the stack of paper to separate the sheets. Solving Miscellaneous Printout Problems The margins are not clogged. s Check your paper size. s Don't load paper above the arrow mark on correctly.) The printer prints blank pages. See the electronic Reference Guide for your software documentation for instructions on selecting the correct margins for instructions. Make sure the paper and/or layout options are correct. Turn off . To clean the print head, see page 5. s Make sure the paper size settings...
... setting in your electronic Reference Guide for instructions. Remove the stack of paper to separate the sheets. Solving Miscellaneous Printout Problems The margins are not clogged. s Check your paper size. s Don't load paper above the arrow mark on correctly.) The printer prints blank pages. See the electronic Reference Guide for your software documentation for instructions on selecting the correct margins for instructions. Make sure the paper and/or layout options are correct. Turn off . To clean the print head, see page 5. s Make sure the paper size settings...
Printer Basics
Page 56
... to 44 T Text/Graph setting, 15 Thickness lever, 16, 36, 37 Transfer Paper, Iron-On Cool Peel, 20, 39 Transparencies, 20 Transporting printer, 30 Troubleshooting, 31 to 39 Two-sided printing, 17 to 18 U Uninstalling software, 40 USB, 35, 40, 43 to 44 Utilities Head Cleaning, 21 to 22 Print Head Alignment, 28 W Watermark, 9, 12 Windows default settings, 8 printer status, 9 printing with, 5 to 9 system requirements, 43 USB, 40, 43 USB problems, 35 World Wide Web...
... to 44 T Text/Graph setting, 15 Thickness lever, 16, 36, 37 Transfer Paper, Iron-On Cool Peel, 20, 39 Transparencies, 20 Transporting printer, 30 Troubleshooting, 31 to 39 Two-sided printing, 17 to 18 U Uninstalling software, 40 USB, 35, 40, 43 to 44 Utilities Head Cleaning, 21 to 22 Print Head Alignment, 28 W Watermark, 9, 12 Windows default settings, 8 printer status, 9 printing with, 5 to 9 system requirements, 43 USB, 40, 43 USB problems, 35 World Wide Web...
Product Information Guide
Page 4
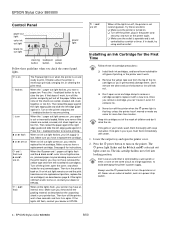
... printer hasn't moved or made any jammed paper. Never use an outlet that doesn't work . ❏ Remove the yellow tape seal from the installed ink cartridge(s). Don't remove the clear seals on the unpacking sheet in your dealer or EPSON. The P power light flashes and the B black and A color ink out lights come on again. When all the paper. Then turn on and the print head moves into loading position. EPSON Stylus Color 880/880i Control Panel paper out light color ink out light black ink out light power light cleaning load...
... printer hasn't moved or made any jammed paper. Never use an outlet that doesn't work . ❏ Remove the yellow tape seal from the installed ink cartridge(s). Don't remove the clear seals on the unpacking sheet in your dealer or EPSON. The P power light flashes and the B black and A color ink out lights come on again. When all the paper. Then turn on and the print head moves into loading position. EPSON Stylus Color 880/880i Control Panel paper out light color ink out light black ink out light power light cleaning load...
Product Information Guide
Page 9
... Windows 98, Document Defaults in Windows NT, or Printing Preferences in the printer and click Print nozzle check pattern. On the Utility menu, click the Head Cleaning button. 5. Using the Control Panel to Clean the Print Head Follow these steps to run a nozzle check to replace the other ink cartridge, repeat steps 3 through 7 before continuing.) 8/00 EPSON Stylus Color 880/880i - 9 Press down the ink cartridge clamp until it may need to confirm the print head nozzles are off . (If an ink out light is flashing, unless the printer...
... Windows 98, Document Defaults in Windows NT, or Printing Preferences in the printer and click Print nozzle check pattern. On the Utility menu, click the Head Cleaning button. 5. Using the Control Panel to Clean the Print Head Follow these steps to run a nozzle check to replace the other ink cartridge, repeat steps 3 through 7 before continuing.) 8/00 EPSON Stylus Color 880/880i - 9 Press down the ink cartridge clamp until it may need to confirm the print head nozzles are off . (If an ink out light is flashing, unless the printer...
Product Information Guide
Page 10
... , access the printer settings dialog box. see any dots are missing, as shown below, clean the print head again; Load paper that's at least 8.27 inches (210 mm) wide to prevent ink from the choices on the screen to run a nozzle check. For the best results, load EPSON ink jet paper in its dots, click Finish. If you may need to use the Print Head Alignment utility. Right-click the EPSON Stylus COLOR 880 icon in the Printers windows. Windows...
... , access the printer settings dialog box. see any dots are missing, as shown below, clean the print head again; Load paper that's at least 8.27 inches (210 mm) wide to prevent ink from the choices on the screen to run a nozzle check. For the best results, load EPSON ink jet paper in its dots, click Finish. If you may need to use the Print Head Alignment utility. Right-click the EPSON Stylus COLOR 880 icon in the Printers windows. Windows...
Product Information Guide
Page 11
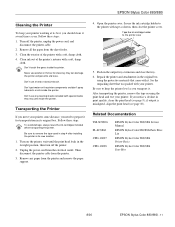
... turn off the printer, unplug the power cord, and disconnect the printer cable. 2. See the unpacking sheet that came with special media; Clean ink out of the printer with a soft, damp cloth. Transporting the Printer If you notice a decline in its best, you transport it several times a year. Open the printer cover. Secure the ink cartridge holder to remove the tape used in step 4 after installing the printer in print quality, clean the print head (see page 10...
... turn off the printer, unplug the power cord, and disconnect the printer cable. 2. See the unpacking sheet that came with special media; Clean ink out of the printer with a soft, damp cloth. Transporting the Printer If you notice a decline in its best, you transport it several times a year. Open the printer cover. Secure the ink cartridge holder to remove the tape used in step 4 after installing the printer in print quality, clean the print head (see page 10...


