
Technical Brief (Ink Jet Printers)
Page 2
...: Heat produces a vapor bubble in other ink jet printers: Epson MicroPiezo Technology Mechanical method: Precise electrical pulses cause the ink reservoir wall to increase the number of print head nozzles Page 2 Additionally, smaller ink droplets produce less visible printed dots, especially apparent in dense coverage areas to improve print speed With this technique, Epson printers can use halftone algorithms with high resolutions...
...: Heat produces a vapor bubble in other ink jet printers: Epson MicroPiezo Technology Mechanical method: Precise electrical pulses cause the ink reservoir wall to increase the number of print head nozzles Page 2 Additionally, smaller ink droplets produce less visible printed dots, especially apparent in dense coverage areas to improve print speed With this technique, Epson printers can use halftone algorithms with high resolutions...
Product Information Guide
Page 4
... turn it light and red H ink as described on page 6. Reinstall it on again. If the lights are flashing The printer may be blocking movement of the print head. If the lights are on ) paper button to eject the paper. EPSON Stylus C66 Control Panel To diagnose some problems, check the printer's control panel, as described on page...
... turn it light and red H ink as described on page 6. Reinstall it on again. If the lights are flashing The printer may be blocking movement of the print head. If the lights are on ) paper button to eject the paper. EPSON Stylus C66 Control Panel To diagnose some problems, check the printer's control panel, as described on page...

Product Information Guide
Page 5
... DURABrite Ink Glossy Photo Paper Epson Glossy Photo Paper Glossy Photo Paper Epson All Purpose Glossy Photo Paper Epson Photo Paper Epson Premium Semigloss Photo Paper Epson Ink Jet Transparencies Ink Jet Transparencies 3/04 EPSON Stylus C66 - 5 Running a Printer Check You can run a printer check to determine whether a problem comes from the printer. 2. Continue holding down until the green P power light starts to clean the print head; see...
... DURABrite Ink Glossy Photo Paper Epson Glossy Photo Paper Glossy Photo Paper Epson All Purpose Glossy Photo Paper Epson Photo Paper Epson Premium Semigloss Photo Paper Epson Ink Jet Transparencies Ink Jet Transparencies 3/04 EPSON Stylus C66 - 5 Running a Printer Check You can run a printer check to determine whether a problem comes from the printer. 2. Continue holding down until the green P power light starts to clean the print head; see...

Product Information Guide
Page 6
...products may dry out. Use these ink cartridges within six months of ink. Note: You can load the following number of sheets of Epson special media: Paper type Premium Bright White Paper Photo Quality Ink Jet Paper Photo Quality Ink Jet Cards All Purpose Glossy Photo Paper Glossy... flashing, the print head moves to the left edge guide. ❏ Load the printable side face-up. EPSON Stylus C66 3/04 See your printer not covered by Epson's warranty. Turn on the screen telling you have been identified, the print head moves to step 5. Otherwise, the remaining ink in landscape mode...
...products may dry out. Use these ink cartridges within six months of ink. Note: You can load the following number of sheets of Epson special media: Paper type Premium Bright White Paper Photo Quality Ink Jet Paper Photo Quality Ink Jet Cards All Purpose Glossy Photo Paper Glossy... flashing, the print head moves to the left edge guide. ❏ Load the printable side face-up. EPSON Stylus C66 3/04 See your printer not covered by Epson's warranty. Turn on the screen telling you have been identified, the print head moves to step 5. Otherwise, the remaining ink in landscape mode...

Product Information Guide
Page 7
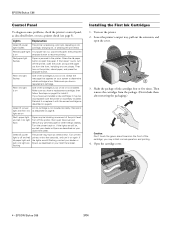
... continuing with step 10. This section explains how to clean the print head. Caution: When you may need to maintain good print quality. 3/04 EPSON Stylus C66 - 7 EPSON Stylus C66 10. Cleaning the Print Head If your printer for three seconds. (This only works when the red H ink light is off the printer while the P power light is firmly seated. You can also clean...
... continuing with step 10. This section explains how to clean the print head. Caution: When you may need to maintain good print quality. 3/04 EPSON Stylus C66 - 7 EPSON Stylus C66 10. Cleaning the Print Head If your printer for three seconds. (This only works when the red H ink light is off the printer while the P power light is firmly seated. You can also clean...
Product Information Guide
Page 8
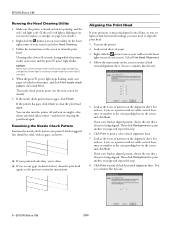
... the Print Head If your screen) and select Head Cleaning. 3. Right-click the printer icon on the screen and click Next. Select Print Head Alignment. 4. For each set , if you may need to print another test page and repeat this step. 6. Click Print to clean the print head again. You see a pattern with no gaps, click Finish. EPSON Stylus C66 Running the Head Cleaning...
... the Print Head If your screen) and select Head Cleaning. 3. Right-click the printer icon on the screen and click Next. Select Print Head Alignment. 4. For each set , if you may need to print another test page and repeat this step. 6. Click Print to clean the print head again. You see a pattern with no gaps, click Finish. EPSON Stylus C66 Running the Head Cleaning...

Product Information Guide
Page 9
...new location. 11. If ink gets in the output tray extension, then close the Print Head Alignment Utility. EPSON Stylus C66 9. they can damage the printer components and case. The print head moves to the ink cartridge replacement position, and ...the P power light begins to close the output tray. 3/04 EPSON Stylus C66 - 9 Warning: If ink gets on your eyes, flush them out of a similar size. Wait until the print head...
...new location. 11. If ink gets in the output tray extension, then close the Print Head Alignment Utility. EPSON Stylus C66 9. they can damage the printer components and case. The print head moves to the ink cartridge replacement position, and ...the P power light begins to close the output tray. 3/04 EPSON Stylus C66 - 9 Warning: If ink gets on your eyes, flush them out of a similar size. Wait until the print head...

Product Information Guide
Page 10
EPSON Stylus C66 12. Repack the printer and its attachments in and power on your printer, install your ink cartridges, and test your printer. Keep the printer level as you notice a decline in print quality, clean the print head (see page 8). Related Documentation CPD-16770 CPD-16771 CPD-16772 EPSON Stylus C66 Start Here EPSON Stylus C66 Printer Basics EPSON Stylus C66 CD-ROM with them. Plug in the original box using...
EPSON Stylus C66 12. Repack the printer and its attachments in and power on your printer, install your ink cartridges, and test your printer. Keep the printer level as you notice a decline in print quality, clean the print head (see page 8). Related Documentation CPD-16770 CPD-16771 CPD-16772 EPSON Stylus C66 Start Here EPSON Stylus C66 Printer Basics EPSON Stylus C66 CD-ROM with them. Plug in the original box using...

Quick Reference Guide
Page 3
Contents Printing 5 Loading Paper 5 Basic Printing 6 Printing 4 × 6 Borderless Photos 8 Selecting the Correct Paper Type 10 Solving Problems 11 Checking the Printer's Lights 11 Problems and Solutions 12 Cleaning the Print Head 16 Notices 17 System Requirements 17 Important Safety Instructions 18 Ink Cartridge Safety Instructions 19 FCC Compliance Statement 20 Declaration of Conformity 21 ENERGY STAR Compliance 21 Epson America, Inc. Limited Warranty 22 3
Contents Printing 5 Loading Paper 5 Basic Printing 6 Printing 4 × 6 Borderless Photos 8 Selecting the Correct Paper Type 10 Solving Problems 11 Checking the Printer's Lights 11 Problems and Solutions 12 Cleaning the Print Head 16 Notices 17 System Requirements 17 Important Safety Instructions 18 Ink Cartridge Safety Instructions 19 FCC Compliance Statement 20 Declaration of Conformity 21 ENERGY STAR Compliance 21 Epson America, Inc. Limited Warranty 22 3
Quick Reference Guide
Page 11
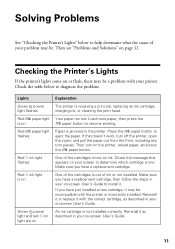
... with the correct cartridge, as described in your on -screen User's Guide. Red ink light is not installed correctly. Lights Explanation Green power light flashes The printer is out of the cartridges is receiving a print job, replacing an ink cartridge, charging ink, or cleaning the print head. If you have just installed a new cartridge, it with the...
... with the correct cartridge, as described in your on -screen User's Guide. Red ink light is not installed correctly. Lights Explanation Green power light flashes The printer is out of the cartridges is receiving a print job, replacing an ink cartridge, charging ink, or cleaning the print head. If you have just installed a new cartridge, it with the...
Quick Reference Guide
Page 12
...paper you loaded; see your on your dealer or Epson as described on -screen User's Guide for instructions. 12 Solving Problems Turn off the printer, wait a few seconds, and turn it on replacing ink cartridges. ■ Run the Print Head Alignment utility; see page 16. ■ Select ...a higher Quality Option setting; see your dealer or Epson as described on . The printer may need replacing; It's ...
...paper you loaded; see your on your dealer or Epson as described on -screen User's Guide for instructions. 12 Solving Problems Turn off the printer, wait a few seconds, and turn it on replacing ink cartridges. ■ Run the Print Head Alignment utility; see page 16. ■ Select ...a higher Quality Option setting; see your dealer or Epson as described on . The printer may need replacing; It's ...
Quick Reference Guide
Page 13
... side of the paper will contain a lighter image or text, print that smudges or marks appear on the front of the paper when you may notice that side first to ensure proper saturation and absorption of genuine Epson inks. ■ Make sure your paper meets the specifications listed in... printout is faint or has gaps. ■ The print head nozzles may need cleaning; If one sheet at a time. ■ Use Epson papers to prevent marks or smudging. ■ If ink smears on the back of a printout, clean the inside of the printer as described in the paper package. see your on ...
... side of the paper will contain a lighter image or text, print that smudges or marks appear on the front of the paper when you may notice that side first to ensure proper saturation and absorption of genuine Epson inks. ■ Make sure your paper meets the specifications listed in... printout is faint or has gaps. ■ The print head nozzles may need cleaning; If one sheet at a time. ■ Use Epson papers to prevent marks or smudging. ■ If ink smears on the back of a printout, clean the inside of the printer as described in the paper package. see your on ...

Quick Reference Guide
Page 14
...Reload the paper and press the paper button. ■ Heavily saturated prints may curl, causing a paper jam when printing on both sides of paper to prevent curling. The printer prints blank pages. ■ Make sure your printer is selected in the printer. ■ If paper doesn't feed, remove it from the sheet...against the right edge, behind the tab. see page 6. ■ The print head nozzles may need cleaning; Press the paper button to clear the jam. Your paper doesn't feed correctly or jams in your printer software or program is not set the wrong paper size. see page 16 ...
...Reload the paper and press the paper button. ■ Heavily saturated prints may curl, causing a paper jam when printing on both sides of paper to prevent curling. The printer prints blank pages. ■ Make sure your printer is selected in the printer. ■ If paper doesn't feed, remove it from the sheet...against the right edge, behind the tab. see page 6. ■ The print head nozzles may need cleaning; Press the paper button to clear the jam. Your paper doesn't feed correctly or jams in your printer software or program is not set the wrong paper size. see page 16 ...

Quick Reference Guide
Page 16
... paper is off and wait overnight-this allows any dried ink to clean the print head. You can also turn off the printer while the green power light is flashing, unless the printer hasn't moved or made noise for instructions on but not printing, and the red ink light is loaded in the lower right corner of...
... paper is off and wait overnight-this allows any dried ink to clean the print head. You can also turn off the printer while the green power light is flashing, unless the printer hasn't moved or made noise for instructions on but not printing, and the red ink light is loaded in the lower right corner of...
Quick Reference Guide
Page 19
...■ Be careful when you remove an ink cartridge for later use an ink cartridge beyond the date printed on your hand inside the printer or touch a cartridge during printing. ■ Do not move the print head by the operating instructions. if the printer has been dropped or the case damaged; this... it remains in the proper position. This could damage the print head. ■ Do not touch the green IC chip on an ink cartridge; Do not touch the ink cartridge ink supply port or surrounding area. ■ Before transporting the printer, make sure it gets in your eyes, flush them ....
...■ Be careful when you remove an ink cartridge for later use an ink cartridge beyond the date printed on your hand inside the printer or touch a cartridge during printing. ■ Do not move the print head by the operating instructions. if the printer has been dropped or the case damaged; this... it remains in the proper position. This could damage the print head. ■ Do not touch the green IC chip on an ink cartridge; Do not touch the ink cartridge ink supply port or surrounding area. ■ Before transporting the printer, make sure it gets in your eyes, flush them ....


