
Basics
Page 3
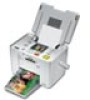
... taking your easy-to delete them any time. 4. Because PictureMate Pal is your photos, review them back later if you could take pictures, leave the film at the photo lab, and come back later for more photos. Print Insert your camera's memory card in PictureMate Pal, choose your PictureMate Pal prints will be as vibrant as they are archival; Welcome...
... taking your easy-to delete them any time. 4. Because PictureMate Pal is your photos, review them back later if you could take pictures, leave the film at the photo lab, and come back later for more photos. Print Insert your camera's memory card in PictureMate Pal, choose your PictureMate Pal prints will be as vibrant as they are archival; Welcome...
Basics
Page 10
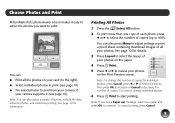
... individual layouts. 6 Press Print to start printing. To cancel printing, press Cancel. 9 Choose Photos and Print PictureMate Pal's photo viewer screen makes it (see a Paper out message, load more than one copy of each photo, press l or r to select the number of copies (up to 999). You can also.... You cannot change the number of your photos on the paper. 4 Press Print. 5 Press l or r to review your photos on your card (to the right) ● Select individual photos to print (see page 10) ● Pre-select photos to continue. Printing All Photos 1 Press the Select All button. 2 ...
... individual layouts. 6 Press Print to start printing. To cancel printing, press Cancel. 9 Choose Photos and Print PictureMate Pal's photo viewer screen makes it (see a Paper out message, load more than one copy of each photo, press l or r to select the number of copies (up to 999). You can also.... You cannot change the number of your photos on the paper. 4 Press Print. 5 Press l or r to review your photos on your card (to the right) ● Select individual photos to print (see page 10) ● Pre-select photos to continue. Printing All Photos 1 Press the Select All button. 2 ...

Basics
Page 11
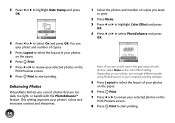
See your camera manual to print your memory card in PictureMate Pal. See page 12 for details. 2 Press Print to choose photos for printing with DPOF, then insert your pre-selected photos. 10 You can also press Menu to select the layout of your photos. 8 Press Print to 999). You see this symbol on the paper... decrease the number. 4 Repeat steps 1 through 3 for details. 5 Press Layout to select the layout of copies (up to start printing. See page 12 for each photo you want to review your photos on the Print Preview screen.
See your camera manual to print your memory card in PictureMate Pal. See page 12 for details. 2 Press Print to choose photos for printing with DPOF, then insert your pre-selected photos. 10 You can also press Menu to select the layout of your photos. 8 Press Print to 999). You see this symbol on the paper... decrease the number. 4 Repeat steps 1 through 3 for details. 5 Press Layout to select the layout of copies (up to start printing. See page 12 for each photo you want to review your photos on the Print Preview screen.
Basics
Page 15
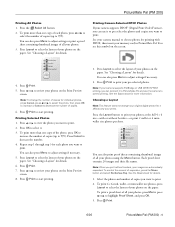
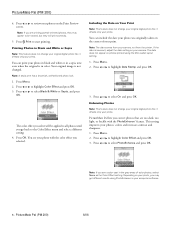
...8 Press Print to start printing. This setting improves your selected photos on the paper. 6 Press Print. 7 Press l or r to review your photos' colors and increases contrast and sharpness. 14 1 Select the photos and number of color photos, select None as the Color Effect setting. 3 Press l...You see a color cast in your computer printing software. 5 Press Layout to select the layout of your photos on the Print Preview screen. 8 Press Print to start printing. Enhancing Photos PictureMate Pal lets you want to print. 2 Press Menu. 3 Press l or r to highlight Color Effect and press...
...8 Press Print to start printing. This setting improves your selected photos on the paper. 6 Press Print. 7 Press l or r to review your photos' colors and increases contrast and sharpness. 14 1 Select the photos and number of color photos, select None as the Color Effect setting. 3 Press l...You see a color cast in your computer printing software. 5 Press Layout to select the layout of your photos on the Print Preview screen. 8 Press Print to start printing. Enhancing Photos PictureMate Pal lets you want to print. 2 Press Menu. 3 Press l or r to highlight Color Effect and press...
Product Information Guide
Page 5
...PictureMate Pal and use the camera to select the number of all your photos. 3. Press or to decrease the number of your photos on the Print Preview screen. 8. See your camera manual to choose photos for individual photos, press Cancel, press or to select the photo, then press OK to increase or Cancel to review your photos...the amount of all your photos, press Menu, press or to 999). Select the photos and number of copies (up to print. Press Print. 6/06 PictureMate Pal (PM 200) - 5 Repeat step 1 through step 3 for more than one copy of the photo, press OK to increase ...
...PictureMate Pal and use the camera to select the number of all your photos. 3. Press or to decrease the number of your photos on the Print Preview screen. 8. See your camera manual to choose photos for individual photos, press Cancel, press or to select the photo, then press OK to increase or Cancel to review your photos...the amount of all your photos, press Menu, press or to 999). Select the photos and number of copies (up to print. Press Print. 6/06 PictureMate Pal (PM 200) - 5 Repeat step 1 through step 3 for more than one copy of the photo, press OK to increase ...
Product Information Guide
Page 6
... PictureMate Pal (PM 200) 6/06 Press Menu. 2. it affects only your prints. This setting improves your photos on the corner of color photos, select None as the Color Effect setting. Press Menu. 2. The color effect you go back to review your photos' colors and increases contrast and sharpness. 1. PictureMate Pal (PM 200..., not from the printer. Press or to select On and press OK. Press or to highlight Date Stamp and press OK. 3. it affects only your camera. PictureMate Pal lets you correct photos that are printing portrait-oriented photos, they may get different...
... PictureMate Pal (PM 200) 6/06 Press Menu. 2. it affects only your prints. This setting improves your photos on the corner of color photos, select None as the Color Effect setting. Press Menu. 2. The color effect you go back to review your photos' colors and increases contrast and sharpness. 1. PictureMate Pal (PM 200..., not from the printer. Press or to select On and press OK. Press or to highlight Date Stamp and press OK. 3. it affects only your camera. PictureMate Pal lets you correct photos that are printing portrait-oriented photos, they may get different...
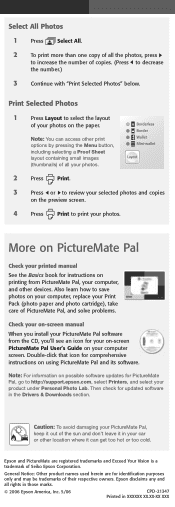
Start Here Card
Page 6
... Vision is a trademark of Seiko Epson Corporation. Epson disclaims any and all the photos, press to increase the number of copies. (Press to http://support.epson.com, select Printers, and select your computer screen. Then check for PictureMate Pal, go to decrease the number.) 3 Continue with "Print Selected Photos" below. More on PictureMate Pal Check your printed manual See the...
... Vision is a trademark of Seiko Epson Corporation. Epson disclaims any and all the photos, press to increase the number of copies. (Press to http://support.epson.com, select Printers, and select your computer screen. Then check for PictureMate Pal, go to decrease the number.) 3 Continue with "Print Selected Photos" below. More on PictureMate Pal Check your printed manual See the...

