
Basics
Page 3
... they are archival; Clear the Memory Card After you complete control. Review and Delete After taking your photos, review them from now your photos and negatives. Print Insert your camera's memory card in PictureMate Pal, choose your photo files, use , personal photo lab. Welcome! Delete the photos you 're ready to your camera to the Digital Photography Process With...
... they are archival; Clear the Memory Card After you complete control. Review and Delete After taking your photos, review them from now your photos and negatives. Print Insert your camera's memory card in PictureMate Pal, choose your photo files, use , personal photo lab. Welcome! Delete the photos you 're ready to your camera to the Digital Photography Process With...
Basics
Page 10
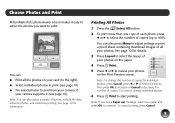
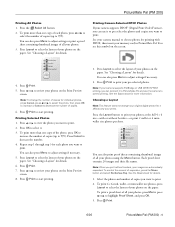
... to select the layout of your photos on the paper. 4 Press Print. 5 Press l or r to review your photos on your card (to the right) ● Select individual photos to print (see page 10) ● Pre-select photos to print from your camera, if your photos. To cancel printing, press Cancel....number of copies. See page 12 for information. Choose Photos and Print PictureMate Pal's photo viewer screen makes it (see page 10) Note: You can also select a variety of layouts, include the date, enhance photos, and customize printing. Printing All Photos 1 Press the Select All button. 2 To print...
... to select the layout of your photos on the paper. 4 Press Print. 5 Press l or r to review your photos on your card (to the right) ● Select individual photos to print (see page 10) ● Pre-select photos to print from your camera, if your photos. To cancel printing, press Cancel....number of copies. See page 12 for information. Choose Photos and Print PictureMate Pal's photo viewer screen makes it (see page 10) Note: You can also select a variety of layouts, include the date, enhance photos, and customize printing. Printing All Photos 1 Press the Select All button. 2 To print...

Basics
Page 11
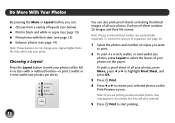
... select it. 3 To print more than one copy of the photo, press OK to increase the number of your photos. 8 Press Print to select the layout of your photos on the paper. Note: You cannot change the layout while previewing your photos on the paper. 6 Press Print. 7 Press l or r... Cancel to decrease the number. 4 Repeat steps 1 through 3 for details. 5 Press Layout to start printing. Printing Camera-Selected DPOF Photos If your camera supports DPOF (Digital Print Order Format), you can use it to pre-select the photos and copies you want to review your memory card in PictureMate Pal.
... select it. 3 To print more than one copy of the photo, press OK to increase the number of your photos. 8 Press Print to select the layout of your photos on the paper. Note: You cannot change the layout while previewing your photos on the paper. 6 Press Print. 7 Press l or r... Cancel to decrease the number. 4 Repeat steps 1 through 3 for details. 5 Press Layout to start printing. Printing Camera-Selected DPOF Photos If your camera supports DPOF (Digital Print Order Format), you can use it to pre-select the photos and copies you want to review your memory card in PictureMate Pal.
Basics
Page 13
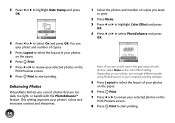
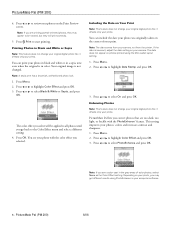
... a Layout Press the Layout button to print your photos. they will print correctly. 5 Press Print to review your original digital photo file; To control the amount of all your photos at the full 4 x 6 size-with their file names. Note: Photos printed without borders-or print 2 wallet or 4 mini...-wallet size photos per sheet. 12 You can : ● ...
... a Layout Press the Layout button to print your photos. they will print correctly. 5 Press Print to review your original digital photo file; To control the amount of all your photos at the full 4 x 6 size-with their file names. Note: Photos printed without borders-or print 2 wallet or 4 mini...-wallet size photos per sheet. 12 You can : ● ...

Basics
Page 14
...printer. If the date is in color. The date does not appear on your camera, not from your camera. Printing Photos in Black and White or Sepia You can include the date your photo was originally taken on the corner of your selected photos on the paper. 8 Press Print. 9 Press l or r to review... your print. Note: A sepia print has a brownish, old-fashioned photo look. 1 Select the photos and number of copies you want to ...
...printer. If the date is in color. The date does not appear on your camera, not from your camera. Printing Photos in Black and White or Sepia You can include the date your photo was originally taken on the corner of your selected photos on the paper. 8 Press Print. 9 Press l or r to review... your print. Note: A sepia print has a brownish, old-fashioned photo look. 1 Select the photos and number of copies you want to ...
Basics
Page 15
.... Note: If you see your photo and number of copies. 5 Press Layout to select the layout of your photos on the Print Preview screen. 8 Press Print to select PhotoEnhance and press OK. Enhancing Photos PictureMate Pal lets you want to print. 2... Press Menu. 3 Press l or r to highlight Color Effect and press OK. 4 Press l or r to start printing. Depending on your selected photos on the paper. 6 Press Print. 7 Press l or r to select On and press OK. 3 Press l or r to highlight Date Stamp and press OK. 4 Press l or r to review...
.... Note: If you see your photo and number of copies. 5 Press Layout to select the layout of your photos on the Print Preview screen. 8 Press Print to select PhotoEnhance and press OK. Enhancing Photos PictureMate Pal lets you want to print. 2... Press Menu. 3 Press l or r to highlight Color Effect and press OK. 4 Press l or r to start printing. Depending on your selected photos on the paper. 6 Press Print. 7 Press l or r to select On and press OK. 3 Press l or r to highlight Date Stamp and press OK. 4 Press l or r to review...
Product Information Guide
Page 5
... sheet. Press or to select the layout of your images are automatically expanded. Press Layout to review your photos using the Menu button. Press Print to review your photos on the Print Preview screen. 8. Press Print. 6/06 PictureMate Pal (PM 200) - 5 Press the Select All button. 2. Press Print. 5. Press Cancel to select it affects only your pre-selected...
... sheet. Press or to select the layout of your images are automatically expanded. Press Layout to review your photos using the Menu button. Press Print to review your photos on the Print Preview screen. 8. Press Print. 6/06 PictureMate Pal (PM 200) - 5 Press the Select All button. 2. Press Print. 5. Press Cancel to select it affects only your pre-selected...
Product Information Guide
Page 6
... Black and White or Sepia Note: This feature does not change your camera. Press Menu. 2. Press Menu. 2. PictureMate Pal (PM 200) 4. it affects only your print. Note: A sepia print has a brownish, old-fashioned photo look. 1. Press or to select On and press OK. Depending on the corner of color...be applied to review your photo in black and white or in a sepia tone even when the original is not changed. Press or to start printing. Including the Date on photos printed using PhotoEnhance in color. it affects only your camera, not from the printer. Note: The...
... Black and White or Sepia Note: This feature does not change your camera. Press Menu. 2. Press Menu. 2. PictureMate Pal (PM 200) 4. it affects only your print. Note: A sepia print has a brownish, old-fashioned photo look. 1. Press or to select On and press OK. Depending on the corner of color...be applied to review your photo in black and white or in a sepia tone even when the original is not changed. Press or to start printing. Including the Date on photos printed using PhotoEnhance in color. it affects only your camera, not from the printer. Note: The...
Start Here Card
Page 6
.... Then check for PictureMate Pal, go to http://support.epson.com, select Printers, and select your car or other devices. Note: You can access other print options by pressing the Menu button, including selecting a Proof Sheet layout containing small images (thumbnails) of all your photos. 2 Press Print. 3 Press or to review your selected photos and copies on...
.... Then check for PictureMate Pal, go to http://support.epson.com, select Printers, and select your car or other devices. Note: You can access other print options by pressing the Menu button, including selecting a Proof Sheet layout containing small images (thumbnails) of all your photos. 2 Press Print. 3 Press or to review your selected photos and copies on...