
Product Brochure
Page 1
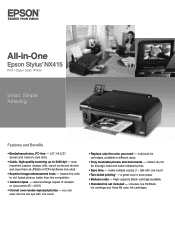
... - Simple. instant-dry ink for smudge, fade and water resistant prints • Save time - High-capacity Black cartridge available • Standard ink set included - includes one touch • Replace only the color you can even remove red eye with one touch • Two-... photos; make multiple copies (1 - 99) with one 69 Black ink cartridge and three 69 color ink cartridges restore the color to 2400 dpi - individual ink cartridges, available in -One Epson Stylus® NX415 Print | Copy | Scan | Photo Smart. better than the competition • Instant copies - All...
... - Simple. instant-dry ink for smudge, fade and water resistant prints • Save time - High-capacity Black cartridge available • Standard ink set included - includes one touch • Replace only the color you can even remove red eye with one touch • Two-... photos; make multiple copies (1 - 99) with one 69 Black ink cartridge and three 69 color ink cartridges restore the color to 2400 dpi - individual ink cartridges, available in -One Epson Stylus® NX415 Print | Copy | Scan | Photo Smart. better than the competition • Instant copies - All...
Product Brochure
Page 2
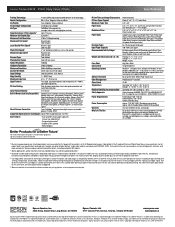
... Glossy measured from digital cameras and mobile phones, PC-free), DPOF Supported Digital Camera Technologies Epson PRINT Image Matching®, Exif Print Eco Features • Save up to 50% of your paper supply with one . Epson Stylus NX415 Print | Copy | Scan | Photo Specifications Printing Technology 4-color (CMYK) drop-on accelerated testing of prints displayed under glass in indoor display conditions.
... Glossy measured from digital cameras and mobile phones, PC-free), DPOF Supported Digital Camera Technologies Epson PRINT Image Matching®, Exif Print Eco Features • Save up to 50% of your paper supply with one . Epson Stylus NX415 Print | Copy | Scan | Photo Specifications Printing Technology 4-color (CMYK) drop-on accelerated testing of prints displayed under glass in indoor display conditions.
Quick Guide
Page 1
Epson Stylus® NX410 Series Quick Guide Basic Copying, Printing, and Scanning Maintenance Solving Problems
Epson Stylus® NX410 Series Quick Guide Basic Copying, Printing, and Scanning Maintenance Solving Problems
Quick Guide
Page 2
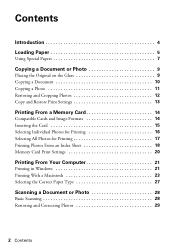
... Placing the Original on the Glass 9 Copying a Document 10 Copying a Photo 11 Restoring and Cropping Photos 12 Copy and Restore Print Settings 13 Printing From a Memory Card 14 Compatible Cards and Image Formats 14 Inserting the Card 15 Selecting Individual Photos for... Printing 16 Selecting All Photos for Printing 17 Printing Photos From an Index Sheet 18 Memory Card Print Settings 20 Printing From Your Computer 21 Printing in Windows 21 Printing With a Macintosh 23 Selecting the Correct Paper Type 27 ...
... Placing the Original on the Glass 9 Copying a Document 10 Copying a Photo 11 Restoring and Cropping Photos 12 Copy and Restore Print Settings 13 Printing From a Memory Card 14 Compatible Cards and Image Formats 14 Inserting the Card 15 Selecting Individual Photos for... Printing 16 Selecting All Photos for Printing 17 Printing Photos From an Index Sheet 18 Memory Card Print Settings 20 Printing From Your Computer 21 Printing in Windows 21 Printing With a Macintosh 23 Selecting the Correct Paper Type 27 ...
Quick Guide
Page 3
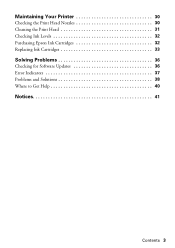
Maintaining Your Printer 30 Checking the Print Head Nozzles 30 Cleaning the Print Head 31 Checking Ink Levels 32 Purchasing Epson Ink Cartridges 32 Replacing Ink Cartridges 33 Solving Problems 36 Checking for Software Updates 36 Error Indicators 37 Problems and Solutions 38 Where to Get Help 40 Notices 41 Contents 3
Maintaining Your Printer 30 Checking the Print Head Nozzles 30 Cleaning the Print Head 31 Checking Ink Levels 32 Purchasing Epson Ink Cartridges 32 Replacing Ink Cartridges 33 Solving Problems 36 Checking for Software Updates 36 Error Indicators 37 Problems and Solutions 38 Where to Get Help 40 Notices 41 Contents 3
Quick Guide
Page 4
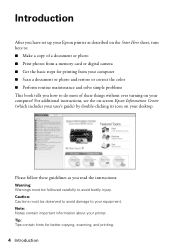
... avoid damage to avoid bodily injury. For additional instructions, see the on-screen Epson Information Center (which includes your user's guide) by double-clicking its icon on your printer. Tip: Tips contain hints for printing from a memory card or digital camera ■ Get the basic steps for ...Introduction After you have set up your Epson printer as described on the Start Here sheet, turn here to: ■ Make a copy of a document or photo ■ Print photos from your computer ■ Scan a document or photo and restore or correct the color ■ Perform routine maintenance and ...
... avoid damage to avoid bodily injury. For additional instructions, see the on-screen Epson Information Center (which includes your user's guide) by double-clicking its icon on your printer. Tip: Tips contain hints for printing from a memory card or digital camera ■ Get the basic steps for ...Introduction After you have set up your Epson printer as described on the Start Here sheet, turn here to: ■ Make a copy of a document or photo ■ Print photos from your computer ■ Scan a document or photo and restore or correct the color ■ Perform routine maintenance and ...

Quick Guide
Page 5
Flip the feeder guard forward, then squeeze the edge guide and slide it left. Loading Paper You can print documents and photos on a variety of paper types and sizes. Open the paper support and pull up the extensions. Then open the output tray, pull out the extensions, and raise the stopper. 2. Loading Paper 5 For details, see page 7. 1.
Flip the feeder guard forward, then squeeze the edge guide and slide it left. Loading Paper You can print documents and photos on a variety of paper types and sizes. Open the paper support and pull up the extensions. Then open the output tray, pull out the extensions, and raise the stopper. 2. Loading Paper 5 For details, see page 7. 1.
Quick Guide
Page 6
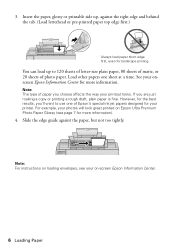
.... See your printout looks. For example, your on Epson Ultra Premium Photo Paper Glossy (see page 7 for more information). 4. Note: For instructions on loading envelopes, see your photos will look great printed on -screen Epson Information Center. 6 Loading Paper Insert the paper, glossy... or printable side up to use one sheet at a time. However, for landscape printing. Slide the edge guide against the right edge and behind...
.... See your printout looks. For example, your on Epson Ultra Premium Photo Paper Glossy (see page 7 for more information). 4. Note: For instructions on loading envelopes, see your photos will look great printed on -screen Epson Information Center. 6 Loading Paper Insert the paper, glossy... or printable side up to use one sheet at a time. However, for landscape printing. Slide the edge guide against the right edge and behind...
Quick Guide
Page 10
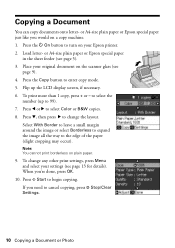
... r to turn on a copy machine. 1. To change the layout. Press x Start to select Color or B&W copies. 8. Press l or r to begin copying. Copying a Document You can copy documents onto letter- Note: You cannot print borderless on the scanner glass (see page 9). 4. Flip up to enter copy mode. 5. to select... the number (up the LCD display screen, if necessary. 6. To print more than 1 copy, press + or - or A4-size plain paper or Epson special paper just like you 're done, press OK. 10. Place your settings (see page 5). 3. Load letter-...
... r to turn on a copy machine. 1. To change the layout. Press x Start to select Color or B&W copies. 8. Press l or r to begin copying. Copying a Document You can copy documents onto letter- Note: You cannot print borderless on the scanner glass (see page 9). 4. Flip up to enter copy mode. 5. to select... the number (up the LCD display screen, if necessary. 6. To print more than 1 copy, press + or - or A4-size plain paper or Epson special paper just like you 're done, press OK. 10. Place your settings (see page 5). 3. Load letter-...
Quick Guide
Page 11
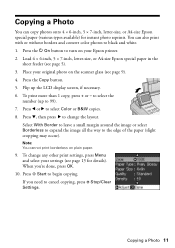
... then press r to select Color or B&W copies. 8. When you need to turn on your settings (see page 13 for instant photo reprints. Copying a Photo 11 Press l or r to change any other print settings, press Menu and select your Epson printer. 2. Note: You cannot print borderless on the scanner glass ...- to select the number (up the LCD display screen, if necessary. 6. To change the layout. Copying a Photo You can also print with or without borders and convert color photos to the edge of the paper (slight cropping may occur). You can copy photos onto 4 × 6-inch, 5 ×...
... then press r to select Color or B&W copies. 8. When you need to turn on your settings (see page 13 for instant photo reprints. Copying a Photo 11 Press l or r to change any other print settings, press Menu and select your Epson printer. 2. Note: You cannot print borderless on the scanner glass ...- to select the number (up the LCD display screen, if necessary. 6. To change the layout. Copying a Photo You can also print with or without borders and convert color photos to the edge of the paper (slight cropping may occur). You can copy photos onto 4 × 6-inch, 5 ×...

Quick Guide
Page 12
...image, press OK. When you are done cropping your photo, press OK. 9. Load 4 × 6-inch, 5 × 7-inch, letter-size, or A4-size Epson special paper. 3. Press OK again to turn on your computer. 1. If you need to select the number. 8. Note: To restore photos larger than 1 copy, .../Crop. ■ To resize the image area, press + or -. ■ To move the image area, use the NX410 Series software on Color Restoration.) 6. Press x Start to zoom in on the scanner glass. 4. To change print settings, press Menu and select your photo: 7. Press the Photo button, and press OK. 5.
...image, press OK. When you are done cropping your photo, press OK. 9. Load 4 × 6-inch, 5 × 7-inch, letter-size, or A4-size Epson special paper. 3. Press OK again to turn on your computer. 1. If you need to select the number. 8. Note: To restore photos larger than 1 copy, .../Crop. ■ To resize the image area, press + or -. ■ To move the image area, use the NX410 Series software on Color Restoration.) 6. Press x Start to zoom in on the scanner glass. 4. To change print settings, press Menu and select your photo: 7. Press the Photo button, and press OK. 5.
Quick Guide
Page 13
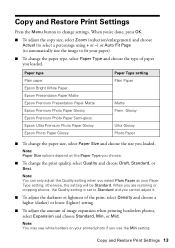
... borders on the Paper Type you loaded. Copy and Restore Print Settings 13 Paper type Plain paper Epson Bright White Paper Epson Presentation Paper Matte Epson Premium Presentation Paper Matte Epson Premium Photo Paper Glossy Epson Premium Photo Paper Semi-gloss Epson Ultra Premium Photo Paper Glossy Epson Photo Paper Glossy Paper Type setting Plain Paper Matte Prem...
... borders on the Paper Type you loaded. Copy and Restore Print Settings 13 Paper type Plain paper Epson Bright White Paper Epson Presentation Paper Matte Epson Premium Presentation Paper Matte Epson Premium Photo Paper Glossy Epson Premium Photo Paper Semi-gloss Epson Ultra Premium Photo Paper Glossy Epson Photo Paper Glossy Paper Type setting Plain Paper Matte Prem...
Quick Guide
Page 14
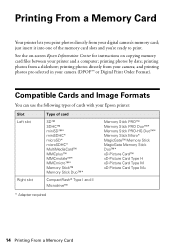
... Cards and Image Formats You can use the following types of the memory card slots and you print photos directly from your Epson printer: Slot Left slot Right slot Type of card SD™ SDHC™ miniSD™* miniSDHC* microSD* microSDHC* MultiMediaCard™ MMCplus™ MMCmobile™* MMCmicro&#...
... Cards and Image Formats You can use the following types of the memory card slots and you print photos directly from your Epson printer: Slot Left slot Right slot Type of card SD™ SDHC™ miniSD™* miniSDHC* microSD* microSDHC* MultiMediaCard™ MMCplus™ MMCmobile™* MMCmicro&#...
Quick Guide
Page 15
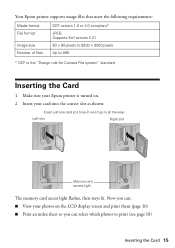
Your Epson printer supports image files that meet the following requirements: Media format File format Image size Number of files DCF version 1.0 or 2.0 compliant* JPEG Supports Exif version 2.21 80 × 80 pixels to 9200 × 9200 pixels Up to 999 * DCF is turned on the LCD display screen and print them (page...
Your Epson printer supports image files that meet the following requirements: Media format File format Image size Number of files DCF version 1.0 or 2.0 compliant* JPEG Supports Exif version 2.21 80 × 80 pixels to 9200 × 9200 pixels Up to 999 * DCF is turned on the LCD display screen and print them (page...
Quick Guide
Page 16
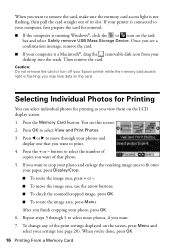
...if you see a confirmation message, remove the card. ■ If your printer is connected to select View and Print Photos. 3. Caution: Do not remove the card or turn off your Epson printer while the memory card access light is a Macintosh®, drag the removable disk icon from your photo, press ...OK. 6. You see page 20). button to select the number of copies you want of its slot. Selecting Individual Photos for Printing You can select ...
...if you see a confirmation message, remove the card. ■ If your printer is connected to select View and Print Photos. 3. Caution: Do not remove the card or turn off your Epson printer while the memory card access light is a Macintosh®, drag the removable disk icon from your photo, press ...OK. 6. You see page 20). button to select the number of copies you want of its slot. Selecting Individual Photos for Printing You can select ...
Quick Guide
Page 17
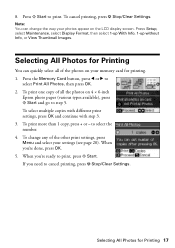
...Info, or View Thumbnail Images. When you need to print, press x Start. 8. To select multiple copies with different print settings, press OK and continue with step 3. 3. Note: You can quickly select all the photos on 4 × 6-inch Epson photo paper (various types available), press x Start and... go to select Print All Photos, then press OK. 2. to print. When you're done, press OK. 5. Press the Memory Card button, press l or r ...
...Info, or View Thumbnail Images. When you need to print, press x Start. 8. To select multiple copies with different print settings, press OK and continue with step 3. 3. Note: You can quickly select all the photos on 4 × 6-inch Epson photo paper (various types available), press x Start and... go to select Print All Photos, then press OK. 2. to print. When you're done, press OK. 5. Press the Memory Card button, press l or r ...
Quick Guide
Page 18
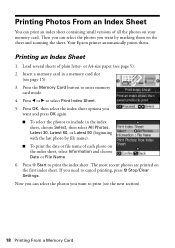
...select All Photos, Latest 30, Latest 60, or Latest 90 (beginning with the last photo by marking them . The most recent photos are printed on the sheet and scanning the sheet. Now you can select the photos you want to include in a memory card slot (see page 5).... OK again. ■ To select the photos to print (see the next section). 18 Printing From a Memory Card Press l or r to cancel printing, press y Stop/Clear Settings. Then you can select the photos you need to select Print Index Sheet. 5. Your Epson printer automatically prints them on the first index sheet.
...select All Photos, Latest 30, Latest 60, or Latest 90 (beginning with the last photo by marking them . The most recent photos are printed on the sheet and scanning the sheet. Now you can select the photos you want to include in a memory card slot (see page 5).... OK again. ■ To select the photos to print (see the next section). 18 Printing From a Memory Card Press l or r to cancel printing, press y Stop/Clear Settings. Then you can select the photos you need to select Print Index Sheet. 5. Your Epson printer automatically prints them on the first index sheet.
Quick Guide
Page 19
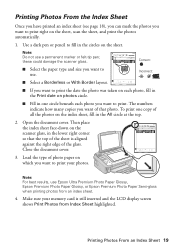
... Once you have printed an index sheet (see page 18), you can mark the photos you want to print right on the scanner glass, in the lower right corner so that photo. Note: Do not use Epson Ultra Premium Photo Paper Glossy, Epson Premium Photo Paper Glossy, or Epson Premium Photo Paper... Semi-gloss when printing photos from Index Sheet highlighted. Open the document cover. Then place the index sheet face-down...
... Once you have printed an index sheet (see page 18), you can mark the photos you want to print right on the scanner glass, in the lower right corner so that photo. Note: Do not use Epson Ultra Premium Photo Paper Glossy, Epson Premium Photo Paper Glossy, or Epson Premium Photo Paper... Semi-gloss when printing photos from Index Sheet highlighted. Open the document cover. Then place the index sheet face-down...
Quick Guide
Page 20
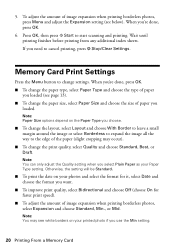
To adjust the amount of paper you loaded. Press OK, then press x Start to cancel printing, press y Stop/Clear Settings. 5. Memory Card Print Settings Press the Menu button to the edge of image expansion when printing borderless photos, select Expansion and choose Standard, Min., or Mid. Otherwise, the setting will ...Layout and choose With Border to leave a small margin around the image or select Borderless to expand the image all the way to change the print quality, select Quality and choose Standard, Best, or Draft. When you're done, press OK. ■ To change the paper type,...
To adjust the amount of paper you loaded. Press OK, then press x Start to cancel printing, press y Stop/Clear Settings. 5. Memory Card Print Settings Press the Menu button to the edge of image expansion when printing borderless photos, select Expansion and choose Standard, Min., or Mid. Otherwise, the setting will ...Layout and choose With Border to leave a small margin around the image or select Borderless to expand the image all the way to change the print quality, select Quality and choose Standard, Best, or Draft. When you're done, press OK. ■ To change the paper type,...
Quick Guide
Page 21
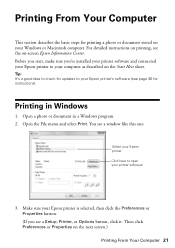
... (If you 've installed your printer software and connected your Epson printer to open your computer as described on -screen Epson Information Center. Printing in a Windows program. 2. Open a photo or document in Windows 1. Make sure your Epson printer's software (see a Setup, Printer, or Options button,...computer. You see the on the Start Here sheet. Printing From Your Computer This section describes the basic steps for instructions). For detailed instructions on printing, see a window like this one: Select your Epson printer Click here to your printer software 3. Before you ...
... (If you 've installed your printer software and connected your Epson printer to open your computer as described on -screen Epson Information Center. Printing in a Windows program. 2. Open a photo or document in Windows 1. Make sure your Epson printer's software (see a Setup, Printer, or Options button,...computer. You see the on the Start Here sheet. Printing From Your Computer This section describes the basic steps for instructions). For detailed instructions on printing, see a window like this one: Select your Epson printer Click here to your printer software 3. Before you ...


