

Product Information Guide
Page 3
...015 inch (0.065 to 0.39 mm) Perforated edges (gathering area) up to 60% RH Do not load paper that has been folded or is damaged, wrinkled, or curled. Epson LX-300+II Electrical Input voltage range Rated frequency range Input frequency range Rated current Power consumption 120 V 220 to 240...EN 55022 Class B EN 61000-3-2 EN 61000-3-3 EN 55024 Paper Use recycled paper, envelopes, and single-sheet multipart forms only under normal temperature and humidity conditions, as follows: Temperature: 59 to 77 °F (15 to 25 °C) Humidity: 30 to 0.035 inch (0.9 mm) 7/06 Epson LX-300+II - 3
...015 inch (0.065 to 0.39 mm) Perforated edges (gathering area) up to 60% RH Do not load paper that has been folded or is damaged, wrinkled, or curled. Epson LX-300+II Electrical Input voltage range Rated frequency range Input frequency range Rated current Power consumption 120 V 220 to 240...EN 55022 Class B EN 61000-3-2 EN 61000-3-3 EN 55024 Paper Use recycled paper, envelopes, and single-sheet multipart forms only under normal temperature and humidity conditions, as follows: Temperature: 59 to 77 °F (15 to 25 °C) Humidity: 30 to 0.035 inch (0.9 mm) 7/06 Epson LX-300+II - 3
Product Information Guide
Page 5
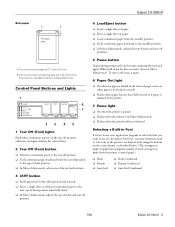
...of-form and tear-off position. ❏ Feeds continuous paper backward from the printer's control panel.) ❏ Draft ❏ Roman ❏ Sans Serif ❏ Draft Condensed ❏ Roman Condensed ❏ Sans Serif Condensed 7/06 Epson LX-300+II - 5 When held down for three seconds, turns ...want to the top-of-form position. ❏ In Micro Adjust mode, selects one of paper. ❏ Loads continuous paper from the standby position. ❏ Feeds continuous paper backward to the tear-off positions. 5 Pause button Stops printing temporarily, and resumes printing when ...
...of-form and tear-off position. ❏ Feeds continuous paper backward from the printer's control panel.) ❏ Draft ❏ Roman ❏ Sans Serif ❏ Draft Condensed ❏ Roman Condensed ❏ Sans Serif Condensed 7/06 Epson LX-300+II - 5 When held down for three seconds, turns ...want to the top-of-form position. ❏ In Micro Adjust mode, selects one of paper. ❏ Loads continuous paper from the standby position. ❏ Feeds continuous paper backward to the tear-off positions. 5 Pause button Stops printing temporarily, and resumes printing when ...

Product Information Guide
Page 6
... Off Problem Solution The print head is where the printer starts printing on but not loaded in font: 1. An unknown printer error has occurred. Paper Positions Top-of-Form Position The top-of-form position is overheated. Standby Position Continuous paper is in the paper path. Epson LX-300+II 7/06 Hold down the Pause button for several minutes; If...
... Off Problem Solution The print head is where the printer starts printing on but not loaded in font: 1. An unknown printer error has occurred. Paper Positions Top-of-Form Position The top-of-form position is overheated. Standby Position Continuous paper is in the paper path. Epson LX-300+II 7/06 Hold down the Pause button for several minutes; If...

Product Information Guide
Page 7
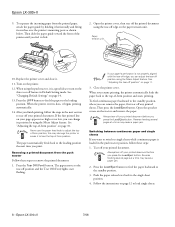
... to load continuous paper on the push tractor: 1. Unlock the sprockets on the printer scale (beneath the tractor). Make sure there are above the 0 mark on the tractor by -sheet. (Follow the instructions in the next section.) The printer comes with the printer so it in the paper and... lock it will be tearing off the printer. 2. Then open the sprocket covers and fit the first holes of this position. 0 mark 5. Epson LX-300+II Printing on Continuous Paper You can print on continuous paper using the tractor ...
... to load continuous paper on the push tractor: 1. Unlock the sprockets on the printer scale (beneath the tractor). Make sure there are above the 0 mark on the tractor by -sheet. (Follow the instructions in the next section.) The printer comes with the printer so it in the paper and... lock it will be tearing off the printer. 2. Then open the sprocket covers and fit the first holes of this position. 0 mark 5. Epson LX-300+II Printing on Continuous Paper You can print on continuous paper using the tractor ...
Product Information Guide
Page 8
... Reverse feeding several pages at a time may cause a paper jam. 2. To separate the incoming paper from the push tractor Follow these steps: 1. Open the printer cover, then tear off the printed document using the Micro...paper release lever back to the standby position. 3. The paper moves to load single sheets. 8 - Switching between continuous paper and single sheets If you can adjust the tear-off edge, you press the Load/Eject button. Turn on page 12 to the tear-off position" on the tractor and remove the paper. Epson LX-300+II 7/06 Epson LX-300+II 9. Paper...
... Reverse feeding several pages at a time may cause a paper jam. 2. To separate the incoming paper from the push tractor Follow these steps: 1. Open the printer cover, then tear off the printed document using the Micro...paper release lever back to the standby position. 3. The paper moves to load single sheets. 8 - Switching between continuous paper and single sheets If you can adjust the tear-off edge, you press the Load/Eject button. Turn on page 12 to the tear-off position" on the tractor and remove the paper. Epson LX-300+II 7/06 Epson LX-300+II 9. Paper...
Product Information Guide
Page 9
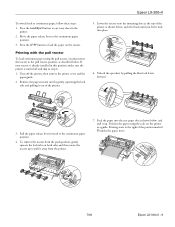
...skip to the right of the printer. 5. Position the paper using the pull tractor, you feel it up to load the paper on both sides and then rotate the tractor up . Press the LF/FF button to pull it out of the position marked 0 (under the paper now). 7/06 Epson LX-300+II - 9 Lower the tractor onto... the mounting slots at the top of the printer as shown below, and ...
...skip to the right of the printer. 5. Position the paper using the pull tractor, you feel it up to load the paper on both sides and then rotate the tractor up . Press the LF/FF button to pull it out of the position marked 0 (under the paper now). 7/06 Epson LX-300+II - 9 Lower the tractor onto... the mounting slots at the top of the printer as shown below, and ...

Product Information Guide
Page 10
...remove any remaining slack by gently pulling the paper from the printed paper, attach the paper guide. this may jam. (See page 14 for about three seconds. Replace the printer cover but do not lock it click. 11. Epson LX-300+II 7/06 Slide the left sprocket so its.... 1. Epson LX-300+II 8. Fit the first holes of your paper has a clean, straight leading edge. Then slide the right sprocket to adjust the loading position. Remove any slack in the Default Setting mode to adjust the paper position. The perforation between the two sprockets. 9. The printer beeps and...
...remove any remaining slack by gently pulling the paper from the printed paper, attach the paper guide. this may jam. (See page 14 for about three seconds. Replace the printer cover but do not lock it click. 11. Epson LX-300+II 7/06 Slide the left sprocket so its.... 1. Epson LX-300+II 8. Fit the first holes of your paper has a clean, straight leading edge. Then slide the right sprocket to adjust the loading position. Remove any slack in the Default Setting mode to adjust the paper position. The perforation between the two sprockets. 9. The printer beeps and...

Product Information Guide
Page 11
...position. Press the LF/FF D button to feed the paper backward, or press the Load/Eject U button to feed the paper forward, until you change it, even if you press the Tear Off (Font) button again, the printer feeds your paper to the next top-of-form position. The top ...paper normally lost between documents. so you make with the tear-off edge on the Auto tear off mode and select the appropriate page length for instructions.) 7/06 Epson LX-300+II - 11 Epson LX-300+II Your top-of-form position setting remains in effect until you change it, even if you turn off the printer...
...position. Press the LF/FF D button to feed the paper backward, or press the Load/Eject U button to feed the paper forward, until you change it, even if you press the Tear Off (Font) button again, the printer feeds your paper to the next top-of-form position. The top ...paper normally lost between documents. so you make with the tear-off edge on the Auto tear off mode and select the appropriate page length for instructions.) 7/06 Epson LX-300+II - 11 Epson LX-300+II Your top-of-form position setting remains in effect until you change it, even if you turn off the printer...
Product Information Guide
Page 12
... after printing each page. Lift up or remove the printer cover. Epson LX-300+II Printing on Single Sheets You can load single sheets of paper one at a time using . To load a stack of singlesheet paper, use the paper guide to match the width of paper you need to the appropriate position. The printer automatically pulls it begins printing. If the document...
... after printing each page. Lift up or remove the printer cover. Epson LX-300+II Printing on Single Sheets You can load single sheets of paper one at a time using . To load a stack of singlesheet paper, use the paper guide to match the width of paper you need to the appropriate position. The printer automatically pulls it begins printing. If the document...
Product Information Guide
Page 13
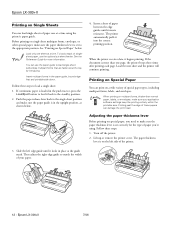
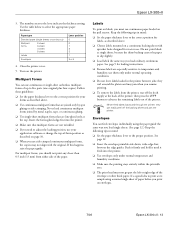
... envelopes only under normal operating conditions. ❏ Do not leave labels loaded in mind: ❏ Set the paper thickness lever to five parts (one original plus four copies). Epson LX-300+II 3. Use the table below to the lever indicate the thickness setting. Close the printer cover. 5. Multipart forms You can easily peel off the fresh supply...
... envelopes only under normal operating conditions. ❏ Do not leave labels loaded in mind: ❏ Set the paper thickness lever to five parts (one original plus four copies). Epson LX-300+II 3. Use the table below to the lever indicate the thickness setting. Close the printer cover. 5. Multipart forms You can easily peel off the fresh supply...

Product Information Guide
Page 14
The table below to change. 8. Make sure paper is loaded and the printer is indicated by which control panel lights are all the factory default settings, turn off . 2. The current language is off the printer to print a list of paper each time the printer ejects a printed page. 1. Press the LF/FF... in effect until the lights show the language you want to change any settings, go to change them again or reset the printer's defaults. Epson LX-300+II 7/06 Changing Default Settings Follow the steps below lists the default settings (in bold) and options you can often set for ...
The table below to change. 8. Make sure paper is loaded and the printer is indicated by which control panel lights are all the factory default settings, turn off . 2. The current language is off the printer to print a list of paper each time the printer ejects a printed page. 1. Press the LF/FF... in effect until the lights show the language you want to change any settings, go to change them again or reset the printer's defaults. Epson LX-300+II 7/06 Changing Default Settings Follow the steps below lists the default settings (in bold) and options you can often set for ...
Product Information Guide
Page 15
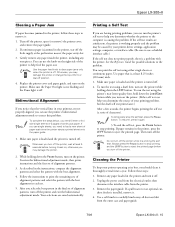
... and paper guide. 7/06 Epson LX-300+II - 15 Use a soft brush to help feed the paper out. Turn off . If continuous paper is a problem with the printer. Otherwise, you may be caused by your printing problem, but the draft self test prints faster.) After a few seconds, the printer begins printing the self test (a series of the printer to load a new...
... and paper guide. 7/06 Epson LX-300+II - 15 Use a soft brush to help feed the paper out. Turn off . If continuous paper is a problem with the printer. Otherwise, you may be caused by your printing problem, but the draft self test prints faster.) After a few seconds, the printer begins printing the self test (a series of the printer to load a new...

Product Information Guide
Page 16
...printer; When transporting the printer, do not lift it by hand to transport your printer is installed in the printer. If any paper loaded in the push position. 5. Then remove the ribbon cartridge. 7. these chemicals can damage the printer mechanism. Remove the paper guide, the USB cable holder, paper... cable from the electrical outlet; Unplug the power cord from the printer. 3. Never use a hard or abrasive brush. Epson LX-300+II 5. Epson LX-300+II 7/06 unsuitable lubricants can damage the printer components as well as the holder may be hot; Remove any ...
...printer; When transporting the printer, do not lift it by hand to transport your printer is installed in the printer. If any paper loaded in the push position. 5. Then remove the ribbon cartridge. 7. these chemicals can damage the printer mechanism. Remove the paper guide, the USB cable holder, paper... cable from the electrical outlet; Unplug the power cord from the printer. 3. Never use a hard or abrasive brush. Epson LX-300+II 5. Epson LX-300+II 7/06 unsuitable lubricants can damage the printer components as well as the holder may be hot; Remove any ...
Reference Guide
Page 9
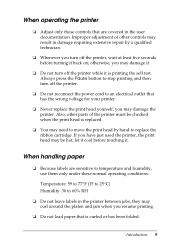
...; Never replace the print head yourself; Always press the Pause button to stop printing and then turn off the printer. ❏ Do not reconnect the power cord to an electrical outlet that are sensitive to temperature and humidity, use them only under these normal operating ... leave labels in damage requiring extensive repair by hand to move the print head by a qualified technician. ❏ Whenever you resume printing. ❏ Do not load paper that is curled or has been folded. Also, other parts of other controls may need to replace the ribbon cartridge. let it cool before turning...
...; Never replace the print head yourself; Always press the Pause button to stop printing and then turn off the printer. ❏ Do not reconnect the power cord to an electrical outlet that are sensitive to temperature and humidity, use them only under these normal operating ... leave labels in damage requiring extensive repair by hand to move the print head by a qualified technician. ❏ Whenever you resume printing. ❏ Do not load paper that is curled or has been folded. Also, other parts of other controls may need to replace the ribbon cartridge. let it cool before turning...
Reference Guide
Page 77
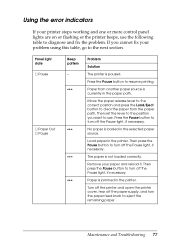
... to turn off the paper supply, and turn the paper feed knob to clear the paper from another paper source is currently in the printer. Load paper in the paper path. Turn off the printer and open the printer cover, tear off the Pause light, if necessary. Remove your paper and reload it. Paper is loaded in the printer. Move the paper release lever to...
... to turn off the paper supply, and turn the paper feed knob to clear the paper from another paper source is currently in the printer. Load paper in the paper path. Turn off the printer and open the printer cover, tear off the Pause light, if necessary. Remove your paper and reload it. Paper is loaded in the printer. Move the paper release lever to...

Reference Guide
Page 81
... three times. Cause What to print again. If the problem persists, check for a paper jam or a ribbon jam. The printer may be worn out. If it on page 96. Load paper in the printer. Turn off the printer and check for a paper jam or ribbon jam. (If an error occurs when you switch between single sheets and...
... three times. Cause What to print again. If the problem persists, check for a paper jam or a ribbon jam. The printer may be worn out. If it on page 96. Load paper in the printer. Turn off the printer and check for a paper jam or ribbon jam. (If an error occurs when you switch between single sheets and...

Reference Guide
Page 102
...using two tractors at the top of continuous paper handling by squeezing its lock tabs gently and pulling it clicks in the push-tractor position. 5. Turn off the printer. 2. Pull the paper release lever forward to install and load paper on the push tractor. 102 Options and ...Consumables Lower the pull tractor into the mounting slots at the same time. Load continuous paper on the standard and optional tractor: 1. Optional...
...using two tractors at the top of continuous paper handling by squeezing its lock tabs gently and pulling it clicks in the push-tractor position. 5. Turn off the printer. 2. Pull the paper release lever forward to install and load paper on the push tractor. 102 Options and ...Consumables Lower the pull tractor into the mounting slots at the same time. Load continuous paper on the standard and optional tractor: 1. Optional...

Reference Guide
Page 115
... to 95 °F (5 to 35 °C) -22 to 140 °F (-30 to 60 °C) Humidity (without condensation) 10 to 80% RH 0 to 85% RH Paper Use recycled paper, envelopes, labels and single-sheet multipart forms only under normal temperature and humidity conditions, as follows: ❏ Temperature: 59 to 77 °F (15 to...
... to 95 °F (5 to 35 °C) -22 to 140 °F (-30 to 60 °C) Humidity (without condensation) 10 to 80% RH 0 to 85% RH Paper Use recycled paper, envelopes, labels and single-sheet multipart forms only under normal temperature and humidity conditions, as follows: ❏ Temperature: 59 to 77 °F (15 to...

Reference Guide
Page 127
H Help, EPSON, 96 to 97 High speed draft, 67, 70 Hot parts caution symbol, 7 I I/F mode, 67, 70 IBM character table, ...Internet technical support, 96 L Labels, 29 to 32, 118 Lights, control panel, 63 to 66, 77 to 78 Line spacing, 111 Loading paper envelopes, 29 to 30, 32 labels, 29 to 32 multipart forms, 29 to 31 on the pull tractor, 19 to 21 on the..., 70, 110 Parity, 67, 70 Power cord, 110 Power supply problems, 79 to 80 Printable columns, 111 Print direction, 67, 69 Printer cleaning, 74 to 75 cover, 109 parts, 109 to 110 server, 45 to 49 sharing, 45 to 58 specifications, 111 to 124 transporting...
H Help, EPSON, 96 to 97 High speed draft, 67, 70 Hot parts caution symbol, 7 I I/F mode, 67, 70 IBM character table, ...Internet technical support, 96 L Labels, 29 to 32, 118 Lights, control panel, 63 to 66, 77 to 78 Line spacing, 111 Loading paper envelopes, 29 to 30, 32 labels, 29 to 32 multipart forms, 29 to 31 on the pull tractor, 19 to 21 on the..., 70, 110 Parity, 67, 70 Power cord, 110 Power supply problems, 79 to 80 Printable columns, 111 Print direction, 67, 69 Printer cleaning, 74 to 75 cover, 109 parts, 109 to 110 server, 45 to 49 sharing, 45 to 58 specifications, 111 to 124 transporting...
User's Guide
Page 39
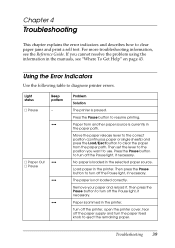
... and turn off the Pause light, if necessary. Press the Pause button to clear the paper from another paper source is loaded in the manuals, see the Reference Guide. No paper is currently in the printer. Remove your paper and reload it. Chapter 4 Troubleshooting This chapter explains the error indicators and describes how to use. If...
... and turn off the Pause light, if necessary. Press the Pause button to clear the paper from another paper source is loaded in the manuals, see the Reference Guide. No paper is currently in the printer. Remove your paper and reload it. Chapter 4 Troubleshooting This chapter explains the error indicators and describes how to use. If...


