Product Information Guide
Page 1
...EPSON FX-890/FX-2190 - 1 Printer Specifications EPSON FX-890/FX-2190 - 2 Control Panel Buttons and Lights EPSON FX-890/FX-2190 - 7 Error Indicators EPSON FX-890/FX-2190 - 8 Selecting a Font and Pitch EPSON FX-890/FX-2190 - 8 Selecting a Paper Source EPSON FX-890/FX-2190 - 9 Setting the Paper Release Lever EPSON FX-890/FX-2190 - 10 Adjusting the Paper-Thickness Setting EPSON FX-890/FX-2190 - 10 Using the Micro Adjust Function EPSON FX-890/FX-2190 - 11 Loading Special Papers EPSON FX-890/FX-2190 - 12 Switching Paper Types EPSON FX-890/FX-2190 - 13 Clearing Paper Jams EPSON FX-890/FX...
...EPSON FX-890/FX-2190 - 1 Printer Specifications EPSON FX-890/FX-2190 - 2 Control Panel Buttons and Lights EPSON FX-890/FX-2190 - 7 Error Indicators EPSON FX-890/FX-2190 - 8 Selecting a Font and Pitch EPSON FX-890/FX-2190 - 8 Selecting a Paper Source EPSON FX-890/FX-2190 - 9 Setting the Paper Release Lever EPSON FX-890/FX-2190 - 10 Adjusting the Paper-Thickness Setting EPSON FX-890/FX-2190 - 10 Using the Micro Adjust Function EPSON FX-890/FX-2190 - 11 Loading Special Papers EPSON FX-890/FX-2190 - 12 Switching Paper Types EPSON FX-890/FX-2190 - 13 Clearing Paper Jams EPSON FX-890/FX...
Product Information Guide
Page 2
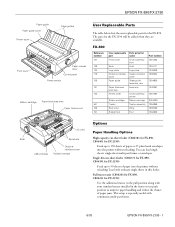
...-capacity cut -sheet feeder (C806371 for FX-890, C806391 for FX-2190) Feeds up to 50 sheets of paper or 25 plain bond envelopes into the printer without reloading. The parts for the FX-890. EPSON FX-890/FX-2190 Paper guide Paper guide cover Printer cover Edge guides Front cover Paper release lever Control panel Power switch Ribbon cartridge Paper thickness lever Paper tension unit User Replaceable Parts The...
...-capacity cut -sheet feeder (C806371 for FX-890, C806391 for FX-2190) Feeds up to 50 sheets of paper or 25 plain bond envelopes into the printer without reloading. The parts for the FX-890. EPSON FX-890/FX-2190 Paper guide Paper guide cover Printer cover Edge guides Front cover Paper release lever Control panel Power switch Ribbon cartridge Paper thickness lever Paper tension unit User Replaceable Parts The...
Product Information Guide
Page 9
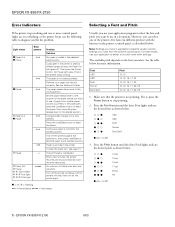
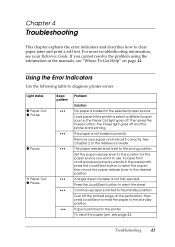
... cpi PS O=On, N=Off 8 - EPSON FX-890/FX-2190 6/03 EPSON FX-890/FX-2190 Error Indicators If the printer stops working and one of paper is loaded in the selected paper source. O Paper Out O Pause O O Tear Off/Bin O O O Font light O O O Pitch light Problem Solution No paper is not fully ejected. If paper from the printer's control panel. then move the paper release lever to the standby position...
... cpi PS O=On, N=Off 8 - EPSON FX-890/FX-2190 6/03 EPSON FX-890/FX-2190 Error Indicators If the printer stops working and one of paper is loaded in the selected paper source. O Paper Out O Pause O O Tear Off/Bin O O O Font light O O O Pitch light Problem Solution No paper is not fully ejected. If paper from the printer's control panel. then move the paper release lever to the standby position...
Product Information Guide
Page 11
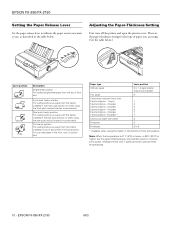
... want to use, as described in the table below .) Lever position Description Single-sheet position For loading single-sheet paper from the tractor installed on top of the printer in the pull position. EPSON FX-890/FX-2190 Setting the Paper Release Lever Set the paper release lever to indicate the paper source you are using the tractor in the bottom or front pull...
... want to use, as described in the table below .) Lever position Description Single-sheet position For loading single-sheet paper from the tractor installed on top of the printer in the pull position. EPSON FX-890/FX-2190 Setting the Paper Release Lever Set the paper release lever to indicate the paper source you are using the tractor in the bottom or front pull...
Product Information Guide
Page 14
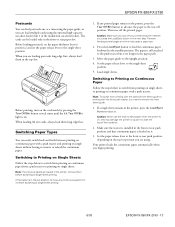
... the paper-thickness lever to position 2 and set the paper release lever to the single-sheet position. 5. Switching to remove the front sheet guide. 1. Then tear off your printed document before switching to eject paper when the printer is installed in the front or rear paper slot. Caution: Never use the knob to single-sheet printing. 1. EPSON FX-890/FX-2190 Postcards...
... the paper-thickness lever to position 2 and set the paper release lever to the single-sheet position. 5. Switching to remove the front sheet guide. 1. Then tear off your printed document before switching to eject paper when the printer is installed in the front or rear paper slot. Caution: Never use the knob to single-sheet printing. 1. EPSON FX-890/FX-2190 Postcards...

Technical Brief (Impact Printers)
Page 3
Pull tractor position For loading continuous paper from the tractor on multi-part forms. Paper feed method Front Paper Guide Type of paper Single sheets, single sheet labels, top- L Paper thickness adjustment: Most EPSON impact printers have a Paper Thickness Lever that allows the printer to accommodate various thicknesses of their respective owners. Sample paper release lever chart Paper release lever position CUT Description Single-sheet position For...
Pull tractor position For loading continuous paper from the tractor on multi-part forms. Paper feed method Front Paper Guide Type of paper Single sheets, single sheet labels, top- L Paper thickness adjustment: Most EPSON impact printers have a Paper Thickness Lever that allows the printer to accommodate various thicknesses of their respective owners. Sample paper release lever chart Paper release lever position CUT Description Single-sheet position For...
User Manual
Page 3
... Printer 7 Assembling the Printer 8 Connecting the Printer to Your Computer 11 Installing the Printer Software 12 For Windows XP, Me, or 2000 12 For Windows 98, 95, or NT 4.0 13 For DOS programs 14 Installing and Using the Online Reference Guide 15 Installing the Remote Configuration Manager 15 Paper Handling Setting the Paper Release Lever 17 Adjusting the Paper...
... Printer 7 Assembling the Printer 8 Connecting the Printer to Your Computer 11 Installing the Printer Software 12 For Windows XP, Me, or 2000 12 For Windows 98, 95, or NT 4.0 13 For DOS programs 14 Installing and Using the Online Reference Guide 15 Installing the Remote Configuration Manager 15 Paper Handling Setting the Paper Release Lever 17 Adjusting the Paper...

User Manual
Page 17
... Description Single-sheet position For loading single-sheet paper from the tractor installed on top of the printer in combination. Paper Handling 17 Setting the Paper Release Lever Before you start printing, be sure to set the paper release lever to indicate the paper source you need to use paper in the front, rear, or bottom slot. Rear push tractor position...
... Description Single-sheet position For loading single-sheet paper from the tractor installed on top of the printer in combination. Paper Handling 17 Setting the Paper Release Lever Before you start printing, be sure to set the paper release lever to indicate the paper source you need to use paper in the front, rear, or bottom slot. Rear push tractor position...
User Manual
Page 19
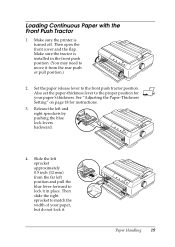
...inch (12 mm) from the rear push or pull position.) 2. Make sure the printer is installed in place. Set the paper release lever to lock it . 10 5 0 Paper Handling 19 See "Adjusting the Paper-Thickness Setting" on page 18 for your paper, but do not lock it in the front push position. (You may need to... move it from the far left position and pull the blue lever forward to the ...
...inch (12 mm) from the rear push or pull position.) 2. Make sure the printer is installed in place. Set the paper release lever to lock it . 10 5 0 Paper Handling 19 See "Adjusting the Paper-Thickness Setting" on page 18 for your paper, but do not lock it in the front push position. (You may need to... move it from the far left position and pull the blue lever forward to the ...
User Manual
Page 21
... adjust the top-of your page appears too high or low, you can begin. Set the paper release lever to move the tractor from the front push or pull position.) 2. The triangle mark on top of the printer indicates the point furthest to the left where printing can change its position using the Micro...
... adjust the top-of your page appears too high or low, you can begin. Set the paper release lever to move the tractor from the front push or pull position.) 2. The triangle mark on top of the printer indicates the point furthest to the left where printing can change its position using the Micro...

User Manual
Page 22
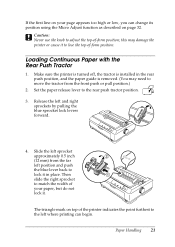
... the tractor from the rear push or front push position.) 2. Turn on your paper has a clean, straight edge. Set the paper release lever to adjust the top-of the paper, with the Pull Tractor 1. If the first line on the printer. Loading Continuous Paper with the printable side down . 7. Make sure your page appears too high or...
... the tractor from the rear push or front push position.) 2. Turn on your paper has a clean, straight edge. Set the paper release lever to adjust the top-of the paper, with the Pull Tractor 1. If the first line on the printer. Loading Continuous Paper with the printable side down . 7. Make sure your page appears too high or...

User Manual
Page 23
... do not lock it in the paper slot. Slide the edge guides to match the width of your paper has a clean, straight edge. Then open the sprocket covers. Note: Make sure the printer is on, a paper jam may occur. Release the sprockets by pulling the sprocket lock levers forward. 4. Edge guides Then slide the right sprocket...
... do not lock it in the paper slot. Slide the edge guides to match the width of your paper has a clean, straight edge. Then open the sprocket covers. Note: Make sure the printer is on, a paper jam may occur. Release the sprockets by pulling the sprocket lock levers forward. 4. Edge guides Then slide the right sprocket...
User Manual
Page 27
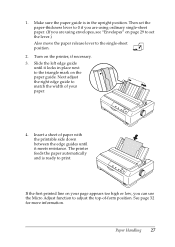
... the Micro Adjust function to adjust the top-of your page appears too high or low, you are using envelopes, see "Envelopes" on the printer, if necessary. 3. See page 32 for more information. If the first printed line on the paper guide. Then set the lever.) Also move the paper release lever to print. Paper Handling 27
... the Micro Adjust function to adjust the top-of your page appears too high or low, you are using envelopes, see "Envelopes" on the printer, if necessary. 3. See page 32 for more information. If the first printed line on the paper guide. Then set the lever.) Also move the paper release lever to print. Paper Handling 27
User Manual
Page 30
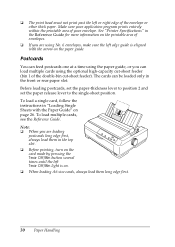
Make sure your envelope. Before loading postcards, set the paper-thickness lever to position 2 and set the paper release lever to the single-sheet position. Note: ❏ When you...print head must not print past the left Tear Off/Bin light is aligned with the Paper Guide" on the paper guide. See "Printer Specifications" in the top slot. ❏ Before printing, turn on the card mode... in the Reference Guide for more information on the printable area of the envelope or other thick paper. To load multiple cards, see the Reference Guide. Postcards You can be loaded only in "Loading...
Make sure your envelope. Before loading postcards, set the paper-thickness lever to position 2 and set the paper release lever to the single-sheet position. Note: ❏ When you...print head must not print past the left Tear Off/Bin light is aligned with the Paper Guide" on the paper guide. See "Printer Specifications" in the top slot. ❏ Before printing, turn on the card mode... in the Reference Guide for more information on the printable area of the envelope or other thick paper. To load multiple cards, see the Reference Guide. Postcards You can be loaded only in "Loading...
User Manual
Page 41
... Beep pattern ••• Problem Solution No paper is set to the standby position. The paper release lever is loaded in the manuals, see page 42. then move the paper release lever to diagnose printer errors. For more troubleshooting information, see your paper and reload it correctly. Load paper in the printer. the Pause light goes off . Press the Load...
... Beep pattern ••• Problem Solution No paper is set to the standby position. The paper release lever is loaded in the manuals, see page 42. then move the paper release lever to diagnose printer errors. For more troubleshooting information, see your paper and reload it correctly. Load paper in the printer. the Pause light goes off . Press the Load...
Service Manual
Page 18
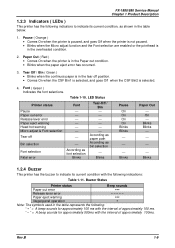
...printer is selected. 4. FX-1880/880 Service Manual Chapter 1 Product Description 1.2.3 Indicators ( LEDs ) This printer has the following indicators to indicate its current condition, as bin selection Blinks Pause On On On On Blinks Blinks Blinks Paper... approximately 100 ms. " - Buzzer Status Printer status Beep sounds Paper out error OOO Release lever error - - - - - Font ( Green ) Indicates the font selections. LED Status Printer status Pause Paper out error Release lever error Paper eject warning Head hot warning Micro adjust &...
...printer is selected. 4. FX-1880/880 Service Manual Chapter 1 Product Description 1.2.3 Indicators ( LEDs ) This printer has the following indicators to indicate its current condition, as bin selection Blinks Pause On On On On Blinks Blinks Blinks Paper... approximately 100 ms. " - Buzzer Status Printer status Beep sounds Paper out error OOO Release lever error - - - - - Font ( Green ) Indicates the font selections. LED Status Printer status Pause Paper out error Release lever error Paper eject warning Head hot warning Micro adjust &...

Service Manual
Page 25
...via the timing belt. The release lever in the paper feed mechanism. PG adjust lever is selected according to the tractor unit setting positions and the lever positions. If the lever is in one direction. The tractor detector detects the release lever setting position, for printing....lever position. No matter the carriage unit is driven left and right along the CR guide shaft and mechanism frame, and stops it at power on paper using the ink ribbon. 2.2 PRINTER MECHANISM FX-1180/FX-880 Service Manual Chapter 2 Operating Principles This printer mechanism consists of Printhead, Paper...
...via the timing belt. The release lever in the paper feed mechanism. PG adjust lever is selected according to the tractor unit setting positions and the lever positions. If the lever is in one direction. The tractor detector detects the release lever setting position, for printing....lever position. No matter the carriage unit is driven left and right along the CR guide shaft and mechanism frame, and stops it at power on paper using the ink ribbon. 2.2 PRINTER MECHANISM FX-1180/FX-880 Service Manual Chapter 2 Operating Principles This printer mechanism consists of Printhead, Paper...
Service Manual
Page 33
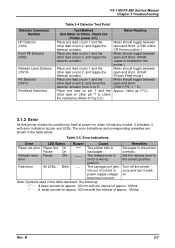
... Error LED Status Buzzer Cause Remedies Paper out error Paper Out: On Pause: On Release lever Pause: ON error Fatal error All LEDs : Blink *** ----- The printer fails to the correct position. Place...FX-1180/FX-880 Service Manual Chapter 3 Troubleshooting Detector Connector Number HP Detector (CN4) Front PE Detector (CN6) Release Lever Detector (CN10) PG Detector (CN11) Printhead thermistor Table 3-4 Detector Test Point Test Method (Set Meter to Ohms. Check the Printer power off the printer once and turn it with the interval of approx. 100ms. Rev. Set paper...
... Error LED Status Buzzer Cause Remedies Paper out error Paper Out: On Pause: On Release lever Pause: ON error Fatal error All LEDs : Blink *** ----- The printer fails to the correct position. Place...FX-1180/FX-880 Service Manual Chapter 3 Troubleshooting Detector Connector Number HP Detector (CN4) Front PE Detector (CN6) Release Lever Detector (CN10) PG Detector (CN11) Printhead thermistor Table 3-4 Detector Test Point Test Method (Set Meter to Ohms. Check the Printer power off the printer once and turn it with the interval of approx. 100ms. Rev. Set paper...
Service Manual
Page 57
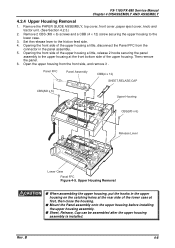
...remove the panel. 6. T Mount the Panel assembly onto the upper housing before installing the upper housing assembly. T Sheet, Release, Cap can be assembled after the upper housing assembly is installed. B 4-8 Upper Housing Removal CAUTION T When assembling the...er C ase P anelF F C Figure 4-5. Remove the PAPER GUIDE ASSEMBLY, top cover, front cover, paper eject cover, knob and tractor unit. (See Section 4.2.3.) 2. FX-1180/FX-880 Service Manual Chapter 4 DISASSEMBLY AND ASSEMBLY 4.2.4 Upper Housing Removal 1. Set the release lever to the lower case. 3. Opening the front side of ...
...remove the panel. 6. T Mount the Panel assembly onto the upper housing before installing the upper housing assembly. T Sheet, Release, Cap can be assembled after the upper housing assembly is installed. B 4-8 Upper Housing Removal CAUTION T When assembling the...er C ase P anelF F C Figure 4-5. Remove the PAPER GUIDE ASSEMBLY, top cover, front cover, paper eject cover, knob and tractor unit. (See Section 4.2.3.) 2. FX-1180/FX-880 Service Manual Chapter 4 DISASSEMBLY AND ASSEMBLY 4.2.4 Upper Housing Removal 1. Set the release lever to the lower case. 3. Opening the front side of ...

