
Technical Brief (Impact Printers)
Page 5
... Printer: FX-2180 Mode: ESC/P Port: LPT1 Font : Roman Pitch : 10CPI Print Quality : LQ Character Table : PC 437 Continuous Rear : 11 inch Continuous Rear : 8.5mm Continuous Front : 7 inch Continuous Front : 8.5mm CutSheetFeeder 1 : 11 inch CutSheetFeeder 1 : 8.5mm CutSheetFeeder 2 : 11 inch CutSheetFeeder 2 : 8.5mm Manual Rear : 14 inch Manual Rear : 8.5mm Help: Select printer Font. EPSON Sales Training EPSON is...
... Printer: FX-2180 Mode: ESC/P Port: LPT1 Font : Roman Pitch : 10CPI Print Quality : LQ Character Table : PC 437 Continuous Rear : 11 inch Continuous Rear : 8.5mm Continuous Front : 7 inch Continuous Front : 8.5mm CutSheetFeeder 1 : 11 inch CutSheetFeeder 1 : 8.5mm CutSheetFeeder 2 : 11 inch CutSheetFeeder 2 : 8.5mm Manual Rear : 14 inch Manual Rear : 8.5mm Help: Select printer Font. EPSON Sales Training EPSON is...
Product Information Guide
Page 7
...group it is on, or no data, so the computer must perform the tear-off function manually by printing the quick reference in a shorter time while the printer prints. Group 1 Features Printer mods Character pitch Page length Skip-over -perforation When you can check the character tables available .../P or IBM emulation lOcpior12cpi 11 in., 12 in., 6.5 in., or 70/6 in the Epson ESC/P mode. The printer automatically feeds the paper perforation to the tear-off the printed page. FX-870/1170 Page length You can then easily tear off position at 10 cpi in the Group 2 default-...
...group it is on, or no data, so the computer must perform the tear-off function manually by printing the quick reference in a shorter time while the printer prints. Group 1 Features Printer mods Character pitch Page length Skip-over -perforation When you can check the character tables available .../P or IBM emulation lOcpior12cpi 11 in., 12 in., 6.5 in., or 70/6 in the Epson ESC/P mode. The printer automatically feeds the paper perforation to the tear-off the printed page. FX-870/1170 Page length You can then easily tear off position at 10 cpi in the Group 2 default-...
Product Information Guide
Page 11
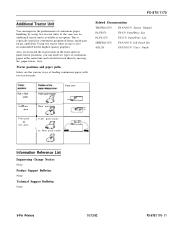
... especially useful for the highest quality graphics. FX-870/1170 Related Documentation TM-FX8/1170 FX-870/1170 Service Manual PL-FX870 FX-870 Parts/Price List PL-FX1170 FX-1170 Parts/Price List SPKFX8/1170 FX-870/1170 Self Paced Kit 4001255 FX-870/1170 User's Guide Paper path Pull + rear push...push-tractor Information Reference List Engineering Change Notices None Product Support Bulletins None Technical Support Bulletins None 9-Pin Printers 10/13/92 FX-870/1170- 11 Tractor positions and paper paths below are the various ways of feeding continuous paper with two tractor ...
... especially useful for the highest quality graphics. FX-870/1170 Related Documentation TM-FX8/1170 FX-870/1170 Service Manual PL-FX870 FX-870 Parts/Price List PL-FX1170 FX-1170 Parts/Price List SPKFX8/1170 FX-870/1170 Self Paced Kit 4001255 FX-870/1170 User's Guide Paper path Pull + rear push...push-tractor Information Reference List Engineering Change Notices None Product Support Bulletins None Technical Support Bulletins None 9-Pin Printers 10/13/92 FX-870/1170- 11 Tractor positions and paper paths below are the various ways of feeding continuous paper with two tractor ...

User Manual
Page 5
...frayed If liquid has been spilled into it If it has been exposed to rain or water If it exhibits a distinct change in the user's manual, do not attempt to service personnel. If it has been dropped or the cabinet has been damaged If it does not operate normally when the... operating instructions are followed. Adjust only those compartments to repair the printer yourself. Refer all products plugged into the extension cord does not exceed the extension cord's ampere rating. Also, make sure that the total of ...
...frayed If liquid has been spilled into it If it has been exposed to rain or water If it exhibits a distinct change in the user's manual, do not attempt to service personnel. If it has been dropped or the cabinet has been damaged If it does not operate normally when the... operating instructions are followed. Adjust only those compartments to repair the printer yourself. Refer all products plugged into the extension cord does not exceed the extension cord's ampere rating. Also, make sure that the total of ...

User Manual
Page 14
... cut -sheet feeder automatically feeds up to the single-bin model. It is especially useful with continuous multi-part forms. You can also manually load single sheets without reloading. Additional Tractor Unit (C80020* for the standard-width carriage, C80021* for the wide carriage) This cut ...-sheet feeder by connecting this cutsheet feeder to 50 sheets of your printer without removing the cut-sheet feeder. High-Capacity Cut-Sheet Feeder (C80638* for the standard-width carriage, C80640* for the wide carriage...
... cut -sheet feeder automatically feeds up to the single-bin model. It is especially useful with continuous multi-part forms. You can also manually load single sheets without reloading. Additional Tractor Unit (C80020* for the standard-width carriage, C80021* for the wide carriage) This cut ...-sheet feeder by connecting this cutsheet feeder to 50 sheets of your printer without removing the cut-sheet feeder. High-Capacity Cut-Sheet Feeder (C80638* for the standard-width carriage, C80640* for the wide carriage...

User Manual
Page 16
... equipment. Other chapters contain information on unpacking, setting up and operating your printer. Be sure to your printer. There is also a glossary of problems and solutions. If the printer does not operate properly or the printed results are not what you expect,...contains information on installing options, general maintenance, specifications, and printer commands. Notes contain important information and useful tips on paper handling and day-to-day operation of your printer. Finding Your Way Around This manual provides fully illustrated, step-by-step instructions for a ...
... equipment. Other chapters contain information on unpacking, setting up and operating your printer. Be sure to your printer. There is also a glossary of problems and solutions. If the printer does not operate properly or the printed results are not what you expect,...contains information on installing options, general maintenance, specifications, and printer commands. Notes contain important information and useful tips on paper handling and day-to-day operation of your printer. Finding Your Way Around This manual provides fully illustrated, step-by-step instructions for a ...

User Manual
Page 66
...You can then easily tear off function manually by pressing the TEAR OFF button. When the printer again receives data, it automatically feeds the paper backward to valid. If your text lines overprint each carriage return (CR) code is valid, the printer automatically performs the tear-off is always...other, set auto line feed to the top-of character tables. You can check the character tables available with software commands. Using the Printer 3-7 When the auto tear off feature. Character table Character tables contain the characters and symbols used in these character tables. You can...
...You can then easily tear off function manually by pressing the TEAR OFF button. When the printer again receives data, it automatically feeds the paper backward to valid. If your text lines overprint each carriage return (CR) code is valid, the printer automatically performs the tear-off is always...other, set auto line feed to the top-of character tables. You can check the character tables available with software commands. Using the Printer 3-7 When the auto tear off feature. Character table Character tables contain the characters and symbols used in these character tables. You can...

User Manual
Page 79
... READY light is blinking. 2. The FONT and CONDENSED lights blink alternately. 3. When you adjust the tearoff position. 3-20 Using the Printer Tear off position, the printer beeps and paper feeding pauses briefly. Tear Off 4. l When the paper reaches the factory-set tear-off any printed pages. 5....follow the steps below to enter the micro-feed feature. When you resume printing, the printer automatically feeds the paper back to the loading position and begins printing. (You can also manually feed the paper back to the loading position by pressing the TEAR OFF button again.) ...
... READY light is blinking. 2. The FONT and CONDENSED lights blink alternately. 3. When you adjust the tearoff position. 3-20 Using the Printer Tear off position, the printer beeps and paper feeding pauses briefly. Tear Off 4. l When the paper reaches the factory-set tear-off any printed pages. 5....follow the steps below to enter the micro-feed feature. When you resume printing, the printer automatically feeds the paper back to the loading position and begins printing. (You can also manually feed the paper back to the loading position by pressing the TEAR OFF button again.) ...

User Manual
Page 81
...~xyz~!l -.- Normal Draft ! Character Fonts Because some application programs control character fonts and because program commands often override panel settings, use your application program's user's manual for each font. "+I$%&' ( ) t-l" ~ --. /~:~j.~~34.5~783: j J,BC:I.J$J---Gt-I :) 1:) q 1" I ,:. Here are printed, check your application program's print options instead of the control panel to select character fonts...
...~xyz~!l -.- Normal Draft ! Character Fonts Because some application programs control character fonts and because program commands often override panel settings, use your application program's user's manual for each font. "+I$%&' ( ) t-l" ~ --. /~:~j.~~34.5~783: j J,BC:I.J$J---Gt-I :) 1:) q 1" I ,:. Here are printed, check your application program's print options instead of the control panel to select character fonts...
User Manual
Page 84
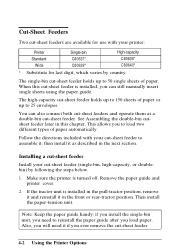
The single-bin cut-sheet feeder holds up to load two different types of paper. You can still manually insert single sheets using the paper guide. then install it in the next section. If the tractor unit is installed in the pull-tractor position,... of paper or up to reinstall the paper guide after you load paper. Note: Keep the paper guide handy; Follow the directions included with your printer: Printer Single-bin High-capacity Standard C80637* C80638* Wide C80639* C80640* * Substitute for use with your cut-sheet feeder (single-bin, high-capacity, or doublebin) ...
The single-bin cut-sheet feeder holds up to load two different types of paper. You can still manually insert single sheets using the paper guide. then install it in the next section. If the tractor unit is installed in the pull-tractor position,... of paper or up to reinstall the paper guide after you load paper. Note: Keep the paper guide handy; Follow the directions included with your printer: Printer Single-bin High-capacity Standard C80637* C80638* Wide C80639* C80640* * Substitute for use with your cut-sheet feeder (single-bin, high-capacity, or doublebin) ...
User Manual
Page 92
.... 5. Install the assembled double-bin cut -sheet feeder becomes BIN 2. See the sections on the tab locks. When you select BIN 1, the printer beeps once. See Installing a cut -sheet feeders are locked securely together. 4. You can also insert single sheets using the software command described in ...now use either cut -sheet feeders together while pushing firmly on loading paper in your software user's manual or by holding down the ALT button and pressing the PAUSE button when the printer is out of paper. Make sure the two cut -sheet feeder earlier in Chapter 8. 4-10 Using...
.... 5. Install the assembled double-bin cut -sheet feeder becomes BIN 2. See the sections on the tab locks. When you select BIN 1, the printer beeps once. See Installing a cut -sheet feeders are locked securely together. 4. You can also insert single sheets using the software command described in ...now use either cut -sheet feeders together while pushing firmly on loading paper in your software user's manual or by holding down the ALT button and pressing the PAUSE button when the printer is out of paper. Make sure the two cut -sheet feeder earlier in Chapter 8. 4-10 Using...

User Manual
Page 106
.... Use the information in the input buffer drops to 256 bytes, the printer outputs an X-OFF code or sets the DTR flag to receive data. If you set the baud rate, see the manual supplied with the interface. Once the vacant area for data in your optional... interface manual or your computer's manual to "0" (SPACE) indicating that it is detected, your C823051 /C823061 optional interface. For all other errors, including framing and overrun errors, are ignored. 4-24 Using the Printer Options Error handling When a parity error is again...
.... Use the information in the input buffer drops to 256 bytes, the printer outputs an X-OFF code or sets the DTR flag to receive data. If you set the baud rate, see the manual supplied with the interface. Once the vacant area for data in your optional... interface manual or your computer's manual to "0" (SPACE) indicating that it is detected, your C823051 /C823061 optional interface. For all other errors, including framing and overrun errors, are ignored. 4-24 Using the Printer Options Error handling When a parity error is again...

User Manual
Page 145
... Some software programs accept only the decimal format, while others let you type in ASCII characters. (Some programs don't let you insert printer commands at all the commands available in your document, you can use to enhance your text in a particular typeface, feed the paper... italics anywhere you like. Sending printer commands Most actions your printer performs are handled by your software allows you to send commands to the printer, the software manual should explain exactly what format and punctuation are indicated by inserting a command in the Epson ESC/P and the IBM emulation ...
... Some software programs accept only the decimal format, while others let you type in ASCII characters. (Some programs don't let you insert printer commands at all the commands available in your document, you can use to enhance your text in a particular typeface, feed the paper... italics anywhere you like. Sending printer commands Most actions your printer performs are handled by your software allows you to send commands to the printer, the software manual should explain exactly what format and punctuation are indicated by inserting a command in the Epson ESC/P and the IBM emulation ...
Service Manual
Page 1
EPSON EPSON TERMINAL PRINTER FX-870/1170 SERVICE MANUAL 4001461 REV.-A
EPSON EPSON TERMINAL PRINTER FX-870/1170 SERVICE MANUAL 4001461 REV.-A

Service Manual
Page 2
... assume no responsibility for any from whatsoever without notice. However, should any errors be detected, SEIKO EPSON would greatly appreciate being informed of this manual or the consequences thereof. @ Copyright 1992 by SEIKO EPSON CORPORATION Nagano, Japan -i- .. & {-'.". ,' .-. " The contents of them. NOTICE " All rights reserved. " All efforts have been made to ensure the...
... assume no responsibility for any from whatsoever without notice. However, should any errors be detected, SEIKO EPSON would greatly appreciate being informed of this manual or the consequences thereof. @ Copyright 1992 by SEIKO EPSON CORPORATION Nagano, Japan -i- .. & {-'.". ,' .-. " The contents of them. NOTICE " All rights reserved. " All efforts have been made to ensure the...
Service Manual
Page 3
...THEIR LINE OF WORK. 3< WHEN PERFORMING TESTING AS DICTATED WITHIN THIS MANUAL, DO NOT CONNECT THE UNIT TO A POWER SOURCE UNTIL INSTRUCTED TO DO SO. ALWAYS VERIFY THAT THE EPSON PRODUCT HAS BEEN DISCONNECTED FROM THE POWER SOURCE BEFORE REMOVING OR REPLACING ...THE SERIAL NUMBER/RATING PLATE. REPLACE MALFUNCTIONING COMPONENTS ONLY WITH THOSE COMPONENTS RECOMMENDED BY THE MANUFACTURER; REPAIRS ON EPSON PRODUCT SHOULD BE PERFORMED ONLY BY AN EPSON CERTIFIED REPAIR TECHNICIAN. 2. The precautionary measures itemized below should be observed when performing repair/maintenance procedures. ...
...THEIR LINE OF WORK. 3< WHEN PERFORMING TESTING AS DICTATED WITHIN THIS MANUAL, DO NOT CONNECT THE UNIT TO A POWER SOURCE UNTIL INSTRUCTED TO DO SO. ALWAYS VERIFY THAT THE EPSON PRODUCT HAS BEEN DISCONNECTED FROM THE POWER SOURCE BEFORE REMOVING OR REPLACING ...THE SERIAL NUMBER/RATING PLATE. REPLACE MALFUNCTIONING COMPONENTS ONLY WITH THOSE COMPONENTS RECOMMENDED BY THE MANUFACTURER; REPAIRS ON EPSON PRODUCT SHOULD BE PERFORMED ONLY BY AN EPSON CERTIFIED REPAIR TECHNICIAN. 2. The precautionary measures itemized below should be observed when performing repair/maintenance procedures. ...

Service Manual
Page 4
Describes the theory of the printer. Provides Epson-approved techniques for product disassembly and assembly. iv - q The contents of the FX-870/l 170. The instructions and procedures included herein are organized as follows: Chapter 1 - Includes... and illustrates the main components of printer operation. Chapter 2 - Describes preventive maintenance techniques. The chapters are intended for adjustment. REV.-A PREFACE This manual describes functions, theory of electrical and mechanical operations, maintenance, and repair of this manual are subject to the precautions on the...
Describes the theory of the printer. Provides Epson-approved techniques for product disassembly and assembly. iv - q The contents of the FX-870/l 170. The instructions and procedures included herein are organized as follows: Chapter 1 - Includes... and illustrates the main components of printer operation. Chapter 2 - Describes preventive maintenance techniques. The chapters are intended for adjustment. REV.-A PREFACE This manual describes functions, theory of electrical and mechanical operations, maintenance, and repair of this manual are subject to the precautions on the...
Service Manual
Page 14
... has been detected, because accuracy of paper Thin ms Thick ms Thin ms (ips) Thick ms (ips) Fanfold paper 77 85 55 (3.0) 66 (2.5) Cut sheet (manual) 69 77 45 (3.7) 55 (3.0) Cut sheet (CSF) 71 77 48 (3.5) 55 (3.0) * Thin: Thick: Thickness is more than 1/6". q M u Iti-part paper must be assured. 1-5 q Do not...
... has been detected, because accuracy of paper Thin ms Thick ms Thin ms (ips) Thick ms (ips) Fanfold paper 77 85 55 (3.0) 66 (2.5) Cut sheet (manual) 69 77 45 (3.7) 55 (3.0) Cut sheet (CSF) 71 77 48 (3.5) 55 (3.0) * Thin: Thick: Thickness is more than 1/6". q M u Iti-part paper must be assured. 1-5 q Do not...
Service Manual
Page 28
...IFONTl+[pApER F E E D I Moves the paper backward by 1/108 inch per step. IFONTl+[pApER FEED] Ejects a cut sheets by manual insertion). q the tear-off position, when paper has been advanced for the loading position of cut sheet forward or feeds continuous paper backward to... paper park position. 1.4.3 Indicators Ready to identify the error. You can end micro feed (or micro adjust) mode by pressing the FONT button again. The printer exits this mode automatically in combination to print : Tear-off : Pause : Paper error : Head hot : ON Blinking (ls~o duty) Blinking (50% duty) ...
...IFONTl+[pApER F E E D I Moves the paper backward by 1/108 inch per step. IFONTl+[pApER FEED] Ejects a cut sheets by manual insertion). q the tear-off position, when paper has been advanced for the loading position of cut sheet forward or feeds continuous paper backward to... paper park position. 1.4.3 Indicators Ready to identify the error. You can end micro feed (or micro adjust) mode by pressing the FONT button again. The printer exits this mode automatically in combination to print : Tear-off : Pause : Paper error : Head hot : ON Blinking (ls~o duty) Blinking (50% duty) ...
Service Manual
Page 76
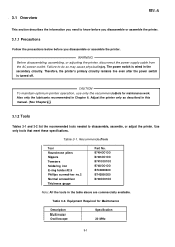
...This section describes the information you need to know before you disassemble or assemble the printer. 3.1.1 Precautions Follow the precautions below before you disassemble or assemble the printer. RecommendedTools Tool Round-nose pliers Nippers Tweezers Soldering iron E-ring holder #2.5 Phillips screwdriver..., assembling, or adjusting the printer, disconnect the power supply cable from the AC power outlet. The power switch is turned off. Therefore, the printer's primary circuitry remains live even after the power switch is wired in this manual. (See Chapter 4.) 3.1.2 Tools...
...This section describes the information you need to know before you disassemble or assemble the printer. 3.1.1 Precautions Follow the precautions below before you disassemble or assemble the printer. RecommendedTools Tool Round-nose pliers Nippers Tweezers Soldering iron E-ring holder #2.5 Phillips screwdriver..., assembling, or adjusting the printer, disconnect the power supply cable from the AC power outlet. The power switch is turned off. Therefore, the printer's primary circuitry remains live even after the power switch is wired in this manual. (See Chapter 4.) 3.1.2 Tools...


