ESC/VP Level 21 Communication Manual (Home Projectors)
Page 1
...set of the agreement. The User's Guide shall not be forewarned that use this user's guide. You expressly acknowledge and agree that EPSON may not duplicate, reprint, modify or send the user's guide either in whole or in the user's guide before downloading "ESC/...User's Guide". You may change or modify this downloading service. LICENSE AGREEMENT 1. Please read carefully the following "LICENSE AGREEMENT" before using the EPSON projector. Copyright of "ESC/VP21 Command User's Guide" (hereafter referred to as user's guide) is at your acceptance of the whole of ...
...set of the agreement. The User's Guide shall not be forewarned that use this user's guide. You expressly acknowledge and agree that EPSON may not duplicate, reprint, modify or send the user's guide either in whole or in the user's guide before downloading "ESC/...User's Guide". You may change or modify this downloading service. LICENSE AGREEMENT 1. Please read carefully the following "LICENSE AGREEMENT" before using the EPSON projector. Copyright of "ESC/VP21 Command User's Guide" (hereafter referred to as user's guide) is at your acceptance of the whole of ...
Installation Guide
Page 3
... Help 12 Planning the Installation 13 Required Tools 14 Laying Out the Home Theater 14 Locating the Screen 15 Locating the Projector 16 Locating Other Components 16 Routing the Cables 16 Making Optional Connections... Lift the Screen onto the Mounting Brackets 29 Installing the Projector 31 Position the Ceiling Mount 32 Attach the Extension Arm (Optional 35 Install the Ceiling Mount 37 ...Wire Management Tracks 43 Install the Tracks and Connector Pieces 44 Connect the Cables to the Projector 45 Connect the Cables to the Subwoofer and AV Controller 46 Assembling the Subwoofer Stand 49...
... Help 12 Planning the Installation 13 Required Tools 14 Laying Out the Home Theater 14 Locating the Screen 15 Locating the Projector 16 Locating Other Components 16 Routing the Cables 16 Making Optional Connections... Lift the Screen onto the Mounting Brackets 29 Installing the Projector 31 Position the Ceiling Mount 32 Attach the Extension Arm (Optional 35 Install the Ceiling Mount 37 ...Wire Management Tracks 43 Install the Tracks and Connector Pieces 44 Connect the Cables to the Projector 45 Connect the Cables to the Subwoofer and AV Controller 46 Assembling the Subwoofer Stand 49...
Installation Guide
Page 5
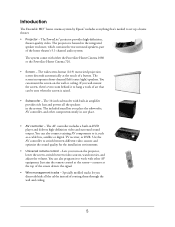
...-quality video. The widescreen-format (16:9) motorized projection screen descends automatically at the top of the home theater's 5.1-channel audio system. Introduction The Ensemble HDTM home cinema system by Epson® includes everything that can mount the screen on the projector, lower the screen, switch between different video sources and optimize the sound quality for the installation environment...
...-quality video. The widescreen-format (16:9) motorized projection screen descends automatically at the top of the home theater's 5.1-channel audio system. Introduction The Ensemble HDTM home cinema system by Epson® includes everything that can mount the screen on the projector, lower the screen, switch between different video sources and optimize the sound quality for the installation environment...
Installation Guide
Page 7
... injury or property damage, such as a ladder for reaching high places or a stud finder to locate the center of the home theater system. Additional Safety Instructions • Safety measures must be adhered to rain or moisture, does not operate normally, or has been dropped... • Do not attempt to install this system if you have fallen into the apparatus, the apparatus has been exposed to . Epson cannot provide advice concerning construction practices or building codes in performing other source of the projector assembly (approximately 50 pounds). Lighter-density concrete ...
... injury or property damage, such as a ladder for reaching high places or a stud finder to locate the center of the home theater system. Additional Safety Instructions • Safety measures must be adhered to rain or moisture, does not operate normally, or has been dropped... • Do not attempt to install this system if you have fallen into the apparatus, the apparatus has been exposed to . Epson cannot provide advice concerning construction practices or building codes in performing other source of the projector assembly (approximately 50 pounds). Lighter-density concrete ...
Installation Guide
Page 9
... convenience receptacles as this can result in a risk of fire or electric shock. • Keep the system components free from your skin could damage it is on. • Don't use the projector outside of the required temperature range of 41 to 95 °F (5 to 35 °C). Never let...WARNING: Handling the cord on the product. • Except as specifically explained in these instructions, do not attempt to projector damage. • The lamp(s) in the system components as the original part. Doing so may touch dangerous voltage points or short-out parts that could lead to service ...
... convenience receptacles as this can result in a risk of fire or electric shock. • Keep the system components free from your skin could damage it is on. • Don't use the projector outside of the required temperature range of 41 to 95 °F (5 to 35 °C). Never let...WARNING: Handling the cord on the product. • Except as specifically explained in these instructions, do not attempt to projector damage. • The lamp(s) in the system components as the original part. Doing so may touch dangerous voltage points or short-out parts that could lead to service ...

Installation Guide
Page 10
...different points during the installation. Box #1 • Projector (PowerLite Home Cinema 1080 or PowerLite Home Cinema 720) • Projector ceiling mount • AV controller with built-in their containers until the instructions tell you mount the screen and projector on surfaces containing wooden studs/joists or on a ...10 That way, you can easily find the parts you have all the items in DVD player (includes remote control) Box #2 • Projector enclosure and rear surround speakers Box #3 • AV Cables (see "Included Cables" on page 11 for details) and HDMI repeater Box...
...different points during the installation. Box #1 • Projector (PowerLite Home Cinema 1080 or PowerLite Home Cinema 720) • Projector ceiling mount • AV controller with built-in their containers until the instructions tell you mount the screen and projector on surfaces containing wooden studs/joists or on a ...10 That way, you can easily find the parts you have all the items in DVD player (includes remote control) Box #2 • Projector enclosure and rear surround speakers Box #3 • AV Cables (see "Included Cables" on page 11 for details) and HDMI repeater Box...
Installation Guide
Page 11
...the screen. You can enhance the home theater with these accessories from the projector to an alternative location. • Extra-long cable set is also available. Suitable for an overview of how all the cables are connected. To find the nearest reseller, call 800-GO-EPSON (800-463-7766). Note An ...extra-long cable set for connecting the projector to the connection diagram on page 18 for installations where the audio and video cables are routed through the...
...the screen. You can enhance the home theater with these accessories from the projector to an alternative location. • Extra-long cable set is also available. Suitable for an overview of how all the cables are connected. To find the nearest reseller, call 800-GO-EPSON (800-463-7766). Note An ...extra-long cable set for connecting the projector to the connection diagram on page 18 for installations where the audio and video cables are routed through the...
Installation Guide
Page 12
...call 800-GO-EPSON (800-463-7766). Where To Get Help Epson provides the following information ready: ■ Product name (Ensemble HD home cinema system) ■ ...Product serial number (located on the back of the weighted bar on the bottom of the screen, on the Epson PrivateLine Support card that the home theater system...purchase genuine Epson supplies and accessories from an Epson authorized reseller. Note Epson strongly recommends that came with your questions. Epson cannot ...
...call 800-GO-EPSON (800-463-7766). Where To Get Help Epson provides the following information ready: ■ Product name (Ensemble HD home cinema system) ■ ...Product serial number (located on the back of the weighted bar on the bottom of the screen, on the Epson PrivateLine Support card that the home theater system...purchase genuine Epson supplies and accessories from an Epson authorized reseller. Note Epson strongly recommends that came with your questions. Epson cannot ...
Installation Guide
Page 13
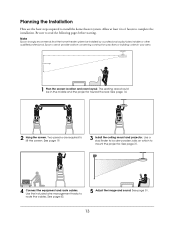
... the middle and the projector toward the rear. See page 14. 2 Hang the screen. See page 43. 5 Adjust the image and sound. Be sure to route the cables. Use a stud finder to locate wooden joists on which to complete the installation. Note Epson strongly recommends that the home theater system be in your area...
... the middle and the projector toward the rear. See page 14. 2 Hang the screen. See page 43. 5 Adjust the image and sound. Be sure to route the cables. Use a stud finder to locate wooden joists on which to complete the installation. Note Epson strongly recommends that the home theater system be in your area...
Installation Guide
Page 14
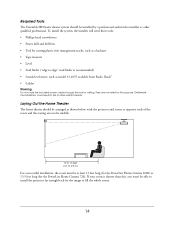
...the wall or ceiling. Required Tools The Ensemble HD home theater system should be at opposite ends of the room and the seating area in fire or other qualified professional. Laying Out the Home Theater The home theater should be able to install the projector far enough back for cutting plastic wire ...than this purpose. If your room is recommended) • Sound-level meter, such as shown below, with the projector and screen at least 13 feet long (for the PowerLite Home Cinema 1080) or 13.5 feet long (for this , you won't be installed by a professional audio/video installer or...
...the wall or ceiling. Required Tools The Ensemble HD home theater system should be at opposite ends of the room and the seating area in fire or other qualified professional. Laying Out the Home Theater The home theater should be able to install the projector far enough back for cutting plastic wire ...than this purpose. If your room is recommended) • Sound-level meter, such as shown below, with the projector and screen at least 13 feet long (for the PowerLite Home Cinema 1080) or 13.5 feet long (for this , you won't be installed by a professional audio/video installer or...
Installation Guide
Page 15
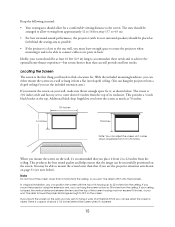
...you must not exceed 15 inches, or you won 't be able to lower the projected image enough to 4.9 m). • For best surround-sound performance, the projector (with the top of its rear surround speakers) should be placed as far behind the seating area as shown below ). When you mount the screen... shown on the screen. This provides a 3-inch black border at least 16 feet (4.9 m) long to accommodate these needs and to achieve the optimal home theater experience-but rooms shorter than that you place it comes down 61 inches from the ceiling. If you mount the screen on the screen. ...
...you must not exceed 15 inches, or you won 't be able to lower the projected image enough to 4.9 m). • For best surround-sound performance, the projector (with the top of its rear surround speakers) should be placed as far behind the seating area as shown below ). When you mount the screen... shown on the screen. This provides a 3-inch black border at least 16 feet (4.9 m) long to accommodate these needs and to achieve the optimal home theater experience-but rooms shorter than that you place it comes down 61 inches from the ceiling. If you mount the screen on the screen. ...
Installation Guide
Page 16
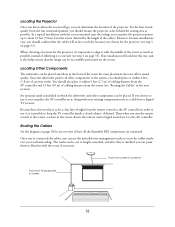
...along with the screen mounted near the ceiling, you choose to use it to screen 16 Since the subwoofer powers all the Ensemble HD components are connected. You should mount the projector as far behind the seating area as possible, instead of a power outlet. Because there does not have to length as a... with the middle of the screen as much as possible. An optional stand is possible to one side (see "Routing the Cables" in the system, you can use it, it to keep the AV controller inside a closed cabinet, if desired. The tracks can be successfully positioned on it...
...along with the screen mounted near the ceiling, you choose to use it to screen 16 Since the subwoofer powers all the Ensemble HD components are connected. You should mount the projector as far behind the seating area as possible, instead of a power outlet. Because there does not have to length as a... with the middle of the screen as much as possible. An optional stand is possible to one side (see "Routing the Cables" in the system, you can use it, it to keep the AV controller inside a closed cabinet, if desired. The tracks can be successfully positioned on it...
Installation Guide
Page 17
... or other safety hazards. See "Using Additional Components" on where the AV equipment is located. (The left side is preferred so that the Ensemble HD system be powered by a dedicated 20-amp circuit. The track going from either the left or right side, depending on page 63. 17 If .... Making Optional Connections Once the Ensemble HD system is installed and adjusted, you can route the video cable, speaker cable, and control cable through your ceiling. If no outlets are not rated for this option, plug the AC power cables for the screen and projector directly into nearby electrical outlets. ...
... or other safety hazards. See "Using Additional Components" on where the AV equipment is located. (The left side is preferred so that the Ensemble HD system be powered by a dedicated 20-amp circuit. The track going from either the left or right side, depending on page 63. 17 If .... Making Optional Connections Once the Ensemble HD system is installed and adjusted, you can route the video cable, speaker cable, and control cable through your ceiling. If no outlets are not rated for this option, plug the AC power cables for the screen and projector directly into nearby electrical outlets. ...

Installation Guide
Page 18
Cable Connections Refer to the diagram below for an overview of how all the Ensemble HD components are connected: Projector Rear surround speakers Speaker cable Motorized screen Control cable 110 VAC power cable HDMI cable HDMI repeater and power supply Speaker cable L/C/R speaker connectors BASS CONTOUR CONTROL FREQ 61 82 LEVEL 47 98 99 PWR ON MODE SUB OUT Control cable AV data cable HDMI cable 110 VAC power cables AV Controller Subwoofer Main power cord 18
Cable Connections Refer to the diagram below for an overview of how all the Ensemble HD components are connected: Projector Rear surround speakers Speaker cable Motorized screen Control cable 110 VAC power cable HDMI cable HDMI repeater and power supply Speaker cable L/C/R speaker connectors BASS CONTOUR CONTROL FREQ 61 82 LEVEL 47 98 99 PWR ON MODE SUB OUT Control cable AV data cable HDMI cable 110 VAC power cables AV Controller Subwoofer Main power cord 18
Installation Guide
Page 26
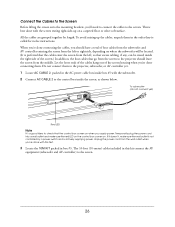
... in the order they're called for in the instructions. Unplug the power cord from the left, so that go from the screen to the projector should have a total of four cables from the subwoofer and AV controller entering the screen from the left or right side, depending on . The 33... apply power. To avoid mixing up on when you 'll need to connect the cables to the screen. 26 Do not connect them to the projector, subwoofer, or AV controller yet. 1 Locate AC CABLE 2, packed in box #3. To subwoofer (do not connect yet) Red LED Note It's a good idea to check...
... in the order they're called for in the instructions. Unplug the power cord from the left, so that go from the screen to the projector should have a total of four cables from the subwoofer and AV controller entering the screen from the left or right side, depending on . The 33... apply power. To avoid mixing up on when you 'll need to connect the cables to the screen. 26 Do not connect them to the projector, subwoofer, or AV controller yet. 1 Locate AC CABLE 2, packed in box #3. To subwoofer (do not connect yet) Red LED Note It's a good idea to check...
Installation Guide
Page 27
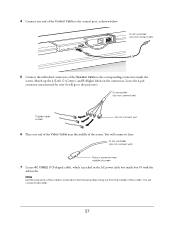
... of screen 7 Locate AC CABLE 3 (Y-shaped cable), which is packed in the following steps hang out from the middle of the Speaker Cable to the projector). Leave the 4-pin connector unconnected for now (it later. To AV controller (do not connect yet) 5 Connect the individual connectors of the screen. Note Let...
... of screen 7 Locate AC CABLE 3 (Y-shaped cable), which is packed in the following steps hang out from the middle of the Speaker Cable to the projector). Leave the 4-pin connector unconnected for now (it later. To AV controller (do not connect yet) 5 Connect the individual connectors of the screen. Note Let...

Installation Guide
Page 28
The 23-foot (7-meter) cables included in this kit connect the projector to the unconnected speaker cable inside the screen. To projector (do not connect yet) To HDMI repeater 9 Locate the 7M KIT packed in place. To projector (do not connect yet) Speaker cable 12 Connect the male end of the Speaker ... to the power cable, as shown above. 11 Connect the 4-pin connector of the Control Cable to the RS-232 port, as shown below . To projector (Do not connect yet) 28 8 Connect AC CABLE 3 to the AC output connector, as shown below . Tighten the thumbscrews on the connector to secure...
The 23-foot (7-meter) cables included in this kit connect the projector to the unconnected speaker cable inside the screen. To projector (do not connect yet) To HDMI repeater 9 Locate the 7M KIT packed in place. To projector (do not connect yet) Speaker cable 12 Connect the male end of the Speaker ... to the power cable, as shown above. 11 Connect the 4-pin connector of the Control Cable to the RS-232 port, as shown below . To projector (Do not connect yet) 28 8 Connect AC CABLE 3 to the AC output connector, as shown below . Tighten the thumbscrews on the connector to secure...
Installation Guide
Page 29
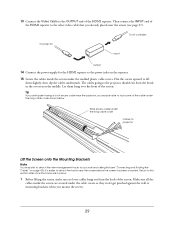
... sure all the cables inside the screen under the molded plastic cable covers. To AV controller To projector input output 14 Connect the power supply for the HDMI repeater to the other video cable that you...Secure the cables inside the screen are in the covers near the middle. It is easier to the projector should exit from the break in place. 1 Before lifting the screen, make sure no loose cables hang... out from the back of the screen. The cables going to attach the tracks near the projector, you mount the screen. 29 Flex the covers upward to tuck some of the cable under the...
... sure all the cables inside the screen under the molded plastic cable covers. To AV controller To projector input output 14 Connect the power supply for the HDMI repeater to the other video cable that you...Secure the cables inside the screen are in the covers near the middle. It is easier to the projector should exit from the break in place. 1 Before lifting the screen, make sure no loose cables hang... out from the back of the screen. The cables going to attach the tracks near the projector, you mount the screen. 29 Flex the covers upward to tuck some of the cable under the...
Installation Guide
Page 31
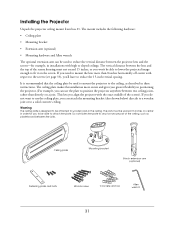
...'t be able to lower the projected image enough to the ceiling, as plasterboard between the lens and the top of the screen). Installing the Projector Unpack the projector ceiling mount from box #1. The mount includes the following hardware: • Ceiling plate • Mounting bracket • Extension arm (optional) • ...with the exact middle of the screen housing must be able to attach the plate. This lets you can be used to mount the projector to fit it on the screen. If you need to mount the lens more secure and gives you greater flexibility in order for example,...
...'t be able to lower the projected image enough to the ceiling, as plasterboard between the lens and the top of the screen). Installing the Projector Unpack the projector ceiling mount from box #1. The mount includes the following hardware: • Ceiling plate • Mounting bracket • Extension arm (optional) • ...with the exact middle of the screen housing must be able to attach the plate. This lets you can be used to mount the projector to fit it on the screen. If you need to mount the lens more secure and gives you greater flexibility in order for example,...
Installation Guide
Page 32
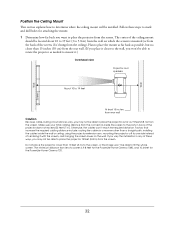
... feet (5.8 m) from the screen. If you vary the installation in any of these steps to mark and drill holes for the PowerLite Home Cinema 720. 32 Do not place the projector closer than 10 feet (3 m) to the screen, or the image won't be able to determine where the ceiling mount will be able... cables in back of the ceiling mount should be able to place the projector as far as possible, but no closer than a straight path; and hanging the screen lower on which the screen is 9.8 feet for the PowerLite Home Cinema 1080, and 10.4 feet for attaching the mount. 1 Determine how far back you...
... feet (5.8 m) from the screen. If you vary the installation in any of these steps to mark and drill holes for the PowerLite Home Cinema 720. 32 Do not place the projector closer than 10 feet (3 m) to the screen, or the image won't be able to determine where the ceiling mount will be able... cables in back of the ceiling mount should be able to place the projector as far as possible, but no closer than a straight path; and hanging the screen lower on which the screen is 9.8 feet for the PowerLite Home Cinema 1080, and 10.4 feet for attaching the mount. 1 Determine how far back you...


