
Installation Guide
Page 21
... it using the included concrete anchor bolts. 1 Check the wall surface where you prefer to hang it between 2 and 22 inches from sliding off the bar. Slide brackets onto alignment bar Insert screws 3 Mark the wall to indicate where you will need to place shims or spacers behind the brackets to... installation, it isn't, the alignment bar will align the top of the brackets. Loosely tighten the screws to the wall, as shown in step 5. 2 Slide the wall-mounting brackets onto the alignment bar, as shown below. You will bow when you attach the brackets to keep the brackets from the...
... it using the included concrete anchor bolts. 1 Check the wall surface where you prefer to hang it between 2 and 22 inches from sliding off the bar. Slide brackets onto alignment bar Insert screws 3 Mark the wall to indicate where you will need to place shims or spacers behind the brackets to... installation, it isn't, the alignment bar will align the top of the brackets. Loosely tighten the screws to the wall, as shown in step 5. 2 Slide the wall-mounting brackets onto the alignment bar, as shown below. You will bow when you attach the brackets to keep the brackets from the...
Installation Guide
Page 23
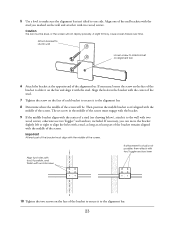
... stud. 7 Tighten the screw on the bar and align it with the stud. If necessary, loosen the screw on the face of the bracket to slide it on the face of each bracket to secure it to the alignment bar. 8 Determine where the middle of the screen will be level, or... the screen will not deploy properly. The set screw in wall Loosen screw to slide bracket on the face of the bracket to secure it 's aligned with the middle of the screen. If necessary, you marked on the wall and...
... stud. 7 Tighten the screw on the bar and align it with the stud. If necessary, loosen the screw on the face of the bracket to slide it on the face of each bracket to secure it to the alignment bar. 8 Determine where the middle of the screen will be level, or... the screen will not deploy properly. The set screw in wall Loosen screw to slide bracket on the face of the bracket to secure it 's aligned with the middle of the screen. If necessary, you marked on the wall and...
Installation Guide
Page 24
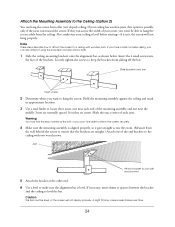
... You must be able to hang the screen safely from a flat (not sloped) ceiling. A slight tilt may cause screen failure over time. 24 Slide brackets onto bar Insert screws 2 Determine where you won 't be level, or the screen will not hang properly. Joist Attach bracket to joist with ...one near each joist. Attach the Mounting Assembly to the Ceiling (Option 2) You can also attach it using the included concrete anchor bolts. 1 Slide the ceiling-mounting brackets onto the alignment bar, as shown below. If necessary, insert shims or spacers between the bracket and the ceiling to make...
... You must be able to hang the screen safely from a flat (not sloped) ceiling. A slight tilt may cause screen failure over time. 24 Slide brackets onto bar Insert screws 2 Determine where you won 't be level, or the screen will not hang properly. Joist Attach bracket to joist with ...one near each joist. Attach the Mounting Assembly to the Ceiling (Option 2) You can also attach it using the included concrete anchor bolts. 1 Slide the ceiling-mounting brackets onto the alignment bar, as shown below. If necessary, insert shims or spacers between the bracket and the ceiling to make...

Installation Guide
Page 30
... must move either the screen or the bracket. 30 Hook screen into the groove on the casing when it goes up or down. 5 If necessary, slide the screen a few inches left or right to make sure the front of the casing doesn't tilt downward, or the screen fabric will rub on...
... must move either the screen or the bracket. 30 Hook screen into the groove on the casing when it goes up or down. 5 If necessary, slide the screen a few inches left or right to make sure the front of the casing doesn't tilt downward, or the screen fabric will rub on...
Installation Guide
Page 37
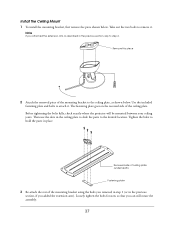
... in place. The fastening plate goes on the recessed side of the mounting bracket to the ceiling plate, as described in the ceiling plate to slide the parts to the desired location. Then use the slots in the previous section, skip to hold the parts in the previous section, if you...
... in place. The fastening plate goes on the recessed side of the mounting bracket to the ceiling plate, as described in the ceiling plate to slide the parts to the desired location. Then use the slots in the previous section, skip to hold the parts in the previous section, if you...
Installation Guide
Page 39
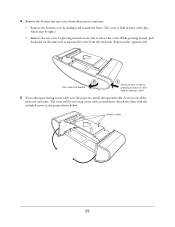
... near the projector, install the optional cable cleats on one side to separate the cover from the projector enclosure. • Remove the bottom cover by sliding it off toward the front. (The cover is held in place with the included screws at the points shown below.
... near the projector, install the optional cable cleats on one side to separate the cover from the projector enclosure. • Remove the bottom cover by sliding it off toward the front. (The cover is held in place with the included screws at the points shown below.
Installation Guide
Page 40
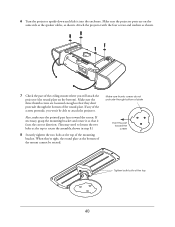
... shown. 7 Check the part of the round plate. Attach the projector with the four screws and washers as shown. 6 Turn the projector upside-down and slide it faces the correct direction. (You may need to loosen the two bolts at the top to attach the projector. If necessary, grasp the mounting...
... shown. 7 Check the part of the round plate. Attach the projector with the four screws and washers as shown. 6 Turn the projector upside-down and slide it faces the correct direction. (You may need to loosen the two bolts at the top to attach the projector. If necessary, grasp the mounting...
Installation Guide
Page 50
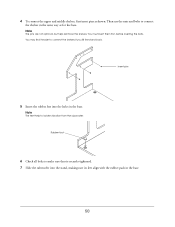
... foot 6 Check all bolts to connect the shelves in the base. 50 Then use the nuts and bolts to make sure they're securely tightened. 7 Slide the subwoofer into the holes in the base. Note The pins are not optional, but help to connect the shelves if you tilt the stand...
... foot 6 Check all bolts to connect the shelves in the base. 50 Then use the nuts and bolts to make sure they're securely tightened. 7 Slide the subwoofer into the holes in the base. Note The pins are not optional, but help to connect the shelves if you tilt the stand...
User's Guide
Page 56
Slide the cover straight forward, then remove it. (The cover is held in place with the projector (not the Ensemble HD remote). You'll need to use the remote control that came with clips, which may also need to turn it off. Press the Pattern button ...
Slide the cover straight forward, then remove it. (The cover is held in place with the projector (not the Ensemble HD remote). You'll need to use the remote control that came with clips, which may also need to turn it off. Press the Pattern button ...
