Installation Guide
Page 5
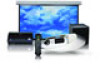
...; Universal remote control - The 10-inch subwoofer with built-in amplifier provides rich bass and powers all the cables instead of the home theater's 5.1-channel audio system. Lets you wall-mount the screen, there's even room behind it to hang a work with either the PowerLite Home Cinema 1080 or the PowerLite Home Cinema 720. • Screen - If you turn on the wall or ceiling. Introduction The Ensemble HDTM home cinema system by Epson®...
...; Universal remote control - The 10-inch subwoofer with built-in amplifier provides rich bass and powers all the cables instead of the home theater's 5.1-channel audio system. Lets you wall-mount the screen, there's even room behind it to hang a work with either the PowerLite Home Cinema 1080 or the PowerLite Home Cinema 720. • Screen - If you turn on the wall or ceiling. Introduction The Ensemble HDTM home cinema system by Epson®...
Installation Guide
Page 6
... user serviceable parts inside. Install in the operating instructions unless you are for use by the manufacturer. 12. Important Safety Instructions CAUTION: To reduce the risk of electric shock, do not perform any servicing other than the other. To reduce the risk of the polarized or grounding-type plug. Keep these instructions. 2. Follow all warnings. 4. Do not use attachments/accessories specified by qualified service...
... user serviceable parts inside. Install in the operating instructions unless you are for use by the manufacturer. 12. Important Safety Instructions CAUTION: To reduce the risk of electric shock, do not perform any servicing other than the other. To reduce the risk of the polarized or grounding-type plug. Keep these instructions. 2. Follow all warnings. 4. Do not use attachments/accessories specified by qualified service...
Installation Guide
Page 8
...screen is completely closed before placing it carefully. When installing an outside antenna or cable system is connected to keep from the type of heat or in fire or other electric light or power circuits, or where it off the wall or ceiling mount. • Do not route the included power cables... type of power supplied in wire to an antenna discharge unit, size of grounding conductors, location of power source indicated on the marking label. • If an outside antenna system, extreme care should be operated only from the type of antenna-discharge unit, connection to the ...
...screen is completely closed before placing it carefully. When installing an outside antenna or cable system is connected to keep from the type of heat or in fire or other electric light or power circuits, or where it off the wall or ceiling mount. • Do not route the included power cables... type of power supplied in wire to an antenna discharge unit, size of grounding conductors, location of power source indicated on the marking label. • If an outside antenna system, extreme care should be operated only from the type of antenna-discharge unit, connection to the ...
Installation Guide
Page 9
...;F (5 to cool for one hour before replacing it. • Do not overload wall outlets, extension cords, or integral convenience receptacles as this can result in a risk of fire or electric shock. • Keep the system components free from your skin could damage it. • Never look into the projector lens when the lamp is turned on. Do not put in...
...;F (5 to cool for one hour before replacing it. • Do not overload wall outlets, extension cords, or integral convenience receptacles as this can result in a risk of fire or electric shock. • Keep the system components free from your skin could damage it. • Never look into the projector lens when the lamp is turned on. Do not put in...
Installation Guide
Page 12
... that came with a support specialist by a professional audio/video installer or other qualified professional. Epson cannot provide advice concerning construction practices or building codes in your questions. You may apply. Toll or long distance charges may also speak with your home theater system. Where To Get Help Epson provides the following information ready: ■ Product name (Ensemble HD home cinema system) ■ Product serial number (located on the back...
... that came with a support specialist by a professional audio/video installer or other qualified professional. Epson cannot provide advice concerning construction practices or building codes in your questions. You may apply. Toll or long distance charges may also speak with your home theater system. Where To Get Help Epson provides the following information ready: ■ Product name (Ensemble HD home cinema system) ■ Product serial number (located on the back...
Installation Guide
Page 35
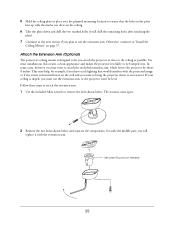
... in place over the planned mounting location to ensure that would interfere with the projected image, or if the screen is mounted lower on the wall and you want to attach the included extension arm, which lowers the projector by about 8 inches. Attach the Extension Arm (Optional) The projector's ceiling mount is sloped, you will replace it with the marks you...
... in place over the planned mounting location to ensure that would interfere with the projected image, or if the screen is mounted lower on the wall and you want to attach the included extension arm, which lowers the projector by about 8 inches. Attach the Extension Arm (Optional) The projector's ceiling mount is sloped, you will replace it with the marks you...
Installation Guide
Page 51
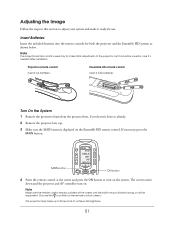
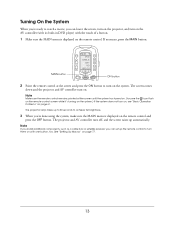
.... 51 MAIN button MAIN DVD CABLE SAT HD RADIO 1 OF 2 ON button 4 Point the remote control at the screen until the built-in case it ready for both the projector and the Ensemble HD system, as shown below. The screen comes down and the projector and AV controller turn on the Ensemble HD remote control. If necessary, press the MAIN button. Note The projector remote control is displayed on the system. Adjusting the Image Follow the steps...
.... 51 MAIN button MAIN DVD CABLE SAT HD RADIO 1 OF 2 ON button 4 Point the remote control at the screen until the built-in case it ready for both the projector and the Ensemble HD system, as shown below. The screen comes down and the projector and AV controller turn on the Ensemble HD remote control. If necessary, press the MAIN button. Note The projector remote control is displayed on the system. Adjusting the Image Follow the steps...
Installation Guide
Page 56
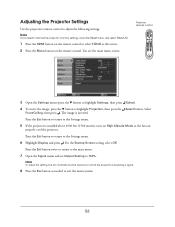
... To adjust this setting, the AV controller must be turned on so that the projector is receiving a signal. 8 Press the Esc button as the source. 2 Press the Menu button on High Altitude Mode so the fan can properly cool the projector. The image is installed above 4900 feet (1500 meters), turn on the remote control. Press the Esc button to return to exit the menu system. 56 Adjusting the Projector Settings Use the projector's remote control to the Settings menu. 6 Highlight Display...
... To adjust this setting, the AV controller must be turned on so that the projector is receiving a signal. 8 Press the Esc button as the source. 2 Press the Menu button on High Altitude Mode so the fan can properly cool the projector. The image is installed above 4900 feet (1500 meters), turn on the remote control. Press the Esc button to return to exit the menu system. 56 Adjusting the Projector Settings Use the projector's remote control to the Settings menu. 6 Highlight Display...

Installation Guide
Page 66
... the User's Guide for additional ways to which you enter a code, the remote control will automatically create the appropriate commands in the back of the port to customize the remote control. 1 Locate the code table for different inputs. The code numbers are listed in the Audio Input column, depending on the projection screen when you're selecting sources. You may be more convenient to set up the Ensemble HD remote control to recognize the new...
... the User's Guide for additional ways to which you enter a code, the remote control will automatically create the appropriate commands in the back of the port to customize the remote control. 1 Locate the code table for different inputs. The code numbers are listed in the Audio Input column, depending on the projection screen when you're selecting sources. You may be more convenient to set up the Ensemble HD remote control to recognize the new...
Schematic
Page 8
...-21) GROUND CLAMPS POWER SERVICE GROUNDING ELECTRODE SYSTEM (NEC ART 250, PART H) An outside antenna system should not be located in direct sunlight. • Make sure nothing blocks the ventilation openings on the marking label. • If an outside antenna system, extreme care should be sure the antenna or cable system is connected to keep from the type of power source indicated on any of...
...-21) GROUND CLAMPS POWER SERVICE GROUNDING ELECTRODE SYSTEM (NEC ART 250, PART H) An outside antenna system should not be located in direct sunlight. • Make sure nothing blocks the ventilation openings on the marking label. • If an outside antenna system, extreme care should be sure the antenna or cable system is connected to keep from the type of power source indicated on any of...

Schematic
Page 9
... the service technician has used replacement parts specified by the manufacturer or have the same characteristics as this product contain mercury. • This product should be operated only from the type of power supplied in your home, consult your skin could lead to cool for one hour before replacing it . • Never look into the projector lens when the lamp is turned...
... the service technician has used replacement parts specified by the manufacturer or have the same characteristics as this product contain mercury. • This product should be operated only from the type of power supplied in your home, consult your skin could lead to cool for one hour before replacing it . • Never look into the projector lens when the lamp is turned...

User's Guide
Page 4
... fire or electric shock. • Keep the system components free from the type of the screen with any components of the system. • Never push objects of power supplied in your home, consult your eyes. Unauthorized substitutions may cause an unstable display and could damage it. • Never look into the projector lens when the lamp is used replacement parts specified by the manufacturer or...
... fire or electric shock. • Keep the system components free from the type of the screen with any components of the system. • Never push objects of power supplied in your home, consult your eyes. Unauthorized substitutions may cause an unstable display and could damage it. • Never look into the projector lens when the lamp is used replacement parts specified by the manufacturer or...
User's Guide
Page 6
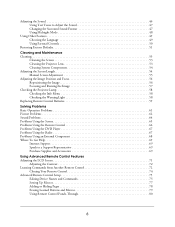
... Mode 48 Using Other Features 49 Choosing the Language 49 Using Parental Controls 50 Restoring Factory Defaults 51 Cleaning and Maintenance Cleaning 53 Cleaning the Screen 53 Cleaning the Projector Lens 53 Cleaning System Components 54 Adjusting the Screen Length 54 Manual Screen Adjustment 55 Adjusting the Image Position and Focus 56 Repositioning the Image 56 Focusing and Resizing the Image 57 Checking the Projector Lamp 58 Checking the Info Menu 58 Checking the Warning Light 58 Replacing Remote Control Batteries 59 Solving Problems Basic Operation Problems 61 Picture...
... Mode 48 Using Other Features 49 Choosing the Language 49 Using Parental Controls 50 Restoring Factory Defaults 51 Cleaning and Maintenance Cleaning 53 Cleaning the Screen 53 Cleaning the Projector Lens 53 Cleaning System Components 54 Adjusting the Screen Length 54 Manual Screen Adjustment 55 Adjusting the Image Position and Focus 56 Repositioning the Image 56 Focusing and Resizing the Image 57 Checking the Projector Lamp 58 Checking the Info Menu 58 Checking the Warning Light 58 Replacing Remote Control Batteries 59 Solving Problems Basic Operation Problems 61 Picture...
User's Guide
Page 13
...'re done using the system, make sure the MAIN menu is displayed on the remote control. The projector lamp takes up to 30 seconds to turn on page 77. 13 If necessary, press the MAIN button. The screen comes down and the projector and AV controller turn on the system. MAIN button MAIN DVD CABLE SAT HD RADIO 1 OF 2 ON button 2 Point the remote control at the screen until the system has turned on...
...'re done using the system, make sure the MAIN menu is displayed on the remote control. The projector lamp takes up to 30 seconds to turn on page 77. 13 If necessary, press the MAIN button. The screen comes down and the projector and AV controller turn on the system. MAIN button MAIN DVD CABLE SAT HD RADIO 1 OF 2 ON button 2 Point the remote control at the screen until the system has turned on...
User's Guide
Page 61
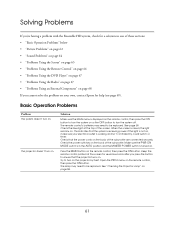
... projector by a wall switch or timer. Keep the remote control pointed at the top of the subwoofer are connected securely. Solving Problems If you're having a problem with the Ensemble HD system, check for a solution in the AUTO position and the MASTER POWER switch is receiving power. The remote control's batteries may need to be replaced. Basic Operation Problems Problem The system doesn't turn the system off. The projector doesn't turn on . See page 59. Check the blue light at the screen...
... projector by a wall switch or timer. Keep the remote control pointed at the top of the subwoofer are connected securely. Solving Problems If you're having a problem with the Ensemble HD system, check for a solution in the AUTO position and the MASTER POWER switch is receiving power. The remote control's batteries may need to be replaced. Basic Operation Problems Problem The system doesn't turn the system off. The projector doesn't turn on . See page 59. Check the blue light at the screen...
User's Guide
Page 62
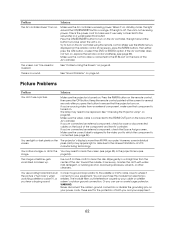
... "Checking the Projector Lamp" on the remote control, then press the ON button. If you and your power cords. However, some individual screen. pixels (dots) may appear light or dark due to clean the disk. The image sometimes gets scrambled or broken up. Use a soft, lint-free cloth to the inherent limitations of both you 've connected an external component, check for several seconds after you 're sourcing video...
... "Checking the Projector Lamp" on the remote control, then press the ON button. If you and your power cords. However, some individual screen. pixels (dots) may appear light or dark due to clean the disk. The image sometimes gets scrambled or broken up. Use a soft, lint-free cloth to the inherent limitations of both you 've connected an external component, check for several seconds after you 're sourcing video...
User's Guide
Page 63
... image. That's because high-definition TVs and home entertainment systems use the slightly narrower 16:9 (1.78:1) aspect ratio. After setting the Color Mode, you may need to fine-tune the color settings. See "Adjusting the Screen Length" on page 58. See "Checking the Projector Lamp" on page 54. The image is too dark. The colors don't look right, you may need to adjust how far the screen comes down. Problem...
... image. That's because high-definition TVs and home entertainment systems use the slightly narrower 16:9 (1.78:1) aspect ratio. After setting the Color Mode, you may need to fine-tune the color settings. See "Adjusting the Screen Length" on page 58. See "Checking the Projector Lamp" on page 54. The image is too dark. The colors don't look right, you may need to adjust how far the screen comes down. Problem...
User's Guide
Page 69
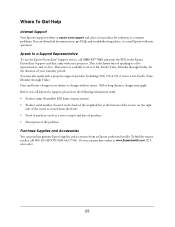
... Get Help Internet Support Visit Epson's support website at epson.com/support and select your product for solutions to common problems. You can download documentation, get FAQs and troubleshooting advice, or e-mail Epson with a projector support specialist by dialing (562) 276-4394, 6 AM to 6 PM, Pacific Time, Monday through Friday, for support, please have the following information ready: • Product name (Ensemble HD home cinema system) • Product serial number (located on...
... Get Help Internet Support Visit Epson's support website at epson.com/support and select your product for solutions to common problems. You can download documentation, get FAQs and troubleshooting advice, or e-mail Epson with a projector support specialist by dialing (562) 276-4394, 6 AM to 6 PM, Pacific Time, Monday through Friday, for support, please have the following information ready: • Product name (Ensemble HD home cinema system) • Product serial number (located on...
User's Guide
Page 124
...: Ensemble HD - Epson requires a debit or a credit card number to Epson within ten (10) working days of receipt of the original product. Epson's liability for installation and removal. 124 The exchanged product or part may be new or refurbished to the Epson standard of quality, and, at no charge, but it to secure the cost of the covered product. Possessions). Limited Warranty Epson Ensemble HD Home Theater System...
...: Ensemble HD - Epson requires a debit or a credit card number to Epson within ten (10) working days of receipt of the original product. Epson's liability for installation and removal. 124 The exchanged product or part may be new or refurbished to the Epson standard of quality, and, at no charge, but it to secure the cost of the covered product. Possessions). Limited Warranty Epson Ensemble HD Home Theater System...
User's Guide
Page 129
... Reset menu, 51 RF base station, using optional, 81 to 82 S Safety instructions, 3 to 4 Screen adjusting position, 54 to 55 black drop length, 54 cleaning, 53 controlling, 15 lowering, 13 to 15 problems, 65 raising, 13 to 15 sensor, remote control, 65 specifications, 120 Sensor, remote control, 65 Service, 69 Sharpness, 45 Shift dial, projector lens, 57 Sound, see Audio equipment or Speakers Source Assign menu, 34, 45 Speakers distance, 46 problems, 64 specifications...
... Reset menu, 51 RF base station, using optional, 81 to 82 S Safety instructions, 3 to 4 Screen adjusting position, 54 to 55 black drop length, 54 cleaning, 53 controlling, 15 lowering, 13 to 15 problems, 65 raising, 13 to 15 sensor, remote control, 65 specifications, 120 Sensor, remote control, 65 Service, 69 Sharpness, 45 Shift dial, projector lens, 57 Sound, see Audio equipment or Speakers Source Assign menu, 34, 45 Speakers distance, 46 problems, 64 specifications...


