Users Guide
Page 20
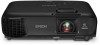
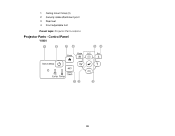
1 Ceiling mount holes (3) 2 Security cable attachment point 3 Rear feet 4 Front adjustable foot Parent topic: Projector Part Locations Projector Parts - Control Panel VS250 20
1 Ceiling mount holes (3) 2 Security cable attachment point 3 Rear feet 4 Front adjustable foot Parent topic: Projector Part Locations Projector Parts - Control Panel VS250 20
Users Guide
Page 26
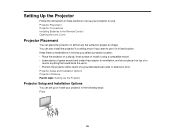
...: Setting Up the Projector Projector Setup and Installation Options You can also install the projector in a ceiling mount if you select a projector location: • Place the projector on a sturdy, level surface or install it using a compatible mount. • Leave plenty of a grounded electrical outlet or extension cord. Setting Up the Projector Follow the...
...: Setting Up the Projector Projector Setup and Installation Options You can also install the projector in a ceiling mount if you select a projector location: • Place the projector on a sturdy, level surface or install it using a compatible mount. • Leave plenty of a grounded electrical outlet or extension cord. Setting Up the Projector Follow the...

Users Guide
Page 91
...button on how you positioned the projector, you project from a table in front of the screen. • Front/Ceiling flips the image over top-to-bottom to project upside-down from a ceiling or wall mount. • Rear flips the image horizontally to project from behind a translucent screen. • Rear.../Ceiling flips the image over top-to-bottom and horizontally to project from the illustration shown here. Parent ...
...button on how you positioned the projector, you project from a table in front of the screen. • Front/Ceiling flips the image over top-to-bottom to project upside-down from a ceiling or wall mount. • Rear flips the image horizontally to project from behind a translucent screen. • Rear.../Ceiling flips the image over top-to-bottom and horizontally to project from the illustration shown here. Parent ...

Users Guide
Page 115
... cable and secure it to attach a Kensington lock. Note: Do not pass drop-prevention cables through the security cable attachment point when mounting the projector on a wall or ceiling. Parent topic: Projector Security Features Projector Identification System for Multiple Projector Control You can operate all the projectors at once or individually. •...
... cable and secure it to attach a Kensington lock. Note: Do not pass drop-prevention cables through the security cable attachment point when mounting the projector on a wall or ceiling. Parent topic: Projector Security Features Projector Identification System for Multiple Projector Control You can operate all the projectors at once or individually. •...

Users Guide
Page 155
Turn off the projector and unplug the power cord. 2. If dust is difficult to remove or the air filter is mounted to the ceiling or placed on a table. 1. Carefully open the air filter cover. 155 Parent topic: Air Filter and Vent Maintenance Replacing the Air Filter You need to ...
Turn off the projector and unplug the power cord. 2. If dust is difficult to remove or the air filter is mounted to the ceiling or placed on a table. 1. Carefully open the air filter cover. 155 Parent topic: Air Filter and Vent Maintenance Replacing the Air Filter You need to ...
Users Guide
Page 158
Warning: If the lamp is broken, glass fragments may be hot. Be careful removing any broken glass to avoid injury. If the projector is mounted to loosen the screw securing the lamp cover. pieces of the lamp cover and not underneath it to avoid injury. Allow the projector lamp to ... unplug the power cord. 2. Warning: Let the lamp fully cool before replacing it ; You can replace the lamp while the projector is installed on the ceiling, stand to cool down for at least one hour. 3. Use the screwdriver included with the replacement lamp to the...
Warning: If the lamp is broken, glass fragments may be hot. Be careful removing any broken glass to avoid injury. If the projector is mounted to loosen the screw securing the lamp cover. pieces of the lamp cover and not underneath it to avoid injury. Allow the projector lamp to ... unplug the power cord. 2. Warning: Let the lamp fully cool before replacing it ; You can replace the lamp while the projector is installed on the ceiling, stand to cool down for at least one hour. 3. Use the screwdriver included with the replacement lamp to the...
Users Guide
Page 188
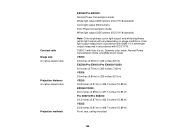
... depending on , Dynamic color mode, Normal Power Consumption mode, and Wide Zoom mode VS250: 23 inches (0.58 m) to 335 inches (8.5 m) EX5260/Pro EX9210/Pro EX9220/VS350: 30 inches (0.76 m) to 300 inches (7.62 m) VS355: 33 inches (0.84 m) to 320 inches (8.13 m) VS250: 35.8 inches (0.91 m) to...VS350: 35.0 inches (0.89 m) to 431.1 inches (10.95 m) Pro EX9210/Pro EX9220: 34.3 inches (0.87 m) to 432.3 inches (10.98 m) VS355: 35.8 inches (0.91 m) to 428.7 inches (10.89 m) Front, rear, ceiling-mounted 188 Contrast ratio Image size (in native aspect ratio) Projection distance (in accordance with ISO ...
... depending on , Dynamic color mode, Normal Power Consumption mode, and Wide Zoom mode VS250: 23 inches (0.58 m) to 335 inches (8.5 m) EX5260/Pro EX9210/Pro EX9220/VS350: 30 inches (0.76 m) to 300 inches (7.62 m) VS355: 33 inches (0.84 m) to 320 inches (8.13 m) VS250: 35.8 inches (0.91 m) to...VS350: 35.0 inches (0.89 m) to 431.1 inches (10.95 m) Pro EX9210/Pro EX9220: 34.3 inches (0.87 m) to 432.3 inches (10.98 m) VS355: 35.8 inches (0.91 m) to 428.7 inches (10.89 m) Front, rear, ceiling-mounted 188 Contrast ratio Image size (in native aspect ratio) Projection distance (in accordance with ISO ...
Users Guide
Page 200
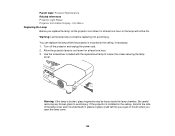
... to hold the plug with these safety instructions when setting up and using mounting hardware designed for cleaning. Do not cover the projector with this projector. • When installing or adjusting a ceiling or wall mount, do not use with a blanket, curtain, or tablecloth. Do not ...and the projector. • Do not operate the projector in a closed-in cabinet unless proper ventilation is mounted on a ceiling or wall, it should be walked on its ceiling mount. Important Safety Instructions Follow these precautions could result in fire or electric shock. • Do not place...
... to hold the plug with these safety instructions when setting up and using mounting hardware designed for cleaning. Do not cover the projector with this projector. • When installing or adjusting a ceiling or wall mount, do not use with a blanket, curtain, or tablecloth. Do not ...and the projector. • Do not operate the projector in a closed-in cabinet unless proper ventilation is mounted on a ceiling or wall, it should be walked on its ceiling mount. Important Safety Instructions Follow these precautions could result in fire or electric shock. • Do not place...


