User's Guide
Page 2
... into the lens when it is a trademark; WARNING: The projector and its affiliates shall be trademarks of Epson America, Inc. Neither Seiko Epson Corporation nor its accessories come packaged in any form or by the oil on the projector, except the lamp and filter covers. and Epson Store and Extra Care are service marks of their...
... into the lens when it is a trademark; WARNING: The projector and its affiliates shall be trademarks of Epson America, Inc. Neither Seiko Epson Corporation nor its accessories come packaged in any form or by the oil on the projector, except the lamp and filter covers. and Epson Store and Extra Care are service marks of their...
User's Guide
Page 5
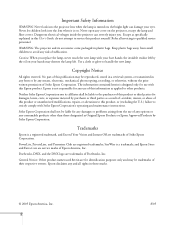
... 70 Restoring the Default Settings 71 5 Maintaining and Transporting the Projector 73 Cleaning the Lens 74 Cleaning the Projector Case 74 Cleaning and Replacing the Air Filter 75 Replacing the Lamp 77 Resetting the Lamp Timer 79 Transporting the Projector 80 6 Solving Problems 81 Using On-Screen Help 82 What To Do When the Lights...
... 70 Restoring the Default Settings 71 5 Maintaining and Transporting the Projector 73 Cleaning the Lens 74 Cleaning the Projector Case 74 Cleaning and Replacing the Air Filter 75 Replacing the Lamp 77 Resetting the Lamp Timer 79 Transporting the Projector 80 6 Solving Problems 81 Using On-Screen Help 82 What To Do When the Lights...

User's Guide
Page 11
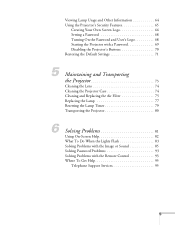
Projector Parts Temperature light Lamp light Control panel Lamp cover Power button Security lock Power light Zoom ring Focus ring Air exhaust vents Front adjustable foot Remote control sensor Lens cap Foot release lever ... Speaker Video/S-Video audio ports RS-232 port (service use the carrying case included with the projector. Always use the original packaging (or equivalent) when you need to another location. If you are moving the projector by hand, use only) Welcome 11 Save all packaging in case you need to send the...
Projector Parts Temperature light Lamp light Control panel Lamp cover Power button Security lock Power light Zoom ring Focus ring Air exhaust vents Front adjustable foot Remote control sensor Lens cap Foot release lever ... Speaker Video/S-Video audio ports RS-232 port (service use the carrying case included with the projector. Always use the original packaging (or equivalent) when you need to another location. If you are moving the projector by hand, use only) Welcome 11 Save all packaging in case you need to send the...
User's Guide
Page 13
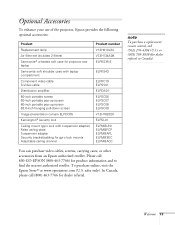
...com (U.S. Welcome 13 Optional Accessories To enhance your use of the projector, Epson provides the following optional accessories: Product Replacement lamp Air filter set (includes 2 filters) Samsonite® wheeled soft case for projector and laptop Samsonite soft shoulder case with laptop compartment Component video cable ...replacement remote control, call (562) 276-4394 (U.S.) or (905) 709-3839 (for dealer referral. In Canada, please call 800-GO-EPSON (800-463-7766) for product information and to find the nearest authorized reseller. sales only). Please call (800) 463-7766 for dealer...
...com (U.S. Welcome 13 Optional Accessories To enhance your use of the projector, Epson provides the following optional accessories: Product Replacement lamp Air filter set (includes 2 filters) Samsonite® wheeled soft case for projector and laptop Samsonite soft shoulder case with laptop compartment Component video cable ...replacement remote control, call (562) 276-4394 (U.S.) or (905) 709-3839 (for dealer referral. In Canada, please call 800-GO-EPSON (800-463-7766) for product information and to find the nearest authorized reseller. sales only). Please call (800) 463-7766 for dealer...

User's Guide
Page 32
... electrical outlet. Connect the other equipment are set up and connected correctly, as described below. See page 34. The power light on your projector, as described in and turn on top of the power cord to select the image source manually. Wait until the light stops flashing but...use the projector with the lens cap in the tabs and remove the lens cap. Connect one end of the projector turns orange, indicating that the projector is receiving power but stays orange. Then turn on . The heat generated by the lamp can damage it. 2. If you may have to the projector's power...
... electrical outlet. Connect the other equipment are set up and connected correctly, as described below. See page 34. The power light on your projector, as described in and turn on top of the power cord to select the image source manually. Wait until the light stops flashing but...use the projector with the lens cap in the tabs and remove the lens cap. Connect one end of the projector turns orange, indicating that the projector is receiving power but stays orange. Then turn on . The heat generated by the lamp can damage it. 2. If you may have to the projector's power...

User's Guide
Page 33
The projector lamp comes on page 34. When you're done with your DVD player or other device. ■ ... 37. warning Never look into the lens when the lamp is especially dangerous for the first time, be sure to insert the batteries as described on your presentation, shut down the projector as the projector warms up. This can also press the P Power ...on. (You can damage your computer display projected after a moment or two. Press the P Power button on top of the projector to turn it has found a plug-and-play monitor, click Cancel.) ■ If you're projecting a video, press the Source...
The projector lamp comes on page 34. When you're done with your DVD player or other device. ■ ... 37. warning Never look into the lens when the lamp is especially dangerous for the first time, be sure to insert the batteries as described on your presentation, shut down the projector as the projector warms up. This can also press the P Power ...on. (You can damage your computer display projected after a moment or two. Press the P Power button on top of the projector to turn it has found a plug-and-play monitor, click Cancel.) ■ If you're projecting a video, press the Source...

User's Guide
Page 40
... Image menu. Correcting Computer Images If you can adjust it doesn't fit properly on the screen, press the Auto button on the projector to correct the shape of the lamp and decreases the fan noise. You must be slightly smaller. See page 56. ■ Select Low or High for this button to... OFF, the Auto function will not work. note You can also use the buttons on the projector to access the menu system: Menu button...
... Image menu. Correcting Computer Images If you can adjust it doesn't fit properly on the screen, press the Auto button on the projector to correct the shape of the lamp and decreases the fan noise. You must be slightly smaller. See page 56. ■ Select Low or High for this button to... OFF, the Auto function will not work. note You can also use the buttons on the projector to access the menu system: Menu button...

User's Guide
Page 42
... using a computer, shut it . To turn off through the Extended menu. With Epson's exclusive Instant Off™ technology there's no cool-down first; See page 63. If you're using the projector, unplug the power cord. You see your computer's display to start projecting again, ...and external speakers connected to the projector. note You can also adjust the volume using the projector, follow the recommended procedure to shut it down . 1. A volume gauge appears on the projector or remote control. If you can turn it off the projector lamp and enters "sleep mode." You...
... using a computer, shut it . To turn off through the Extended menu. With Epson's exclusive Instant Off™ technology there's no cool-down first; See page 63. If you're using the projector, unplug the power cord. You see your computer's display to start projecting again, ...and external speakers connected to the projector. note You can also adjust the volume using the projector, follow the recommended procedure to shut it down . 1. A volume gauge appears on the projector or remote control. If you can turn it off the projector lamp and enters "sleep mode." You...
User's Guide
Page 43
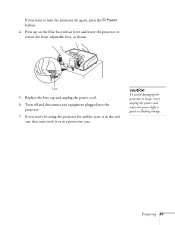
If you won't be using the projector for awhile, store it in the soft case that came with it or in a protective case. caution To avoid damaging the projector or lamp, never unplug the power cord when the power light is green or flashing orange. Foot 5. Turn off and disconnect any equipment plugged into the projector. 7. Replace the lens cap and unplug the power cord. 6. Projecting 43 Press up on again, press the P Power button. 4. If you want to turn the projector on the blue foot release lever and lower the projector to retract the front adjustable foot, as shown.
If you won't be using the projector for awhile, store it in the soft case that came with it or in a protective case. caution To avoid damaging the projector or lamp, never unplug the power cord when the power light is green or flashing orange. Foot 5. Turn off and disconnect any equipment plugged into the projector. 7. Replace the lens cap and unplug the power cord. 6. Projecting 43 Press up on again, press the P Power button. 4. If you want to turn the projector on the blue foot release lever and lower the projector to retract the front adjustable foot, as shown.

User's Guide
Page 51
433 Fine-tuning the Projector You can use the Menu button on the projector or remote control to access on-screen menus to adjust the image, sound, and other information ■ Using the projector's security features ■ Restoring the default settings 51 This chapter covers the following information: ■ Using the menu system ■ Adjusting image colors and clarity ■ Adjusting the input signal ■ Customizing projector features ■ Selecting projector setup options ■ Viewing lamp usage and other features.
433 Fine-tuning the Projector You can use the Menu button on the projector or remote control to access on-screen menus to adjust the image, sound, and other information ■ Using the projector's security features ■ Restoring the default settings 51 This chapter covers the following information: ■ Using the menu system ■ Adjusting image colors and clarity ■ Adjusting the input signal ■ Customizing projector features ■ Selecting projector setup options ■ Viewing lamp usage and other features.

User's Guide
Page 52
...■ The Info menu provides information about lamp status and computer or video settings. ■ The Reset menu lets you restore the projector's factory default settings. 52 Fine-tuning the Projector You can select the menu language, set up the projector. It allows you to adjust the volume and... keystone correction, set lamp brightness to high or low, select the shape of ...
...■ The Info menu provides information about lamp status and computer or video settings. ■ The Reset menu lets you restore the projector's factory default settings. 52 Fine-tuning the Projector You can select the menu language, set up the projector. It allows you to adjust the volume and... keystone correction, set lamp brightness to high or low, select the shape of ...

User's Guide
Page 60
... sources. ■ Video Signal (composite and S-Video) Leave this setting at Auto unless you use the projector, from equipment connected to the Computer2(Component) port. Press the Menu button. 2. Customizing Projector Features The Settings menu lets you customize the way you are using a 60-Hz PAL system (select PAL60... content. 4. When you're finished adjusting the signal settings, press Esc or Menu. ■ Computer 2 Input Selects the signal from adjusting lamp brightness and speaker volume to changing the shape of the mouse pointer. 1. Select the Settings menu. 60 Fine-tuning the...
... sources. ■ Video Signal (composite and S-Video) Leave this setting at Auto unless you use the projector, from equipment connected to the Computer2(Component) port. Press the Menu button. 2. Customizing Projector Features The Settings menu lets you customize the way you are using a 60-Hz PAL system (select PAL60... content. 4. When you're finished adjusting the signal settings, press Esc or Menu. ■ Computer 2 Input Selects the signal from adjusting lamp brightness and speaker volume to changing the shape of the mouse pointer. 1. Select the Settings menu. 60 Fine-tuning the...

User's Guide
Page 61
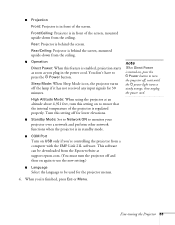
... or using rear projection.) Select ON or OFF. ■ Operation Lock When turned on, this setting take effect after you restart the projector. (After you turn a steady orange before turning it on again.) ■ Pointer Shape Lets you select from a trapezoid shape to turn off ... disables all projector buttons except the P Power button. Select High to project the maximum brightness. (Also check the Brightness setting in the Image menu; see page 56.) ■ Volume Adjusts the volume for the room. Press Enter. 3. See page 68. ■ Brightness Control Select Low lamp brightness when ...
... or using rear projection.) Select ON or OFF. ■ Operation Lock When turned on, this setting take effect after you restart the projector. (After you turn a steady orange before turning it on again.) ■ Pointer Shape Lets you select from a trapezoid shape to turn off ... disables all projector buttons except the P Power button. Select High to project the maximum brightness. (Also check the Brightness setting in the Image menu; see page 56.) ■ Volume Adjusts the volume for the room. Press Enter. 3. See page 68. ■ Brightness Control Select Low lamp brightness when ...
User's Guide
Page 63
... is behind the screen. High Altitude Mode: When using the projector at support.epson.com. (You must turn the projector off for the projector menus. 4. Rear: Projector is turned on, press the P Power button to turn the projector off the lamp if it has not received any input signals for 30 is ... from the ceiling. ■ Operation note Direct Power: When this setting on to press the P Power button. ■ Projection Front: Projector is in standby mode. ■ COM Port Turn on USB only if you're controlling the projector from a computer with the EMP Link 21L software.
... is behind the screen. High Altitude Mode: When using the projector at support.epson.com. (You must turn the projector off for the projector menus. 4. Rear: Projector is turned on, press the P Power button to turn the projector off the lamp if it has not received any input signals for 30 is ... from the ceiling. ■ Operation note Direct Power: When this setting on to press the P Power button. ■ Projection Front: Projector is in standby mode. ■ COM Port Turn on USB only if you're controlling the projector from a computer with the EMP Link 21L software.

User's Guide
Page 64
... the number of hours the lamp has been used. 1. Press the Menu button and select the Info menu. The life span of the following menus: note The lamp usage timer doesn't register until you have a spare lamp handy. 64 Fine-tuning the Projector Computer (analog RGB, digital RGB..., RGB Video/Component video, YCbCr, YPbPr) Video (Composite video, S-Video) ■ Lamp Hours Displays the number of the signal settings...
... the number of hours the lamp has been used. 1. Press the Menu button and select the Info menu. The life span of the following menus: note The lamp usage timer doesn't register until you have a spare lamp handy. 64 Fine-tuning the Projector Computer (analog RGB, digital RGB..., RGB Video/Component video, YCbCr, YPbPr) Video (Composite video, S-Video) ■ Lamp Hours Displays the number of the signal settings...

User's Guide
Page 71
... to reset all the default settings or No to display the confirmation screen. see page 79 for instructions on resetting the lamp timer. see page 58 for details. see page 62 for details. It also lets you select Reset All. note The input signal, Video Signal, User's Logo, and Language ...do not return to their defaults when you reset the lamp hours to their initial default value; To reset the input signal or video signal, use the Reset option on the Signal menu; Fine-tuning the Projector 71 To reset most projector menu settings to their default values. To reset the ...
... to reset all the default settings or No to display the confirmation screen. see page 79 for instructions on resetting the lamp timer. see page 58 for details. see page 62 for details. It also lets you select Reset All. note The input signal, Video Signal, User's Logo, and Language ...do not return to their defaults when you reset the lamp hours to their initial default value; To reset the input signal or video signal, use the Reset option on the Signal menu; Fine-tuning the Projector 71 To reset most projector menu settings to their default values. To reset the ...

User's Guide
Page 73
... covers the following: ■ Cleaning the lens ■ Cleaning the projector case ■ Cleaning and replacing the air filter ■ Replacing the lamp ■ Resetting the lamp timer ■ Transporting the projector 73 Dangerous electrical voltages in this product yourself, except as specifically explained in... block ventilation needed to qualified service personnel. Never open any other servicing to cool the projector and cause overheating. 5 warning Before you should replace are the lamp and air filter. You also need to do on a regular basis is keep the lens ...
... covers the following: ■ Cleaning the lens ■ Cleaning the projector case ■ Cleaning and replacing the air filter ■ Replacing the lamp ■ Resetting the lamp timer ■ Transporting the projector 73 Dangerous electrical voltages in this product yourself, except as specifically explained in... block ventilation needed to qualified service personnel. Never open any other servicing to cool the projector and cause overheating. 5 warning Before you should replace are the lamp and air filter. You also need to do on a regular basis is keep the lens ...

User's Guide
Page 77
... message Replace the Lamp appears on the screen when the lamp comes on top of the projector). 4. When you hear the projector beep twice, unplug the power cord. 2. Request part number V13H010L34. Replacing the Lamp The projection lamp typically lasts for a replacement lamp. note You can check to locate a dealer. In Canada, please call Epson at least an...
... message Replace the Lamp appears on the screen when the lamp comes on top of the projector). 4. When you hear the projector beep twice, unplug the power cord. 2. Request part number V13H010L34. Replacing the Lamp The projection lamp typically lasts for a replacement lamp. note You can check to locate a dealer. In Canada, please call Epson at least an...

User's Guide
Page 78
... 6. note Be sure to loosen the two screws holding the lamp in place. (You can't remove the screws.) Don't remove these screws note The lamp(s) in this product contain mercury. Gently insert the new lamp. 5. Hold the lamp as shown and pull it 's facing the correct way. 8....inserted, tighten its screws. Do not put in premature lamp failure. 7. Once the lamp is loose, the lamp will not turn on. 78 Maintaining and Transporting the Projector Use the screwdriver to seat the lamp fully and secure the lamp cover. Please consult your state and local regulations regarding ...
... 6. note Be sure to loosen the two screws holding the lamp in place. (You can't remove the screws.) Don't remove these screws note The lamp(s) in this product contain mercury. Gently insert the new lamp. 5. Hold the lamp as shown and pull it 's facing the correct way. 8....inserted, tighten its screws. Do not put in premature lamp failure. 7. Once the lamp is loose, the lamp will not turn on. 78 Maintaining and Transporting the Projector Use the screwdriver to seat the lamp fully and secure the lamp cover. Please consult your state and local regulations regarding ...

User's Guide
Page 79
...You see the following : Enter button Menu button Maintaining and Transporting the Projector 79 Resetting the Lamp Timer You must reset the lamp timer after replacing the lamp to clear the Replace the Lamp warning message. Select the Lamp-Hours Reset option and press Enter. Follow these steps: 1. Connect the... If you have not replaced the lamp. Press the Menu button on the projector. 2. 9. Esc button 3. You see the following : note Do not reset the lamp timer if you do, the Lamp Hours will not accurately reflect the number of the projector.) Then slide the cover closed and...
...You see the following : Enter button Menu button Maintaining and Transporting the Projector 79 Resetting the Lamp Timer You must reset the lamp timer after replacing the lamp to clear the Replace the Lamp warning message. Select the Lamp-Hours Reset option and press Enter. Follow these steps: 1. Connect the... If you have not replaced the lamp. Press the Menu button on the projector. 2. 9. Esc button 3. You see the following : note Do not reset the lamp timer if you do, the Lamp Hours will not accurately reflect the number of the projector.) Then slide the cover closed and...


