Quick Reference Guide
Page 2
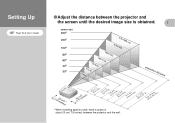
screen size projection distance (7.9 i2n0chcems*) 2(70.9cmin*ches) 0.9(3-.10.-13.6) 1.2(3-.19.-65.2)1.8(5-.29.-47.92).(58-.23-.210.5) 3(.110-.42.-113.5) 6(.210-.80.-327.2)9.(23-01.22-.440m.7 ft.) * When installing against a wall, leave a space of User's Guide Adjust the distance between the projector and the wall. Setting Up Page 18 of about 20 cm (7.9 inches) between the projector and the screen until the desired image size is obtained.
screen size projection distance (7.9 i2n0chcems*) 2(70.9cmin*ches) 0.9(3-.10.-13.6) 1.2(3-.19.-65.2)1.8(5-.29.-47.92).(58-.23-.210.5) 3(.110-.42.-113.5) 6(.210-.80.-327.2)9.(23-01.22-.440m.7 ft.) * When installing against a wall, leave a space of User's Guide Adjust the distance between the projector and the wall. Setting Up Page 18 of about 20 cm (7.9 inches) between the projector and the screen until the desired image size is obtained.
Quick Reference Guide
Page 3
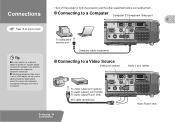
... port. To computer's monitor port Computer cable (accessory) Connecting to the projector, depending on the shape of the projector. Connections * Turn off the power for both the projector and the other equipment before connecting them. If connecting component video source (such as a DVD player), you can use an optional adapter or purchase a separate adapter to connect the computer to a Video Source Video port (yellow) Audio L port (white) To video output port (yellow) To audio output L port (white) To audio output R port (red) A/V cable (accessory) Audio R port (red) Setting...
... port. To computer's monitor port Computer cable (accessory) Connecting to the projector, depending on the shape of the projector. Connections * Turn off the power for both the projector and the other equipment before connecting them. If connecting component video source (such as a DVD player), you can use an optional adapter or purchase a separate adapter to connect the computer to a Video Source Video port (yellow) Audio L port (white) To video output port (yellow) To audio output L port (white) To audio output R port (red) A/V cable (accessory) Audio R port (red) Setting...
Quick Reference Guide
Page 4
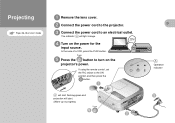
will start flashing green and projection will light orange. Projecting Pages 36--38 of a VCR, press the PLAY button. Turn on the projector's power. In the case of User's Guide Remove the lens cover. If using the remote control, set the R/C switch to the projector. Connect the power cord to the ON position and then press the button. The indicator will start. (Warm-up in progress) Operation indicator Connect the power cord to turn on the power for the input source. Press the button to an electrical outlet.
will start flashing green and projection will light orange. Projecting Pages 36--38 of a VCR, press the PLAY button. Turn on the projector's power. In the case of User's Guide Remove the lens cover. If using the remote control, set the R/C switch to the projector. Connect the power cord to the ON position and then press the button. The indicator will start. (Warm-up in progress) Operation indicator Connect the power cord to turn on the power for the input source. Press the button to an electrical outlet.

Quick Reference Guide
Page 5
... to the online Help information. Examples of the Function keys. Press , and then follow the instructions. Projector If you may need to Troubleshooting. Change the input signal. Refer to the documentation provided with a LCD screen has been connected to the projector, you have other problems ... If images do not appear ... The output destination can normally be used. Once the source has been changed by holding down...
... to the online Help information. Examples of the Function keys. Press , and then follow the instructions. Projector If you may need to Troubleshooting. Change the input signal. Refer to the documentation provided with a LCD screen has been connected to the projector, you have other problems ... If images do not appear ... The output destination can normally be used. Once the source has been changed by holding down...
Quick Reference Guide
Page 6
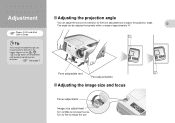
...˚ Front adjustable foot 10˚ Foot adjust button Adjusting the image size and focus Focus adjustment Image size adjustment Turn to Wide to increase the size Turn to Tele to correct keystone distortion. You can adjust the amount of User's Guide Tip If you change the projection angle, you may get keystone distortion in the images. Adjusting the projection angle You can use the , , and buttons on the projector's control panel to reduce the size See page 7. Adjustment Pages 41,42...
...˚ Front adjustable foot 10˚ Foot adjust button Adjusting the image size and focus Focus adjustment Image size adjustment Turn to Wide to increase the size Turn to Tele to correct keystone distortion. You can adjust the amount of User's Guide Tip If you change the projection angle, you may get keystone distortion in the images. Adjusting the projection angle You can use the , , and buttons on the projector's control panel to reduce the size See page 7. Adjustment Pages 41,42...

Quick Reference Guide
Page 7
Projector Remote Control Using the on the remote control. Automatically adjusting computer images to the optimum settings Press on the projector's control panel or on -screen menus Main menu Projector Remote control Move up Return Move up Select Move left Move right Move left Select Move down Move down Return Move right Adjustment / Turning Off the Projector Projector Other adjustments Remote Control Press on the projector's control panel or on the projection screen, and you can then adjust settings such as brightness...
Projector Remote Control Using the on the remote control. Automatically adjusting computer images to the optimum settings Press on the projector's control panel or on -screen menus Main menu Projector Remote control Move up Return Move up Select Move left Move right Move left Select Move down Move down Return Move right Adjustment / Turning Off the Projector Projector Other adjustments Remote Control Press on the projector's control panel or on the projection screen, and you can then adjust settings such as brightness...

Quick Reference Guide
Page 8
... to the default setting: While holding down the button, press the button for 1 second or more . To restore the vertical keystone correction to correct the keystone distortion. Press on the projector's control panel to the default setting: While holding down the button, press the button for 1 second or more . Extend the front adjustable foot to the factory default setting, do the following order. 1 . The keystone correction settings are memorized...
... to the default setting: While holding down the button, press the button for 1 second or more . To restore the vertical keystone correction to correct the keystone distortion. Press on the projector's control panel to the default setting: While holding down the button, press the button for 1 second or more . Extend the front adjustable foot to the factory default setting, do the following order. 1 . The keystone correction settings are memorized...
Quick Reference Guide
Page 9
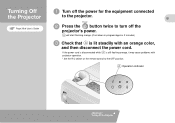
Operation indicator Adjustment / Turning Off the Projector will start flashing orange. (Cool-down in progress/approx. 2 minutes) Check that is still flashing orange, it may cause problems with an orange color, and then disconnect the power cord. Press the button twice to turn off the power for the equipment connected to the OFF position. If the power cord is disconnected while is lit steadily with projector operation. * Set the R/C switch on the remote control to the projector. Turning Off the Projector Page 39 of User's Guide Turn off the projector's power.
Operation indicator Adjustment / Turning Off the Projector will start flashing orange. (Cool-down in progress/approx. 2 minutes) Check that is still flashing orange, it may cause problems with an orange color, and then disconnect the power cord. Press the button twice to turn off the power for the equipment connected to the OFF position. If the power cord is disconnected while is lit steadily with projector operation. * Set the R/C switch on the remote control to the projector. Turning Off the Projector Page 39 of User's Guide Turn off the projector's power.
Quick Reference Guide
Page 10
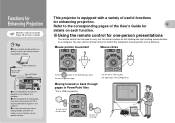
... clicks Mouse/USB port Mouse cable (accessory) Mouse/USB port Use a USB cable to connect the projector to the USB port of useful functions for one-person presentations The remote control can use the remote control to connect the projector as follows. Using the remote control for enhancing projection. Functions for details on each function. Refer to the corresponding pages of the User's Guide for Enhancing Projection Wireless mouse function Page 25 of User's Guide Tip When using the remote control as left...
... clicks Mouse/USB port Mouse cable (accessory) Mouse/USB port Use a USB cable to connect the projector to the USB port of useful functions for one-person presentations The remote control can use the remote control to connect the projector as follows. Using the remote control for enhancing projection. Functions for details on each function. Refer to the corresponding pages of the User's Guide for Enhancing Projection Wireless mouse function Page 25 of User's Guide Tip When using the remote control as left...
Quick Reference Guide
Page 11
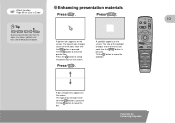
... of three sizes each time the button is pressed. The size of the spotlight changes to one of three icons each time the button is pressed. Tilt the button to move the spotlight. The type of User's Guide Tip By pressing any button other than the above, the stamps, spotlights and bars used for Enhancing Projection Press . A pointer icon appears on the screen. Effect...
... of three sizes each time the button is pressed. The size of the spotlight changes to one of three icons each time the button is pressed. Tilt the button to move the spotlight. The type of User's Guide Tip By pressing any button other than the above, the stamps, spotlights and bars used for Enhancing Projection Press . A pointer icon appears on the screen. Effect...
Quick Reference Guide
Page 12
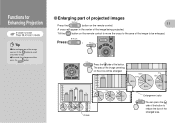
... tilt the button to scroll around the image. Tilt the button on the remote control. The area of the image centering on the cross will appear in the center of the image being projected. Functions for Enhancing Projection E-Zoom function Page 56 of User's Guide Tip After enlarging part of the image, you can press the side of the button to reduce the size of the...
... tilt the button to scroll around the image. Tilt the button on the remote control. The area of the image centering on the cross will appear in the center of the image being projected. Functions for Enhancing Projection E-Zoom function Page 56 of User's Guide Tip After enlarging part of the image, you can press the side of the button to reduce the size of the...
Quick Reference Guide
Page 13
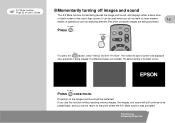
... default setting is being projected. The following choices are being stopped. Press once more. A/V Mute function Page 52 of the images and sound will still continue to be played back, and you cannot return to be displayed when projection is the black screen. Press . Projection of User's Guide Momentarily turning off images and sound The A/V Mute function momentarily pauses the image and sound, and displays either a blank blue...
... default setting is being projected. The following choices are being stopped. Press once more. A/V Mute function Page 52 of the images and sound will still continue to be played back, and you cannot return to be displayed when projection is the black screen. Press . Projection of User's Guide Momentarily turning off images and sound The A/V Mute function momentarily pauses the image and sound, and displays either a blank blue...
Quick Reference Guide
Page 14
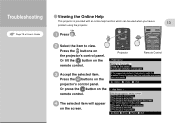
Or tilt the button on the projector's control panel. Accept the selected item. Projector Remote Control Press the buttons on the remote control. Or press the button on the screen. Select the item to view. The selected item will appear on the remote control. Troubleshooting Page 78 of User's Guide Viewing the Online Help This projector is provided with an online help function which can be used when you have a problem using the projector. Press . Press the buttons on the projector's control panel.
Or tilt the button on the projector's control panel. Accept the selected item. Projector Remote Control Press the buttons on the remote control. Or press the button on the screen. Select the item to view. The selected item will appear on the remote control. Troubleshooting Page 78 of User's Guide Viewing the Online Help This projector is provided with an online help function which can be used when you have a problem using the projector. Press . Press the buttons on the projector's control panel.
Quick Reference Guide
Page 15
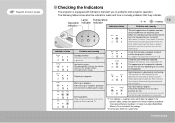
... nearest address provided at this time will stop . Lamp Temperature Operation indicator indicator indicator Indicator status lit flashing Problem and remedy Indicator status Problem and remedy Standby condition. The lamp will turn off . Page 80 of User's Guide Checking the Indicators The projector is equipped with indicators that alert you to the standby condition (the indicator lights orange). button Cool-down period had finished the last time the projector was turned off automatically and projection will vary depending on the status of the operation indicator...
... nearest address provided at this time will stop . Lamp Temperature Operation indicator indicator indicator Indicator status lit flashing Problem and remedy Indicator status Problem and remedy Standby condition. The lamp will turn off . Page 80 of User's Guide Checking the Indicators The projector is equipped with indicators that alert you to the standby condition (the indicator lights orange). button Cool-down period had finished the last time the projector was turned off automatically and projection will vary depending on the status of the operation indicator...


