
Owners Manual
Page 4
.... Use a cloth or gloves to qualified service personnel. Dangerous electrical voltages inside the projector can damage your eyes. Important Information About Your projector Important Safety Information Warning: Never look into the projector lens when the lamp is on your hands may result in this Owner's Manual, ...do not attempt to service this product yourself. Never let children look into the lens when it is switched on the projector except the lamp and filter...
.... Use a cloth or gloves to qualified service personnel. Dangerous electrical voltages inside the projector can damage your eyes. Important Information About Your projector Important Safety Information Warning: Never look into the projector lens when the lamp is on your hands may result in this Owner's Manual, ...do not attempt to service this product yourself. Never let children look into the lens when it is switched on the projector except the lamp and filter...

Owners Manual
Page 5
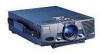
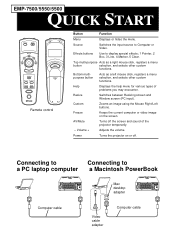
... to various computer graphic signals (tracking adjustment). Left, right arrows(tracking-/ tracking+) Matches the projector's internal clock to Computer or Video. Volume + Adjusts the volume. Help Displays the help menu for various types of the projector temporarily. - EMP-7500/5550/5500 QUICK START operation panel speaker operation indicator remote control receiver speaker zoom ring...
... to various computer graphic signals (tracking adjustment). Left, right arrows(tracking-/ tracking+) Matches the projector's internal clock to Computer or Video. Volume + Adjusts the volume. Help Displays the help menu for various types of the projector temporarily. - EMP-7500/5550/5500 QUICK START operation panel speaker operation indicator remote control receiver speaker zoom ring...
Owners Manual
Page 6
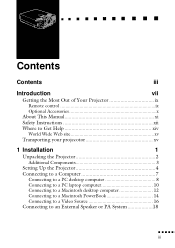
... PowerBook Mac desktop adapter Computer cable Video cable adapter Computer cable Help Displays the help menu for various types of the projector temporarily. - Resize Switches between Resizing screen and Window screen (PC input). Volume + Adjusts the volume. Connecting to Connecting...Clear. Top multi-purpose Acts as a left mouse click, registers a menu selection, and selects other custom functions. AV/Mute Turns off . EMP-7500/5550/5500 QUICK START 1 2 Source Menu Effects 3 5 4 AV/Mute Resize Custom Freeze Help - Source Switches the input source to Computer ...
... PowerBook Mac desktop adapter Computer cable Video cable adapter Computer cable Help Displays the help menu for various types of the projector temporarily. - Resize Switches between Resizing screen and Window screen (PC input). Volume + Adjusts the volume. Connecting to Connecting...Clear. Top multi-purpose Acts as a left mouse click, registers a menu selection, and selects other custom functions. AV/Mute Turns off . EMP-7500/5550/5500 QUICK START 1 2 Source Menu Effects 3 5 4 AV/Mute Resize Custom Freeze Help - Source Switches the input source to Computer ...
Owners Manual
Page 9
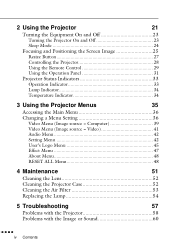
... This Manual xi Safety Instructions xii Where to Get Help xiv World Wide Web site xv Transporting your projecotor xv 1 Installation 1 Unpacking the Projector 2 Additional Components 3 Setting Up the Projector 4 Connecting to a Computer 7 Connecting to a PC desktop computer 8 Connecting to a PC laptop computer 10 Connecting to a Macintosh desktop computer 12 Connecting to...
... This Manual xi Safety Instructions xii Where to Get Help xiv World Wide Web site xv Transporting your projecotor xv 1 Installation 1 Unpacking the Projector 2 Additional Components 3 Setting Up the Projector 4 Connecting to a Computer 7 Connecting to a PC desktop computer 8 Connecting to a PC laptop computer 10 Connecting to a Macintosh desktop computer 12 Connecting to...
Owners Manual
Page 10
... Focusing and Positioning the Screen Image 25 Resize Button 27 Controlling the Projector 28 Using the Remote Control 29 Using the Operation Panel 31 Projector Status Indicators 33 Operation Indicator 33 Lamp Indicator 34 Temperature Indicator 34 3 Using the Projector Menus 35 Accessing the Main Menu 36 Changing a Menu Setting 36 ...Menu 42 User's Logo Menu 45 Effect Menu 47 About Menu 48 RESET ALL Menu 48 4 Maintenance 51 Cleaning the Lens 52 Cleaning the Projector Case 52 Cleaning the Air Filter 53 Replacing the Lamp 54 5 Troubleshooting 57 Problems with the...
... Focusing and Positioning the Screen Image 25 Resize Button 27 Controlling the Projector 28 Using the Remote Control 29 Using the Operation Panel 31 Projector Status Indicators 33 Operation Indicator 33 Lamp Indicator 34 Temperature Indicator 34 3 Using the Projector Menus 35 Accessing the Main Menu 36 Changing a Menu Setting 36 ...Menu 42 User's Logo Menu 45 Effect Menu 47 About Menu 48 RESET ALL Menu 48 4 Maintenance 51 Cleaning the Lens 52 Cleaning the Projector Case 52 Cleaning the Air Filter 53 Replacing the Lamp 54 5 Troubleshooting 57 Problems with the...
Owners Manual
Page 13
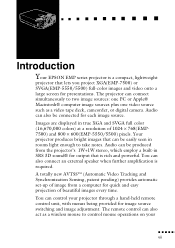
...Sensing, patent pending) provides automatic set-up of image from the projector's 1W+1W stereo, which employ a built-in SRS 3D sound® for output that lets you project XGA(EMP-7500) or SVGA(EMP-5550/5500) full-color images and video onto a large screen for ...mouse operations on your projector through a hand-held remote control unit, with menus being provided for quick and easy projection of 1024 × 768(EMP7500) and 800 × 600(EMP-5550/5500) pixels. s s s s ss s s s s s s s s s Introduction Your EPSON EMP series projector is a compact, lightweight projector that is required. ...
...Sensing, patent pending) provides automatic set-up of image from the projector's 1W+1W stereo, which employ a built-in SRS 3D sound® for output that lets you project XGA(EMP-7500) or SVGA(EMP-5550/5500) full-color images and video onto a large screen for ...mouse operations on your projector through a hand-held remote control unit, with menus being provided for quick and easy projection of 1024 × 768(EMP7500) and 800 × 600(EMP-5550/5500) pixels. s s s s ss s s s s s s s s s Introduction Your EPSON EMP series projector is a compact, lightweight projector that is required. ...

Owners Manual
Page 14
... The optional ELP LINK III™ provides a number of outstanding clarity. Your projector also features a new patented BIS CUIT (Balanced Image Size Conversion UnIT) chip which supports XGA(EMP-7500), VGA~XGA(EMP-5550/5500) computer output, as well as Apple® Macintosh®, Power Macintosh and... PowerBook computers. Your projector supports IBM-compatible PCs and laptops, as well as VGA and SXGA ...
... The optional ELP LINK III™ provides a number of outstanding clarity. Your projector also features a new patented BIS CUIT (Balanced Image Size Conversion UnIT) chip which supports XGA(EMP-7500), VGA~XGA(EMP-5550/5500) computer output, as well as Apple® Macintosh®, Power Macintosh and... PowerBook computers. Your projector supports IBM-compatible PCs and laptops, as well as VGA and SXGA ...

Owners Manual
Page 15
... and audio. Remote control The buttons on the remote control let you turn the projector on or off, and provide direct access to auto set of features that enable you to access custom functions and the projector's menu system. To get the most out of your computer's mouse. Getting the... Most Out of Your Projector Your projector comes with a full set -up, blank, freeze, volume, mute and image source switching. Use...
... and audio. Remote control The buttons on the remote control let you turn the projector on or off, and provide direct access to auto set of features that enable you to access custom functions and the projector's menu system. To get the most out of your computer's mouse. Getting the... Most Out of Your Projector Your projector comes with a full set -up, blank, freeze, volume, mute and image source switching. Use...
Owners Manual
Page 16
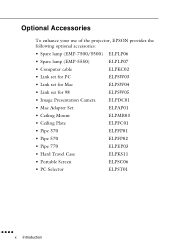
Optional Accessories To enhance your use of the projector, EPSON provides the following optional accessories: • Spare lamp (EMP-7500/5500) ELPLP06 • Spare lamp (EMP-5550) ELPLP07 • Computer cable ELPKC02 • Link set for PC ELPSW03 • Link set for Mac ELPSW04 • Link ser for 98 ELPSW05 • Image ...
Optional Accessories To enhance your use of the projector, EPSON provides the following optional accessories: • Spare lamp (EMP-7500/5500) ELPLP06 • Spare lamp (EMP-5550) ELPLP07 • Computer cable ELPKC02 • Link set for PC ELPSW03 • Link set for Mac ELPSW04 • Link ser for 98 ELPSW05 • Image ...
Owners Manual
Page 17
...describes how to your computer, video source, or other external speaker or PA system. Chapter 5, "Troubleshooting", describes you how to your projector. A Glossary and Index are provided at the end of the projected image and modify audio settings such as bass and treble. Read the... installation procedures that apply to interpret the projector's indicator lights and gives helpful information for avoiding errors, optimizing image quality and solving problems. Chapter 6, "Technical Specifications," lists ...
...describes how to your computer, video source, or other external speaker or PA system. Chapter 5, "Troubleshooting", describes you how to your projector. A Glossary and Index are provided at the end of the projected image and modify audio settings such as bass and treble. Read the... installation procedures that apply to interpret the projector's indicator lights and gives helpful information for avoiding errors, optimizing image quality and solving problems. Chapter 6, "Technical Specifications," lists ...

Owners Manual
Page 18
... damp cloth for cleaning. s s s s s xii Introduction Do not place the projector on the projector. Do not handle the plug with wet hands. 7. Unplug the projector from the wall outlet before cleaning. Insert the projector's three-pin grounding-type plug into the outlet. 8. This may result in sparks or...insert the plug into an outlet with dust present. • Insert the plug firmly into a properly grounded outlet. Do not place the projector where the cord can be stepped on. It may cause fire or electric shock. 9. Do not overload wall outlets, extension cords or ...
... damp cloth for cleaning. s s s s s xii Introduction Do not place the projector on the projector. Do not handle the plug with wet hands. 7. Unplug the projector from the wall outlet before cleaning. Insert the projector's three-pin grounding-type plug into the outlet. 8. This may result in sparks or...insert the plug into an outlet with dust present. • Insert the plug firmly into a properly grounded outlet. Do not place the projector where the cord can be stepped on. It may cause fire or electric shock. 9. Do not overload wall outlets, extension cords or ...

Owners Manual
Page 19
...qualified service personnel under the following conditions; • When the power cord or plug is provided. 12. Except as a car. 16. Do not place the projector and remote control on a sofa, rug or other hazards. 14. s s s s s s Safety Instructions xiii 11. Never push objects of any kind ...8226; If it exhibits a distinct change in cabinet unless proper ventilation is damaged or frayed • If liquid has been spilled into the projector. 13. Refer all servicing to service this product yourself. Opening or removing covers may expose you follow the operating instructions, or if it...
...qualified service personnel under the following conditions; • When the power cord or plug is provided. 12. Except as a car. 16. Do not place the projector and remote control on a sofa, rug or other hazards. 14. s s s s s s Safety Instructions xiii 11. Never push objects of any kind ...8226; If it exhibits a distinct change in cabinet unless proper ventilation is damaged or frayed • If liquid has been spilled into the projector. 13. Refer all servicing to service this product yourself. Opening or removing covers may expose you follow the operating instructions, or if it...

Owners Manual
Page 20
Where to Get Help If you cannot resolve the problem, contact the appropriate representative listed in the section entitled "After sales service contact addresses" at the end of the problem s s s s s xiv Introduction Before you call, please have the following information ready: • Product name • Product serial number • Computer configuration • Description of this manual. If you are haveing trouble setting up or running your projector, first see Chapter 5, "Troubleshooting".
Where to Get Help If you cannot resolve the problem, contact the appropriate representative listed in the section entitled "After sales service contact addresses" at the end of the problem s s s s s xiv Introduction Before you call, please have the following information ready: • Product name • Product serial number • Computer configuration • Description of this manual. If you are haveing trouble setting up or running your projector, first see Chapter 5, "Troubleshooting".

Owners Manual
Page 21
...the following. Put cushioning around the world, EPSON Contacts includes Contact Information for business use the equivalent. com. epson. World Wide Web site If you connect to the Internet and have the original packaging use • First, put the projector in a hard travel case(optional accessories :... ELPKS11), then pack it in a firm box, using cushioning. EPSON's home page provides you can access to EPSON's World Wide Web site at http:// www. When transporting to...
...the following. Put cushioning around the world, EPSON Contacts includes Contact Information for business use the equivalent. com. epson. World Wide Web site If you connect to the Internet and have the original packaging use • First, put the projector in a hard travel case(optional accessories :... ELPKS11), then pack it in a firm box, using cushioning. EPSON's home page provides you can access to EPSON's World Wide Web site at http:// www. When transporting to...

Owners Manual
Page 22
EPSON shall not be liable against any damage. When traveling by an airplane • Be sure to bring the projector with you when traveling by hands • Use a hard travel case (optional accessories : ELPKS11) or a soft travel case to avoid any damages arose during the transportation. s s s s s xvi Introduction When carrying by an airplane. • When transporting the projector as baggage on an airplane, first put the projector in a hard travel case (additional components).
EPSON shall not be liable against any damage. When traveling by an airplane • Be sure to bring the projector with you when traveling by hands • Use a hard travel case (optional accessories : ELPKS11) or a soft travel case to avoid any damages arose during the transportation. s s s s s xvi Introduction When carrying by an airplane. • When transporting the projector as baggage on an airplane, first put the projector in a hard travel case (additional components).

Owners Manual
Page 23
... deck, camcorder, digital camera or laser disk player before it to amplify the audio. You may also what to set up the projector for one or more of the following: • Connect the mouse cable to use the remote control as a wireless mouse. • Connect... the projector to a computer or a video source such as a stereo. • Connect the projector to an external speaker or PA system to other equipment. s s s s s s 1 s s s s ss s s s s s s s s s 1 Installation This ...
... deck, camcorder, digital camera or laser disk player before it to amplify the audio. You may also what to set up the projector for one or more of the following: • Connect the mouse cable to use the remote control as a wireless mouse. • Connect... the projector to a computer or a video source such as a stereo. • Connect the projector to an external speaker or PA system to other equipment. s s s s s s 1 s s s s ss s s s s s s s s s 1 Installation This ...
Owners Manual
Page 24
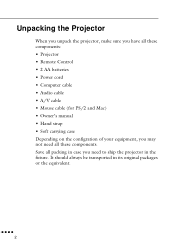
... sure you have all these components. Save all these components: • Projector • Remote Control • 2 AA batteries • Power cord • Computer cable • Audio cable • A/V cable • Mouse cable (for PS/2 and Mac) • ..., you need all packing in its original packages or the equivalent. It should always be transported in case you may not need to ship the projector in the future.
... sure you have all these components. Save all these components: • Projector • Remote Control • 2 AA batteries • Power cord • Computer cable • Audio cable • A/V cable • Mouse cable (for PS/2 and Mac) • ..., you need all packing in its original packages or the equivalent. It should always be transported in case you may not need to ship the projector in the future.

Owners Manual
Page 25
...use the mouse cable. ♦ Note: You can connect a Kensington MicroSaver® anti-theft device in the hole on how you plan to use the projector, you may need these additional components: • To receive an S-Video signal, you need an S-Video cable. (One is usually provided with your ...video device.) A separate cable is required for each video source. • To connect the projector to a Macintosh PowerBook, you need a video-out cable. (One is provided by/or can obtain these items from Apple for all new PowerBooks that have...
...use the mouse cable. ♦ Note: You can connect a Kensington MicroSaver® anti-theft device in the hole on how you plan to use the projector, you may need these additional components: • To receive an S-Video signal, you need an S-Video cable. (One is usually provided with your ...video device.) A separate cable is required for each video source. • To connect the projector to a Macintosh PowerBook, you need a video-out cable. (One is provided by/or can obtain these items from Apple for all new PowerBooks that have...

Owners Manual
Page 26
... 63.0 inches (1.6 m) 25 inches (51x38cm) 39.4 inches (1.0 m) ~ 51.2 inches (1.3 m) 19 inches (39x29cm) 39.4 inches (1.0 m) s s s s s 4 Place the projector at a correct distance from projector to determine the correct distance. This can damage the lens. 2. Screen size Horizontal distance from the screen. The distance between the... projector and the screen determines the actual image size. Setting Up the Projector 1. Place the projector on a sturdy, level surface within five feet of the computer...
... 63.0 inches (1.6 m) 25 inches (51x38cm) 39.4 inches (1.0 m) ~ 51.2 inches (1.3 m) 19 inches (39x29cm) 39.4 inches (1.0 m) s s s s s 4 Place the projector at a correct distance from projector to determine the correct distance. This can damage the lens. 2. Screen size Horizontal distance from the screen. The distance between the... projector and the screen determines the actual image size. Setting Up the Projector 1. Place the projector on a sturdy, level surface within five feet of the computer...
Owners Manual
Page 27
...angled correctly, the screen image will be allowed to the screen. If the projector is not in sleep mode, indicated by an orange power indicator. ♦ Warning: Never look into the lens when the projector is especially important that children should be in use. There is a risk ...that the lens is at right angles to look into the lens. s s s s s s Setting Up the Projector 5 Turn the projector so that the projector might come on . Connect the other end to the projector's power connector. 3. The light from the lamp can damage your eyes.
...angled correctly, the screen image will be allowed to the screen. If the projector is not in sleep mode, indicated by an orange power indicator. ♦ Warning: Never look into the lens when the projector is especially important that children should be in use. There is a risk ...that the lens is at right angles to look into the lens. s s s s s s Setting Up the Projector 5 Turn the projector so that the projector might come on . Connect the other end to the projector's power connector. 3. The light from the lamp can damage your eyes.


