
Instruction Manual
Page 2
If any of purchase. • Projector • Lens cover with cord • Remote control • Two manganese dry cells for the remote control • Power cord (9,8 ft (3 m)) • Computer cable (6 ft (1,8 m)) • Audio/Video (A/V) cable (red/white/yellow) (6ft (1,8 m)) • USB mouse cable (6 ft (1,8 m)) • PS/2 mouse cable (6 ft (1,8 m)) • Safety Instructions/WorldWide Warranty Terms • Instruction Manual (this manual) • Quick Reference Guide • Soft case Checking Accessories When unpacking the projector and accessories from their box...
If any of purchase. • Projector • Lens cover with cord • Remote control • Two manganese dry cells for the remote control • Power cord (9,8 ft (3 m)) • Computer cable (6 ft (1,8 m)) • Audio/Video (A/V) cable (red/white/yellow) (6ft (1,8 m)) • USB mouse cable (6 ft (1,8 m)) • PS/2 mouse cable (6 ft (1,8 m)) • Safety Instructions/WorldWide Warranty Terms • Instruction Manual (this manual) • Quick Reference Guide • Soft case Checking Accessories When unpacking the projector and accessories from their box...
Instruction Manual
Page 3
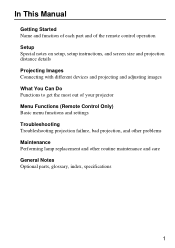
In This Manual Getting Started Name and function of each part and of the remote control operation Setup Special notes on setup, setup instructions, and screen size and projection distance details Projecting Images Connecting with different devices and projecting and adjusting images What You Can Do Functions to get the most out of your projector Menu Functions (Remote Control Only) Basic menu functions and settings Troubleshooting Troubleshooting projection failure, bad projection, and other problems Maintenance Performing lamp replacement and other routine maintenance and care General...
In This Manual Getting Started Name and function of each part and of the remote control operation Setup Special notes on setup, setup instructions, and screen size and projection distance details Projecting Images Connecting with different devices and projecting and adjusting images What You Can Do Functions to get the most out of your projector Menu Functions (Remote Control Only) Basic menu functions and settings Troubleshooting Troubleshooting projection failure, bad projection, and other problems Maintenance Performing lamp replacement and other routine maintenance and care General...

Instruction Manual
Page 12
... assigned effect function. Menu Button (See page 42) Displays or cancels menus. R/C switch (See pages 25, 32) Switches remote control power on and off. *Press twice to the selected video source. E-Zoom Button (See page 36) Executes the E-Zoom function. Computer, S-Video, Video Button (See page 26) Switches to turn the power off . Enter Button Used for addressing problems. Use this button when problems occur. Volume Button (See page 30) Adjusts volume. [Back] Indicator Lights during signal output from remote control. Help Button (See page...
... assigned effect function. Menu Button (See page 42) Displays or cancels menus. R/C switch (See pages 25, 32) Switches remote control power on and off. *Press twice to the selected video source. E-Zoom Button (See page 36) Executes the E-Zoom function. Computer, S-Video, Video Button (See page 26) Switches to turn the power off . Enter Button Used for addressing problems. Use this button when problems occur. Volume Button (See page 30) Adjusts volume. [Back] Indicator Lights during signal output from remote control. Help Button (See page...

Instruction Manual
Page 13
... the operating distance (approximately 393.70inches (10m) ) of direct sunlight, fluorescent light, and similar light sources. These may cause the remote control to use . • Situate the remote control receiver out of the remote control when the control is pointed towards the remote control receiver on the projector. Remote Control Operating Range The remote control may not operate beyond certain distances and angles from the receiver on the projector unit. • Certain screens may need changing.
... the operating distance (approximately 393.70inches (10m) ) of direct sunlight, fluorescent light, and similar light sources. These may cause the remote control to use . • Situate the remote control receiver out of the remote control when the control is pointed towards the remote control receiver on the projector. Remote Control Operating Range The remote control may not operate beyond certain distances and angles from the receiver on the projector unit. • Certain screens may need changing.

Instruction Manual
Page 27
The operation display indicator begins to "On". 2. Press the Power button to switch power on your settings, there may be no display. (See page 47) After approximately 30 seconds, the operation display indicator changes from flashing green to steady green. Depending on . Projector Remote control "No-Signal" is displayed. The operation display indicator lights green. 25 Projection When preparations are complete, you are ready for projection. 1. To use the remote control, turn the remote control R/C switch to flash green, and projection begins.
The operation display indicator begins to "On". 2. Press the Power button to switch power on your settings, there may be no display. (See page 47) After approximately 30 seconds, the operation display indicator changes from flashing green to steady green. Depending on . Projector Remote control "No-Signal" is displayed. The operation display indicator lights green. 25 Projection When preparations are complete, you are ready for projection. 1. To use the remote control, turn the remote control R/C switch to flash green, and projection begins.

Instruction Manual
Page 29
... screen at the same time as they are being projected. In such cases, use only external output. 27 [Settings for laptop and integrated LCD computers (when connected)] When a laptop or integrated LCD computer is connected to the projector, some computers require key commands or settings to change the output destination of the computer you are set to have images displayed on the control panel are using. For details, consult the instruction manual of a video signal. Keep...
... screen at the same time as they are being projected. In such cases, use only external output. 27 [Settings for laptop and integrated LCD computers (when connected)] When a laptop or integrated LCD computer is connected to the projector, some computers require key commands or settings to change the output destination of the computer you are set to have images displayed on the control panel are using. For details, consult the instruction manual of a video signal. Keep...

Instruction Manual
Page 33
.... Check that cool-down (which takes about 2 minutes) is complete, the indicator switches to shut the power, press another button. Tip: • The flashing orange operation display indicator indicates that the operation display indicator lights orange. Projector Remote control 2. Or, if no action is taken, the message disappears after cool-down . • If the power cord plug is displayed. Press the Power button. Press the Power button again. Operation display indicator lights orange. 3. Buttons cannot be operated during cool-down * is in progress. The projector lamp...
.... Check that cool-down (which takes about 2 minutes) is complete, the indicator switches to shut the power, press another button. Tip: • The flashing orange operation display indicator indicates that the operation display indicator lights orange. Projector Remote control 2. Or, if no action is taken, the message disappears after cool-down . • If the power cord plug is displayed. Press the Power button. Press the Power button again. Operation display indicator lights orange. 3. Buttons cannot be operated during cool-down * is in progress. The projector lamp...

Instruction Manual
Page 34
... a malfunction or shorten the projector lamp life. 5. Attach the lens cover. 32 If the remote control will be used for a long period or you are moving the unit, set the remote control R/C switch to Off. Foot adjust levers 1. Caution: Do not pull the power cord plug out of the outlet while the operation display indicator is switched off, a small amount of the outlet. Support the projector unit with your hands, pull...
... a malfunction or shorten the projector lamp life. 5. Attach the lens cover. 32 If the remote control will be used for a long period or you are moving the unit, set the remote control R/C switch to Off. Foot adjust levers 1. Caution: Do not pull the power cord plug out of the outlet while the operation display indicator is switched off, a small amount of the outlet. Support the projector unit with your hands, pull...

Instruction Manual
Page 37
... compatible with other cable may cause failure. Connect the computer USB port and the projector USB mouse port. Caution: • Connecting a non-USB mouse cable with the standard USB interface configuration in Windows2000/Me and Windows98. When using a USB mouse, note the following. • Windows The only compatible models are those pre-installed with the power on can cause malfunction or failure. • Use only the mouse cable supplied. If the computer...
... compatible with other cable may cause failure. Connect the computer USB port and the projector USB mouse port. Caution: • Connecting a non-USB mouse cable with the standard USB interface configuration in Windows2000/Me and Windows98. When using a USB mouse, note the following. • Windows The only compatible models are those pre-installed with the power on can cause malfunction or failure. • Use only the mouse cable supplied. If the computer...
Instruction Manual
Page 42
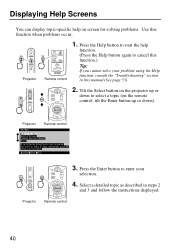
... follow the instructions displayed. Displaying Help Screens You can display topic-specific help function. (Press the Help button again to select a topic (on the remote Enter control, tilt the Enter button up or down ). Press the Help button to start the help on the projector up or down to cancel this function.) Tip: If you cannot solve your selection. 4. Projector Remote control 40 Tilt the Select button on screen for solving problems. Use this manual (See...
... follow the instructions displayed. Displaying Help Screens You can display topic-specific help function. (Press the Help button again to select a topic (on the remote Enter control, tilt the Enter button up or down ). Press the Help button to start the help on the projector up or down to cancel this function.) Tip: If you cannot solve your selection. 4. Projector Remote control 40 Tilt the Select button on screen for solving problems. Use this manual (See...
Instruction Manual
Page 46
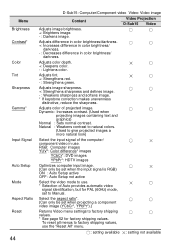
... contrast. (Used when projecting images containing text and graphics) Normal : Sets normal contrast. To reset all menus to Manual. Menu Brightness Contrast* Color Tint Sharpness Gamma* Input Signal Auto Setup Mode Aspect Ratio Reset 44 D-Sub15: Computer/Component video Video: Video image Content Video Projection D-Sub15 Video Adjusts image brightness. +: Brightens image. - : Darkens image. RGB: Computer images YUV*: Color difference* images YCbCr*: DVD images YPbPr*: HDTV images Optimizes computer input image. (Can only be set to factory shipping values, use . Adjusts color depth...
... contrast. (Used when projecting images containing text and graphics) Normal : Sets normal contrast. To reset all menus to Manual. Menu Brightness Contrast* Color Tint Sharpness Gamma* Input Signal Auto Setup Mode Aspect Ratio Reset 44 D-Sub15: Computer/Component video Video: Video image Content Video Projection D-Sub15 Video Adjusts image brightness. +: Brightens image. - : Darkens image. RGB: Computer images YUV*: Color difference* images YCbCr*: DVD images YPbPr*: HDTV images Optimizes computer input image. (Can only be set to factory shipping values, use . Adjusts color depth...

Instruction Manual
Page 52
... menu, "Auto (NTSC)" is displayed.) : Display : No display Displays a computer/component video input signal. V: Displays the vertical scanning frequency. Displays input resolution. Displays sync polarity. Computer/Component Video Projection Video Projection Menu Lamp Reset Lamp Timer Video Source Input Signal Frequency SYNC Polarity SYNC Mode Resolution Refresh Rate Video Signal 50 D-Sub15: Computer/Component video Video: Video image Content Video Projection D-Sub15 Video Displays cumulative lamp-on screen. Displays the source for the video displayed on time...
... menu, "Auto (NTSC)" is displayed.) : Display : No display Displays a computer/component video input signal. V: Displays the vertical scanning frequency. Displays input resolution. Displays sync polarity. Computer/Component Video Projection Video Projection Menu Lamp Reset Lamp Timer Video Source Input Signal Frequency SYNC Polarity SYNC Mode Resolution Refresh Rate Video Signal 50 D-Sub15: Computer/Component video Video: Video image Content Video Projection D-Sub15 Video Displays cumulative lamp-on screen. Displays the source for the video displayed on time...
Instruction Manual
Page 57
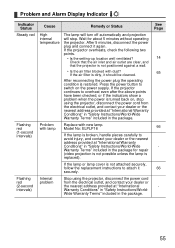
... for about 5 minutes without operating the projector. Wait for repair (video projection is not possible unless the lamp is dirty, it should be cleaned. See Page 14 65 66 66 - 55 Problem and Alarm Display Indicator Indicator Status Steady red Flashing red (1-second intervals) Flashing red (2-second intervals) Cause Remedy or Status High internal temperature The lamp will turn off automatically and projection will stop using the projector, disconnect the power cord from the electrical outlet, and...
... for about 5 minutes without operating the projector. Wait for repair (video projection is not possible unless the lamp is dirty, it should be cleaned. See Page 14 65 66 66 - 55 Problem and Alarm Display Indicator Indicator Status Steady red Flashing red (1-second intervals) Flashing red (2-second intervals) Cause Remedy or Status High internal temperature The lamp will turn off automatically and projection will stop using the projector, disconnect the power cord from the electrical outlet, and...
Instruction Manual
Page 59
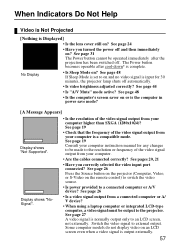
...; Is the resolution of the video signal output from your computer is a compatible mode. See page 26 Press the Source button on the projector (Computer, Video, or S-Video on the remote control) to switch the video source. • Is power provided to an LCD screen, not externally. Some computer models do not display video on ? See page 24 • Have you correctly selected the video input port connected? See page 19 • Check that the...
...; Is the resolution of the video signal output from your computer is a compatible mode. See page 26 Press the Source button on the projector (Computer, Video, or S-Video on the remote control) to switch the video source. • Is power provided to an LCD screen, not externally. Some computer models do not display video on ? See page 24 • Have you correctly selected the video input port connected? See page 19 • Check that the...

Instruction Manual
Page 60
... the Auto button on the remote control. Image is Unclear • Blurry image • Image only partially focused • Not focused at all • Is the focus adjusted correctly? See page 64 • Is the projection beam facing the screen directly? See page 43 Use the menu to adjust. • Are the video signal mode settings correct? Carefully review sections such as "Providing External Output" and "Providing Output to an Externally Connected...
... the Auto button on the remote control. Image is Unclear • Blurry image • Image only partially focused • Not focused at all • Is the focus adjusted correctly? See page 64 • Is the projection beam facing the screen directly? See page 43 Use the menu to adjust. • Are the video signal mode settings correct? Carefully review sections such as "Providing External Output" and "Providing Output to an Externally Connected...

Instruction Manual
Page 61
... input signal settings by selecting Menu > Video > Input Signal. Consult your computer instruction manual with regard to the video driver manual for the computer's monitor for dual display? Refer to modifying the signal. • Change the resolution of the image on the computer screen, turn off the dual display setting. RGB: Computer images YUV*: Color difference images YCbCr*: DVD images YPbPr*: HDTV images • Are you adjusted Sync.*, Tracking*, and Position? See page 19 Set your computer instruction manual with the projector...
... input signal settings by selecting Menu > Video > Input Signal. Consult your computer instruction manual with regard to the video driver manual for the computer's monitor for dual display? Refer to modifying the signal. • Change the resolution of the image on the computer screen, turn off the dual display setting. RGB: Computer images YUV*: Color difference images YCbCr*: DVD images YPbPr*: HDTV images • Are you adjusted Sync.*, Tracking*, and Position? See page 19 Set your computer instruction manual with the projector...

Instruction Manual
Page 66
... checks, repairs and cleaning, contact your projector when it is easily scratched and should only be rubbed or struck with a separate cloth. Projector Cleaning, Lens Replacement, Air Inlet Cleaning Clean your dealer or the nearest address provided at "International Warranty Conditions" in "Safety Instructions/World-Wide Warranty Terms" included in the package. • Use care when handling the power plug and connector. The projector contains several high...
... checks, repairs and cleaning, contact your projector when it is easily scratched and should only be rubbed or struck with a separate cloth. Projector Cleaning, Lens Replacement, Air Inlet Cleaning Clean your dealer or the nearest address provided at "International Warranty Conditions" in "Safety Instructions/World-Wide Warranty Terms" included in the package. • Use care when handling the power plug and connector. The projector contains several high...

Instruction Manual
Page 68
... a new lamp in the user's manual."] A message will not light. 66 If the lamp or lamp cover is opened, the abnormal warning display indicator flashes red, and the projector lamp goes out. A replacement lamp is an optional part (sold separately). (Model No: ELPLP16) [When the following instances. Lamp Replacement Replace the lamp with a new one as soon as possible, even if it even if the lamp life has not expired. • To maintain the original brightness and picture quality, replacement messages...
... a new lamp in the user's manual."] A message will not light. 66 If the lamp or lamp cover is opened, the abnormal warning display indicator flashes red, and the projector lamp goes out. A replacement lamp is an optional part (sold separately). (Model No: ELPLP16) [When the following instances. Lamp Replacement Replace the lamp with a new one as soon as possible, even if it even if the lamp life has not expired. • To maintain the original brightness and picture quality, replacement messages...

Instruction Manual
Page 78
... A/V Mute 48 A/V Mute Button 10, 39 About Menu 50 Adjusting 28, 30 Advanced Menu 49 Air Inlet 8 Aspect Ratio 44 Audio In Port 9, 20 Audio Input 45 Audio Menu 45 Audio Out Port 9, 23 Audio Ports 9, 21 Auto Button 10, 30 Auto Setup 44 [B] Battery Cover 10, 12 Brightness 44 [C] Ceiling 49 Color 44 Color Setting 49 Compatible Mode 19 Computer 18 Computer Button 10, 26 Computer/Component Video Port 9, 20 Connecting 20, 21 Contrast 44 Control Panel 12 Cursor Speed...
... A/V Mute 48 A/V Mute Button 10, 39 About Menu 50 Adjusting 28, 30 Advanced Menu 49 Air Inlet 8 Aspect Ratio 44 Audio In Port 9, 20 Audio Input 45 Audio Menu 45 Audio Out Port 9, 23 Audio Ports 9, 21 Auto Button 10, 30 Auto Setup 44 [B] Battery Cover 10, 12 Brightness 44 [C] Ceiling 49 Color 44 Color Setting 49 Compatible Mode 19 Computer 18 Computer Button 10, 26 Computer/Component Video Port 9, 20 Connecting 20, 21 Contrast 44 Control Panel 12 Cursor Speed...

Instruction Manual
Page 79
... Display Indicator 8, 55, 66 Projection Distance 16 Prompt 47 PS/2 Mouse Cable 35 [R] R/C Switch 10, 25, 32 Rear Adjustable Foot 8 Rear Projection 49 Refresh Rate 50 Remote Control 10, 11 Remote Control Receiver . . . . 8 Reset 44, 45, 46, 48, 49 Reset All Menu 51 Reset Lamp Timer 50 Resolution 50 [S] Screen Size 16 Setting Menu 47 Setup Instructions 15 Sharpness 44 Sleep Mode 48 Source (Enter) Button . .9, 26, 40 Speaker 8 Special Notes on Setup . . . . . .14 Specifications 73 Storage 32 S-Video Button 10, 26 S-Video Port 9, 21 SYNC Mode...
... Display Indicator 8, 55, 66 Projection Distance 16 Prompt 47 PS/2 Mouse Cable 35 [R] R/C Switch 10, 25, 32 Rear Adjustable Foot 8 Rear Projection 49 Refresh Rate 50 Remote Control 10, 11 Remote Control Receiver . . . . 8 Reset 44, 45, 46, 48, 49 Reset All Menu 51 Reset Lamp Timer 50 Resolution 50 [S] Screen Size 16 Setting Menu 47 Setup Instructions 15 Sharpness 44 Sleep Mode 48 Source (Enter) Button . .9, 26, 40 Speaker 8 Special Notes on Setup . . . . . .14 Specifications 73 Storage 32 S-Video Button 10, 26 S-Video Port 9, 21 SYNC Mode...


