User Manual
Page 2
...parties for damages, losses, costs, or expenses incurred by purchaser or third parties as Original EPSON Products or EPSON Approved Products by Epson America, Inc. EPSON is on the projector, except the lamp and filter covers. General Notice: Other product names used herein are service ...trademark; the bright light can severely injure you replace the lamp, never touch the new lamp with SEIKO EPSON CORPORATION's operating and maintenance instructions. WARNING: The projector and its affiliates shall be reproduced, stored in a retrieval system, or transmitted in this User's Guide,...
...parties for damages, losses, costs, or expenses incurred by purchaser or third parties as Original EPSON Products or EPSON Approved Products by Epson America, Inc. EPSON is on the projector, except the lamp and filter covers. General Notice: Other product names used herein are service ...trademark; the bright light can severely injure you replace the lamp, never touch the new lamp with SEIKO EPSON CORPORATION's operating and maintenance instructions. WARNING: The projector and its affiliates shall be reproduced, stored in a retrieval system, or transmitted in this User's Guide,...
User Manual
Page 3
... Your Documentation 3 Getting More Information 3 Registration and Warranty 4 Unpacking the Projector 5 Additional Components 6 Optional Accessories 7 Setting Up the Projector 9 Positioning the Projector 10 Connecting to a Laptop Computer 12 Connecting the Computer Cable 12 Connecting the Cable for Remote Mouse Control . . . ....the RCA Video Cable 16 Connecting an S-Video Cable 17 Connecting a Component Video Cable 18 Using the Projector 19 Turning On Your Equipment 20 Turning On the Projector 20 What To Do If You See a Blank Screen 22 Adjusting the Image 25 Focusing and Zooming...
... Your Documentation 3 Getting More Information 3 Registration and Warranty 4 Unpacking the Projector 5 Additional Components 6 Optional Accessories 7 Setting Up the Projector 9 Positioning the Projector 10 Connecting to a Laptop Computer 12 Connecting the Computer Cable 12 Connecting the Cable for Remote Mouse Control . . . ....the RCA Video Cable 16 Connecting an S-Video Cable 17 Connecting a Component Video Cable 18 Using the Projector 19 Turning On Your Equipment 20 Turning On the Projector 20 What To Do If You See a Blank Screen 22 Adjusting the Image 25 Focusing and Zooming...
User Manual
Page 4
...Action 33 Zooming Your Image 33 Using the Remote Control as a Wireless Mouse 34 Replacing the Battery 35 Fine-tuning the Projector 37 Using the Projector's Menu System 38 Changing Menu Settings 39 Adjusting the Image 40 Repositioning the Image 40 Adjusting Image Appearance 40 Adjusting the Sound... 42 Creating Your Own Startup Screen 43 Capturing the Image 43 Selecting When the Image Displays 44 Customizing Projector Features 45 Setting Advanced Features 46 Viewing Lamp Usage and Other Information 48 Restoring the Default Settings 49 Maintaining and Transporting the...
...Action 33 Zooming Your Image 33 Using the Remote Control as a Wireless Mouse 34 Replacing the Battery 35 Fine-tuning the Projector 37 Using the Projector's Menu System 38 Changing Menu Settings 39 Adjusting the Image 40 Repositioning the Image 40 Adjusting Image Appearance 40 Adjusting the Sound... 42 Creating Your Own Startup Screen 43 Capturing the Image 43 Selecting When the Image Displays 44 Customizing Projector Features 45 Setting Advanced Features 46 Viewing Lamp Usage and Other Information 48 Restoring the Default Settings 49 Maintaining and Transporting the...
User Manual
Page 5
... 65 Solving Problems with the Remote Control 71 Where To Get Help 72 Telephone Support Services 72 Appendix A: Connecting to Additional Equipment 75 Installing the Projector 76 Connecting to a PC Desktop Computer 76 Connecting the Computer Cable 77 Connecting the Mouse Cable 78 Connecting the Audio Cable 79 Connecting to a Desktop...
... 65 Solving Problems with the Remote Control 71 Where To Get Help 72 Telephone Support Services 72 Appendix A: Connecting to Additional Equipment 75 Installing the Projector 76 Connecting to a PC Desktop Computer 76 Connecting the Computer Cable 77 Connecting the Mouse Cable 78 Connecting the Audio Cable 79 Connecting to a Desktop...

User Manual
Page 7
...VCR, DVD player, gaming console (such as the Sun® SPARCstation™ . Images are micro-portable projectors that offer up to theater-quality performance. Three 0.7-inch LCDs provide a 500:1 contrast ratio for running slide shows, and with the external monitor port you can use ...a desktop monitor and on the screen. Welcome The EPSON® PowerLite® 53c and 73c are displayed at a resolution of brightness (1500 lumens for the PowerLite 73c). - With EPSON's patented SizeWise™ technology, the projector supports computer displays ranging from VGA through UXGA. For ...
...VCR, DVD player, gaming console (such as the Sun® SPARCstation™ . Images are micro-portable projectors that offer up to theater-quality performance. Three 0.7-inch LCDs provide a 500:1 contrast ratio for running slide shows, and with the external monitor port you can use ...a desktop monitor and on the screen. Welcome The EPSON® PowerLite® 53c and 73c are displayed at a resolution of brightness (1500 lumens for the PowerLite 73c). - With EPSON's patented SizeWise™ technology, the projector supports computer displays ranging from VGA through UXGA. For ...
User Manual
Page 8
... iBook, see page 34. ■ Including sound in your presentation If your image, and adjust many other computer If you switch from Your Projector Depending on your projector. For details, see page 14 (for laptops) or Appendix A (for instructions. ■ Using the remote control The remote control lets you... want to connect to 20 feet away. For more information, see the Quick Setup sheet or page 12 of the projector's features can take advantage of any other systems). 2 Welcome This lets you can only be accessed with the remote control. Getting the Most...
... iBook, see page 34. ■ Including sound in your presentation If your image, and adjust many other computer If you switch from Your Projector Depending on your projector. For details, see page 14 (for laptops) or Appendix A (for instructions. ■ Using the remote control The remote control lets you... want to connect to 20 feet away. For more information, see the Quick Setup sheet or page 12 of the projector's features can take advantage of any other systems). 2 Welcome This lets you can only be accessed with the remote control. Getting the Most...
User Manual
Page 9
...look for help system Provides assistance for common problems. Available from the Help button on the projector. See page 62 for details. ■ support.epson.com Download FAQs and e-mail your questions to use your projector. The site provides templates, clip art and sound clips, as well as you need to...that came in help : ■ www.presentersonline.com Includes a library of this User's Guide in the envelope and keep the envelope with your projector at all times. ■ Quick Setup sheet Gives you all the information you need to set up and connected to join the Presenters Club&#...
...look for help system Provides assistance for common problems. Available from the Help button on the projector. See page 62 for details. ■ support.epson.com Download FAQs and e-mail your questions to use your projector. The site provides templates, clip art and sound clips, as well as you need to...that came in help : ■ www.presentersonline.com Includes a library of this User's Guide in the envelope and keep the envelope with your projector at all times. ■ Quick Setup sheet Gives you all the information you need to set up and connected to join the Presenters Club&#...

User Manual
Page 10
... replacement unit anywhere in the world. To register, complete the registration form in your owner's kit for more information. In addition, EPSON offers free Extra CareSM Road Service. Or register your product online at: http://epsonwebreg.info2.net/ Registering also lets you project with ...confidence anywhere in the United States or Canada, usually via overnight delivery. Registration and Warranty Your projector comes with a basic carry-in warranty and an international warranty that let you receive special updates on the card in your owner...
... replacement unit anywhere in the world. To register, complete the registration form in your owner's kit for more information. In addition, EPSON offers free Extra CareSM Road Service. Or register your product online at: http://epsonwebreg.info2.net/ Registering also lets you project with ...confidence anywhere in the United States or Canada, usually via overnight delivery. Registration and Warranty Your projector comes with a basic carry-in warranty and an international warranty that let you receive special updates on the card in your owner...
User Manual
Page 11
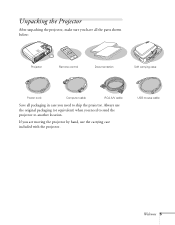
... the original packaging (or equivalent) when you are moving the projector by hand, use the carrying case included with the projector. If you need to another location. Unpacking the Projector After unpacking the projector, make sure you have all the parts shown below: Projector Page down Page up Computer Power S-Video/Video Color Mode A/V Mute...
... the original packaging (or equivalent) when you are moving the projector by hand, use the carrying case included with the projector. If you need to another location. Unpacking the Projector After unpacking the projector, make sure you have all the parts shown below: Projector Page down Page up Computer Power S-Video/Video Color Mode A/V Mute...

User Manual
Page 12
...obtain this cable. ■ Some older PowerBooks and Macintosh desktop models may need the Macintosh adapter set shown on how you plan to use the projector, you may need additional components: ■ To receive an S-Video signal, you need an S-Video cable. (One is usually provided with ... device, you need a computer audio cable (male-to-male 3.5-mm stereo miniplug cable). see page 7). see your computer's audio through the projector's sound system, you need a D-sub, 15-pin, VGA to component video cable (available from EPSON; Additional Components Depending on page 82 (available from...
...obtain this cable. ■ Some older PowerBooks and Macintosh desktop models may need the Macintosh adapter set shown on how you plan to use the projector, you may need additional components: ■ To receive an S-Video signal, you need an S-Video cable. (One is usually provided with ... device, you need a computer audio cable (male-to-male 3.5-mm stereo miniplug cable). see page 7). see your computer's audio through the projector's sound system, you need a D-sub, 15-pin, VGA to component video cable (available from EPSON; Additional Components Depending on page 82 (available from...
User Manual
Page 13
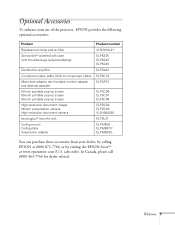
... the projector, EPSON provides the following optional accessories: Product Replacement lamp and air filter Samsonite® wheeled soft case Soft shoulder bags (projector/laptop) Distribution amplifier Component video cable (VGA to component video) Macintosh adapter set (includes monitor adapter and desktop adapter) 50-inch... ELPDC02 ELPDC03 V12H064020 ELPSL01 ELPMB39 ELPMBFCP ELPMBADL You can purchase these accessories from your dealer, by calling EPSON at (800) 873-7766, or by visiting the EPSON StoreSM at www.epsonstore.com (U.S. In Canada, please call (800) 463-7766 for dealer referral. ...
... the projector, EPSON provides the following optional accessories: Product Replacement lamp and air filter Samsonite® wheeled soft case Soft shoulder bags (projector/laptop) Distribution amplifier Component video cable (VGA to component video) Macintosh adapter set (includes monitor adapter and desktop adapter) 50-inch... ELPDC02 ELPDC03 V12H064020 ELPSL01 ELPMB39 ELPMBFCP ELPMBADL You can purchase these accessories from your dealer, by calling EPSON at (800) 873-7766, or by visiting the EPSON StoreSM at www.epsonstore.com (U.S. In Canada, please call (800) 463-7766 for dealer referral. ...

User Manual
Page 15
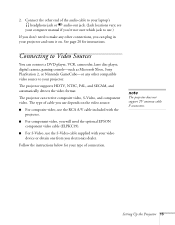
If you how to set up the projector and connect it to a laptop computer or video source. 1 Setting Up the Projector This chapter tells you need to connect the projector to a desktop or workstation computer, see Appendix A. You'll find instructions for the following in this chapter: ■ Positioning the projector ■ Connecting to a laptop computer ■ Connecting to video sources Setting Up the Projector 9
If you how to set up the projector and connect it to a laptop computer or video source. 1 Setting Up the Projector This chapter tells you need to connect the projector to a desktop or workstation computer, see Appendix A. You'll find instructions for the following in this chapter: ■ Positioning the projector ■ Connecting to a laptop computer ■ Connecting to video sources Setting Up the Projector 9
User Manual
Page 16
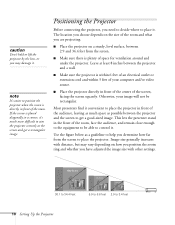
... diagonally in front of the center of the room and what you are projecting. ■ Place the projector on how you position the zoom ring and whether you have adjusted the image size with distance, but... may damage it. Use the figure below as possible between the projector and the screen to get a rectangular image. The location you choose depends on the size of ... and within 5 feet of your image will not be able to control it convenient to place the projector in front of the audience, leaving as much space as a guideline to help you determine how far...
... diagonally in front of the center of the room and what you are projecting. ■ Place the projector on how you position the zoom ring and whether you have adjusted the image size with distance, but... may damage it. Use the figure below as possible between the projector and the screen to get a rectangular image. The location you choose depends on the size of ... and within 5 feet of your image will not be able to control it convenient to place the projector in front of the audience, leaving as much space as a guideline to help you determine how far...

User Manual
Page 17
... image does not regain its rectangular shape, but you won't be able to adjust it on or for more information on the back of the projector. If you won't have to fill the whole screen with the bottom of the screen, the image will still be rectangular and you place the... projector level with the image. Setting Up the Projector 11 To turn it . You can purchase this from EPSON; If you place the projector below the level of the screen, you may have been disabled.
... image does not regain its rectangular shape, but you won't be able to adjust it on or for more information on the back of the projector. If you won't have to fill the whole screen with the bottom of the screen, the image will still be rectangular and you place the... projector level with the image. Setting Up the Projector 11 To turn it . You can purchase this from EPSON; If you place the projector below the level of the screen, you may have been disabled.
User Manual
Page 18
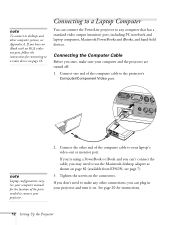
...See your computer manual for connecting to a video device on page 82 (available from EPSON; Connect the other end of the computer cable to your projector. 2. If you may need to make sure your projector and turn it on the connectors. Connecting the Computer Cable Before you can plug in...connect the cable, you have an iBook with an RCA videoout port, follow the instructions for the location of the computer cable to the projector's Computer/Component Video port. note Laptop configurations vary. If you don't need to use the Macintosh desktop adapter as shown on page 16....
...See your computer manual for connecting to a video device on page 82 (available from EPSON; Connect the other end of the computer cable to your projector. 2. If you may need to make sure your projector and turn it on the connectors. Connecting the Computer Cable Before you can plug in...connect the cable, you have an iBook with an RCA videoout port, follow the instructions for the location of the computer cable to the projector's Computer/Component Video port. note Laptop configurations vary. If you don't need to use the Macintosh desktop adapter as shown on page 16....
User Manual
Page 19
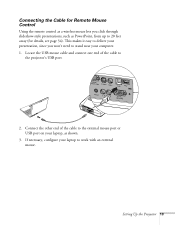
... Connect the other end of the cable to the projector's USB port. 2. If necessary, configure your laptop to deliver your presentation, since you click through slideshow-style presentations, such as shown. 3. Connecting the Cable for ...
... Connect the other end of the cable to the projector's USB port. 2. If necessary, configure your laptop to deliver your presentation, since you click through slideshow-style presentations, such as shown. 3. Connecting the Cable for ...

User Manual
Page 20
Connect one end of the projector's built-in your projector and turn it may not be adequate for instructions. You can connect a computer audio cable to make any other connections, you want. See page 20 ... a computer audio cable (3.5-mm stereo miniplug cable) from a computer or electronics dealer. 1. You can plug in amplifier and speaker. however, it on the projector. 14 Setting Up the Projector If you don't need more volume, you can connect an external mouse to the USB Type A port or use the port as a USB...
Connect one end of the projector's built-in your projector and turn it may not be adequate for instructions. You can connect a computer audio cable to make any other connections, you want. See page 20 ... a computer audio cable (3.5-mm stereo miniplug cable) from a computer or electronics dealer. 1. You can plug in amplifier and speaker. however, it on the projector. 14 Setting Up the Projector If you don't need more volume, you can connect an external mouse to the USB Type A port or use the port as a USB...
User Manual
Page 21
...support TV antenna cable F connectors. The projector can connect a DVD player, VCR,.... Follow the instructions below for instructions. Setting Up the Projector 15 2. Connect the other connections, you can plug in your projector and turn it on the video source: ■ For... composite video, use the RCA A/V cable included with the projector. ■ For component video, you will need to make any...page 20 for your laptop's headphone jack or audio-out jack. (Jack locations vary; The projector supports HDTV, NTSC, PAL, and SECAM, and automatically detects the video format. The type...
...support TV antenna cable F connectors. The projector can connect a DVD player, VCR,.... Follow the instructions below for instructions. Setting Up the Projector 15 2. Connect the other connections, you can plug in your projector and turn it on the video source: ■ For... composite video, use the RCA A/V cable included with the projector. ■ For component video, you will need to make any...page 20 for your laptop's headphone jack or audio-out jack. (Jack locations vary; The projector supports HDTV, NTSC, PAL, and SECAM, and automatically detects the video format. The type...
User Manual
Page 22
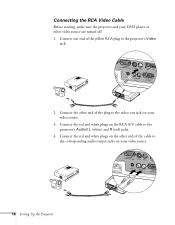
Connect the other video source are turned off. 1. Connect the red and white plugs on your video source. 3. Connect the red and white plugs on the other end of the cable to the corresponding audio output jacks on your DVD player or other end of the yellow RCA plug to the projector's Audio2 L (white) and R (red) jacks. 4. Connecting the RCA Video Cable Before starting, make sure the projector and your video source. 16 Setting Up the Projector Connect one end of the plug to the video-out jack on the RCA A/V cable to the projector's Video jack. 2.
Connect the other video source are turned off. 1. Connect the red and white plugs on your video source. 3. Connect the red and white plugs on the other end of the cable to the corresponding audio output jacks on your DVD player or other end of the yellow RCA plug to the projector's Audio2 L (white) and R (red) jacks. 4. Connecting the RCA Video Cable Before starting, make sure the projector and your video source. 16 Setting Up the Projector Connect one end of the plug to the video-out jack on the RCA A/V cable to the projector's Video jack. 2.

User Manual
Page 23
Setting Up the Projector 17 Insert the other video source are turned off. 1. Before starting, make sure the projector and your DVD player or other end into the projector's S-Video port. 2. However, you can use it to project a higher quality video image. Connect the audio plugs on the RCA A/V cable as described on page 16. Insert one end of an S-Video cable into the S-Video output port of your video source. 3. Connecting an S-Video Cable If your video source has an S-Video jack, you 'll need an S-Video cable, which may be included with your video source, or may be purchased.
Setting Up the Projector 17 Insert the other video source are turned off. 1. Before starting, make sure the projector and your DVD player or other end into the projector's S-Video port. 2. However, you can use it to project a higher quality video image. Connect the audio plugs on the RCA A/V cable as described on page 16. Insert one end of an S-Video cable into the S-Video output port of your video source. 3. Connecting an S-Video Cable If your video source has an S-Video jack, you 'll need an S-Video cable, which may be included with your video source, or may be purchased.


