Product Brochure
Page 1
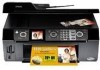
...-pack (3 colors) Product Code C11C696201 T068120-D1 T069120 T069220 T069320 T069420 T069520 UPC 0 10343 86581 5 0 10343 86633 1 0 10343 86429 0 0 10343 86430 6 0 10343 86431 3 0 10343 86432 0 0 10343 86229 6 Epson. prints resist fading up to 32 ppm* with individual ink cartridges Ordering Information Product Name Epson Stylus® CX9400Fax all-in-one -touch copying; Over 40...
...-pack (3 colors) Product Code C11C696201 T068120-D1 T069120 T069220 T069320 T069420 T069520 UPC 0 10343 86581 5 0 10343 86633 1 0 10343 86429 0 0 10343 86430 6 0 10343 86431 3 0 10343 86432 0 0 10343 86229 6 Epson. prints resist fading up to 32 ppm* with individual ink cartridges Ordering Information Product Name Epson Stylus® CX9400Fax all-in-one -touch copying; Over 40...
Product Brochure
Page 2
...printed, print settings, paper type, frequency of prints. Epson, Epson Stylus, Epson PRINT Image Matching and MicroPiezo are trademarks and/or registered trademarks of Epson America, Inc. CPD 24559R1 4/08 PDF Color photo in Draft Mode on plain paper. For print ...quality, a small amount of unframed color prints on plain paper in -one damage. See www.epson.com/printspeed for more information about cartridges. ††† Adapter required Packaging Specifications Epson Stylus CX9400Fax Single Carton Dimensions 21.1" x 18.7" x 11.7" (W ...
...printed, print settings, paper type, frequency of prints. Epson, Epson Stylus, Epson PRINT Image Matching and MicroPiezo are trademarks and/or registered trademarks of Epson America, Inc. CPD 24559R1 4/08 PDF Color photo in Draft Mode on plain paper. For print ...quality, a small amount of unframed color prints on plain paper in -one damage. See www.epson.com/printspeed for more information about cartridges. ††† Adapter required Packaging Specifications Epson Stylus CX9400Fax Single Carton Dimensions 21.1" x 18.7" x 11.7" (W ...
Product Information Guide
Page 1
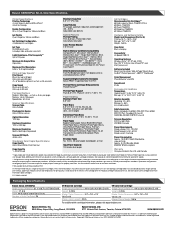
Ink Cartridges Use the following part numbers when you order or purchase new ink cartridges: Ink color Black Cyan Magenta Yellow Part number 69 or 68 (High Capacity) 69 69 69 Note: We recommend that you use up a cartridge within six months ... amount of other products may affect your print quality and could result in printer damage. To find the nearest one, call 800-GO-EPSON (800-463-7766). Epson Stylus CX9400Fax Series Product Parts Paper support Automatic document feeder Memory card slots Output tray and extension Document cover Scanner glass Control panel Display screen...
Ink Cartridges Use the following part numbers when you order or purchase new ink cartridges: Ink color Black Cyan Magenta Yellow Part number 69 or 68 (High Capacity) 69 69 69 Note: We recommend that you use up a cartridge within six months ... amount of other products may affect your print quality and could result in printer damage. To find the nearest one, call 800-GO-EPSON (800-463-7766). Epson Stylus CX9400Fax Series Product Parts Paper support Automatic document feeder Memory card slots Output tray and extension Document cover Scanner glass Control panel Display screen...
Product Information Guide
Page 3
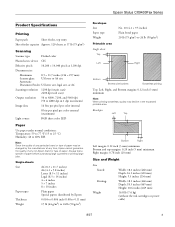
...18.5 inches (469 mm) Height: 10.6 inches (269 mm) 16.8 lb (7.6 kg) (without the ink cartridges or power cable) 8/07 3 Epson Stylus CX9400Fax Series Product Specifications Printing Paper path Sheet feeder, top entry Sheet feeder capacity Approx. 120 sheets at 17 lb (75 g/m2) Scanning Scanner type... Flatbed color Photoelectric device CIS Effective pixels 10,200 × 14,040 pixels at 1200 dpi Document size Maximum: 8.5 × 11.7 inches (216...
...18.5 inches (469 mm) Height: 10.6 inches (269 mm) 16.8 lb (7.6 kg) (without the ink cartridges or power cable) 8/07 3 Epson Stylus CX9400Fax Series Product Specifications Printing Paper path Sheet feeder, top entry Sheet feeder capacity Approx. 120 sheets at 17 lb (75 g/m2) Scanning Scanner type... Flatbed color Photoelectric device CIS Effective pixels 10,200 × 14,040 pixels at 1200 dpi Document size Maximum: 8.5 × 11.7 inches (216...
Product Information Guide
Page 4
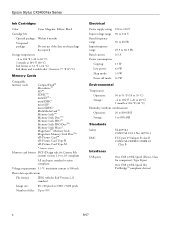
Epson Stylus CX9400Fax Series Ink Cartridges Color Cyan, Magenta, Yellow, Black Cartridge life Opened package: Within 6 months Unopened package: Do not use if the date on the package has expired Storage temperature -4 ...
Epson Stylus CX9400Fax Series Ink Cartridges Color Cyan, Magenta, Yellow, Black Cartridge life Opened package: Within 6 months Unopened package: Do not use if the date on the package has expired Storage temperature -4 ...
Product Information Guide
Page 5
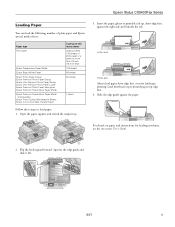
Load letterhead or pre-printed paper top edge first. 4. Squeeze the edge guide and slide it left. 8/07 5 Epson Stylus CX9400Fax Series Loading Paper You can load the following number of 20 lb paper or a stack no more than 1/2 inch (12 mm) thick 100 sheets ...
Load letterhead or pre-printed paper top edge first. 4. Squeeze the edge guide and slide it left. 8/07 5 Epson Stylus CX9400Fax Series Loading Paper You can load the following number of 20 lb paper or a stack no more than 1/2 inch (12 mm) thick 100 sheets ...
Product Information Guide
Page 6
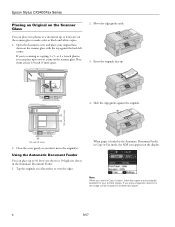
Place them at a time on the scanner glass. Insert the originals face-up to letter-size on the scanner glass to make color or black and white copies. 1. Using the Automatic Document Feeder You can place up to 30 letter-size sheets or 10 legal-size sheets in ... the Automatic Document Feeder in the Automatic Document Feeder. 1. When paper is automatically selected for your original facedown on a flat surface to even the edges. Epson Stylus CX9400Fax Series Placing an Original on the Scanner Glass You can place up to two at least 1/4 inch (5 mm) apart. 2. or 4 × 6-inch photos, you...
Place them at a time on the scanner glass. Insert the originals face-up to letter-size on the scanner glass to make color or black and white copies. 1. Using the Automatic Document Feeder You can place up to 30 letter-size sheets or 10 legal-size sheets in ... the Automatic Document Feeder in the Automatic Document Feeder. 1. When paper is automatically selected for your original facedown on a flat surface to even the edges. Epson Stylus CX9400Fax Series Placing an Original on the Scanner Glass You can place up to two at least 1/4 inch (5 mm) apart. 2. or 4 × 6-inch photos, you...
Product Information Guide
Page 7
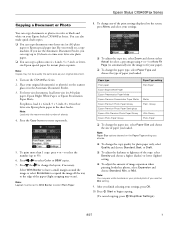
... change the paper type, select Paper Type and choose the type of the print settings displayed on the screen, press Menu and select your Epson Stylus CX9400Fax Series. Note: Copies may see white borders on the CX9400Fax Series. 2. to select the number (up to enter copy mode. ...the edge of image expansion when printing borderless photos, select Expansion and choose Standard, Min, or Mid. Epson Stylus CX9400Fax Series Copying a Document or Photo You can copy documents or photos in color or black and white on a copy machine. Turn on your original document. 1. Select With Border ...
... change the paper type, select Paper Type and choose the type of the print settings displayed on the screen, press Menu and select your Epson Stylus CX9400Fax Series. Note: Copies may see white borders on the CX9400Fax Series. 2. to select the number (up to enter copy mode. ...the edge of image expansion when printing borderless photos, select Expansion and choose Standard, Min, or Mid. Epson Stylus CX9400Fax Series Copying a Document or Photo You can copy documents or photos in color or black and white on a copy machine. Turn on your original document. 1. Select With Border ...
Product Information Guide
Page 8
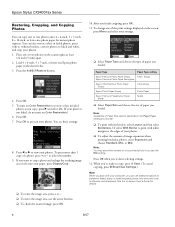
... select your settings. ❏ Select Paper Type and choose the type of paper you finish cropping, press OK. 11. Press OK. 7. You can also restore colors in the sheet feeder. 3. Place one or two photos onto 4 × 6-inch, 5 × 7-inch, 8 × 10-inch, or letter-size photo paper for... To check the zoomed image, press OK. 8 8/07 Or select With Border to fit onto your paper, press Display/Crop. 10. After you loaded. Epson Stylus CX9400Fax Series Restoring, Cropping, and Copying Photos You can copy one or two photos on the scanner glass at the edges of your photos. ❏...
... select your settings. ❏ Select Paper Type and choose the type of paper you finish cropping, press OK. 11. Press OK. 7. You can also restore colors in the sheet feeder. 3. Place one or two photos onto 4 × 6-inch, 5 × 7-inch, 8 × 10-inch, or letter-size photo paper for... To check the zoomed image, press OK. 8 8/07 Or select With Border to fit onto your paper, press Display/Crop. 10. After you loaded. Epson Stylus CX9400Fax Series Restoring, Cropping, and Copying Photos You can copy one or two photos on the scanner glass at the edges of your photos. ❏...
Product Information Guide
Page 9
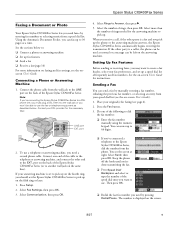
... the onscreen User's Guide. If the other party is set to pick up on the fourth ring, you 've connected a telephone to the Epson Stylus CX9400Fax Series, dial the number from the wall jack to another wall jack on the answering machine. Sending a Fax You can be used as ...phone or answering machine ❏ Set up fax features ❏ Send a fax ❏ Receive a fax (page 10) For more than the number of the Epson Stylus CX9400Fax Series (or to the LINE port on faxing and fax settings, see page 6). 2. Select Send, then press OK. Contact your original(s) for the answering...
... the onscreen User's Guide. If the other party is set to pick up on the fourth ring, you 've connected a telephone to the Epson Stylus CX9400Fax Series, dial the number from the wall jack to another wall jack on the answering machine. Sending a Fax You can be used as ...phone or answering machine ❏ Set up fax features ❏ Send a fax ❏ Receive a fax (page 10) For more than the number of the Epson Stylus CX9400Fax Series (or to the LINE port on faxing and fax settings, see page 6). 2. Select Send, then press OK. Contact your original(s) for the answering...
Product Information Guide
Page 10
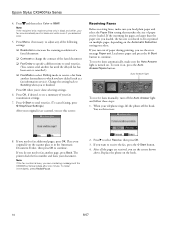
... to send your fax. (To cancel faxing, press y Stop/Clear Settings.) After your original(s) are received, you 've loaded. Epson Stylus CX9400Fax Series 4. Press and then select Color or B&W. Press x Start to receive a fax from another page, press Back. After all the pages are scanned, you see a...following settings: ❏ Resolution to increase the scanning resolution of a faxed document ❏ Contrast to send your fax is busy, you selected color. 5. Press OK, if desired, to see the screen shown above. If the incoming fax pages are larger than the paper size you loaded...
... to send your fax. (To cancel faxing, press y Stop/Clear Settings.) After your original(s) are received, you 've loaded. Epson Stylus CX9400Fax Series 4. Press and then select Color or B&W. Press x Start to receive a fax from another page, press Back. After all the pages are scanned, you see a...following settings: ❏ Resolution to increase the scanning resolution of a faxed document ❏ Contrast to send your fax is busy, you selected color. 5. Press OK, if desired, to see the screen shown above. If the incoming fax pages are larger than the paper size you loaded...
Product Information Guide
Page 11
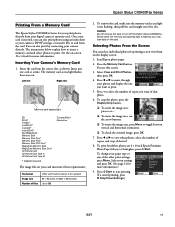
... type or any of the other photos, select the number of that photo. 6. Caution: Do not remove the card or turn off the Epson Stylus CX9400Fax Series while the memory card access light is not flashing, then pull the card straight out of its slot. To crop the photo,..., press Menu. Press x Start to print. Select your camera directly. Select View and Print Photos, then press OK. 4. Epson Stylus CX9400Fax Series Printing From a Memory Card The Epson Stylus CX9400Fax Series lets you can also print photos using an index sheet or your camera's DPOF settings, or transfer files to and...
... type or any of the other photos, select the number of that photo. 6. Caution: Do not remove the card or turn off the Epson Stylus CX9400Fax Series while the memory card access light is not flashing, then pull the card straight out of its slot. To crop the photo,..., press Menu. Press x Start to print. Select your camera directly. Select View and Print Photos, then press OK. 4. Epson Stylus CX9400Fax Series Printing From a Memory Card The Epson Stylus CX9400Fax Series lets you can also print photos using an index sheet or your camera's DPOF settings, or transfer files to and...
Product Information Guide
Page 12
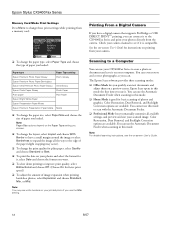
...camera. You can use the Automatic Document Feeder when scanning in this mode. You cannot use it. You can use the Min setting. Color Restoration, Dust Removal, and Backlight Correction options are available. Note: For detailed scanning instructions, see if it is good for faster print ...To adjust the amount of photos and graphics. Check your camera manual to scan a photo or document and save it on your computer. Epson Stylus CX9400Fax Series Memory Card Mode Print Settings Press Menu to change these print settings while printing from a memory card: Printing From a Digital ...
...camera. You can use the Automatic Document Feeder when scanning in this mode. You cannot use it. You can use the Min setting. Color Restoration, Dust Removal, and Backlight Correction options are available. Note: For detailed scanning instructions, see if it is good for faster print ...To adjust the amount of photos and graphics. Check your camera manual to scan a photo or document and save it on your computer. Epson Stylus CX9400Fax Series Memory Card Mode Print Settings Press Menu to change these print settings while printing from a memory card: Printing From a Digital ...
Product Information Guide
Page 13
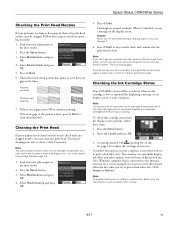
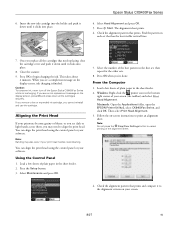
...Load letter-size plain paper in the sheet feeder. 2. Cleaning lasts around 1 minute. When it is expended even if the other updates retrieved from Epson, see any improvement after cleaning the print head three times, turn off your all -in-one and wait at least once a month to maintain ...Accept or Decline. Press the Setup button. 3. Then try to print when ink is low or expended by displaying a message on the display screen. Epson Stylus CX9400Fax Series Checking the Print Head Nozzles If your printouts are faint or have gaps in them, the print head nozzles may not be clogged...
...Load letter-size plain paper in the sheet feeder. 2. Cleaning lasts around 1 minute. When it is expended even if the other updates retrieved from Epson, see any improvement after cleaning the print head three times, turn off your all -in-one and wait at least once a month to maintain ...Accept or Decline. Press the Setup button. 3. Then try to print when ink is low or expended by displaying a message on the display screen. Epson Stylus CX9400Fax Series Checking the Print Head Nozzles If your printouts are faint or have gaps in them, the print head nozzles may not be clogged...
Product Information Guide
Page 14
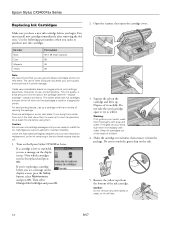
...you see a message on the display screen. Turn on . Use the following part numbers when you order or purchase new ink cartridges: Ink color Black Cyan Magenta Yellow Part number 69 or 68 (High Capacity) 69 69 69 Note: We recommend that you see a message on the ...to room temperature for charging the printer. If you're replacing a cartridge before using them. Shake the cartridge several times, then remove it . Epson Stylus CX9400Fax Series Replacing Ink Cartridges Make sure you have obtained a replacement, or the ink remaining in the print head nozzles may affect your eyes,...
...you see a message on the display screen. Turn on . Use the following part numbers when you order or purchase new ink cartridges: Ink color Black Cyan Magenta Yellow Part number 69 or 68 (High Capacity) 69 69 69 Note: We recommend that you see a message on the ...to room temperature for charging the printer. If you're replacing a cartridge before using them. Shake the cartridge several times, then remove it . Epson Stylus CX9400Fax Series Replacing Ink Cartridges Make sure you have obtained a replacement, or the ink remaining in the print head nozzles may affect your eyes,...
Product Information Guide
Page 15
...vertical lines. 7. Select Head Alignment and press OK. 5. Caution: To conserve ink, never turn off the Epson Stylus CX9400Fax Series while ink is finished. Aligning the Print Head If your printouts become grainy or blurry, or you ...of the alignment sheet. 4. Press OK to print an alignment sheet. Macintosh: Open the Applications folder, open the EPSON Printer Utility2, select CX9400Fax Series, and click OK. Follow the on the display screen, ink charging is charging.... Maintenance and press OK. 7. Press Start. Press the Setup button. 3. Epson Stylus CX9400Fax Series 4.
...vertical lines. 7. Select Head Alignment and press OK. 5. Caution: To conserve ink, never turn off the Epson Stylus CX9400Fax Series while ink is finished. Aligning the Print Head If your printouts become grainy or blurry, or you ...of the alignment sheet. 4. Press OK to print an alignment sheet. Macintosh: Open the Applications folder, open the EPSON Printer Utility2, select CX9400Fax Series, and click OK. Follow the on the display screen, ink charging is charging.... Maintenance and press OK. 7. Press Start. Press the Setup button. 3. Epson Stylus CX9400Fax Series 4.

Product Information Guide
Page 16
...If no patterns are aligned, choose the closest one of a similar size using protective material to the right (the home position). Epson Stylus CX9400Fax Series 5. Turn off the CX9400Fax Series. 2. Remove all the way to keep the CX9400Fax Series working at its original ... transportation as follows: 1. CPD-24115R1 CPD-24114 CPD-24159 CPD-23925R1 Epson Stylus CX9400Fax Series Start Here (English/French) Epson Stylus CX9400Fax Series Quick Guide (English) Epson Stylus CX9400Fax Series Quick Guide (French) Epson Stylus CX9400Fax Series CD-ROM with on the glass. 7. Leave the ink ...
...If no patterns are aligned, choose the closest one of a similar size using protective material to the right (the home position). Epson Stylus CX9400Fax Series 5. Turn off the CX9400Fax Series. 2. Remove all the way to keep the CX9400Fax Series working at its original ... transportation as follows: 1. CPD-24115R1 CPD-24114 CPD-24159 CPD-23925R1 Epson Stylus CX9400Fax Series Start Here (English/French) Epson Stylus CX9400Fax Series Quick Guide (English) Epson Stylus CX9400Fax Series Quick Guide (French) Epson Stylus CX9400Fax Series CD-ROM with on the glass. 7. Leave the ink ...
Quick Reference Guide
Page 1
Epson Stylus® CX9400Fax Series Quick Guide Basic Printing, Copying, Scanning, and Faxing Maintaining Your All-in-One Solving Problems
Epson Stylus® CX9400Fax Series Quick Guide Basic Printing, Copying, Scanning, and Faxing Maintaining Your All-in-One Solving Problems
Quick Reference Guide
Page 24
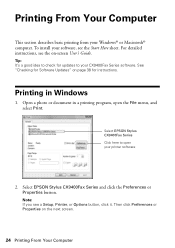
... Macintosh® computer. Printing From Your Computer This section describes basic printing from your printer software 2. Tip: It's a good idea to check for instructions. Select EPSON Stylus CX9400Fax Series Click here to your software, see the Start Here sheet. Open a photo or document in Windows 1. Note: If you see the on-screen... screen. 24 Printing From Your Computer Then click Preferences or Properties on page 38 for updates to open the File menu, and select Print. Select EPSON Stylus CX9400Fax Series and click the Preferences or Properties button.
... Macintosh® computer. Printing From Your Computer This section describes basic printing from your printer software 2. Tip: It's a good idea to check for instructions. Select EPSON Stylus CX9400Fax Series Click here to your software, see the Start Here sheet. Open a photo or document in Windows 1. Note: If you see the on-screen... screen. 24 Printing From Your Computer Then click Preferences or Properties on page 38 for updates to open the File menu, and select Print. Select EPSON Stylus CX9400Fax Series and click the Preferences or Properties button.
Quick Reference Guide
Page 26
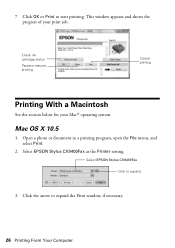
Select EPSON Stylus CX9400Fax as the Printer setting. Mac OS X 10.5 1. Select EPSON Stylus CX9400Fax Click to start printing. Check ink cartridge status Pause or resume printing Cancel printing Printing With a Macintosh See the section below for your print job. Click OK or Print to expand 3. Open a photo or document in a printing program, open the File menu, and select Print. 2. This window appears and shows the progress of your Mac® operating system. 7. Click the arrow to expand the Print window, if necessary. 26 Printing From Your Computer
Select EPSON Stylus CX9400Fax as the Printer setting. Mac OS X 10.5 1. Select EPSON Stylus CX9400Fax Click to start printing. Check ink cartridge status Pause or resume printing Cancel printing Printing With a Macintosh See the section below for your print job. Click OK or Print to expand 3. Open a photo or document in a printing program, open the File menu, and select Print. 2. This window appears and shows the progress of your Mac® operating system. 7. Click the arrow to expand the Print window, if necessary. 26 Printing From Your Computer


