Product Brochure
Page 1
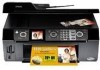
... and enlarge copies 25 to six times longer than leading competitive prints** • Make multiple color copies effortlessly with individual ink cartridges Ordering Information Product Name Epson Stylus® CX9400Fax all-in , high-speed fax and 30-page Automatic Document Feeder • Archive documents and photos with high quality scanning • Get smudge resistant, double-sided documents and truly touchable photos with instant-drying DURABrite® Ultra Ink • Select, copy and print photos, PC-free, with large...
... and enlarge copies 25 to six times longer than leading competitive prints** • Make multiple color copies effortlessly with individual ink cartridges Ordering Information Product Name Epson Stylus® CX9400Fax all-in , high-speed fax and 30-page Automatic Document Feeder • Archive documents and photos with high quality scanning • Get smudge resistant, double-sided documents and truly touchable photos with instant-drying DURABrite® Ultra Ink • Select, copy and print photos, PC-free, with large...
Product Brochure
Page 2
... the "Replace cartridge" indicator comes on. and Canada * Pages/copies per page Memory: Up to 100 pages Speed dials: 60 (max) Scanner Specifications Scanner Type Color flatbed Photoelectric Device Color CIS line sensor Optical Resolution 1200 dpi Hardware Resolution 1200 x 2400 dpi Maximum Resolution 9600 x 9600 dpi interpolated Scanner Bit Depth 48-bit color Standalone Color Copier Specifications Copy Quality Color: Black/White, Draft: Normal Copy Quantity 1 - 99 (PC-free) Special Features PC-free Printing Print all photos, Photo index sheet, Color photo restoration Color Preview...
... the "Replace cartridge" indicator comes on. and Canada * Pages/copies per page Memory: Up to 100 pages Speed dials: 60 (max) Scanner Specifications Scanner Type Color flatbed Photoelectric Device Color CIS line sensor Optical Resolution 1200 dpi Hardware Resolution 1200 x 2400 dpi Maximum Resolution 9600 x 9600 dpi interpolated Scanner Bit Depth 48-bit color Standalone Color Copier Specifications Copy Quality Color: Black/White, Draft: Normal Copy Quantity 1 - 99 (PC-free) Special Features PC-free Printing Print all photos, Photo index sheet, Color photo restoration Color Preview...
Product Information Guide
Page 7
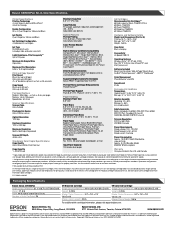
... Photo Paper Glossy Epson Premium Photo Paper Semi-gloss Epson Ultra Premium Photo Paper Glossy Epson Photo Paper Glossy Paper Type setting Plain Paper Matte Prem. Press the Copy button to 99). 6. Note: Copies may occur). Note: Paper Size options depend on the screen, press Menu and select your settings. ❏ To adjust the copy size, select Zoom and choose either Actual (to select a percentage using + or -) or Auto Fit Page (to automatically size the image to fit your original document. 1. After you loaded...
... Photo Paper Glossy Epson Premium Photo Paper Semi-gloss Epson Ultra Premium Photo Paper Glossy Epson Photo Paper Glossy Paper Type setting Plain Paper Matte Prem. Press the Copy button to 99). 6. Note: Copies may occur). Note: Paper Size options depend on the screen, press Menu and select your settings. ❏ To adjust the copy size, select Zoom and choose either Actual (to select a percentage using + or -) or Auto Fit Page (to automatically size the image to fit your original document. 1. After you loaded...
Product Information Guide
Page 8
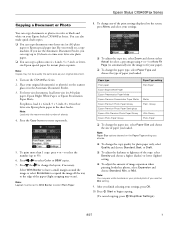
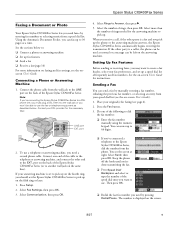
..., convert photos to print with trueto-life color and sharpness. Press OK to fit onto your photos. When you're ready to copy, press x Start. (To cancel copying, press y Stop/Clear Settings.) Note: When you scan with your computer, you want to crop a photo and enlarge the resulting image area to prescan your paper, press Display/Crop. 10. Load 4 × 6-inch, 5 × 7-inch, or letter-size Epson photo paper in the sheet feeder...
..., convert photos to print with trueto-life color and sharpness. Press OK to fit onto your photos. When you're ready to copy, press x Start. (To cancel copying, press y Stop/Clear Settings.) Note: When you scan with your computer, you want to crop a photo and enlarge the resulting image area to prescan your paper, press Display/Crop. 10. Load 4 × 6-inch, 5 × 7-inch, or letter-size Epson photo paper in the sheet feeder...
Product Information Guide
Page 9
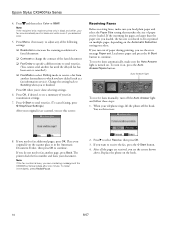
... is displayed on -screen User's Guide for instructions. See the on the screen. 8/07 9 Connect the phone cable from the phone. Do one end of rings, then press OK. Then press OK. ❏ Redial the last fax number you used fax numbers. Using the Automatic Document Feeder, you can enter up on the same line). Select Send, then press OK. Select Fax Settings, then press OK. 3. Epson Stylus CX9400Fax Series Faxing a Document or Photo Your Epson Stylus CX9400Fax Series lets you send faxes by entering fax numbers...
... is displayed on -screen User's Guide for instructions. See the on the screen. 8/07 9 Connect the phone cable from the phone. Do one end of rings, then press OK. Then press OK. ❏ Redial the last fax number you used fax numbers. Using the Automatic Document Feeder, you can enter up on the same line). Select Send, then press OK. Select Fax Settings, then press OK. 3. Epson Stylus CX9400Fax Series Faxing a Document or Photo Your Epson Stylus CX9400Fax Series lets you send faxes by entering fax numbers...
Product Information Guide
Page 10
... paper size you see the error message Paper out. Auto Answer light To receive faxes manually, turn it on the scanner glass or in black and white even if you 've loaded. When your original(s) on , press the Auto Answer/Space button. After all the pages are scanned, you see a summary of paper you selected color. 5. Press OK, if desired, to send your fax. (To cancel faxing, press y Stop/Clear Settings.) After your fax transmission settings. 7. Press x Start to see this screen...
... paper size you see the error message Paper out. Auto Answer light To receive faxes manually, turn it on the scanner glass or in black and white even if you 've loaded. When your original(s) on , press the Auto Answer/Space button. After all the pages are scanned, you see a summary of paper you selected color. 5. Press OK, if desired, to send your fax. (To cancel faxing, press y Stop/Clear Settings.) After your fax transmission settings. 7. Press x Start to see this screen...
Product Information Guide
Page 11
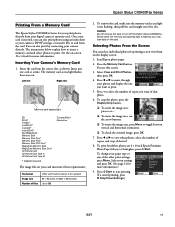
... image area, press Menu to print. 5. Press + to select the number of copies, and crop, if desired. 8. Epson Stylus CX9400Fax Series Printing From a Memory Card The Epson Stylus CX9400Fax Series lets you print photos directly from the card. The instructions below explain how to insert a memory card and select photos to start printing. (To cancel printing, press y Stop/Clear Settings.) 8/07 11 Insert the card into the correct slot, as you may lose data on your photos and display the one card at a time...
... image area, press Menu to print. 5. Press + to select the number of copies, and crop, if desired. 8. Epson Stylus CX9400Fax Series Printing From a Memory Card The Epson Stylus CX9400Fax Series lets you print photos directly from the card. The instructions below explain how to insert a memory card and select photos to start printing. (To cancel printing, press y Stop/Clear Settings.) 8/07 11 Insert the card into the correct slot, as you may lose data on your photos and display the one card at a time...
Product Information Guide
Page 12
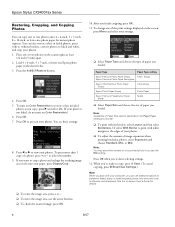
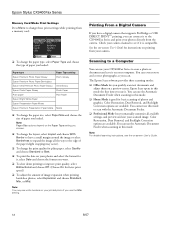
...Restoration, Dust Removal, and Backlight Correction options are available. Epson Stylus CX9400Fax Series Memory Card Mode Print Settings Press Menu to change these print settings while printing from a memory card: Printing From a Digital Camera If you have a digital camera that supports PictBridge or USB DIRECT PRINT™ printing, you can connect it to the CX9400Fax Series and print your scanned image. Check your camera. ❏ To change the paper type, select Paper Type and choose the type of paper you quickly scan text documents and adjust them on -screen User's Guide. 12...
...Restoration, Dust Removal, and Backlight Correction options are available. Epson Stylus CX9400Fax Series Memory Card Mode Print Settings Press Menu to change these print settings while printing from a memory card: Printing From a Digital Camera If you have a digital camera that supports PictBridge or USB DIRECT PRINT™ printing, you can connect it to the CX9400Fax Series and print your scanned image. Check your camera. ❏ To change the paper type, select Paper Type and choose the type of paper you quickly scan text documents and adjust them on -screen User's Guide. 12...
Product Information Guide
Page 13
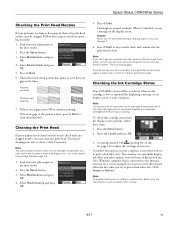
... . 6. Load letter-size plain paper in the sheet feeder. 2. Select Maintenance and press OK. 4. Select Head Cleaning and press OK. 5. Press x Start. When it's finished, you may damage it is low. See page 14 to run a nozzle check and confirm that the print head is low or expended by displaying a message on -screen User's Guide. 8/07 13 A window may be able to print when ink is expended, and may see the instructions in...
... . 6. Load letter-size plain paper in the sheet feeder. 2. Select Maintenance and press OK. 4. Select Head Cleaning and press OK. 5. Press x Start. When it's finished, you may damage it is low. See page 14 to run a nozzle check and confirm that the print head is low or expended by displaying a message on -screen User's Guide. 8/07 13 A window may be able to print when ink is expended, and may see the instructions in...
Product Information Guide
Page 15
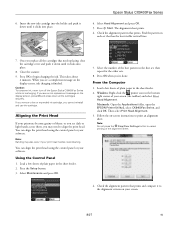
.... Using the Control Panel 1. Follow the on the display screen, ink charging is charging. Epson Stylus CX9400Fax Series 4. Press Start. Caution: To conserve ink, never turn off the Epson Stylus CX9400Fax Series while ink is finished. Macintosh: Open the Applications folder, open the EPSON Printer Utility2, select CX9400Fax Series, and click OK. 6. Select Head Alignment and press OK. 5. The alignment sheet prints. 6. Check the alignment pattern that has the least visible vertical lines. 7. Close the scanner. 9. If you remove a low or expended ink cartridge...
.... Using the Control Panel 1. Follow the on the display screen, ink charging is charging. Epson Stylus CX9400Fax Series 4. Press Start. Caution: To conserve ink, never turn off the Epson Stylus CX9400Fax Series while ink is finished. Macintosh: Open the Applications folder, open the EPSON Printer Utility2, select CX9400Fax Series, and click OK. 6. Select Head Alignment and press OK. 5. The alignment sheet prints. 6. Check the alignment pattern that has the least visible vertical lines. 7. Close the scanner. 9. If you remove a low or expended ink cartridge...

Product Information Guide
Page 16
... Series working at its original box or one and click Realignment. Related Documentation Note: Availability of manuals varies by location. Then print another alignment sheet and check it for transportation as follows: 1. Leave the ink cartridges installed to prevent damage. 10. If necessary, turn on the glass. 7. After unpacking the CX9400Fax Series, remove the tape securing the ink cartridge holder. Turn off the CX9400Fax Series. 2. Close the document cover and paper support, then clean...
... Series working at its original box or one and click Realignment. Related Documentation Note: Availability of manuals varies by location. Then print another alignment sheet and check it for transportation as follows: 1. Leave the ink cartridges installed to prevent damage. 10. If necessary, turn on the glass. 7. After unpacking the CX9400Fax Series, remove the tape securing the ink cartridge holder. Turn off the CX9400Fax Series. 2. Close the document cover and paper support, then clean...
Quick Reference Guide
Page 2
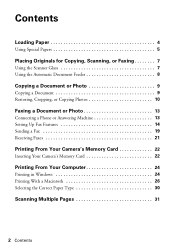
... Papers 5 Placing Originals for Copying, Scanning, or Faxing 7 Using the Scanner Glass 7 Using the Automatic Document Feeder 8 Copying a Document or Photo 9 Copying a Document 9 Restoring, Cropping, or Copying Photos 10 Faxing a Document or Photo 13 Connecting a Phone or Answering Machine 13 Setting Up Fax Features 14 Sending a Fax 19 Receiving Faxes 21 Printing From Your Camera's Memory Card 22 Inserting Your Camera's Memory Card 22 Printing From Your Computer 24 Printing in Windows 24 Printing With a Macintosh 26 Selecting the Correct Paper Type 30 Scanning Multiple Pages...
... Papers 5 Placing Originals for Copying, Scanning, or Faxing 7 Using the Scanner Glass 7 Using the Automatic Document Feeder 8 Copying a Document or Photo 9 Copying a Document 9 Restoring, Cropping, or Copying Photos 10 Faxing a Document or Photo 13 Connecting a Phone or Answering Machine 13 Setting Up Fax Features 14 Sending a Fax 19 Receiving Faxes 21 Printing From Your Camera's Memory Card 22 Inserting Your Camera's Memory Card 22 Printing From Your Computer 24 Printing in Windows 24 Printing With a Macintosh 26 Selecting the Correct Paper Type 30 Scanning Multiple Pages...
Quick Reference Guide
Page 17
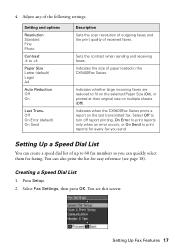
... Photo Contrast -4 to print reports for every fax you can quickly select them for easy reference (see this screen: Setting Up Fax Features 17 You can create a speed dial list of received faxes. Select Fax Settings, then press OK. Setting Up a Speed Dial List You can also print the list for faxing. Indicates when the CX9400Fax Series prints a report on multiple sheets (Off). Select Off to turn off report printing, On Error to print reports only when an error occurs, or On Send to +4 Paper Size Letter (default) Legal...
... Photo Contrast -4 to print reports for every fax you can quickly select them for easy reference (see this screen: Setting Up Fax Features 17 You can create a speed dial list of received faxes. Select Fax Settings, then press OK. Setting Up a Speed Dial List You can also print the list for faxing. Indicates when the CX9400Fax Series prints a report on multiple sheets (Off). Select Off to turn off report printing, On Error to print reports only when an error occurs, or On Send to +4 Paper Size Letter (default) Legal...
Quick Reference Guide
Page 27
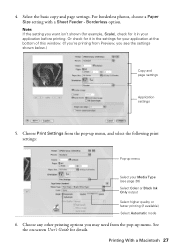
... need from the pop-up menu, and select the following print settings: Pop-up menu. Choose any other printing options you see page 30) Select Color or Black Ink Only output Select higher quality or faster printing (if available) Select Automatic mode 6. Or check for it in the settings for it in your Media Type (see the settings shown below.) Copy and page settings Application settings 5. See the on-screen User's Guide for details.
... need from the pop-up menu, and select the following print settings: Pop-up menu. Choose any other printing options you see page 30) Select Color or Black Ink Only output Select higher quality or faster printing (if available) Select Automatic mode 6. Or check for it in the settings for it in your Media Type (see the settings shown below.) Copy and page settings Application settings 5. See the on-screen User's Guide for details.
Quick Reference Guide
Page 38
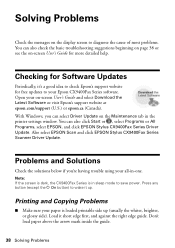
... Copying Problems ■ Make sure your paper is in -one. Load it 's a good idea to check Epson's support website for more detailed help. Don't load paper above the arrow mark inside the guide. 38 Solving Problems You can select Driver Update on the Maintenance tab in the printer settings window. Note: If the screen is dark, the CX9400Fax Series is loaded printable side up . With Windows, you 're having trouble using your all-in sleep mode to save power. Problems...
... Copying Problems ■ Make sure your paper is in -one. Load it 's a good idea to check Epson's support website for more detailed help. Don't load paper above the arrow mark inside the guide. 38 Solving Problems You can select Driver Update on the Maintenance tab in the printer settings window. Note: If the screen is dark, the CX9400Fax Series is loaded printable side up . With Windows, you 're having trouble using your all-in sleep mode to save power. Problems...
Quick Reference Guide
Page 40
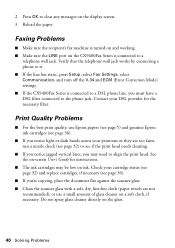
... print quality, use a small amount of glass cleaner on the CX9400Fax Series is connected to clear any messages on the display screen. 3. See the on-screen User's Guide for the necessary filter. Do not spray glass cleaner directly on ink. Check your DSL provider for instructions. ■ The ink cartridges may need to a telephone wall jack. Faxing Problems ■ Make sure the recipient's fax machine is turned on and working. ■ Make sure the LINE port...
... print quality, use a small amount of glass cleaner on the CX9400Fax Series is connected to clear any messages on the display screen. 3. See the on-screen User's Guide for the necessary filter. Do not spray glass cleaner directly on ink. Check your DSL provider for instructions. ■ The ink cartridges may need to a telephone wall jack. Faxing Problems ■ Make sure the recipient's fax machine is turned on and working. ■ Make sure the LINE port...
Quick Reference Guide
Page 43
... when you handle used ink cartridges; If discomfort or vision problems remain after removing an expended one. If ink gets on the document table when placing the originals. ■ Do not open the scanner section while the product is in the ink supply port, making covers or plugs unnecessary, but care is a valve in use. ■ Do not touch the flat white cable inside the product...
... when you handle used ink cartridges; If discomfort or vision problems remain after removing an expended one. If ink gets on the document table when placing the originals. ■ Do not open the scanner section while the product is in the ink supply port, making covers or plugs unnecessary, but care is a valve in use. ■ Do not touch the flat white cable inside the product...
Start Here Book (with wireless print server)
Page 13
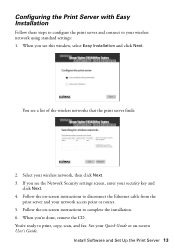
... settings screen, enter your wireless network using standard settings: 1. Follow the on -screen User's Guide. You're ready to disconnect the Ethernet cable from the print server and your wireless network, then click Next. 3. You see this window, select Easy Installation and click Next. Follow the on-screen instructions to print, copy, scan, and fax. If you 're done, remove the CD. Install Software and Set Up the Print Server 13 When you see a list of the wireless networks that the print server finds: 2. Configuring...
... settings screen, enter your wireless network using standard settings: 1. Follow the on -screen User's Guide. You're ready to disconnect the Ethernet cable from the print server and your wireless network, then click Next. 3. You see this window, select Easy Installation and click Next. Follow the on-screen instructions to print, copy, scan, and fax. If you 're done, remove the CD. Install Software and Set Up the Print Server 13 When you see a list of the wireless networks that the print server finds: 2. Configuring...
Start Here Book (with wireless print server)
Page 14
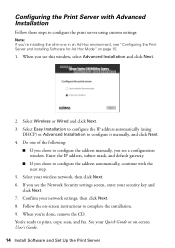
... Installation to print, copy, scan, and fax. Confirm your wireless network, then click Next. 6. You're ready to configure it manually, and click Next. 4. Select Easy Installation to configure the IP address automatically (using custom settings: Note: If you're installing the all-in-one of the following: ■ If you chose to configure the address manually, you see a configuration window. When you 're done, remove the CD. Follow the on -screen User's Guide. 14 Install Software...
... Installation to print, copy, scan, and fax. Confirm your wireless network, then click Next. 6. You're ready to configure it manually, and click Next. 4. Select Easy Installation to configure the IP address automatically (using custom settings: Note: If you're installing the all-in-one of the following: ■ If you chose to configure the address manually, you see a configuration window. When you 're done, remove the CD. Follow the on -screen User's Guide. 14 Install Software...
Start Here Book (with wireless print server)
Page 16
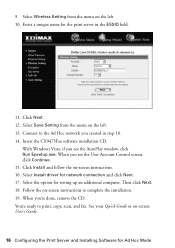
... Install driver for setting up an additional computer. Select Save Setting from the menu on the left . 13. Click Install and follow the on -screen instructions to complete the installation. 19. Click Next. 12. When you created in the ESSID field. 11. Connect to print, copy, scan, and fax. Select Wireless Setting from the menu on -screen User's Guide. 16 Configuring the Print Server and Installing Software for the print server in step 10. 14. See your Quick Guide or...
... Install driver for setting up an additional computer. Select Save Setting from the menu on the left . 13. Click Install and follow the on -screen instructions to complete the installation. 19. Click Next. 12. When you created in the ESSID field. 11. Connect to print, copy, scan, and fax. Select Wireless Setting from the menu on -screen User's Guide. 16 Configuring the Print Server and Installing Software for the print server in step 10. 14. See your Quick Guide or...


