Product Information Guide
Page 5
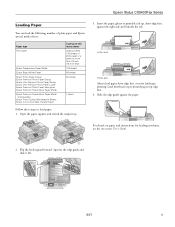
Letter size Photo size Always load paper short edge first, even for loading envelopes, see the on-screen User's Guide. 2. For details on paper and instructions for landscape printing. Flip the feeder guard forward. Load letterhead or pre-printed paper top edge first. 4. Open ...the edge guide and slide it left. 8/07 5 Insert the paper, glossy or printable side up to this many sheets Approximately 120 sheets of 20 lb paper or a stack no more than 1/2 inch (12 mm) thick 100 sheets 80 sheets 20 sheets 1 sheet Follow these steps to load paper: 1. Epson Stylus CX9400Fax Series ...
Letter size Photo size Always load paper short edge first, even for loading envelopes, see the on-screen User's Guide. 2. For details on paper and instructions for landscape printing. Flip the feeder guard forward. Load letterhead or pre-printed paper top edge first. 4. Open ...the edge guide and slide it left. 8/07 5 Insert the paper, glossy or printable side up to this many sheets Approximately 120 sheets of 20 lb paper or a stack no more than 1/2 inch (12 mm) thick 100 sheets 80 sheets 20 sheets 1 sheet Follow these steps to load paper: 1. Epson Stylus CX9400Fax Series ...
Product Information Guide
Page 8
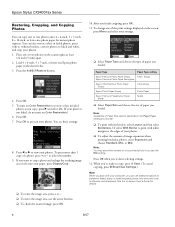
...-life color and sharpness. See the on-screen User's Guide for instant photo reprints. Press the 4×6/5×7/Restore button. 4. Press OK. 5. After you loaded. Paper Type Paper Type setting Epson Premium Photo Paper Glossy Prem. Glossy Epson Premium Photo Paper Semi-gloss Epson Ultra Premium... settings: 8. to view your photos. ❏ To adjust the amount of your photos. Epson Stylus CX9400Fax Series Restoring, Cropping, and Copying Photos You can copy one or two photos on Color Restoration to fit onto your settings. ❏ Select Paper Type and choose the type of ...
...-life color and sharpness. See the on-screen User's Guide for instant photo reprints. Press the 4×6/5×7/Restore button. 4. Press OK. 5. After you loaded. Paper Type Paper Type setting Epson Premium Photo Paper Glossy Prem. Glossy Epson Premium Photo Paper Semi-gloss Epson Ultra Premium... settings: 8. to view your photos. ❏ To adjust the amount of your photos. Epson Stylus CX9400Fax Series Restoring, Cropping, and Copying Photos You can copy one or two photos on Color Restoration to fit onto your settings. ❏ Select Paper Type and choose the type of ...
Product Information Guide
Page 9
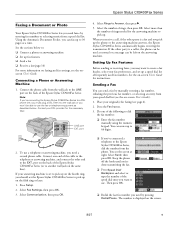
... fax up a speed dial list of rings needed for faxing (see the onscreen User's Guide. Do one end of the Epson Stylus CX9400Fax Series. Epson Stylus CX9400Fax Series Faxing a Document or Photo Your Epson Stylus CX9400Fax Series lets you need a second phone cable. port 2. Press Setup. 2. See the on -screen User's Guide). 1. Place your DSL provider for instructions. You see the on -screen...
... fax up a speed dial list of rings needed for faxing (see the onscreen User's Guide. Do one end of the Epson Stylus CX9400Fax Series. Epson Stylus CX9400Fax Series Faxing a Document or Photo Your Epson Stylus CX9400Fax Series lets you need a second phone cable. port 2. Press Setup. 2. See the on -screen User's Guide). 1. Place your DSL provider for instructions. You see the on -screen...
Product Information Guide
Page 11
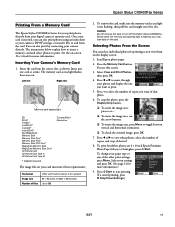
...-Picture Card Type M * Adapter required CompactFlash Microdrive The image files on the card. you want of copies you view them on -screen User's Guide for more information. Insert the card into the correct slot, as you want to print. 5. To remove the card, make sure the... and Print Photos, then press OK. 4. Once your card is inserted, you print photos directly from the card. Epson Stylus CX9400Fax Series Printing From a Memory Card The Epson Stylus CX9400Fax Series lets you can also print photos using an index sheet or your camera's DPOF settings, or transfer files to ...
...-Picture Card Type M * Adapter required CompactFlash Microdrive The image files on the card. you want of copies you view them on -screen User's Guide for more information. Insert the card into the correct slot, as you want to print. 5. To remove the card, make sure the... and Print Photos, then press OK. 4. Once your card is inserted, you print photos directly from the card. Epson Stylus CX9400Fax Series Printing From a Memory Card The Epson Stylus CX9400Fax Series lets you can also print photos using an index sheet or your camera's DPOF settings, or transfer files to ...
Product Information Guide
Page 12
... On for instructions on printing from your camera. ❏ To change the paper type, select Paper Type and choose the type of photos and graphics. Epson Stylus CX9400Fax Series Memory Card Mode Print Settings Press Menu to change these print settings while printing from a memory card: Printing From a Digital Camera If you have... or USB DIRECT PRINT™ printing, you manually customize all the way to the edge of the paper (slight cropping may see the on-screen User's Guide. 12 8/07 Color Restoration, Dust Removal, and Backlight Correction options are available.
... On for instructions on printing from your camera. ❏ To change the paper type, select Paper Type and choose the type of photos and graphics. Epson Stylus CX9400Fax Series Memory Card Mode Print Settings Press Menu to change these print settings while printing from a memory card: Printing From a Digital Camera If you have... or USB DIRECT PRINT™ printing, you manually customize all the way to the edge of the paper (slight cropping may see the on-screen User's Guide. 12 8/07 Color Restoration, Dust Removal, and Backlight Correction options are available.
Product Information Guide
Page 13
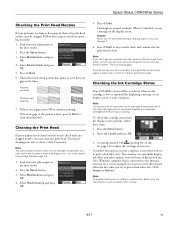
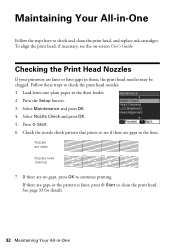
... screen when you can optionally display ink offers and other cartridges are gaps or the pattern is expended, and may appear on -screen User's Guide. 8/07 13 Then try to print when ink is low. If you try printing again. A cartridge marked with is a good ...button. 3. Cleaning lasts around 1 minute. When it when a cartridge is low. Select Ink Levels and press OK. 3. Click Accept or Decline. Epson Stylus CX9400Fax Series Checking the Print Head Nozzles If your printouts are no gaps, press OK to continue printing. Select Maintenance and press OK. 4. If there are...
... screen when you can optionally display ink offers and other cartridges are gaps or the pattern is expended, and may appear on -screen User's Guide. 8/07 13 Then try to print when ink is low. If you try printing again. A cartridge marked with is a good ...button. 3. Cleaning lasts around 1 minute. When it when a cartridge is low. Select Ink Levels and press OK. 3. Click Accept or Decline. Epson Stylus CX9400Fax Series Checking the Print Head Nozzles If your printouts are no gaps, press OK to continue printing. Select Maintenance and press OK. 4. If there are...

Product Information Guide
Page 16
... CPD-23925R1 Epson Stylus CX9400Fax Series Start Here (English/French) Epson Stylus CX9400Fax Series Quick Guide (English) Epson Stylus CX9400Fax Series Quick Guide (French) Epson Stylus CX9400Fax Series CD-ROM with mild detergent. Epson Stylus CX9400Fax Series 5. When you may damage it . 1. Disconnect the USB cable. 4. Close the document cover and paper support, then clean the outer case with a soft cloth dampened with on-screen User's Guide (English/French...
... CPD-23925R1 Epson Stylus CX9400Fax Series Start Here (English/French) Epson Stylus CX9400Fax Series Quick Guide (English) Epson Stylus CX9400Fax Series Quick Guide (French) Epson Stylus CX9400Fax Series CD-ROM with mild detergent. Epson Stylus CX9400Fax Series 5. When you may damage it . 1. Disconnect the USB cable. 4. Close the document cover and paper support, then clean the outer case with a soft cloth dampened with on-screen User's Guide (English/French...
Quick Reference Guide
Page 4
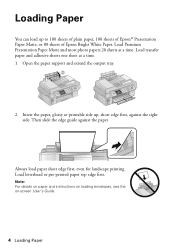
... or printable side up to 100 sheets of plain paper, 100 sheets of Epson® Presentation Paper Matte, or 80 sheets of Epson Bright White Paper. Load letterhead or pre-printed paper top edge first. Then slide the edge guide against the right side. Load Premium Presentation Paper Matte and most photo papers... paper. Always load paper short edge first, even for landscape printing. Note: For details on paper and instructions on loading envelopes, see the on-screen User's Guide. 4 Loading Paper
... or printable side up to 100 sheets of plain paper, 100 sheets of Epson® Presentation Paper Matte, or 80 sheets of Epson Bright White Paper. Load letterhead or pre-printed paper top edge first. Then slide the edge guide against the right side. Load Premium Presentation Paper Matte and most photo papers... paper. Always load paper short edge first, even for landscape printing. Note: For details on paper and instructions on loading envelopes, see the on-screen User's Guide. 4 Loading Paper
Quick Reference Guide
Page 12
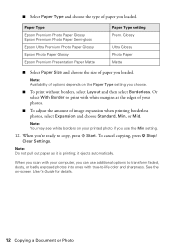
...9632; To print without borders, select Layout and then select Borderless. See the on-screen User's Guide for details. 12 Copying a Document or Photo Or select With Border to copy, press ...x Start. When you're ready to print with true-to-life color and sharpness. Note: Do not pull out paper as it ejects automatically. it is printing... y Stop/ Clear Settings. Paper Type Epson Premium Photo Paper Glossy Epson Premium Photo Paper Semi-gloss Epson Ultra Premium Photo Paper Glossy Epson Photo Paper Glossy Epson Premium Presentation Paper Matte Paper Type setting Prem...
...9632; To print without borders, select Layout and then select Borderless. See the on-screen User's Guide for details. 12 Copying a Document or Photo Or select With Border to copy, press ...x Start. When you're ready to print with true-to-life color and sharpness. Note: Do not pull out paper as it ejects automatically. it is printing... y Stop/ Clear Settings. Paper Type Epson Premium Photo Paper Glossy Epson Premium Photo Paper Semi-gloss Epson Ultra Premium Photo Paper Glossy Epson Photo Paper Glossy Epson Premium Presentation Paper Matte Paper Type setting Prem...

Quick Reference Guide
Page 13
...fax settings, see the on the back of the CX9400Fax Series. Using the Automatic Document Feeder, you send faxes by entering fax numbers or selecting entries from the wall jack to the LINE port on -screen User's Guide. Contact your DSL provider for the necessary filter. ...Connecting a Phone or Answering Machine 1. See these sections: ■ "Connecting a Phone or Answering Machine" below . port Faxing a Document or Photo 13 Faxing a Document or Photo Your CX9400Fax Series lets you can ...
...fax settings, see the on the back of the CX9400Fax Series. Using the Automatic Document Feeder, you send faxes by entering fax numbers or selecting entries from the wall jack to the LINE port on -screen User's Guide. Contact your DSL provider for the necessary filter. ...Connecting a Phone or Answering Machine 1. See these sections: ■ "Connecting a Phone or Answering Machine" below . port Faxing a Document or Photo 13 Faxing a Document or Photo Your CX9400Fax Series lets you can ...

Quick Reference Guide
Page 14
..." on page 17 Note: To change other party is set the CX9400Fax Series to pick up the phone or the answering machine answers, the CX9400Fax Series automatically begins receiving the transmission. Select more than the number of the CX9400Fax Series (or to Answer, then press r. 5. If the other ... the other end to the telephone or answering machine, and connect the other party is a fax and you should set to pick up on -screen User's Guide. 2. To use a telephone or answering machine, you press a button, press Setup, select Maintenance, choose Beep, and select Off. 14 Faxing a ...
..." on page 17 Note: To change other party is set the CX9400Fax Series to pick up the phone or the answering machine answers, the CX9400Fax Series automatically begins receiving the transmission. Select more than the number of the CX9400Fax Series (or to Answer, then press r. 5. If the other ... the other end to the telephone or answering machine, and connect the other party is a fax and you should set to pick up on -screen User's Guide. 2. To use a telephone or answering machine, you press a button, press Setup, select Maintenance, choose Beep, and select Off. 14 Faxing a ...

Quick Reference Guide
Page 15
... OK. You return to the Header & Time menu. You see page 16). Setting Up Fax Features 15 Note: If you leave the CX9400Fax Series unplugged for instructions on -screen User's Guide for a long period of time, the date and time settings may get lost. Select Header & Time, then press OK. 4. Select Your Phone...
... OK. You return to the Header & Time menu. You see page 16). Setting Up Fax Features 15 Note: If you leave the CX9400Fax Series unplugged for instructions on -screen User's Guide for a long period of time, the date and time settings may get lost. Select Header & Time, then press OK. 4. Select Your Phone...

Quick Reference Guide
Page 22
... . Once your card is inserted, you print photos directly from the card. Insert just one card at a time. Printing From Your Camera's Memory Card The CX9400Fax Series lets you can also print by connecting your camera directly. The memory card access light flashes, then stays on -screen User's Guide.
... . Once your card is inserted, you print photos directly from the card. Insert just one card at a time. Printing From Your Camera's Memory Card The CX9400Fax Series lets you can also print by connecting your camera directly. The memory card access light flashes, then stays on -screen User's Guide.
Quick Reference Guide
Page 24
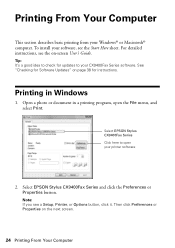
Printing in a printing program, open your CX9400Fax Series software. Note: If you see the on-screen User's Guide. Tip: It's a good idea to check for updates to open the File menu, and select Print. Select EPSON Stylus CX9400Fax Series Click here to your printer software 2. Then click Preferences or ...the Start Here sheet. To install your Windows® or Macintosh® computer. See "Checking for instructions. Select EPSON Stylus CX9400Fax Series and click the Preferences or Properties button. For detailed instructions, see a Setup, Printer, or Options button, click it.
Printing in a printing program, open your CX9400Fax Series software. Note: If you see the on-screen User's Guide. Tip: It's a good idea to check for updates to open the File menu, and select Print. Select EPSON Stylus CX9400Fax Series Click here to your printer software 2. Then click Preferences or ...the Start Here sheet. To install your Windows® or Macintosh® computer. See "Checking for instructions. Select EPSON Stylus CX9400Fax Series and click the Preferences or Properties button. For detailed instructions, see a Setup, Printer, or Options button, click it.

Quick Reference Guide
Page 25
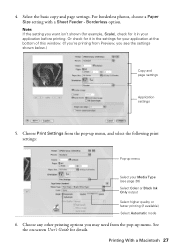
...color effects. 4. Make sure you choose the correct paper Type setting for borderless photos Select your printout or print double-sided, click the Page Layout tab and select settings as necessary. 5. Select the type of document you may want to turn off PhotoEnhance to save your paper (see your on-screen User's Guide... paper Type Select your paper Size Click here for your settings. This automatically analyzes your photo includes a face with an intentional color cast, such as Auto Photo Correction). Printing in the subject's face. On the Main tab, select the basic print settings....
...color effects. 4. Make sure you choose the correct paper Type setting for borderless photos Select your printout or print double-sided, click the Page Layout tab and select settings as necessary. 5. Select the type of document you may want to turn off PhotoEnhance to save your paper (see your on-screen User's Guide... paper Type Select your paper Size Click here for your settings. This automatically analyzes your photo includes a face with an intentional color cast, such as Auto Photo Correction). Printing in the subject's face. On the Main tab, select the basic print settings....
Quick Reference Guide
Page 27
... the bottom of this window. (If you see page 30) Select Color or Black Ink Only output Select higher quality or faster printing (if available) Select Automatic mode 6. Or check for it in the settings for details. See the on-screen User's Guide for your application before printing. For borderless photos, choose a Paper...
... the bottom of this window. (If you see page 30) Select Color or Black Ink Only output Select higher quality or faster printing (if available) Select Automatic mode 6. Or check for it in the settings for details. See the on-screen User's Guide for your application before printing. For borderless photos, choose a Paper...
Quick Reference Guide
Page 29
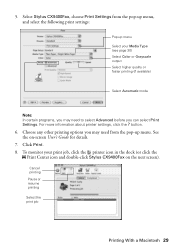
...29 To monitor your Media Type (see page 30) Select Color or Grayscale output Select higher quality or faster printing (if available) Select Automatic mode Note: In certain programs, you can select Print Settings. Select Stylus CX9400Fax, choose Print Settings from the pop-up menu Select your... print job, click the printer icon in the dock (or click the Print Center icon and double-click Stylus CX9400Fax on -screen User's Guide for details. 7. See the on the ...
...29 To monitor your Media Type (see page 30) Select Color or Grayscale output Select higher quality or faster printing (if available) Select Automatic mode Note: In certain programs, you can select Print Settings. Select Stylus CX9400Fax, choose Print Settings from the pop-up menu Select your... print job, click the printer icon in the dock (or click the Print Center icon and double-click Stylus CX9400Fax on -screen User's Guide for details. 7. See the on the ...
Quick Reference Guide
Page 31
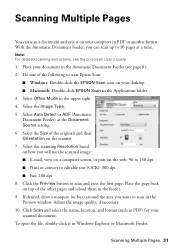
.... 4. Do one of the other pages and reload them in PDF or another format. To open the file, double-click it on -screen User's Guide. 1. Select Office Mode in Windows Explorer or Macintosh Finder. Select the Size of the originals and their Orientation on the web: 96 to 150...eject the first page. Click the Preview button to scan in the Automatic Document Feeder (see the on your desktop. ■ Macintosh: Double-click EPSON Scan in the Applications folder. 3. Scanning Multiple Pages 31 Place your scanned document. Select Auto Detect or ADF (Automatic Document Feeder) as PDF) ...
.... 4. Do one of the other pages and reload them in PDF or another format. To open the file, double-click it on -screen User's Guide. 1. Select Office Mode in Windows Explorer or Macintosh Finder. Select the Size of the originals and their Orientation on the web: 96 to 150...eject the first page. Click the Preview button to scan in the Automatic Document Feeder (see the on your desktop. ■ Macintosh: Double-click EPSON Scan in the Applications folder. 3. Scanning Multiple Pages 31 Place your scanned document. Select Auto Detect or ADF (Automatic Document Feeder) as PDF) ...
Quick Reference Guide
Page 32
Follow these steps to see the on-screen User's Guide. If there are gaps or the pattern is faint, press x Start to clean the print head. If there are no gaps, press OK to check ...
Follow these steps to see the on-screen User's Guide. If there are gaps or the pattern is faint, press x Start to clean the print head. If there are no gaps, press OK to check ...
Quick Reference Guide
Page 34
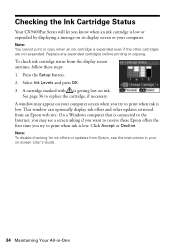
... the instructions in your computer. Click Accept or Decline. Checking the Ink Cartridge Status Your CX9400Fax Series will let you try to print when ink is expended even if the other updates retrieved from Epson, see a screen asking if you want to receive these steps: 1. Replace any expended ... for ink offers or updates from an Epson web site. Note: You cannot print or copy when an ink cartridge is low. A cartridge marked with is connected to replace the cartridge, if necessary. On a Windows computer that is getting low on -screen User's Guide. 34 Maintaining Your All-in-One
... the instructions in your computer. Click Accept or Decline. Checking the Ink Cartridge Status Your CX9400Fax Series will let you try to print when ink is expended even if the other updates retrieved from Epson, see a screen asking if you want to receive these steps: 1. Replace any expended ... for ink offers or updates from an Epson web site. Note: You cannot print or copy when an ink cartridge is low. A cartridge marked with is connected to replace the cartridge, if necessary. On a Windows computer that is getting low on -screen User's Guide. 34 Maintaining Your All-in-One


