
Epson Scan ICM Updater v1.20 (PSB.2008.07.001)
Page 1
....exe from the Epson Scan ICM pull-down menu (under Color tab in the Configuration menu). EPSON PRODUCT SUPPORT BULLETIN Date: PSB #: Reference: Product(s): Subject: 07/08/2008 Originator: RY PSB.2008.07.001 Authorization: TE08-0061 Rev A Total Pages: 1 All Scanners and All-in-One's using Epson Scan Epson Scan ICM updater v.1.20 for Epson Scan-affects all driver...
....exe from the Epson Scan ICM pull-down menu (under Color tab in the Configuration menu). EPSON PRODUCT SUPPORT BULLETIN Date: PSB #: Reference: Product(s): Subject: 07/08/2008 Originator: RY PSB.2008.07.001 Authorization: TE08-0061 Rev A Total Pages: 1 All Scanners and All-in-One's using Epson Scan Epson Scan ICM updater v.1.20 for Epson Scan-affects all driver...
Product Brochure
Page 1
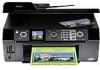
...enlarge copies 25 to six times longer than leading competitive prints** • Make multiple color copies effortlessly with individual ink cartridges Ordering Information Product Name Epson Stylus® CX9400Fax all-in , high-speed fax and 30-page Automatic Document Feeder • Archive ...documents and photos with high quality scanning • Get smudge resistant, double-sided documents and truly ...
...enlarge copies 25 to six times longer than leading competitive prints** • Make multiple color copies effortlessly with individual ink cartridges Ordering Information Product Name Epson Stylus® CX9400Fax all-in , high-speed fax and 30-page Automatic Document Feeder • Archive ...documents and photos with high quality scanning • Get smudge resistant, double-sided documents and truly ...
Product Brochure
Page 2
...DL, C6; For print quality, a small amount of paper feed. Epson, Epson Stylus, Epson PRINT Image Matching and MicroPiezo are based on accelerated testing of their respective...light intensity, humidity and atmospheric conditions. Epson CX9400Fax All-in-One Specifications Printer Specifications Printing Technology 4-color drop-on system configuration, software application ... Intel® processor) Software Included Epson® printer driver, Web to Page†, Epson Scan, ArcSoft® PhotoImpression™, ABBYY® FineReader® Color Management PhotoEnhance† and ICM Sound...
...DL, C6; For print quality, a small amount of paper feed. Epson, Epson Stylus, Epson PRINT Image Matching and MicroPiezo are based on accelerated testing of their respective...light intensity, humidity and atmospheric conditions. Epson CX9400Fax All-in-One Specifications Printer Specifications Printing Technology 4-color drop-on system configuration, software application ... Intel® processor) Software Included Epson® printer driver, Web to Page†, Epson Scan, ArcSoft® PhotoImpression™, ABBYY® FineReader® Color Management PhotoEnhance† and ICM Sound...
Product Information Guide
Page 3
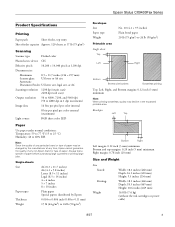
...kg) (without the ink cartridges or power cable) 8/07 3 Epson Stylus CX9400Fax Series Product Specifications Printing Paper path Sheet feeder, top entry Sheet feeder capacity Approx. 120 sheets at 17 lb (75 g/m2) Scanning Scanner type Flatbed color Photoelectric device CIS Effective pixels 10,200 × 14,040 pixels ...at any time, Epson cannot guarantee the quality of any particular brand or type of paper may ...
...kg) (without the ink cartridges or power cable) 8/07 3 Epson Stylus CX9400Fax Series Product Specifications Printing Paper path Sheet feeder, top entry Sheet feeder capacity Approx. 120 sheets at 17 lb (75 g/m2) Scanning Scanner type Flatbed color Photoelectric device CIS Effective pixels 10,200 × 14,040 pixels ...at any time, Epson cannot guarantee the quality of any particular brand or type of paper may ...
Product Information Guide
Page 6
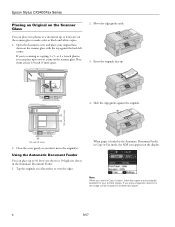
...paper is loaded in the Automatic Document Feeder in the Automatic Document Feeder. 1. Move the edge guides aside. 3. Close the cover gently so you 're scanning or copying 3 × 5- Open the document cover and place your printed copies. Place them at a time on the scanner glass. or 4 × 6-... Document Feeder You can place up to letter-size on the scanner glass to make color or black and white copies. 1. Tap the originals on a flat surface to fit letter-size paper. 6 8/07 Epson Stylus CX9400Fax Series Placing an Original on the Scanner Glass You can place two photos or a ...
...paper is loaded in the Automatic Document Feeder in the Automatic Document Feeder. 1. Move the edge guides aside. 3. Close the cover gently so you 're scanning or copying 3 × 5- Open the document cover and place your printed copies. Place them at a time on the scanner glass. or 4 × 6-... Document Feeder You can place up to letter-size on the scanner glass to make color or black and white copies. 1. Tap the originals on a flat surface to fit letter-size paper. 6 8/07 Epson Stylus CX9400Fax Series Placing an Original on the Scanner Glass You can place two photos or a ...
Product Information Guide
Page 8
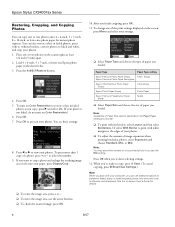
Epson Stylus CX9400Fax Series Restoring, Cropping, and Copying Photos You can copy one or two photos on the scanner glass at the edges of your photos. ❏ To .... (To cancel copying, press y Stop/Clear Settings.) Note: When you scan with or without borders, select Layout and then select Borderless. When you're ready to print with trueto-life color and sharpness. Load 4 × 6-inch, 5 × 7-inch, or letter-size Epson photo paper in faded photos as you loaded. To print more...
Epson Stylus CX9400Fax Series Restoring, Cropping, and Copying Photos You can copy one or two photos on the scanner glass at the edges of your photos. ❏ To .... (To cancel copying, press y Stop/Clear Settings.) Note: When you scan with or without borders, select Layout and then select Borderless. When you're ready to print with trueto-life color and sharpness. Load 4 × 6-inch, 5 × 7-inch, or letter-size Epson photo paper in faded photos as you loaded. To print more...
Product Information Guide
Page 10
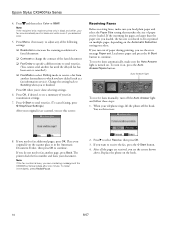
...to increase the scanning resolution of a faxed document ❏ Contrast to fax additional pages, press OK. The printer dials the fax number and faxes your telephone rings, lift the phone off the Auto Answer light and follow these steps: 1. To redial immediately, press Redial/Pause. 2. Epson Stylus CX9400Fax Series 4. ... Back. Load more paper and press the x Start button to receive the fax, press the x Start button. 4. Press and then select Color or B&W. Replace the phone on the Automatic Reduction setting you see the screen shown above. Press OK, if desired, to send your fax....
...to increase the scanning resolution of a faxed document ❏ Contrast to fax additional pages, press OK. The printer dials the fax number and faxes your telephone rings, lift the phone off the Auto Answer light and follow these steps: 1. To redial immediately, press Redial/Pause. 2. Epson Stylus CX9400Fax Series 4. ... Back. Load more paper and press the x Start button to receive the fax, press the x Start button. 4. Press and then select Color or B&W. Replace the phone on the Automatic Reduction setting you see the screen shown above. Press OK, if desired, to send your fax....
Product Information Guide
Page 12
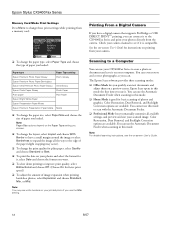
... adjust the amount of image expansion when printing borderless photos, select Expansion and choose Standard, Min, or Mid. Epson Scan opens in this mode. Color Restoration, Dust Removal, and Backlight Correction options are available. Note: Paper Size options depend on the Paper Type...07 Check your scanned image. The Epson Scan software provides three scanning modes: ❏ Office Mode lets you quickly scan text documents and adjust them on printing from the camera. See the on-screen User's Guide for basic scanning of paper you loaded. Epson Stylus CX9400Fax Series Memory ...
... adjust the amount of image expansion when printing borderless photos, select Expansion and choose Standard, Min, or Mid. Epson Scan opens in this mode. Color Restoration, Dust Removal, and Backlight Correction options are available. Note: Paper Size options depend on the Paper Type...07 Check your scanned image. The Epson Scan software provides three scanning modes: ❏ Office Mode lets you quickly scan text documents and adjust them on printing from the camera. See the on-screen User's Guide for basic scanning of paper you loaded. Epson Stylus CX9400Fax Series Memory ...
Quick Reference Guide
Page 1
Epson Stylus® CX9400Fax Series Quick Guide Basic Printing, Copying, Scanning, and Faxing Maintaining Your All-in-One Solving Problems
Epson Stylus® CX9400Fax Series Quick Guide Basic Printing, Copying, Scanning, and Faxing Maintaining Your All-in-One Solving Problems
Quick Reference Guide
Page 2
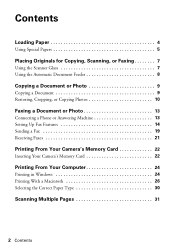
Contents Loading Paper 4 Using Special Papers 5 Placing Originals for Copying, Scanning, or Faxing 7 Using the Scanner Glass 7 Using the Automatic Document Feeder 8 Copying a Document or Photo 9 Copying a Document 9 Restoring, Cropping, or Copying Photos 10 Faxing a Document ... Inserting Your Camera's Memory Card 22 Printing From Your Computer 24 Printing in Windows 24 Printing With a Macintosh 26 Selecting the Correct Paper Type 30 Scanning Multiple Pages 31 2 Contents
Contents Loading Paper 4 Using Special Papers 5 Placing Originals for Copying, Scanning, or Faxing 7 Using the Scanner Glass 7 Using the Automatic Document Feeder 8 Copying a Document or Photo 9 Copying a Document 9 Restoring, Cropping, or Copying Photos 10 Faxing a Document ... Inserting Your Camera's Memory Card 22 Printing From Your Computer 24 Printing in Windows 24 Printing With a Macintosh 26 Selecting the Correct Paper Type 30 Scanning Multiple Pages 31 2 Contents

Quick Reference Guide
Page 7
If you don't move the original(s). Placing Originals for Copying, Scanning, or Faxing Before you can place two photos or a document up to make color or black and white copies. 1. Open the document cover and place your documents or photos on the scanner glass, with the top against the back ...left corner. or 4 × 6-inch photos, you copy, scan, or fax, place your original face-down on...
If you don't move the original(s). Placing Originals for Copying, Scanning, or Faxing Before you can place two photos or a document up to make color or black and white copies. 1. Open the document cover and place your documents or photos on the scanner glass, with the top against the back ...left corner. or 4 × 6-inch photos, you copy, scan, or fax, place your original face-down on...
Quick Reference Guide
Page 8
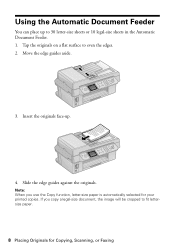
Tap the originals on a flat surface to 30 letter-size sheets or 10 legal-size sheets in the Automatic Document Feeder. 1. Slide the edge guides against the originals. If you use the Copy function, letter-size paper is automatically selected for Copying, Scanning, or Faxing Note: When you copy a legal-size document, the image will be cropped to fit lettersize paper. 8 Placing Originals for your printed copies. Using the Automatic Document Feeder You can place up . 4. Insert the originals face-up to even the edges. 2. Move the edge guides aside. 3.
Tap the originals on a flat surface to 30 letter-size sheets or 10 legal-size sheets in the Automatic Document Feeder. 1. Slide the edge guides against the originals. If you use the Copy function, letter-size paper is automatically selected for Copying, Scanning, or Faxing Note: When you copy a legal-size document, the image will be cropped to fit lettersize paper. 8 Placing Originals for your printed copies. Using the Automatic Document Feeder You can place up . 4. Insert the originals face-up to even the edges. 2. Move the edge guides aside. 3.
Quick Reference Guide
Page 12
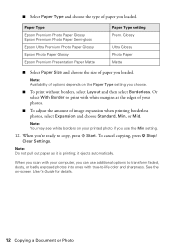
Paper Type Epson Premium Photo Paper Glossy Epson Premium Photo Paper Semi-gloss Epson Ultra Premium Photo Paper Glossy Epson Photo Paper Glossy Epson Premium Presentation Paper Matte Paper Type setting Prem. Glossy Ultra Glossy Photo Paper Matte ■ Select Paper Size and choose the size of paper...copy, press x Start. When you loaded. Note: Do not pull out paper as it ejects automatically. Or select With Border to -life color and sharpness. When you scan with your computer, you loaded. ■ Select Paper Type and choose the type of paper you can use the Min setting. 12. Note...
Paper Type Epson Premium Photo Paper Glossy Epson Premium Photo Paper Semi-gloss Epson Ultra Premium Photo Paper Glossy Epson Photo Paper Glossy Epson Premium Presentation Paper Matte Paper Type setting Prem. Glossy Ultra Glossy Photo Paper Matte ■ Select Paper Size and choose the size of paper...copy, press x Start. When you loaded. Note: Do not pull out paper as it ejects automatically. Or select With Border to -life color and sharpness. When you scan with your computer, you loaded. ■ Select Paper Type and choose the type of paper you can use the Min setting. 12. Note...

Quick Reference Guide
Page 14
... you pick up on -screen User's Guide. Select the number of the CX9400Fax Series (or to pick up a speed dial list of frequently used fax numbers. ■ "Entering Fax Header Information" on page 15 ■ "Select Scan and Print Settings" on page 16 ■ "Setting Up a Speed Dial...choose Beep, and select Off. 14 Faxing a Document or Photo 2. Select Fax Settings, then press OK. 3. If your fax preferences, and set the CX9400Fax Series to Answer, then press r. 5. To turn off the "beep" heard when you need a second phone cable. Setting Up Fax Features Before sending ...
... you pick up on -screen User's Guide. Select the number of the CX9400Fax Series (or to pick up a speed dial list of frequently used fax numbers. ■ "Entering Fax Header Information" on page 15 ■ "Select Scan and Print Settings" on page 16 ■ "Setting Up a Speed Dial...choose Beep, and select Off. 14 Faxing a Document or Photo 2. Select Fax Settings, then press OK. 3. If your fax preferences, and set the CX9400Fax Series to Answer, then press r. 5. To turn off the "beep" heard when you need a second phone cable. Setting Up Fax Features Before sending ...
Quick Reference Guide
Page 16
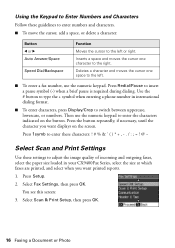
... character and moves the cursor one character to the right. Use the # button to type the + symbol when entering a phone number in your CX9400Fax Series, select the size at which faxes are printed, and select when you want printed reports. 1. Press Setup. 2. You see this screen: 3...., if necessary, until the character you want displays on the button. Select Fax Settings, then press OK. Press 1symb to enter these characters Select Scan and Print Settings Use these guidelines to enter numbers and characters. ■ To move the cursor, add a space, or delete a character: Button...
... character and moves the cursor one character to the right. Use the # button to type the + symbol when entering a phone number in your CX9400Fax Series, select the size at which faxes are printed, and select when you want printed reports. 1. Press Setup. 2. You see this screen: 3...., if necessary, until the character you want displays on the button. Select Fax Settings, then press OK. Press 1symb to enter these characters Select Scan and Print Settings Use these guidelines to enter numbers and characters. ■ To move the cursor, add a space, or delete a character: Button...
Quick Reference Guide
Page 17
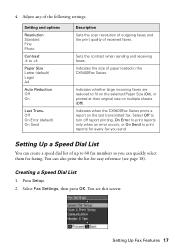
...default) Legal A4 Auto Reduction Off On Last Trans. Setting Up a Speed Dial List You can create a speed dial list of paper loaded in the CX9400Fax Series. Creating a Speed Dial List 1. Press Setup. 2. You see page 18). Indicates whether large incoming faxes are reduced to print reports for every ... prints a report on multiple sheets (Off). Adjust any of received faxes. Off On Error (default) On Send Description Sets the scan resolution of outgoing faxes and the print quality of the following settings: Setting and options Resolution Standard Fine Photo Contrast -4 to 60 fax...
...default) Legal A4 Auto Reduction Off On Last Trans. Setting Up a Speed Dial List You can create a speed dial list of paper loaded in the CX9400Fax Series. Creating a Speed Dial List 1. Press Setup. 2. You see page 18). Indicates whether large incoming faxes are reduced to print reports for every ... prints a report on multiple sheets (Off). Adjust any of received faxes. Off On Error (default) On Send Description Sets the scan resolution of outgoing faxes and the print quality of the following settings: Setting and options Resolution Standard Fine Photo Contrast -4 to 60 fax...
Quick Reference Guide
Page 20
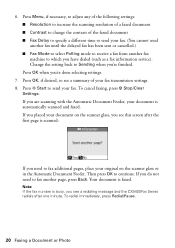
... settings. 8. To redial immediately, press Redial/Pause. 20 Faxing a Document or Photo Change the setting back to see a redialing message and the CX9400Fax Series redials after the first page is busy, you placed your original on the scanner glass, you see this screen after one minute. Press OK... a different time to receive a fax from another page, press Back. Note: If the fax number is scanned: If you need to fax another fax machine to which you are scanning with the Automatic Document Feeder, your fax. (You cannot send another fax until the delayed fax has been ...
... settings. 8. To redial immediately, press Redial/Pause. 20 Faxing a Document or Photo Change the setting back to see a redialing message and the CX9400Fax Series redials after the first page is busy, you placed your original on the scanner glass, you see this screen after one minute. Press OK... a different time to receive a fax from another page, press Back. Note: If the fax number is scanned: If you need to fax another fax machine to which you are scanning with the Automatic Document Feeder, your fax. (You cannot send another fax until the delayed fax has been ...

Quick Reference Guide
Page 21
.... Replace the phone on , press the Auto Answer/Space button. If you run out of rings before the CX9400Fax Series answers, see this screen: 2. To turn off the hook. If you see "Select Scan and Print Settings" on page 16). When your telephone rings, lift the phone off the Auto Answer light...
.... Replace the phone on , press the Auto Answer/Space button. If you run out of rings before the CX9400Fax Series answers, see this screen: 2. To turn off the hook. If you see "Select Scan and Print Settings" on page 16). When your telephone rings, lift the phone off the Auto Answer light...
Quick Reference Guide
Page 31
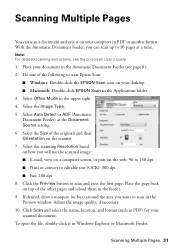
...desired, draw a marquee (or box) around the area you want to scan in Windows Explorer or Macintosh Finder. Scanning Multiple Pages 31 Do one of the following to start Epson Scan: ■ Windows: Double-click the EPSON Scan icon on top of the originals and their Orientation on -screen User's ... (see the on the scanner. 7. Place your desktop. ■ Macintosh: Double-click EPSON Scan in the Applications folder. 3. Adjust the image quality, if necessary. 10. Scanning Multiple Pages You can scan up to 30 pages at a time. Select Auto Detect or ADF (Automatic Document Feeder)...
...desired, draw a marquee (or box) around the area you want to scan in Windows Explorer or Macintosh Finder. Scanning Multiple Pages 31 Do one of the following to start Epson Scan: ■ Windows: Double-click the EPSON Scan icon on top of the originals and their Orientation on -screen User's ... (see the on the scanner. 7. Place your desktop. ■ Macintosh: Double-click EPSON Scan in the Applications folder. 3. Adjust the image quality, if necessary. 10. Scanning Multiple Pages You can scan up to 30 pages at a time. Select Auto Detect or ADF (Automatic Document Feeder)...
Quick Reference Guide
Page 38
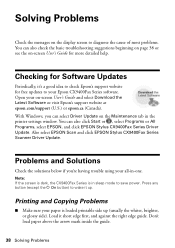
... P On button) to save power. Note: If the screen is dark, the CX9400Fax Series is loaded printable side up . Also select EPSON Scan and click EPSON Stylus CX9400Fax Series Scanner Driver Update. Solving Problems Check the messages on the display screen to your Epson CX9400Fax Series software. You can select Driver Update on -screen User's Guide for more...
... P On button) to save power. Note: If the screen is dark, the CX9400Fax Series is loaded printable side up . Also select EPSON Scan and click EPSON Stylus CX9400Fax Series Scanner Driver Update. Solving Problems Check the messages on the display screen to your Epson CX9400Fax Series software. You can select Driver Update on -screen User's Guide for more...


