Basics
Page 10
The light indicates which type is copied with color restoration on the glass as the original. The P On light flashes and the Epson Stylus CX7800 starts printing. Note: The copies may not be ejected automatically to the output tray. Place the photo on . When Restoration ON is also selected, the photo is ... u or d Copies button to set the number of copies. 8. Press the u or d Copies button to select the number of copies. 7. To cancel copying, press the y Stop/Clear Settings button. Make sure the Epson Stylus CX7800 is being printed; Load up to select Plain Paper.
The light indicates which type is copied with color restoration on the glass as the original. The P On light flashes and the Epson Stylus CX7800 starts printing. Note: The copies may not be ejected automatically to the output tray. Place the photo on . When Restoration ON is also selected, the photo is ... u or d Copies button to set the number of copies. 8. Press the u or d Copies button to select the number of copies. 7. To cancel copying, press the y Stop/Clear Settings button. Make sure the Epson Stylus CX7800 is being printed; Load up to select Plain Paper.
Basics
Page 11
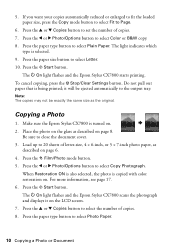
...or r Photo/Options button to select Letter, 4"x6", or 5"x7". 10. Press the paper size button to select Color or B&W copy. 11. The P On light flashes and the Epson Stylus CX7800 starts printing. Press the paper type button to select Draft. Press the u or d Copies button to select Letter. 5. Note: ...Press the l or r Photo/Options button to enter setup mode. 6. To cancel copying, press the y Stop/Clear Settings button. To cancel copying, press the y Stop/Clear Settings button. Press the x Start button. Press the x Start button. The print quality is reduced, but the copy is being...
...or r Photo/Options button to select Letter, 4"x6", or 5"x7". 10. Press the paper size button to select Color or B&W copy. 11. The P On light flashes and the Epson Stylus CX7800 starts printing. Press the paper type button to select Draft. Press the u or d Copies button to select Letter. 5. Note: ...Press the l or r Photo/Options button to enter setup mode. 6. To cancel copying, press the y Stop/Clear Settings button. To cancel copying, press the y Stop/Clear Settings button. Press the x Start button. Press the x Start button. The print quality is reduced, but the copy is being...

Basics
Page 17
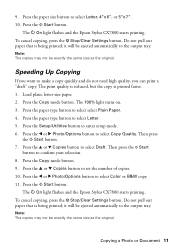
... photo or film is being printed; If necessary, press the paper type button to select Photo Paper and the paper size button to view the photos. To cancel copying, press the y Stop/Clear Settings button. Press the x Start button. Press the l or r Photo/Options button to select 4"x 6", or ... scanned and a preview of photo you can bring them back to life using the Color Restoration feature. 1. Copying a Photo or Document 17 Restoring Color in Faded Photos, Slides, and Negatives If you have color-faded photos, negatives, or slides, you want to restore: ■ Copy Photograph ...
... photo or film is being printed; If necessary, press the paper type button to select Photo Paper and the paper size button to view the photos. To cancel copying, press the y Stop/Clear Settings button. Press the x Start button. Press the l or r Photo/Options button to select 4"x 6", or ... scanned and a preview of photo you can bring them back to life using the Color Restoration feature. 1. Copying a Photo or Document 17 Restoring Color in Faded Photos, Slides, and Negatives If you have color-faded photos, negatives, or slides, you want to restore: ■ Copy Photograph ...

Basics
Page 21
... page 20). 4. Load several sheets of copies. 7. Note: To cancel printing, press the y Stop/Clear Settings button. 10. Note: If your computer is not connected to your computer (or your camera supports DPOF, you can use it straight out of its slot. Make sure your Epson Stylus CX7800 is turned off ). 2. Printing From a Memory Card 21
... page 20). 4. Load several sheets of copies. 7. Note: To cancel printing, press the y Stop/Clear Settings button. 10. Note: If your computer is not connected to your computer (or your camera supports DPOF, you can use it straight out of its slot. Make sure your Epson Stylus CX7800 is turned off ). 2. Printing From a Memory Card 21

Basics
Page 22
... photos on page 23 to select photos to be printed. 3. Make sure your Epson Stylus CX7800 is not connected to see page 20). 4. For multiple index sheets, the pages containing the most recent images are more sheets, press the y Stop/Clear Settings button. Press the x Start button. Printing an Index Sheet to Select Photos You can...
... photos on page 23 to select photos to be printed. 3. Make sure your Epson Stylus CX7800 is not connected to see page 20). 4. For multiple index sheets, the pages containing the most recent images are more sheets, press the y Stop/Clear Settings button. Press the x Start button. Printing an Index Sheet to Select Photos You can...

Basics
Page 24
If you select Plain Paper, the photos print with DPOF. 1. Note: To cancel printing, press the y Stop/Clear Settings button. 9. Printing All Photos or DPOF Photos Follow the steps below to 20 sheets of photo paper at a time (see page 20). 2. Press the Memory Card mode button until the Print All/PictBridge light comes on the...
If you select Plain Paper, the photos print with DPOF. 1. Note: To cancel printing, press the y Stop/Clear Settings button. 9. Printing All Photos or DPOF Photos Follow the steps below to 20 sheets of photo paper at a time (see page 20). 2. Press the Memory Card mode button until the Print All/PictBridge light comes on the...

Basics
Page 25
...to the edge of the paper. 5. Then follow the steps in your photos, or print using PhotoEnhance. ■ OFF: No automatic correction is used. 4. Press the paper type button to print your selection. 5. Press the u or d Copies button to confirm your photos. Press... longer, but provides better quality. ■ Exif: Prints using PRINT Image Matching. (Automatically selected when your pictures contain Exif data.) If the photo doesn't include Exif Print data, try printing with a white border. Note: To cancel printing, press the y Stop/Clear Settings button. 7. Press the l or r Photo...
...to the edge of the paper. 5. Then follow the steps in your photos, or print using PhotoEnhance. ■ OFF: No automatic correction is used. 4. Press the paper type button to print your selection. 5. Press the u or d Copies button to confirm your photos. Press... longer, but provides better quality. ■ Exif: Prints using PRINT Image Matching. (Automatically selected when your pictures contain Exif data.) If the photo doesn't include Exif Print data, try printing with a white border. Note: To cancel printing, press the y Stop/Clear Settings button. 7. Press the l or r Photo...
Basics
Page 47
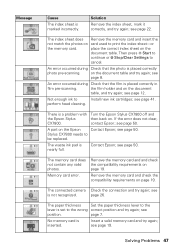
... photos on the document table and try again; on card used to print the index sheet-or the memory card. Not enough ink to the wrong correct position and try again; If the error does not clear, CX7800. A part on the document table, and try again; see page ...see page 50. see is nearly full. Then press x Start to continue or y Stop/Clear Settings to be replaced. An error occurred during Check that the photo is a problem with Turn the Epson Stylus CX7800 off and the Epson Stylus then back on page 19. There is placed correctly photo pre-scanning. contact...
... photos on the document table and try again; on card used to print the index sheet-or the memory card. Not enough ink to the wrong correct position and try again; If the error does not clear, CX7800. A part on the document table, and try again; see page ...see page 50. see is nearly full. Then press x Start to continue or y Stop/Clear Settings to be replaced. An error occurred during Check that the photo is a problem with Turn the Epson Stylus CX7800 off and the Epson Stylus then back on page 19. There is placed correctly photo pre-scanning. contact...
Basics
Page 59
..., about, 35 photos, 35 to 37 problems, 49 slides, 35 to 37 thick documents, 9 Slides loading, 12 to 13 printing from, 12 to 15 restoring color, 17 scanning, 35 to 37 Stopping printing, 21, 30, 33 Support, 50 T Technical support, 50 Troubleshooting copying, 48 image quality, 49 LCD messages, 46 to 47...47 paper feeding, 48 scanning, 49 Type setting, Windows, 29, 34 U Utilities Cleaning print head, 39 to 41 Nozzle Check, 38 to 39, 40 to 41 W Warranty, 55 to 56 Windows color management settings, 30 page layout settings, 29 printing, 28 to 30 starting EPSON Scan, 36 Type setting, 29, 34 Index 59
..., about, 35 photos, 35 to 37 problems, 49 slides, 35 to 37 thick documents, 9 Slides loading, 12 to 13 printing from, 12 to 15 restoring color, 17 scanning, 35 to 37 Stopping printing, 21, 30, 33 Support, 50 T Technical support, 50 Troubleshooting copying, 48 image quality, 49 LCD messages, 46 to 47...47 paper feeding, 48 scanning, 49 Type setting, Windows, 29, 34 U Utilities Cleaning print head, 39 to 41 Nozzle Check, 38 to 39, 40 to 41 W Warranty, 55 to 56 Windows color management settings, 30 page layout settings, 29 printing, 28 to 30 starting EPSON Scan, 36 Type setting, 29, 34 Index 59

Photo Projects Made Easy Without Using a Computer
Page 7
... "Restoring Faded Color Photos, Slides, and Negatives" on page 9 for details. 3 Press the x Start button to preview your photos on the LCD screen. 4 Press the l or r Photo/Options button to view your photos and the u or d Copies button to select the number of copies to print. 5 If .../Photo mode button. 2 If necessary, press the l or r Photo/Options button to select Copy Photograph. Tip: You can also restore faded color photos when copying. Note: To cancel printing, press the y Stop/Clear Settings button. 7 Copying 4 × 6-inch Photos Before you begin, load paper and place your photo.
... "Restoring Faded Color Photos, Slides, and Negatives" on page 9 for details. 3 Press the x Start button to preview your photos on the LCD screen. 4 Press the l or r Photo/Options button to view your photos and the u or d Copies button to select the number of copies to print. 5 If .../Photo mode button. 2 If necessary, press the l or r Photo/Options button to select Copy Photograph. Tip: You can also restore faded color photos when copying. Note: To cancel printing, press the y Stop/Clear Settings button. 7 Copying 4 × 6-inch Photos Before you begin, load paper and place your photo.

Photo Projects Made Easy Without Using a Computer
Page 8
...❍ Negative Film ❍ Positive Film ❍ Slides ❍ B&W Negative Film Tip: You can also restore faded color negatives and slides when copying. Note: To cancel printing, press the y Stop/Clear Settings button. 8 Making Photos From Slides and Negatives Before you begin, load paper, remove the document mat, and ... Press the l or r Photo/Options button to view your photos and the u or d Copies button to select the number of copies to print. 5 If necessary, press the paper type button to select Photo Paper and the paper size button to select 4"×6." 6 Press the x Start button ...
...❍ Negative Film ❍ Positive Film ❍ Slides ❍ B&W Negative Film Tip: You can also restore faded color negatives and slides when copying. Note: To cancel printing, press the y Stop/Clear Settings button. 8 Making Photos From Slides and Negatives Before you begin, load paper, remove the document mat, and ... Press the l or r Photo/Options button to view your photos and the u or d Copies button to select the number of copies to print. 5 If necessary, press the paper type button to select Photo Paper and the paper size button to select 4"×6." 6 Press the x Start button ...

Photo Projects Made Easy Without Using a Computer
Page 9
Before you have faded color photos, negatives, or slides, your Epson Stylus CX7800 can bring them back to print your photos and the u or d Copies button to select the number of these settings: ❍ Copy Photograph Restoration ON ❍ Negative Film Restoration ON &#...preview your photos on the LCD screen. 4 Press the l or r Photo/Options button to view your photos. Note: To cancel printing, press the y Stop/Clear Settings button. 9 Restoring Faded Color Photos, Slides, and Negatives If you begin, load paper and place your photo, negatives, or slides on the glass as described in...
Before you have faded color photos, negatives, or slides, your Epson Stylus CX7800 can bring them back to print your photos and the u or d Copies button to select the number of these settings: ❍ Copy Photograph Restoration ON ❍ Negative Film Restoration ON &#...preview your photos on the LCD screen. 4 Press the l or r Photo/Options button to view your photos. Note: To cancel printing, press the y Stop/Clear Settings button. 9 Restoring Faded Color Photos, Slides, and Negatives If you begin, load paper and place your photo, negatives, or slides on the glass as described in...

Photo Projects Made Easy Without Using a Computer
Page 11
... Note: To cancel printing, press the y Stop/Clear Settings button. Epson disclaims any and all rights in those marks. © 2005 Epson America, Inc. 7/05 11 General Notice: Other product names used herein are registered trademarks and Exceed Your Vision is a trademark of copies to print. 5 Press the ... Paper and the paper size button to select 4"×6". 6 Press the x Start button to start printing your photos. You can use the following types of cards with your Epson Stylus CX7800: Slot Top slot Middle slot Bottom slot *Adapter required Type of card SmartMedia™ xD-Picture Card...
... Note: To cancel printing, press the y Stop/Clear Settings button. Epson disclaims any and all rights in those marks. © 2005 Epson America, Inc. 7/05 11 General Notice: Other product names used herein are registered trademarks and Exceed Your Vision is a trademark of copies to print. 5 Press the ... Paper and the paper size button to select 4"×6". 6 Press the x Start button to start printing your photos. You can use the following types of cards with your Epson Stylus CX7800: Slot Top slot Middle slot Bottom slot *Adapter required Type of card SmartMedia™ xD-Picture Card...

Product Information Guide
Page 6
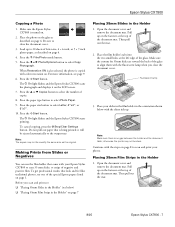
... Epson Stylus CX7800 is turned on top of the Epson Stylus CX7800. Note: The copies may damage the document cover. Epson Stylus CX7800 As with traditional photos, Epson recommends proper care that will minimize color changes and lengthen display life: ❏ Frame prints under...printing. Epson Stylus CX7800 8/05 Placing Originals for Copying or Scanning 1. You may not be ejected automatically to the output tray. Be sure to select Letter. 10. Press the u or d Copies button to set the number of letter-size plain paper, as the original. 6 - To cancel copying, press the y Stop...
... Epson Stylus CX7800 is turned on top of the Epson Stylus CX7800. Note: The copies may damage the document cover. Epson Stylus CX7800 As with traditional photos, Epson recommends proper care that will minimize color changes and lengthen display life: ❏ Frame prints under...printing. Epson Stylus CX7800 8/05 Placing Originals for Copying or Scanning 1. You may not be ejected automatically to the output tray. Be sure to select Letter. 10. Press the u or d Copies button to set the number of letter-size plain paper, as the original. 6 - To cancel copying, press the y Stop...
Product Information Guide
Page 7
...be exactly the same size as described on page 7 Placing 35mm Slides in the Holder 1. Making Prints from Slides or Negatives You can use the film holder that came with color restoration on the fastener at the top of negative and positive film. Be sure to select Letter,...photo on the fastener at the left edge of the glass to scan and print your Epson Stylus CX7800 to select Copy Photograph. To cancel copying, press the y Stop/Clear Settings button. Then pull out the mat. 8/05 Epson Stylus CX7800 - 7 To get professional results that is no gap between the holder and...
...be exactly the same size as described on page 7 Placing 35mm Slides in the Holder 1. Making Prints from Slides or Negatives You can use the film holder that came with color restoration on the fastener at the top of negative and positive film. Be sure to select Letter,...photo on the fastener at the left edge of the glass to scan and print your Epson Stylus CX7800 to select Copy Photograph. To cancel copying, press the y Stop/Clear Settings button. Then pull out the mat. 8/05 Epson Stylus CX7800 - 7 To get professional results that is no gap between the holder and...
Product Information Guide
Page 9
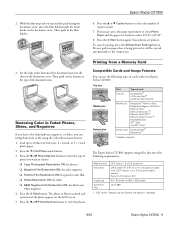
... push on the fastener at the bottom of the document mat into the slots on the document cover. Your photos are printed. To cancel copying, press the y Stop/Clear Settings button. Press the x Start button. Press the u or d Copies button to select the number of the...10063; B&W Negative Film Restoration ON: for Camera File system" standard 8/05 Epson Stylus CX7800 - 9 Then push in Faded Photos, Slides, and Negatives If you have color-faded photos, negatives, or slides, you want to life using the Color Restoration feature. 1. Do not pull out paper that meet the following types...
... push on the fastener at the bottom of the document mat into the slots on the document cover. Your photos are printed. To cancel copying, press the y Stop/Clear Settings button. Press the x Start button. Press the u or d Copies button to select the number of the...10063; B&W Negative Film Restoration ON: for Camera File system" standard 8/05 Epson Stylus CX7800 - 9 Then push in Faded Photos, Slides, and Negatives If you have color-faded photos, negatives, or slides, you want to life using the Color Restoration feature. 1. Do not pull out paper that meet the following types...

Product Information Guide
Page 10
... Epson Stylus CX7800 is not connected to print, the Epson Stylus CX7800 scans the sheet and automatically prints the selected photos. Press the x Start button. you want to your computer (or your card into the correct slot. For multiple index sheets, the pages containing the most recent images are more sheets, press the y Stop/Clear Settings button. To cancel printing...
... Epson Stylus CX7800 is not connected to print, the Epson Stylus CX7800 scans the sheet and automatically prints the selected photos. Press the x Start button. you want to your computer (or your card into the correct slot. For multiple index sheets, the pages containing the most recent images are more sheets, press the y Stop/Clear Settings button. To cancel printing...
Product Information Guide
Page 11
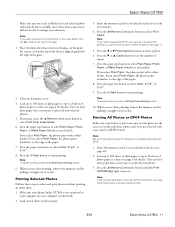
...: To cancel printing, press the y Stop/Clear Settings button. 10. Press the Memory Card mode button to select Plain Paper, Photo Paper, or Matte Paper (whichever you select Plain Paper, the photos print with your selected photos. 5. once it straight out of each selected photo and mark the sheet carefully; Epson Stylus CX7800 Make sure just...
...: To cancel printing, press the y Stop/Clear Settings button. 10. Press the Memory Card mode button to select Plain Paper, Photo Paper, or Matte Paper (whichever you select Plain Paper, the photos print with your selected photos. 5. once it straight out of each selected photo and mark the sheet carefully; Epson Stylus CX7800 Make sure just...

Product Information Guide
Page 12
...Paper (whichever you can even automatically restore faded color photographs as you are done printing, remove the memory card by connecting your digital camera directly to use your Epson Stylus CX7800 to 9200 × 9200 pixels. 1. or USB DIRECT-PRINT™compatible, you loaded). For details, see... of the following image appears on the LCD screen. Epson Stylus CX7800 If the memory card contains DPOF information, the following icons is displayed on -screen User's Guide. 12 - Note: To cancel printing, press the y Stop/Clear Settings button. 7. Load the type of paper you...
...Paper (whichever you can even automatically restore faded color photographs as you are done printing, remove the memory card by connecting your digital camera directly to use your Epson Stylus CX7800 to 9200 × 9200 pixels. 1. or USB DIRECT-PRINT™compatible, you loaded). For details, see... of the following image appears on the LCD screen. Epson Stylus CX7800 If the memory card contains DPOF information, the following icons is displayed on -screen User's Guide. 12 - Note: To cancel printing, press the y Stop/Clear Settings button. 7. Load the type of paper you...

Product Information Guide
Page 16
...cartridges are low on . Caution: Do not remove or tear the label on the Epson Stylus CX7800. 2. When it clicks into place. Replace any other cartridges that need to align the print head. Do not touch the green chip on your taskbar (in the lower right ...finished, the P On light stops flashing and remains on ink or you may also occur if your Epson Stylus CX7800 in the printer list, click OK, and select Print Head Alignment. 16 - Then remove it clicks into place. 7. Epson Stylus CX7800 8/05 Caution: Never turn off the Epson Stylus CX7800 while the P On light ...
...cartridges are low on . Caution: Do not remove or tear the label on the Epson Stylus CX7800. 2. When it clicks into place. Replace any other cartridges that need to align the print head. Do not touch the green chip on your taskbar (in the lower right ...finished, the P On light stops flashing and remains on ink or you may also occur if your Epson Stylus CX7800 in the printer list, click OK, and select Print Head Alignment. 16 - Then remove it clicks into place. 7. Epson Stylus CX7800 8/05 Caution: Never turn off the Epson Stylus CX7800 while the P On light ...


