Product Information Guide
Page 8
... to fit the loaded paper size, press the Fit to select Plain Paper. Press the x Start Color or x Start B&W button. Note: When making a lot of copies in black and white). Epson Stylus CX4200 Series/Epson Stylus CX4800 Series 4. Load up to the output tray. Do not pull out paper that is turned on .... of copies in the Copy window. To make a copy quickly, you want to make more copies, load more copies, see the next section. 5. Do not pull out paper that is a good idea to Page button. Making 10 or More Copies 1. This tells the Epson Stylus CX to print up to...
... to fit the loaded paper size, press the Fit to select Plain Paper. Press the x Start Color or x Start B&W button. Note: When making a lot of copies in black and white). Epson Stylus CX4200 Series/Epson Stylus CX4800 Series 4. Load up to the output tray. Do not pull out paper that is turned on .... of copies in the Copy window. To make a copy quickly, you want to make more copies, load more copies, see the next section. 5. Do not pull out paper that is a good idea to Page button. Making 10 or More Copies 1. This tells the Epson Stylus CX to print up to...
Product Information Guide
Page 17
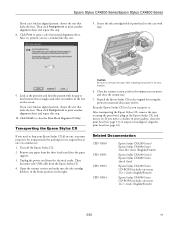
...10. Turn off the Epson Stylus CX. 2. Keep the Epson Stylus CX level as you see page 13); Epson Stylus CX4200 Series/Epson Stylus CX4800 Series If you can 't find an aligned pattern, choose the one that looks the best. Then click Realignment to ship your Epson Stylus...print head (see a window like this one of a similar size. 1. After transporting the Epson Stylus CX, remove the ...Epson Stylus CX. 4. English/French) 5/05 17 Secure the ink cartridge holder (print head) to print a color horizontal alignment sheet. Repack the Epson Stylus CX in its number in the Epson Stylus...
...10. Turn off the Epson Stylus CX. 2. Keep the Epson Stylus CX level as you see page 13); Epson Stylus CX4200 Series/Epson Stylus CX4800 Series If you can 't find an aligned pattern, choose the one that looks the best. Then click Realignment to ship your Epson Stylus...print head (see a window like this one of a similar size. 1. After transporting the Epson Stylus CX, remove the ...Epson Stylus CX. 4. English/French) 5/05 17 Secure the ink cartridge holder (print head) to print a color horizontal alignment sheet. Repack the Epson Stylus CX in its number in the Epson Stylus...
Quick Reference Guide
Page 8
...10. 5. Load up to stop copying at a time this way. Press the paper type button to the output tray. If you need to 9 copies at any time, just press the y Stop button. The P On light flashes and after a moment the Epson Stylus... CX starts printing. Copying You can select up to 100 sheets of copies in the Copy window. it will be exactly the same ... To make a color copy, press the x Start Color button. Note: The copies may not be ejected automatically to select Plain Paper. Make sure the Epson Stylus CX is being ...
...10. 5. Load up to stop copying at a time this way. Press the paper type button to the output tray. If you need to 9 copies at any time, just press the y Stop button. The P On light flashes and after a moment the Epson Stylus... CX starts printing. Copying You can select up to 100 sheets of copies in the Copy window. it will be exactly the same ... To make a color copy, press the x Start Color button. Note: The copies may not be ejected automatically to select Plain Paper. Make sure the Epson Stylus CX is being ...
Quick Reference Guide
Page 9
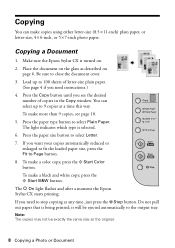
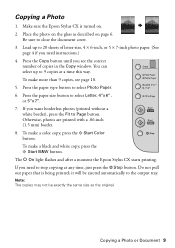
... copying at a time this way. Press the paper size button to 20 sheets of copies in the Copy window. To make a black and white copy, press the x Start B&W button. To make more than 9 copies...-size, 4 × 6-inch, or 5 × 7-inch photo paper. (See page 4 if you see page 10. 5. Copying a Photo 1. Load up to close the document cover. 3. Press the paper type button to the output tray... a color copy, press the x Start Color button. it will be exactly the same size as described on . 2. Do not pull out paper that is turned on page 6. Make sure the Epson Stylus CX is...
... copying at a time this way. Press the paper size button to 20 sheets of copies in the Copy window. To make a black and white copy, press the x Start B&W button. To make more than 9 copies...-size, 4 × 6-inch, or 5 × 7-inch photo paper. (See page 4 if you see page 10. 5. Copying a Photo 1. Load up to close the document cover. 3. Press the paper type button to the output tray... a color copy, press the x Start Color button. it will be exactly the same size as described on . 2. Do not pull out paper that is turned on page 6. Make sure the Epson Stylus CX is...
Quick Reference Guide
Page 10
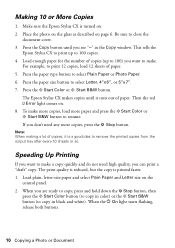
...then press the x Start Color button (to copy in color) or the x Start B&W button (to make. When you want to copy in the Copy window. Load enough paper for the number of paper. 5. Press the paper size button to select Plain Paper or Photo Paper. 6. The Epson Stylus CX makes copies until you ... more paper and press the x Start Color or x Start B&W button to remove the printed copies from the output tray after every 10 sheets or so. The print quality is reduced, but the copy is turned on . 8. Making 10 or More Copies 1. Make sure the Epson Stylus CX is printed faster. 1. Then the...
...then press the x Start Color button (to copy in color) or the x Start B&W button (to make. When you want to copy in the Copy window. Load enough paper for the number of paper. 5. Press the paper size button to select Plain Paper or Photo Paper. 6. The Epson Stylus CX makes copies until you ... more paper and press the x Start Color or x Start B&W button to remove the printed copies from the output tray after every 10 sheets or so. The print quality is reduced, but the copy is turned on . 8. Making 10 or More Copies 1. Make sure the Epson Stylus CX is printed faster. 1. Then the...
Quick Reference Guide
Page 22
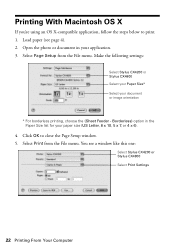
... the Paper Size list for your paper size (US Letter, 8 x 10, 5 x 7, or 4 x 6). 4. Select Page Setup from the File menu. Click OK to print. 1. Select Print from the File menu. Make the following settings: Select Stylus CX4200 or Stylus CX4800 Select your Paper Size* Select your application. 3. You see page 4). ... Printing With Macintosh OS X If you're using an OS X-compatible application, follow the steps below to close the Page Setup window. 5. Load paper (see a window like this one: Select Stylus CX4200 or Stylus CX4800 Select Print Settings 22 Printing From Your Computer
... the Paper Size list for your paper size (US Letter, 8 x 10, 5 x 7, or 4 x 6). 4. Select Page Setup from the File menu. Click OK to print. 1. Select Print from the File menu. Make the following settings: Select Stylus CX4200 or Stylus CX4800 Select your Paper Size* Select your application. 3. You see page 4). ... Printing With Macintosh OS X If you're using an OS X-compatible application, follow the steps below to close the Page Setup window. 5. Load paper (see a window like this one: Select Stylus CX4200 or Stylus CX4800 Select Print Settings 22 Printing From Your Computer

Quick Reference Guide
Page 24
... like this: Pause printing Resume printing Cancel printing Select the print job 11. When you 're using OS X 10.2.x, click the Print Center icon instead, then double-click Stylus CX4200 or Stylus CX4800 in the dock on saving them as a group so you can reuse them later, click ?. 9. Select Print... desktop. To monitor the progress of your print job, click the printer icon when it appears in the Printer List window. Click Print. 10. If you 're finished, close the printer window or Print Center. 24 Printing From Your Computer Click the Advanced button to change additional settings. 8.
... like this: Pause printing Resume printing Cancel printing Select the print job 11. When you 're using OS X 10.2.x, click the Print Center icon instead, then double-click Stylus CX4200 or Stylus CX4800 in the dock on saving them as a group so you can reuse them later, click ?. 9. Select Print... desktop. To monitor the progress of your print job, click the printer icon when it appears in the Printer List window. Click Print. 10. If you 're finished, close the printer window or Print Center. 24 Printing From Your Computer Click the Advanced button to change additional settings. 8.


