
Product Information Guide
Page 1
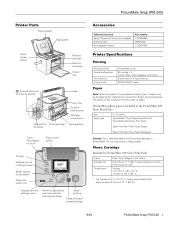
... PictureMate on or off Photo viewer screen On light Displays photos in different sizes Select options on the screen Opens the output tray Displays optional settings menu Move through photos and menu options, and select settings Starts printing Stops printing or cancels settings Accessories Optional accessory Epson® Bluetooth® Photo Print Adapter Carrying Case Rechargeable Battery Part number C12C824383 PMBAG06 C12C831082 Printer Specifications Printing Printing method Nozzle configuration Print direction Control code On-demand ink jet 90 nozzles × 4 Colors: Black...
... PictureMate on or off Photo viewer screen On light Displays photos in different sizes Select options on the screen Opens the output tray Displays optional settings menu Move through photos and menu options, and select settings Starts printing Stops printing or cancels settings Accessories Optional accessory Epson® Bluetooth® Photo Print Adapter Carrying Case Rechargeable Battery Part number C12C824383 PMBAG06 C12C831082 Printer Specifications Printing Printing method Nozzle configuration Print direction Control code On-demand ink jet 90 nozzles × 4 Colors: Black...
Product Information Guide
Page 2
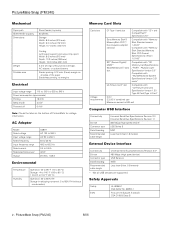
... Interface Connectivity Bit rate Connector type Data Encoding Recommended cable length Universal Serial Bus Specifications Revision 2.0* 480 Mbps (High speed device) USB Series A NRZI Less than 6 feet (1.8 meters) * Not all sides of the paper Borderless printing: no margins Electrical Input voltage range 110 to 120 V or 220 to 240 V Power consumption (approximate) Printing 19.0 W Sleep mode 4.0 W Powered off 0.4 W Note: Check the label on all USB devices are supported. Physical Layer Specification...
... Interface Connectivity Bit rate Connector type Data Encoding Recommended cable length Universal Serial Bus Specifications Revision 2.0* 480 Mbps (High speed device) USB Series A NRZI Less than 6 feet (1.8 meters) * Not all sides of the paper Borderless printing: no margins Electrical Input voltage range 110 to 120 V or 220 to 240 V Power consumption (approximate) Printing 19.0 W Sleep mode 4.0 W Powered off 0.4 W Note: Check the label on all USB devices are supported. Physical Layer Specification...

Product Information Guide
Page 3
Open the paper support. 3. Note: When you may damage PictureMate. 1. Press the On button to turn on edge guides Note: Load a maximum of 20 sheets at one time. Loading Paper Caution: Don't load plain paper or you need more paper, order a PictureMate 200 Series Print Pack. Load glossy or whiter side up Make sure paper stack is glossy or whiter side up to the back. 2. Make sure paper is beneath arrow on PictureMate. 2. PictureMate Snap (PM 240) 5. Move the handle to prevent...
Open the paper support. 3. Note: When you may damage PictureMate. 1. Press the On button to turn on edge guides Note: Load a maximum of 20 sheets at one time. Loading Paper Caution: Don't load plain paper or you need more paper, order a PictureMate 200 Series Print Pack. Load glossy or whiter side up Make sure paper stack is glossy or whiter side up to the back. 2. Make sure paper is beneath arrow on PictureMate. 2. PictureMate Snap (PM 240) 5. Move the handle to prevent...

Product Information Guide
Page 4
...; Memory Stick PRO Duo™ * MagicGate Memory Stick MagicGate Memory Stick Duo * Requires adapter To remove a card from the top slot, push in the card and release it, then pull it easy to select the photos you are ready to print. Caution: Do not remove a card while the memory card light is in all the way). Layout icon Guide to lower the screen before closing the printer lid. 4 - PictureMate Snap (PM 240...
...; Memory Stick PRO Duo™ * MagicGate Memory Stick MagicGate Memory Stick Duo * Requires adapter To remove a card from the top slot, push in the card and release it, then pull it easy to select the photos you are ready to print. Caution: Do not remove a card while the memory card light is in all the way). Layout icon Guide to lower the screen before closing the printer lid. 4 - PictureMate Snap (PM 240...
Product Information Guide
Page 5
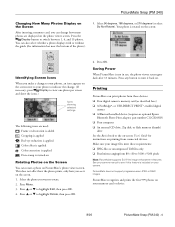
... an optional Epson Bluetooth Photo Print adapter, part number C12C824383) ❏ Your computer ❏ An external CD drive, Zip disk, or flash memory (thumb) drive See the Basics book or the on-screen User's Guide for instructions on the photo viewer screen. PictureMate Snap (PM 240) Changing How Many Photos Display on the Screen After inserting a memory card, you can change . (If necessary, press Display to view one photo per screen and show the icons.) Icons showing selected settings The following...
... an optional Epson Bluetooth Photo Print adapter, part number C12C824383) ❏ Your computer ❏ An external CD drive, Zip disk, or flash memory (thumb) drive See the Basics book or the on-screen User's Guide for instructions on the photo viewer screen. PictureMate Snap (PM 240) Changing How Many Photos Display on the Screen After inserting a memory card, you can change . (If necessary, press Display to view one photo per screen and show the icons.) Icons showing selected settings The following...

Product Information Guide
Page 6
... the number, or Copy - PictureMate Snap (PM 240) 8/06 When you see page 8.) 7. PictureMate Snap (PM 240) Printing Individual Photos If you have many photos on your camera's memory card, you can select just the ones you want to continue printing. to review your photos on the paper. (For more than one copy, press OK to select it . 5. Press or to decrease the number using the left selection button under the photo viewer screen...
... the number, or Copy - PictureMate Snap (PM 240) 8/06 When you see page 8.) 7. PictureMate Snap (PM 240) Printing Individual Photos If you have many photos on your camera's memory card, you can select just the ones you want to continue printing. to review your photos on the paper. (For more than one copy, press OK to select it . 5. Press or to decrease the number using the left selection button under the photo viewer screen...

Product Information Guide
Page 7
... memory card, this makes it easier to increase the number, or Copy - Select Yes (using the right selection button under the photo viewer screen). Make sure you selected. Press or to print your camera supports DPOF (Digital Print Order Format), you have enough paper loaded, then press Print to select the photo.) 5. Make sure you can use , , , or to start printing. 4. Printing Camera-Selected DPOF Photos If your pre-selected photos. 8/06 PictureMate Snap (PM 240) - 7 Your photos...
... memory card, this makes it easier to increase the number, or Copy - Select Yes (using the right selection button under the photo viewer screen). Make sure you selected. Press or to print your camera supports DPOF (Digital Print Order Format), you have enough paper loaded, then press Print to select the photo.) 5. Make sure you can use , , , or to start printing. 4. Printing Camera-Selected DPOF Photos If your pre-selected photos. 8/06 PictureMate Snap (PM 240) - 7 Your photos...
Product Information Guide
Page 8
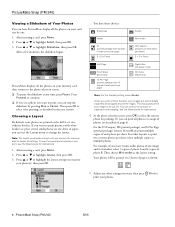
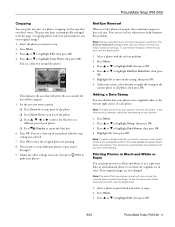
... layout setting you want for printing, as shown: 5. At the photo selection screen, press OK to select the current photo for instructions. 1. To use the Layout menu to change the layout. You can print all the photos on one sheet of paper, you can use the same layout whenever you print, see the Basics book for printing. Then choose Mini-wallet as described on your photos. 8 - PictureMate Snap (PM 240) Viewing...
... layout setting you want for printing, as shown: 5. At the photo selection screen, press OK to select the current photo for instructions. 1. To use the Layout menu to change the layout. You can print all the photos on one sheet of paper, you can use the same layout whenever you print, see the Basics book for printing. Then choose Mini-wallet as described on your photos. 8 - PictureMate Snap (PM 240) Viewing...
Product Information Guide
Page 9
... next screen, select whether to apply the setting to turn off the setting. Note: The color effect you choose is kept until you remove the memory card or cancel all settings. Press or to highlight Edit, then press OK. 8/06 PictureMate Snap (PM 240) - 9 Highlight On, then press OK. To use red-eye reduction to help eliminate this information is automatically enlarged to select the cropped photo for printing...
... next screen, select whether to apply the setting to turn off the setting. Note: The color effect you choose is kept until you remove the memory card or cancel all settings. Press or to highlight Edit, then press OK. 8/06 PictureMate Snap (PM 240) - 9 Highlight On, then press OK. To use red-eye reduction to help eliminate this information is automatically enlarged to select the cropped photo for printing...
Product Information Guide
Page 10
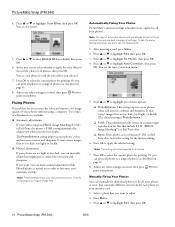
... page 6). 8. or Exif Print data. Fixing Photos PictureMate lets you selected. 7. The PhotoEnhance setting improves your original image files. Press or to highlight Color Effect, then press OK. PictureMate Snap (PM 240) 8/06 Press or to highlight Fix Photos, then press OK. 4. You see the Auto Correction menu: 5. Press OK to select the current photo for the best results. You can manually fix individual photos or fix all photos or a range of adjustments are too light...
... page 6). 8. or Exif Print data. Fixing Photos PictureMate lets you selected. 7. The PhotoEnhance setting improves your original image files. Press or to highlight Color Effect, then press OK. PictureMate Snap (PM 240) 8/06 Press or to highlight Fix Photos, then press OK. 4. You see the Auto Correction menu: 5. Press OK to select the current photo for the best results. You can manually fix individual photos or fix all photos or a range of adjustments are too light...
Product Information Guide
Page 11
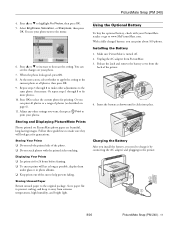
... the printer. 8/06 PictureMate Snap (PM 240) - 11 Charging the Battery After you install the battery, you can see your PictureMate retailer or go to help prevent fading. PictureMate Snap (PM 240) 4. Select Brightness, Saturation, or Sharpness, then press OK. You see the changes on PictureMate photo paper are beautiful, long-lasting images. You can print about 100 photos. Press OK to highlight Fix Photos, then press OK. 5. Make sure PictureMate is turned off...
... the printer. 8/06 PictureMate Snap (PM 240) - 11 Charging the Battery After you install the battery, you can see your PictureMate retailer or go to help prevent fading. PictureMate Snap (PM 240) 4. Select Brightness, Saturation, or Sharpness, then press OK. You see the changes on PictureMate photo paper are beautiful, long-lasting images. You can print about 100 photos. Press OK to highlight Fix Photos, then press OK. 5. Make sure PictureMate is turned off...
Product Information Guide
Page 12
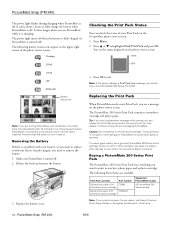
...: photo paper and a photo cartridge. Press the On button to a computer and a memory card is inserted). Replace the battery cover. Press or to exit. You see the status displayed on the photo viewer screen. To ensure good results, use a genuine PictureMate 200 Series photo cartridge and do not refill it is charging. Make sure PictureMate is turned off . Press Menu. 2. Press OK to highlight Check Print Pack and press OK. Other products may cause ink...
...: photo paper and a photo cartridge. Press the On button to a computer and a memory card is inserted). Replace the battery cover. Press or to exit. You see the status displayed on the photo viewer screen. To ensure good results, use a genuine PictureMate 200 Series photo cartridge and do not refill it is charging. Make sure PictureMate is turned off . Press Menu. 2. Press OK to highlight Check Print Pack and press OK. Other products may cause ink...
Product Information Guide
Page 13
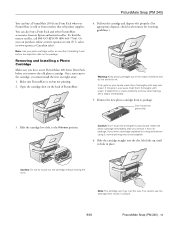
...). Removing and Installing a Photo Cartridge Make sure you remove the old photo cartridge. Slide the cartridge lever left, to pull out the cartridge without moving the lever. Note: Use your eyes, flush them thoroughly with water. Install the photo cartridge immediately after flushing, see a doctor immediately. 5. You need to use the cartridge lever to lock it properly. (For appropriate disposal, check local resources for a long time before you have a new PictureMate 200 Series Print Pack before using...
...). Removing and Installing a Photo Cartridge Make sure you remove the old photo cartridge. Slide the cartridge lever left, to pull out the cartridge without moving the lever. Note: Use your eyes, flush them thoroughly with water. Install the photo cartridge immediately after flushing, see a doctor immediately. 5. You need to use the cartridge lever to lock it properly. (For appropriate disposal, check local resources for a long time before you have a new PictureMate 200 Series Print Pack before using...
Product Information Guide
Page 14
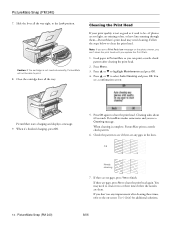
...: If the cartridge is complete, PictureMate prints a nozzle check pattern. 6. Press or to print. 8. OK 14 - PictureMate Snap (PM 240) Needs cleaning 7. If there are gaps, press No to finish. Load paper in the lines. You see a Print Pack low message on -screen User's Guide for additional solutions. 8/06 PictureMate Snap (PM 240) 7. Note: If you see a confirmation screen: PictureMate starts charging and displays a message. 9. Press Menu. 3. If there are no gaps, press Yes to clean the print head again. Press or to clean the print head. Press...
...: If the cartridge is complete, PictureMate prints a nozzle check pattern. 6. Press or to print. 8. OK 14 - PictureMate Snap (PM 240) Needs cleaning 7. If there are gaps, press No to finish. Load paper in the lines. You see a Print Pack low message on -screen User's Guide for additional solutions. 8/06 PictureMate Snap (PM 240) 7. Note: If you see a confirmation screen: PictureMate starts charging and displays a message. 9. Press Menu. 3. If there are no gaps, press Yes to clean the print head again. Press or to clean the print head. Press...
Product Information Guide
Page 15
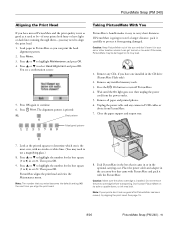
... to carry short distances. Press or to continue. 6. You see a confirmation screen: 5. Otherwise, PictureMate may be -if your car or other location where it can print the head alignment pattern. 2. Note: The number that came in or in your prints look as it used to be damaged or ink may need to align the print head. 1. Caution: Make sure the photo cartridge is installed. See page 15. 8/06 PictureMate Snap (PM 240) - 15
... to carry short distances. Press or to continue. 6. You see a confirmation screen: 5. Otherwise, PictureMate may be -if your car or other location where it can print the head alignment pattern. 2. Note: The number that came in or in your prints look as it used to be damaged or ink may need to align the print head. 1. Caution: Make sure the photo cartridge is installed. See page 15. 8/06 PictureMate Snap (PM 240) - 15
Product Information Guide
Page 16
PictureMate Snap (PM 240) Related Documentation CPD-22153 CPD-22154 CPD-22155 PictureMate Snap/PictureMate Flash Start Here PictureMate Snap/PictureMate Flash Basics book PictureMate Snap (PM 240) CD-ROM with HTML User's Guide 16 - PictureMate Snap (PM 240) 8/06
PictureMate Snap (PM 240) Related Documentation CPD-22153 CPD-22154 CPD-22155 PictureMate Snap/PictureMate Flash Start Here PictureMate Snap/PictureMate Flash Basics book PictureMate Snap (PM 240) CD-ROM with HTML User's Guide 16 - PictureMate Snap (PM 240) 8/06


