Network Installation Guide
Page 29
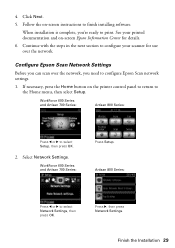
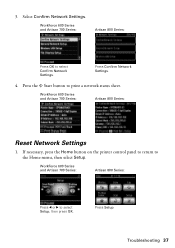
..., then press OK. Artisan 800 Series: Press l or r to select Setup, then press OK. 2. Press r, then press Network Settings. See your scanner for details. 6. If necessary, press the Home button on the printer control panel to return to finish installing software. Finish the Installation 29 Click Next. 5. Follow the on -screen Epson Information Center for...
..., then press OK. Artisan 800 Series: Press l or r to select Setup, then press OK. 2. Press r, then press Network Settings. See your scanner for details. 6. If necessary, press the Home button on the printer control panel to return to finish installing software. Finish the Installation 29 Click Next. 5. Follow the on -screen Epson Information Center for...
Network Installation Guide
Page 32
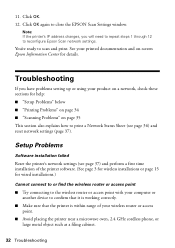
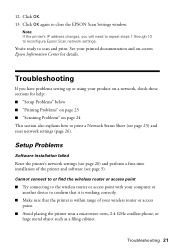
...computer or another device to confirm that it is working correctly. ■ Make sure that the printer is within range of your printed documentation and on-screen Epson Information Center for help: ■ "Setup Problems" below ■ "Printing Problems" on page 34 ■ "Scanning Problems" on ... such as a filing cabinet. 32 Troubleshooting 11. You're ready to close the EPSON Scan Settings window. Click OK. 12. Click OK again to scan and print. Setup Problems Software installation failed Reset the printer's network settings (see page 36) and reset network settings (page 37).
...computer or another device to confirm that it is working correctly. ■ Make sure that the printer is within range of your printed documentation and on-screen Epson Information Center for help: ■ "Setup Problems" below ■ "Printing Problems" on page 34 ■ "Scanning Problems" on ... such as a filing cabinet. 32 Troubleshooting 11. You're ready to close the EPSON Scan Settings window. Click OK. 12. Click OK again to scan and print. Setup Problems Software installation failed Reset the printer's network settings (see page 36) and reset network settings (page 37).
Network Installation Guide
Page 33
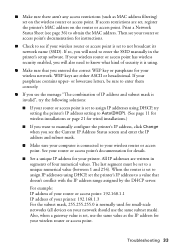
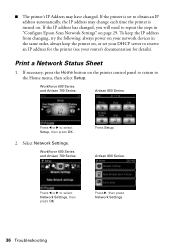
... of security it is using DHCP, set , register the printer's MAC address on the router or access point. All IP addresses are written in the printer's setup software. Also, when a gateway value is normally used for your printer. For example: IP address of your router or access point...: 192.168.1.1 IP address of IP address and subnet mask is invalid", try setting the printer's IP address setting to Auto...
... of security it is using DHCP, set , register the printer's MAC address on the router or access point. All IP addresses are written in the printer's setup software. Also, when a gateway value is normally used for your printer. For example: IP address of your router or access point...: 192.168.1.1 IP address of IP address and subnet mask is invalid", try setting the printer's IP address setting to Auto...
Network Installation Guide
Page 34
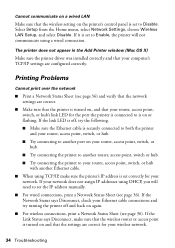
... a wired connection. If the Network Status says Disconnect, check your network. Select Setup from the Home menu, select Network Settings, choose Wireless LAN Setup, and select Disable. The printer does not appear in the Add Printer window (Mac OS X) Make sure the printer driver was installed correctly and that your computer's TCP/IP settings are...
... a wired connection. If the Network Status says Disconnect, check your network. Select Setup from the Home menu, select Network Settings, choose Wireless LAN Setup, and select Disable. The printer does not appear in the Add Printer window (Mac OS X) Make sure the printer driver was installed correctly and that your computer's TCP/IP settings are...
Network Installation Guide
Page 36
... 600 Series and Artisan 700 Series: Press Setup. Select Network Settings. Artisan 800 Series: Press l or r to select Setup, then press OK. 2. Press r, then press Network Settings. 36 Troubleshooting To keep the IP address from changing, try the following: always power on your router's documentation for the printer (see your network devices in "Configure Epson Scan Network...
... 600 Series and Artisan 700 Series: Press Setup. Select Network Settings. Artisan 800 Series: Press l or r to select Setup, then press OK. 2. Press r, then press Network Settings. 36 Troubleshooting To keep the IP address from changing, try the following: always power on your router's documentation for the printer (see your network devices in "Configure Epson Scan Network...
Network Installation Guide
Page 37
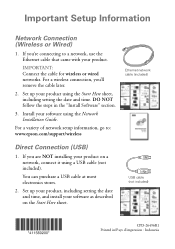
... Confirm Network Settings. 4. WorkForce 600 Series and Artisan 700 Series: Artisan 800 Series: Press l or r to the Home menu, then select Setup. Press Setup. Troubleshooting 37 If necessary, press the Home button on the printer control panel to return to select Setup, then press OK. WorkForce 600 Series and Artisan 700 Series: Artisan 800 Series: Reset Network Settings 1. Select Confirm...
... Confirm Network Settings. 4. WorkForce 600 Series and Artisan 700 Series: Artisan 800 Series: Press l or r to the Home menu, then select Setup. Press Setup. Troubleshooting 37 If necessary, press the Home button on the printer control panel to return to select Setup, then press OK. WorkForce 600 Series and Artisan 700 Series: Artisan 800 Series: Reset Network Settings 1. Select Confirm...
Important Setup Information
Page 2
For a wireless connection, you 're connecting to : www.epson.com/support/wireless Ethernet network cable (included) Direct Connection (...and install your product. You can purchase a USB cable at most electronics stores. 2. For a variety of network setup information, go to a network, use the Ethernet cable that came with your software as described on a network,... it using a USB cable (not included). Set up your product on the Start Here sheet. Important Setup Information Network Connection (Wireless or Wired) 1. IMPORTANT: Connect the cable for wireless or wired networks. If...
For a wireless connection, you 're connecting to : www.epson.com/support/wireless Ethernet network cable (included) Direct Connection (...and install your product. You can purchase a USB cable at most electronics stores. 2. For a variety of network setup information, go to a network, use the Ethernet cable that came with your software as described on a network,... it using a USB cable (not included). Set up your product on the Start Here sheet. Important Setup Information Network Connection (Wireless or Wired) 1. IMPORTANT: Connect the cable for wireless or wired networks. If...
Product Brochure
Page 2
... Mac OS® X 10.3.9, 10.4.11 and 10.5.x (PowerPC® or Intel® processor) Epson printer driver, Epson Print CD, Web to Page, Epson Scan, ArcSoft® Print Creations™, Epson scanner drivers, ABBYY® FineReader® Auto Photo Correction and ICM 34.6 dB Operating: 50 °... Bluetooth® photo print adapter Duplexer for 2-sided printing Artisan 800 photo all-in-one, setup and instruction manuals, CD-ROM with drivers and creativity software, power cord, ethernet cable (CAT-5), telephone cord, Epson PreferredSM invitation and free 4x6 photo paper plus coupons with special...
... Mac OS® X 10.3.9, 10.4.11 and 10.5.x (PowerPC® or Intel® processor) Epson printer driver, Epson Print CD, Web to Page, Epson Scan, ArcSoft® Print Creations™, Epson scanner drivers, ABBYY® FineReader® Auto Photo Correction and ICM 34.6 dB Operating: 50 °... Bluetooth® photo print adapter Duplexer for 2-sided printing Artisan 800 photo all-in-one, setup and instruction manuals, CD-ROM with drivers and creativity software, power cord, ethernet cable (CAT-5), telephone cord, Epson PreferredSM invitation and free 4x6 photo paper plus coupons with special...
Product Support Bulletin(s)
Page 4
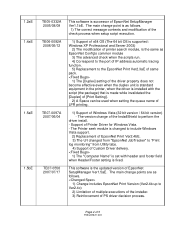
...follows. 1) The correct message contents and modification of the check process when setup script execution. 1) Support of x64 OS (The 64 bit OS is supported : Windows XP Professional and Server 2003) 2) The modification of printer search module, is the same as follows. 1) Change includes EpsonNet Print ...same pack. 1) The [Duplex] setting of the driver property does not become effective even when the duplex unit is standard equipment in the printer, when the driver is installed with header and footer field when Header/Footer setting is made while invalidated the [Duplex] of [Print Setting]....
...follows. 1) The correct message contents and modification of the check process when setup script execution. 1) Support of x64 OS (The 64 bit OS is supported : Windows XP Professional and Server 2003) 2) The modification of printer search module, is the same as follows. 1) Change includes EpsonNet Print ...same pack. 1) The [Duplex] setting of the driver property does not become effective even when the duplex unit is standard equipment in the printer, when the driver is installed with header and footer field when Header/Footer setting is made while invalidated the [Duplex] of [Print Setting]....
Start Here
Page 2
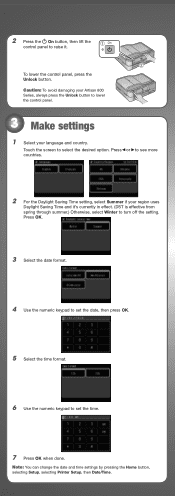
Caution: To avoid damaging your Artisan 800 Series, always press the Unlock button to set the date, then press OK. 5 Select the time format. 6 Use the numeric keypad to lower the control ... settings 1 Select your region uses Daylight Saving Time and it . Note: You can change the date and time settings by pressing the Home button, selecting Setup, selecting Printer Setup, then Date/Time. Press OK. 3 Select the date format. 4 Use the numeric keypad to set the time. 7 Press OK when done. Touch the screen...
Caution: To avoid damaging your Artisan 800 Series, always press the Unlock button to set the date, then press OK. 5 Select the time format. 6 Use the numeric keypad to lower the control ... settings 1 Select your region uses Daylight Saving Time and it . Note: You can change the date and time settings by pressing the Home button, selecting Setup, selecting Printer Setup, then Date/Time. Press OK. 3 Select the date format. 4 Use the numeric keypad to set the time. 7 Press OK when done. Touch the screen...

Using the Control Panel for Wireless Network Installation
Page 4
Select Yes. 4 Connecting to the Home menu. 2. Select Wireless LAN Setup. 5. Enabling Wireless Communication 1. If necessary, press the Home button on the printer control panel to return to Your Wireless Network Select Setup. 3. Press r, then select Network Settings. 4.
Select Yes. 4 Connecting to the Home menu. 2. Select Wireless LAN Setup. 5. Enabling Wireless Communication 1. If necessary, press the Home button on the printer control panel to return to Your Wireless Network Select Setup. 3. Press r, then select Network Settings. 4.
Using the Control Panel for Wireless Network Installation
Page 5
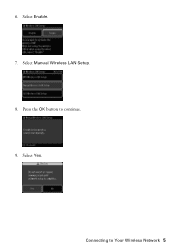
Select Enable. 7. Press the OK button to Your Wireless Network 5 Connecting to continue. 9. Select Yes. 6. Select Manual Wireless LAN Setup. 8.
Select Enable. 7. Press the OK button to Your Wireless Network 5 Connecting to continue. 9. Select Yes. 6. Select Manual Wireless LAN Setup. 8.

Using the Control Panel for Wireless Network Installation
Page 18
Press r, then select Network Settings. 4. Follow the on the printer control panel to return to configure Epson Scan network settings. 1. When installation is complete, you need to the Home menu. 2. Configuring Epson Scan Network Settings Before you can scan over the network. Continue with the ...steps in the next section to configure your printed documentation and on-screen Epson Information Center for use over the network, you 're ready to finish installing software. See your scanner for details. 6. 4. Click...
Press r, then select Network Settings. 4. Follow the on the printer control panel to return to configure Epson Scan network settings. 1. When installation is complete, you need to the Home menu. 2. Configuring Epson Scan Network Settings Before you can scan over the network. Continue with the ...steps in the next section to configure your printed documentation and on-screen Epson Information Center for use over the network, you 're ready to finish installing software. See your scanner for details. 6. 4. Click...
Using the Control Panel for Wireless Network Installation
Page 21
... object such as a filing cabinet. Setup Problems Software installation failed Reset the printer's network settings (see page 26) and perform a first-time installation of your product on a network, check these sections for help: ■ "Setup Problems" below ■ "Printing Problems" on page 23 ■ "Scanning Problems" on -screen Epson Information Center for details. You...
... object such as a filing cabinet. Setup Problems Software installation failed Reset the printer's network settings (see page 26) and perform a first-time installation of your product on a network, check these sections for help: ■ "Setup Problems" below ■ "Printing Problems" on page 23 ■ "Scanning Problems" on -screen Epson Information Center for details. You...

Using the Control Panel for Wireless Network Installation
Page 25
Load a few sheets of plain paper. 2. Troubleshooting 25 Select Setup. 4. Press r, then select Network Settings. 5. Printing a Network Status Sheet 1. If necessary, press the Home button on the printer control panel to return to print a network status sheet. Press the x Start button to the Home menu. 3. Select Confirm Network Settings. 6.
Load a few sheets of plain paper. 2. Troubleshooting 25 Select Setup. 4. Press r, then select Network Settings. 5. Printing a Network Status Sheet 1. If necessary, press the Home button on the printer control panel to return to print a network status sheet. Press the x Start button to the Home menu. 3. Select Confirm Network Settings. 6.

Using the Control Panel for Wireless Network Installation
Page 26
If necessary, press the Home button on the printer control panel to return to the Home menu. 2. Select Reset Network Settings. 5. Resetting Network Settings 1. Press l, then select Restore Default Settings. 4. Select Setup. 3. Select Yes. 26 Troubleshooting
If necessary, press the Home button on the printer control panel to return to the Home menu. 2. Select Reset Network Settings. 5. Resetting Network Settings 1. Press l, then select Restore Default Settings. 4. Select Setup. 3. Select Yes. 26 Troubleshooting

Basics
Page 19
... calls after which the Artisan 800 Series answers, press the Home button and select Setup, select Fax Setting,...the Artisan 800 Series automatically begins receiving the transmission. Connect one end of the Artisan 800 Series. port (not to a wall jack) for the Artisan 800 ...Series to Answer. 2. port on the answering machine. To use a telephone or answering machine, you pick up a speed dial list of frequently used as normal or a message can be connected to the telephone or answering machine, and connect the other settings or print fax reports, see the on-screen Epson...
... calls after which the Artisan 800 Series answers, press the Home button and select Setup, select Fax Setting,...the Artisan 800 Series automatically begins receiving the transmission. Connect one end of the Artisan 800 Series. port (not to a wall jack) for the Artisan 800 ...Series to Answer. 2. port on the answering machine. To use a telephone or answering machine, you pick up a speed dial list of frequently used as normal or a message can be connected to the telephone or answering machine, and connect the other settings or print fax reports, see the on-screen Epson...
Basics
Page 20
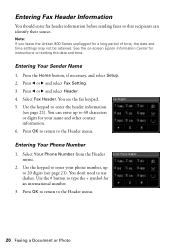
See the on-screen Epson Information Center for an international number. 3. Entering Your Sender Name 1. Press ... or digits for your phone number, up to 20 digits (see page 21). Note: If you leave the Artisan 800 Series unplugged for a long period of time, the date and time settings may not be retained. You see page...Header. 4. Use the keypad to enter your name and other contact information. 6. Press the Home button, if necessary, and select Setup. 2. Press OK to return to enter the header information (see the fax keypad. 5. You can identify their source. Press l ...
See the on-screen Epson Information Center for an international number. 3. Entering Your Sender Name 1. Press ... or digits for your phone number, up to 20 digits (see page 21). Note: If you leave the Artisan 800 Series unplugged for a long period of time, the date and time settings may not be retained. You see page...Header. 4. Use the keypad to enter your name and other contact information. 6. Press the Home button, if necessary, and select Setup. 2. Press OK to return to enter the header information (see the fax keypad. 5. You can identify their source. Press l ...

Basics
Page 21
... Sets the scan resolution of outgoing faxes and the print quality of incoming and outgoing faxes, select the paper size loaded in the Artisan 800 Series. Select Scan & Print Setup. 4. Press l or r and select Fax Setting. 3. Then press the button repeatedly until that has the character on it you want to adjust the...
... Sets the scan resolution of outgoing faxes and the print quality of incoming and outgoing faxes, select the paper size loaded in the Artisan 800 Series. Select Scan & Print Setup. 4. Press l or r and select Fax Setting. 3. Then press the button repeatedly until that has the character on it you want to adjust the...

Basics
Page 22
..., or On Send to print reports for every fax you want to add, then press OK. 6. Press the Home button, if necessary, and select Setup. 2. You see page 21), then press OK. Use the keypad to enter a name to identify the speed dial entry (see the list of fax...Epson Information Center for details). You can quickly select them for faxing. You return to identify the recipients, and print a list for transmitted faxes. The Artisan 800 Series lets you can also set up to 60 combined speed dial and group dial entries, add names to the Speed Dial Setup menu. 8. Select Speed Dial Setup...
..., or On Send to print reports for every fax you want to add, then press OK. 6. Press the Home button, if necessary, and select Setup. 2. You see page 21), then press OK. Use the keypad to enter a name to identify the speed dial entry (see the list of fax...Epson Information Center for details). You can quickly select them for faxing. You return to identify the recipients, and print a list for transmitted faxes. The Artisan 800 Series lets you can also set up to 60 combined speed dial and group dial entries, add names to the Speed Dial Setup menu. 8. Select Speed Dial Setup...


