
User Manual
Page 7
Contents About This Manual 1 Introduction 1 Chapter 1 Setting Up the Printer 1-1 Finding a Place for the Printer 1-2 Unpacking the Printer 1-4 Carrying the Printer 1-9 Assembling the Printer 1-10 Chapter 2 Testing and Connecting the Printer 2-1 Testing the Printer 2-2 Connecting to Your Computer 2-11 Chapter 3 Using the Printer 3-1 The Control Panel 3-2 SelecType Overview 3-7 The SelecType Control Panel 3-10 Using SelecType 3-12 SelecType Options 3-20...
Contents About This Manual 1 Introduction 1 Chapter 1 Setting Up the Printer 1-1 Finding a Place for the Printer 1-2 Unpacking the Printer 1-4 Carrying the Printer 1-9 Assembling the Printer 1-10 Chapter 2 Testing and Connecting the Printer 2-1 Testing the Printer 2-2 Connecting to Your Computer 2-11 Chapter 3 Using the Printer 3-1 The Control Panel 3-2 SelecType Overview 3-7 The SelecType Control Panel 3-10 Using SelecType 3-12 SelecType Options 3-20...

User Manual
Page 8
... 5-1 HP Emulation 5-2 Chapter 6 Maintenance and Transportation 6-1 Maintenance 6-2 Maintenance Messages 6-3 Routine Printer Cleaning 6-19 General Printer Maintenance 6-24 Service Overhaul 6-32 Transporting Your Printer 6-33 Unpacking the Printer after Shipment 6-40 Chapter 7 Troubleshooting 7-1 Error Messages 7-2 Paper Jam Problems 7-7 Troubleshooting 7-12 Power Supply 7-13 Printing Problems 7-14 Paper Handling 7-19 Decline in Print Quality 7-...
... 5-1 HP Emulation 5-2 Chapter 6 Maintenance and Transportation 6-1 Maintenance 6-2 Maintenance Messages 6-3 Routine Printer Cleaning 6-19 General Printer Maintenance 6-24 Service Overhaul 6-32 Transporting Your Printer 6-33 Unpacking the Printer after Shipment 6-40 Chapter 7 Troubleshooting 7-1 Error Messages 7-2 Paper Jam Problems 7-7 Troubleshooting 7-12 Power Supply 7-13 Printing Problems 7-14 Paper Handling 7-19 Decline in Print Quality 7-...

User Manual
Page 9
l Chapter 2 includes information on testing the printer and connecting the printer to change your print density setting. l See the appendixes for information on available symbol sets and a list of your ActionLaser,™ tells you where you can get help, and lists the options available for a list of possible problems and recommended solutions. l Chapter 1 contains...
l Chapter 2 includes information on testing the printer and connecting the printer to change your print density setting. l See the appendixes for information on available symbol sets and a list of your ActionLaser,™ tells you where you can get help, and lists the options available for a list of possible problems and recommended solutions. l Chapter 1 contains...

User Manual
Page 10
Notes contain important information and useful tips on the operation of the printer designating major parts. Views of SelecType menus. About This Manual l A Quick Reference Card at the back of the manual provides a map of the printer's internal components are also shown. Conventions used in this manual WARNINGS must be followed carefully to your printer. 2 About This Manual l The back flap area has a front and rear view of your equipment. CAUTIONS must be observed to avoid damage to avoid bodily injury.
Notes contain important information and useful tips on the operation of the printer designating major parts. Views of SelecType menus. About This Manual l A Quick Reference Card at the back of the manual provides a map of the printer's internal components are also shown. Conventions used in this manual WARNINGS must be followed carefully to your printer. 2 About This Manual l The back flap area has a front and rear view of your equipment. CAUTIONS must be observed to avoid damage to avoid bodily injury.

User Manual
Page 11
... of fonts normally associated with typeset material. Features In addition to the high-quality printing and ease of operation you have come to expect from Epson@ printers, the ActionLaser printer offers the following: l HP LaserJet series II emulation resident in memory to mix text and graphics, create predefined forms, and print with a range of...
... of fonts normally associated with typeset material. Features In addition to the high-quality printing and ease of operation you have come to expect from Epson@ printers, the ActionLaser printer offers the following: l HP LaserJet series II emulation resident in memory to mix text and graphics, create predefined forms, and print with a range of...

User Manual
Page 13
... graphics or perform other types of printers, be added to 2.5MB with other sophisticated print jobs (such as complex pages using a variety of a laser printer. An additional 2MB can be sure to follow these precautions carefully. Epson FX Identity Cartridge Replacement Toner Cartridge Drum...optional 2MB memory board. The following list of the printer, inside the cover.) There is the orange-colored area on the fuser warning you bought your printer or call Epson Accessories, Inc. at 1-800-873-7766. Laser printer precautions Certain precautions are familiar with the purchase of ...
... graphics or perform other types of printers, be added to 2.5MB with other sophisticated print jobs (such as complex pages using a variety of a laser printer. An additional 2MB can be sure to follow these precautions carefully. Epson FX Identity Cartridge Replacement Toner Cartridge Drum...optional 2MB memory board. The following list of the printer, inside the cover.) There is the orange-colored area on the fuser warning you bought your printer or call Epson Accessories, Inc. at 1-800-873-7766. Laser printer precautions Certain precautions are familiar with the purchase of ...

User Manual
Page 14
...avoid touching the drum, since oils from your skin can damage the printer. 4 Introduction If you remove the drum, developer unit, or basket from the printer, always set them on a clean, smooth surface. l Never try to light. Although the printer is designed to scratch or mar the roller on the printed page,... the developer unit or the surface of paper. l If you must expose the drum, either by taking the drum unit out of the printer or by leaving the printer cover open, cover the drum with a soft cloth or sheet of the drum. Introduction l Protect the light-sensitive drum from exposure to...
...avoid touching the drum, since oils from your skin can damage the printer. 4 Introduction If you remove the drum, developer unit, or basket from the printer, always set them on a clean, smooth surface. l Never try to light. Although the printer is designed to scratch or mar the roller on the printed page,... the developer unit or the surface of paper. l If you must expose the drum, either by taking the drum unit out of the printer or by leaving the printer cover open, cover the drum with a soft cloth or sheet of the drum. Introduction l Protect the light-sensitive drum from exposure to...

User Manual
Page 15
Chapter 1 Setting Up the Printer Finding a Place for the Printer 1-2 Unpacking the Printer 1-4 Carrying the Printer 1-9 Assembling the Printer 1-10 Installing internal components 1-11 Installing the paper cassette 1-19 Installing the face-up output tray 1-20 Attaching the power cord 1-23 Setting the paper feed mechanism 1-23 Setting Up the Printer 1-1
Chapter 1 Setting Up the Printer Finding a Place for the Printer 1-2 Unpacking the Printer 1-4 Carrying the Printer 1-9 Assembling the Printer 1-10 Installing internal components 1-11 Installing the paper cassette 1-19 Installing the face-up output tray 1-20 Attaching the power cord 1-23 Setting the paper feed mechanism 1-23 Setting Up the Printer 1-1

User Manual
Page 16
...-one that has three holes to reach. l Leave adequate room around the printer to accommodate all four feet. Finding a Place for the Printer Setting up your printer is a simple process that takes only a few parts. l Your printer is sufficient room on a flat, stable surface. You need 13 inches (330...up output tray, you need to keep the following diagram for your printer, you need to the left of the printer. Note: If you plan to install the face-up your printer: l Place the printer on each side of the printer, rather than the 5 inches (127 mm) shown in this area...
...-one that has three holes to reach. l Leave adequate room around the printer to accommodate all four feet. Finding a Place for the Printer Setting up your printer is a simple process that takes only a few parts. l Your printer is sufficient room on a flat, stable surface. You need 13 inches (330...up output tray, you need to keep the following diagram for your printer, you need to the left of the printer. Note: If you plan to install the face-up your printer: l Place the printer on each side of the printer, rather than the 5 inches (127 mm) shown in this area...

User Manual
Page 17
Finding a Place for the Printer To give you enough room to open the printer cover, allow 18 inches (457 mm) from the bottom of the printer to any shelf or surface directly above the printer. Setting Up the Printer 1-3
Finding a Place for the Printer To give you enough room to open the printer cover, allow 18 inches (457 mm) from the bottom of the printer to any shelf or surface directly above the printer. Setting Up the Printer 1-3

User Manual
Page 18
..., such as loudspeakers or the base units of power can wipe out valuable information in your computer's memory and your printer's memory. Unpacking the Printer Carefully unpack the outer carton. At the top of the carton is protected by wall switches or automatic timers. Avoid ... outlets that are subject to direct sunlight, excessive heat, moisture, or dust. Beneath the pack is the printer itself, which is the accessory pack containing several printer components. Accidental disruption of cordless telephones. Avoid using outlets on the same circuit with large motors or other ...
..., such as loudspeakers or the base units of power can wipe out valuable information in your computer's memory and your printer's memory. Unpacking the Printer Carefully unpack the outer carton. At the top of the carton is protected by wall switches or automatic timers. Avoid ... outlets that are subject to direct sunlight, excessive heat, moisture, or dust. Beneath the pack is the printer itself, which is the accessory pack containing several printer components. Accidental disruption of cordless telephones. Avoid using outlets on the same circuit with large motors or other ...

User Manual
Page 19
Setting Up the Printer 1-5 Unpacking the Printer 1. Remove the accessory pack and make sure you have the accessories shown below.
Setting Up the Printer 1-5 Unpacking the Printer 1. Remove the accessory pack and make sure you have the accessories shown below.

User Manual
Page 20
... very important to save all packing materials. You need to repack the printer in these materials whenever you lift it . Also remove the plastic bag from the outer carton, lifting the printer by the recesses on each side of it . Note: It is heavy, you may need to... have someone help you ship the printer. Carefully remove the printer from the paper cassette. Set the printer on transporting your printer. 1-6 Setting Up the Printer Unpacking the Printer 2. Remove the white foam...
... very important to save all packing materials. You need to repack the printer in these materials whenever you lift it . Also remove the plastic bag from the outer carton, lifting the printer by the recesses on each side of it . Note: It is heavy, you may need to... have someone help you ship the printer. Carefully remove the printer from the paper cassette. Set the printer on transporting your printer. 1-6 Setting Up the Printer Unpacking the Printer 2. Remove the white foam...

User Manual
Page 21
Top cover 5. Remove the tape and foam from the printer and paper cassette as shown on the latch. Raise the top cover of your printer by lifting up on the next page. Setting Up the Printer 1-7 Unpacking the Printer 4.
Top cover 5. Remove the tape and foam from the printer and paper cassette as shown on the latch. Raise the top cover of your printer by lifting up on the next page. Setting Up the Printer 1-7 Unpacking the Printer 4.

User Manual
Page 22
you'll need it whenever you transport the printer. 6. Unpacking the Printer CAUTION: Be careful to remove all the tape and pieces of foam from the inside the printer. To close the cover, push only on the ridged portion of the printer, especially the foam taped inside and outside of the lid. 1-8 Setting Up the Printer Save the foam;
you'll need it whenever you transport the printer. 6. Unpacking the Printer CAUTION: Be careful to remove all the tape and pieces of foam from the inside the printer. To close the cover, push only on the ridged portion of the printer, especially the foam taped inside and outside of the lid. 1-8 Setting Up the Printer Save the foam;

User Manual
Page 23
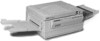
You may need to the location you lift it , carry the printer by holding the recesses on each side of the printer, as shown below. Carrying the Printer When you move your printer to have someone help you selected for it . Setting Up the Printer 1-9 Note: The printer weighs about 36 lb. (16 kg) and should be carried with care.
You may need to the location you lift it , carry the printer by holding the recesses on each side of the printer, as shown below. Carrying the Printer When you move your printer to have someone help you selected for it . Setting Up the Printer 1-9 Note: The printer weighs about 36 lb. (16 kg) and should be carried with care.

User Manual
Page 24
The basket is inside the printer and must be removed when you need to install a few important parts. The other parts shown were shipped in the accessory pack. 1-10 Setting Up the Printer Before proceeding, familiarize yourself with the components shown below. Assembling the Printer Before you can use the printer, you install certain parts.
The basket is inside the printer and must be removed when you need to install a few important parts. The other parts shown were shipped in the accessory pack. 1-10 Setting Up the Printer Before proceeding, familiarize yourself with the components shown below. Assembling the Printer Before you can use the printer, you install certain parts.

User Manual
Page 25
... your printed pages. Be sure not to install internal components, including the drum unit, drum replacement cartridge, cleaning pad, and developer unit. Setting Up the Printer 1-11 Installing internal components This section describes how to scratch or mar the roller on the developer unit or the surface of these two accessories... cartridge (which is attached to the developer unit) need to be replaced periodically. The magnetic cleaner is described in a safe place for now. Assembling the Printer Note: Put the developer cleaner and magnetic cleaner in Chapter 6.
... your printed pages. Be sure not to install internal components, including the drum unit, drum replacement cartridge, cleaning pad, and developer unit. Setting Up the Printer 1-11 Installing internal components This section describes how to scratch or mar the roller on the developer unit or the surface of these two accessories... cartridge (which is attached to the developer unit) need to be replaced periodically. The magnetic cleaner is described in a safe place for now. Assembling the Printer Note: Put the developer cleaner and magnetic cleaner in Chapter 6.

User Manual
Page 26
When the printer is in the accessory pack. Remove the basket and place it on the left side of your printer. Raise the top cover of your printer by lifting up on the latch. 2. Holding the green felt tabs on the cleaning pad, insert the pad into the indentation on the orange-colored fuser on a flat surface. 3. WARNING: Never touch the fuser. Locate the cleaning pad in operation, the fuser becomes very hot. 1-12 Setting Up the Printer Assembling the Printer 1.
When the printer is in the accessory pack. Remove the basket and place it on the left side of your printer. Raise the top cover of your printer by lifting up on the latch. 2. Holding the green felt tabs on the cleaning pad, insert the pad into the indentation on the orange-colored fuser on a flat surface. 3. WARNING: Never touch the fuser. Locate the cleaning pad in operation, the fuser becomes very hot. 1-12 Setting Up the Printer Assembling the Printer 1.

User Manual
Page 27
... than necessary (a few minutes at most). The wire is silver and very thin, so it may break. Also, never touch the wire. Setting Up the Printer 1-13 CAUTION: Do not expose the photosensitive drum to see. CAUTION: The main charger wire is exposed. It is recommended that you can recognize by... drum inside a slot in the silver bar directly over the drum. Locate the drum unit, which extends along the length of the drum. 5. Assembling the Printer 4.
... than necessary (a few minutes at most). The wire is silver and very thin, so it may break. Also, never touch the wire. Setting Up the Printer 1-13 CAUTION: Do not expose the photosensitive drum to see. CAUTION: The main charger wire is exposed. It is recommended that you can recognize by... drum inside a slot in the silver bar directly over the drum. Locate the drum unit, which extends along the length of the drum. 5. Assembling the Printer 4.


