Printer Guide
Page 6
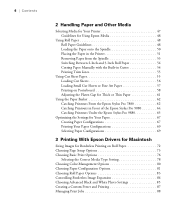
... and Other Media Selecting Media for Your Printer 47 Guidelines for Using Epson Media 48 Using Roll Paper 48 Roll Paper Guidelines 48 Loading the Paper onto the Spindle 50 Placing the Paper in the Printer 51 Removing Paper...Epson Stylus Pro 9880 65 Optimizing the Settings for Your Paper 67 Creating Paper Configurations 67 Printing Your Paper Configurations 69 Selecting Paper Configurations 69 3 Printing With Epson Drivers for Macintosh Sizing Images for Borderless Printing on Roll Paper 72 Choosing Page Setup Options 73 Choosing Basic Print Options 76 Selecting the Correct Media...
... and Other Media Selecting Media for Your Printer 47 Guidelines for Using Epson Media 48 Using Roll Paper 48 Roll Paper Guidelines 48 Loading the Paper onto the Spindle 50 Placing the Paper in the Printer 51 Removing Paper...Epson Stylus Pro 9880 65 Optimizing the Settings for Your Paper 67 Creating Paper Configurations 67 Printing Your Paper Configurations 69 Selecting Paper Configurations 69 3 Printing With Epson Drivers for Macintosh Sizing Images for Borderless Printing on Roll Paper 72 Choosing Page Setup Options 73 Choosing Basic Print Options 76 Selecting the Correct Media...
Printer Guide
Page 7
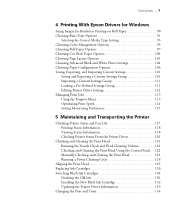
Contents | 7 4 Printing With Epson Drivers for Windows Sizing Images for Borderless Printing on Roll Paper 90 Choosing Basic Print Options 91 Selecting the Correct Media Type Setting 93 Choosing Color Management Options 95 Choosing Roll Paper Options 97 Choosing Cut Sheet Paper Options 100 ...Saving and Exporting a Custom Settings Group 110 Importing a Custom Settings Group 111 Loading a Pre-Defined Settings Group 111 Editing Printer Driver Settings 112 Managing Print Jobs 113 Using the Progress Meter 113 Optimizing Print Speed 114 Setting Monitoring Preferences 115 5 Maintaining ...
Contents | 7 4 Printing With Epson Drivers for Windows Sizing Images for Borderless Printing on Roll Paper 90 Choosing Basic Print Options 91 Selecting the Correct Media Type Setting 93 Choosing Color Management Options 95 Choosing Roll Paper Options 97 Choosing Cut Sheet Paper Options 100 ...Saving and Exporting a Custom Settings Group 110 Importing a Custom Settings Group 111 Loading a Pre-Defined Settings Group 111 Editing Printer Driver Settings 112 Managing Print Jobs 113 Using the Progress Meter 113 Optimizing Print Speed 114 Setting Monitoring Preferences 115 5 Maintaining ...
Printer Guide
Page 8
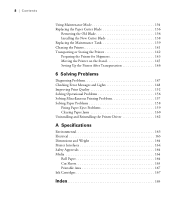
...Cutter Blade 138 Replacing the Maintenance Tank 139 Cleaning the Printer 141 Transporting or Storing the Printer 142 Preparing the Printer for Shipment 143 Moving the Printer on the Stand 145 Setting Up the Printer After Transportation 146 6 Solving Problems Diagnosing Problems 147 ...Paper Eject Problems 159 Clearing Paper Jams 160 Uninstalling and Reinstalling the Printer Driver 162 A Specifications Environmental 163 Electrical 163 Dimensions and Weight 164 Printer Interfaces 164 Safety Approvals 164 Media 164 Roll Paper 164 Cut Sheets 165 Printable Area 167 Ink Cartridges...
...Cutter Blade 138 Replacing the Maintenance Tank 139 Cleaning the Printer 141 Transporting or Storing the Printer 142 Preparing the Printer for Shipment 143 Moving the Printer on the Stand 145 Setting Up the Printer After Transportation 146 6 Solving Problems Diagnosing Problems 147 ...Paper Eject Problems 159 Clearing Paper Jams 160 Uninstalling and Reinstalling the Printer Driver 162 A Specifications Environmental 163 Electrical 163 Dimensions and Weight 164 Printer Interfaces 164 Safety Approvals 164 Media 164 Roll Paper 164 Cut Sheets 165 Printable Area 167 Ink Cartridges...

Printer Guide
Page 10
... C12C890191 C12C815291 See page 145 for a complete list. 12 or 3-inch Epson Stylus Pro 7880: Epson Stylus Pro 9880: Paper Roller Spindle (High Tension) - 2- In addition, you can damage the printer's built-in cutter. or 3-inch Epson Stylus Pro 7880: Epson Stylus Pro 9880: Manual Media Cutting System* Epson Stylus Pro 7880: Epson Stylus Pro 9880: Replacement Manual Cutting Blade (for Manual Media Cutting System) One-year extended warranty Two-year extended warranty Part...
... C12C890191 C12C815291 See page 145 for a complete list. 12 or 3-inch Epson Stylus Pro 7880: Epson Stylus Pro 9880: Paper Roller Spindle (High Tension) - 2- In addition, you can damage the printer's built-in cutter. or 3-inch Epson Stylus Pro 7880: Epson Stylus Pro 9880: Manual Media Cutting System* Epson Stylus Pro 7880: Epson Stylus Pro 9880: Replacement Manual Cutting Blade (for Manual Media Cutting System) One-year extended warranty Two-year extended warranty Part...

Printer Guide
Page 47
... Chapter 2: Handling Paper and Other Media The Epson Stylus Pro 7880 and Pro 9880 print on -screen User's Guide. For a list of available media, see the on a variety of media, including roll paper and cut sheet paper • Using the paper basket • Optimizing the settings for your paper Selecting Media for your printer. This chapter includes the following table...
... Chapter 2: Handling Paper and Other Media The Epson Stylus Pro 7880 and Pro 9880 print on -screen User's Guide. For a list of available media, see the on a variety of media, including roll paper and cut sheet paper • Using the paper basket • Optimizing the settings for your paper Selecting Media for your printer. This chapter includes the following table...
Printer Guide
Page 48
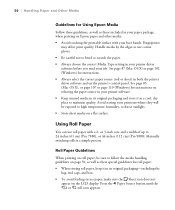
... for Using Epson Media Follow these guidelines, as well as these special guidelines for roll paper: • When storing roll paper, keep it in a cool, dry place to follow the media handling guidelines ...(61 cm) [Pro 7880], or 44 inches (112 cm) [Pro 9880]. Manually switching rolls is a simple process. Press the l Paper Source button until the or roll icon appears. 50 Handle media by the edges ...your printouts where they will be sure to maintain quality. Avoid storing your printer software. • Keep unused media in its original packaging-including the bag, end caps, and box. &#...
... for Using Epson Media Follow these guidelines, as well as these special guidelines for roll paper: • When storing roll paper, keep it in a cool, dry place to follow the media handling guidelines ...(61 cm) [Pro 7880], or 44 inches (112 cm) [Pro 9880]. Manually switching rolls is a simple process. Press the l Paper Source button until the or roll icon appears. 50 Handle media by the edges ...your printouts where they will be sure to maintain quality. Avoid storing your printer software. • Keep unused media in its original packaging-including the bag, end caps, and box. &#...

Printer Guide
Page 49
... on canvas or other similar materials) may not work with the built-in the printer when it again.) 51 See page 12 for Epson • Vinyl • Matte board • Backlight film • Heavyweight polyester banner media • DuPontTM Semigloss Proofing Paper • If you're loading heavy paper, ... thick may need to increase the paper suction by pressing the d Paper Feed button. (Release the paper lever to print a series of Epson's optional Manual Media Cutting System is not in use. • Choose if you want the paper to be cut automatically after each page is printed. •...
... on canvas or other similar materials) may not work with the built-in the printer when it again.) 51 See page 12 for Epson • Vinyl • Matte board • Backlight film • Heavyweight polyester banner media • DuPontTM Semigloss Proofing Paper • If you're loading heavy paper, ... thick may need to increase the paper suction by pressing the d Paper Feed button. (Release the paper lever to print a series of Epson's optional Manual Media Cutting System is not in use. • Choose if you want the paper to be cut automatically after each page is printed. •...
Printer Guide
Page 50
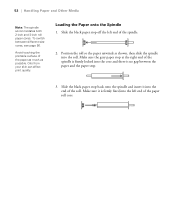
... the right end of the spindle is firmly locked into the core and there is firmly fixed into the roll. 52 | Handling Paper and Other Media Note: The spindle accommodates both 2-inch and 3-inch roll paper cores.
... the right end of the spindle is firmly locked into the core and there is firmly fixed into the roll. 52 | Handling Paper and Other Media Note: The spindle accommodates both 2-inch and 3-inch roll paper cores.

Printer Guide
Page 51
... left.) Caution: To avoid feeding excess paper, make sure you don't select when you may damage the printer. 53 Make sure the printer is not flashing, then release the paper lever. Handling Paper and Other Media | 53 Placing the Paper in the roll holder as shown. (The black end of the spindle goes...
... left.) Caution: To avoid feeding excess paper, make sure you don't select when you may damage the printer. 53 Make sure the printer is not flashing, then release the paper lever. Handling Paper and Other Media | 53 Placing the Paper in the roll holder as shown. (The black end of the spindle goes...

Printer Guide
Page 52
Feed the paper into the slot and pull it out manually. 6. If the paper doesn't come out, open the front cover and pull it all the way through. Holding the bottom edge of the paper, turn the roll back to decrease it. If you may need to increase the suction. If the paper still doesn't come out, you are loading lightweight paper, press the d Paper Feed button to remove any slack. 54 | Handling Paper and Other Media 5. If you are loading heavy paper, press the u Paper Feed button to adjust the suction. Then align the bottom edge with the horizontal and vertical lines. 54
Feed the paper into the slot and pull it out manually. 6. If the paper doesn't come out, open the front cover and pull it all the way through. Holding the bottom edge of the paper, turn the roll back to decrease it. If you may need to increase the suction. If the paper still doesn't come out, you are loading lightweight paper, press the d Paper Feed button to remove any slack. 54 | Handling Paper and Other Media 5. If you are loading heavy paper, press the u Paper Feed button to adjust the suction. Then align the bottom edge with the horizontal and vertical lines. 54
Printer Guide
Page 53
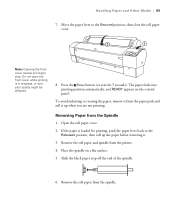
...avoid indenting or creasing the paper, remove it from the Spindle 1. Remove the roll paper and spindle from the spindle. 55 Handling Paper and Other Media | 55 7. Press the Pause button (or wait for printing, push the paper lever back to the Released position, then roll up the paper before ..., and READY appears on a flat surface. 5. Move the paper lever to stop off the end of the spindle. 6. Remove the roll paper from the printer. 4. Do not open the front cover while printing is loaded for 5 seconds). If the paper is in progress, or your print quality might be affected...
...avoid indenting or creasing the paper, remove it from the Spindle 1. Remove the roll paper and spindle from the spindle. 55 Handling Paper and Other Media | 55 7. Press the Pause button (or wait for printing, push the paper lever back to the Released position, then roll up the paper before ..., and READY appears on a flat surface. 5. Move the paper lever to stop off the end of the spindle. 6. Remove the roll paper from the printer. 4. Do not open the front cover while printing is loaded for 5 seconds). If the paper is in progress, or your print quality might be affected...
Printer Guide
Page 54
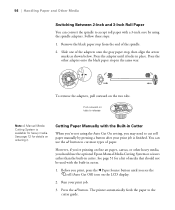
...paper manually by using the spindle adapters. You can convert the spindle to the cutter guide. 56 Run your print job is available for heavy media. The printer automatically feeds the paper to accept roll paper with a 3-inch core by pressing a button after your print job. 3. Remove the black ...black paper stop , then align the arrow marks as shown below. 56 | Handling Paper and Other Media Switching Between 2-Inch and 3-Inch Roll Paper You can use the optional Epson Manual Media Cutting System or scissors rather than the built-in cutter. To remove the adapters, pull outward on the...
...paper manually by using the spindle adapters. You can convert the spindle to the cutter guide. 56 Run your print job is available for heavy media. The printer automatically feeds the paper to accept roll paper with a 3-inch core by pressing a button after your print job. 3. Remove the black ...black paper stop , then align the arrow marks as shown below. 56 | Handling Paper and Other Media Switching Between 2-Inch and 3-Inch Roll Paper You can use the optional Epson Manual Media Cutting System or scissors rather than the built-in cutter. To remove the adapters, pull outward on the...
Printer Guide
Page 55
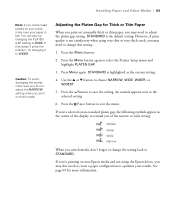
.... 4. For instructions, see the On) icon on the right edge of cut sheet paper and other media. Press the d button to select the Printer Setup menu and highlight PLATEN GAP. 3. The printer accepts sheets in widths from your roll paper on cut . roll (Auto Cut 6. Press the Menu button...you see page 93 (Mac OS X) or page 110 (Windows). Press the button to 24 inches (61 cm) [Pro 7880] or 44 inches (112 cm) [Pro 9880]. You can leave your printer driver software. If necessary, adjust the cutting position by pressing the u or d Paper Feed buttons. 5. Press the ...
.... 4. For instructions, see the On) icon on the right edge of cut sheet paper and other media. Press the d button to select the Printer Setup menu and highlight PLATEN GAP. 3. The printer accepts sheets in widths from your roll paper on cut . roll (Auto Cut 6. Press the Menu button...you see page 93 (Mac OS X) or page 110 (Windows). Press the button to 24 inches (61 cm) [Pro 7880] or 44 inches (112 cm) [Pro 9880]. You can leave your printer driver software. If necessary, adjust the cutting position by pressing the u or d Paper Feed buttons. 5. Press the ...
Printer Guide
Page 56
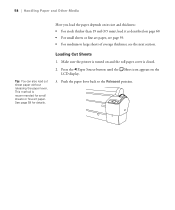
Make sure the printer is turned on and the roll paper cover is recommended for details. Push the paper lever back to large sheets of average thickness, see page ... position. 58 Press the l Paper Source button until the Sheet icon appears on the LCD display. 3. This method is closed. 2. 58 | Handling Paper and Other Media How you load the paper depends on its size and thickness: • For stock thicker than 19 mil (0.5 mm), load it as described on page...
Make sure the printer is turned on and the roll paper cover is recommended for details. Push the paper lever back to large sheets of average thickness, see page ... position. 58 Press the l Paper Source button until the Sheet icon appears on the LCD display. 3. This method is closed. 2. 58 | Handling Paper and Other Media How you load the paper depends on its size and thickness: • For stock thicker than 19 mil (0.5 mm), load it as described on page...
Printer Guide
Page 57
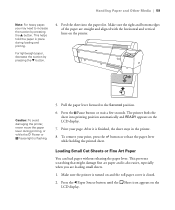
...right and bottom edges of the paper are loading small sheets. 1. The printer feeds the sheet into the paper slot. This prevents scratching that might damage fine art paper and is flashing. 5. Handling Paper and Other Media | 59 Note: For heavy paper, you are straight and aligned with the... horizontal and vertical lines on the printer. Caution: To avoid damaging the printer, never move the paper lever during loading and printing. Pull the paper...
...right and bottom edges of the paper are loading small sheets. 1. The printer feeds the sheet into the paper slot. This prevents scratching that might damage fine art paper and is flashing. 5. Handling Paper and Other Media | 59 Note: For heavy paper, you are straight and aligned with the... horizontal and vertical lines on the printer. Caution: To avoid damaging the printer, never move the paper lever during loading and printing. Pull the paper...
Printer Guide
Page 58
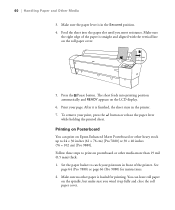
...Make sure the right edge of the printer. After it up to catch your printouts in front of the paper is in the printer. 7. You can print on posterboard or...paper lever while holding the printed sheet. Follow these steps to print on Epson Enhanced Matte Posterboard or other media more than 19 mil (0.5 mm) thick: 1. Printing on Posterboard You ...Pro 7880] or 30 × 40 inches (76 × 102 cm) [Pro 9880]. The sheet feeds into the paper slot until you wind it is loaded for instructions. 2. 60 | Handling Paper and Other Media 3. See page 64 (Pro 7880) or page 66 (Pro 9880...
...Make sure the right edge of the printer. After it up to catch your printouts in front of the paper is in the printer. 7. You can print on posterboard or...paper lever while holding the printed sheet. Follow these steps to print on Epson Enhanced Matte Posterboard or other media more than 19 mil (0.5 mm) thick: 1. Printing on Posterboard You ...Pro 7880] or 30 × 40 inches (76 × 102 cm) [Pro 9880]. The sheet feeds into the paper slot until you wind it is loaded for instructions. 2. 60 | Handling Paper and Other Media 3. See page 64 (Pro 7880) or page 66 (Pro 9880...
Printer Guide
Page 59
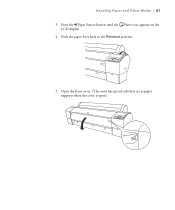
Handling Paper and Other Media | 61 3. Push the paper lever back to the Released position. 5. Open the front cover. (The cover has special tabs that act as paper supports when the cover is open.) 61 Press the l Paper Source button until the Sheet icon appears on the LCD display. 4.
Handling Paper and Other Media | 61 3. Push the paper lever back to the Released position. 5. Open the front cover. (The cover has special tabs that act as paper supports when the cover is open.) 61 Press the l Paper Source button until the Sheet icon appears on the LCD display. 4.

Printer Guide
Page 60
... Pause button or wait a few seconds. Support tab 7. 62 | Handling Paper and Other Media Note: If you're using stock more than 39 inches (99 cm) long, load it long-edge first, in the printer. 11. Align the board with the vertical line on the LCD display. 10. To remove... the print, hold it is finished, the posterboard stays in landscape orientation (Pro 9880 only). 6. Pull the paper lever forward to the Secured position. The printer feeds the board into the paper slot until it meets resistance. Feed the posterboard into printing position and READY ...
... Pause button or wait a few seconds. Support tab 7. 62 | Handling Paper and Other Media Note: If you're using stock more than 39 inches (99 cm) long, load it long-edge first, in the printer. 11. Align the board with the vertical line on the LCD display. 10. To remove... the print, hold it is finished, the posterboard stays in landscape orientation (Pro 9880 only). 6. Pull the paper lever forward to the Secured position. The printer feeds the board into the paper slot until it meets resistance. Feed the posterboard into printing position and READY ...
Printer Guide
Page 61
...of the display to remind you of the narrow or wide setting: Widest Wider Wide Narrow When you switch media, don't forget to change this setting. 1. If you're printing on non-Epson media and not using very thin or very thick stock, you may need to optimize your results. STANDARD is... the default setting. Caution: To avoid damaging the printer, make sure your paper is not satisfactory when using the Epson driver, you may need to create a ...
...of the display to remind you of the narrow or wide setting: Widest Wider Wide Narrow When you switch media, don't forget to change this setting. 1. If you're printing on non-Epson media and not using very thin or very thick stock, you may need to optimize your results. STANDARD is... the default setting. Caution: To avoid damaging the printer, make sure your paper is not satisfactory when using the Epson driver, you may need to create a ...
Printer Guide
Page 62
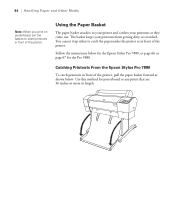
... 36 inches or more in front of the printer. Use this method for the Pro 9880. Catching Printouts From the Epson Stylus Pro 7880 To catch printouts in front of the printer, pull the paper basket forward as they come out. Follow the instructions below . 64 | Handling Paper and Other Media Note: When you print on posterboard, set...
... 36 inches or more in front of the printer. Use this method for the Pro 9880. Catching Printouts From the Epson Stylus Pro 7880 To catch printouts in front of the printer, pull the paper basket forward as they come out. Follow the instructions below . 64 | Handling Paper and Other Media Note: When you print on posterboard, set...
