Printer Guide
Page 5
... System Requirements 12 Important Safety Instructions 13 Ink Cartridge Safety Instructions 15 1 Setting Up the Printer Unpacking and Assembling the Epson Stylus Pro 7800 17 Unpacking and Assembling the Stand 18 Unpacking the Printer 20 Mounting the Printer on the Stand 22 Attaching the Paper Basket 25 Unpacking and Assembling the Epson Stylus Pro 9800 27 Unpacking and Assembling the Stand 28...
... System Requirements 12 Important Safety Instructions 13 Ink Cartridge Safety Instructions 15 1 Setting Up the Printer Unpacking and Assembling the Epson Stylus Pro 7800 17 Unpacking and Assembling the Stand 18 Unpacking the Printer 20 Mounting the Printer on the Stand 22 Attaching the Paper Basket 25 Unpacking and Assembling the Epson Stylus Pro 9800 27 Unpacking and Assembling the Stand 28...
Printer Guide
Page 6
... Other Media Selecting Media for Your Printer 55 Guidelines for Using Epson Media 56 Using Roll Paper 56 Roll Paper Guidelines 57 Loading the Paper onto the Spindle 58 Placing the Paper in the Printer 59 Removing Paper from the Spindle 62...Epson Stylus Pro 9800 72 Catching Printouts Under the Epson Stylus Pro 9800 73 Optimizing the Settings for Your Paper 75 Creating Paper Configurations 75 Printing Your Paper Configurations 77 Selecting Paper Configurations 77 3 Printing with Epson Drivers for Macintosh Choosing Page Setup Options 80 Choosing Basic Print Options 83 Choosing Color...
... Other Media Selecting Media for Your Printer 55 Guidelines for Using Epson Media 56 Using Roll Paper 56 Roll Paper Guidelines 57 Loading the Paper onto the Spindle 58 Placing the Paper in the Printer 59 Removing Paper from the Spindle 62...Epson Stylus Pro 9800 72 Catching Printouts Under the Epson Stylus Pro 9800 73 Optimizing the Settings for Your Paper 75 Creating Paper Configurations 75 Printing Your Paper Configurations 77 Selecting Paper Configurations 77 3 Printing with Epson Drivers for Macintosh Choosing Page Setup Options 80 Choosing Basic Print Options 83 Choosing Color...
Printer Guide
Page 13
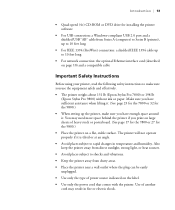
... compatible cable Important Safety Instructions Before using your printer, read the following safety instructions to make sure you have sufficient assistance when lifting it. (See page 23 for the 7800 or 32 for the 9800.) • When setting up to 10 feet long • For ...1394 (FireWire) connection: a shielded IEEE 1394 cable up the printer, make sure you use the equipment safely and effectively. • The printer weighs about 131 lb (Epson Stylus Pro 7800) or 198 lb (Epson Stylus Pro 9800) without ink or paper. The printer will not operate properly if it . You may result in ...
... compatible cable Important Safety Instructions Before using your printer, read the following safety instructions to make sure you have sufficient assistance when lifting it. (See page 23 for the 7800 or 32 for the 9800.) • When setting up to 10 feet long • For ...1394 (FireWire) connection: a shielded IEEE 1394 cable up the printer, make sure you use the equipment safely and effectively. • The printer weighs about 131 lb (Epson Stylus Pro 7800) or 198 lb (Epson Stylus Pro 9800) without ink or paper. The printer will not operate properly if it . You may result in ...

Printer Guide
Page 17
...moisture, or dust. If you have the Epson Stylus Pro 9800, see page 27 instead. Unpacking and Assembling the Epson Stylus Pro 7800 Follow these steps to assemble the printer and stand. 17 Avoid locations subject to unpack and set up the printer. Before you begin, make sure you have... power cord • Installing ink • Connecting to your printer and its stand. Note: When choosing a place for the printer, leave adequate room for using the Epson Stylus Pro 7800: 8 in. 6 in. 24 in. 12 in. 17 Chapter 1: Setting Up the Printer This chapter includes the following ...
...moisture, or dust. If you have the Epson Stylus Pro 9800, see page 27 instead. Unpacking and Assembling the Epson Stylus Pro 7800 Follow these steps to assemble the printer and stand. 17 Avoid locations subject to unpack and set up the printer. Before you begin, make sure you have... power cord • Installing ink • Connecting to your printer and its stand. Note: When choosing a place for the printer, leave adequate room for using the Epson Stylus Pro 7800: 8 in. 6 in. 24 in. 12 in. 17 Chapter 1: Setting Up the Printer This chapter includes the following ...
Printer Guide
Page 119
...This chapter describes the following routine procedures: • Checking printer status and part life • Checking and cleaning the print head • Aligning the print head • Replacing ink cartridges • Changing the black ink cartridge • Changing the date and time • ... the menu system on the CD-ROM that came with your printer. 119 119 Chapter 5: Maintaining and Transporting the Printer The Epson Stylus Pro 7800/9800 requires little maintenance to fine-tune a variety of printer settings. For more information, see the electronic Reference Guide included on ...
...This chapter describes the following routine procedures: • Checking printer status and part life • Checking and cleaning the print head • Aligning the print head • Replacing ink cartridges • Changing the black ink cartridge • Changing the date and time • ... the menu system on the CD-ROM that came with your printer. 119 119 Chapter 5: Maintaining and Transporting the Printer The Epson Stylus Pro 7800/9800 requires little maintenance to fine-tune a variety of printer settings. For more information, see the electronic Reference Guide included on ...

Printer Guide
Page 174
... Windows, 114 to 117 Storing printer, 144 to 146 Stylus Pro 7800 mounting on stand, 22 to 24 paper basket, 71 to 72 paper basket, attaching, 25 to 26 removing shipping bracket, 24 setting up, 17 to 26 stand, unpacking and assembling, 18 to 20 unpacking, 20 to 22 Stylus Pro 9800 mounting on stand, 31 to... 34 paper basket, 34 to 36, 72 to 74 removing shipping bracket, 33 setting up, 27 to 36 stand, unpacking and assembling, 28 to 29 unpacking, 29 to 30 Suction, 76, 89, 111 Support, Epson, 11 System requirements, 12 to 13...
... Windows, 114 to 117 Storing printer, 144 to 146 Stylus Pro 7800 mounting on stand, 22 to 24 paper basket, 71 to 72 paper basket, attaching, 25 to 26 removing shipping bracket, 24 setting up, 17 to 26 stand, unpacking and assembling, 18 to 20 unpacking, 20 to 22 Stylus Pro 9800 mounting on stand, 31 to... 34 paper basket, 34 to 36, 72 to 74 removing shipping bracket, 33 setting up, 27 to 36 stand, unpacking and assembling, 28 to 29 unpacking, 29 to 30 Suction, 76, 89, 111 Support, Epson, 11 System requirements, 12 to 13...

Product Brochure
Page 4
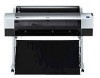
...Stylus Pro 7800 and 44-inch Stylus Pro 9800 professional wide-format printers incorporate forward-thinking designs with professional results. Based on Epson Premium Luster Photo Paper (250) New Three-level Black Ink Technology n Simultaneously uses Black, Light Black, and Light Light Black inks n Significantly improves the printer's gray balance while eliminating color... ICM™ workflows Two User-exchangeable Black Ink Modes Both printers can be used for any media type, in roll or cut-sheet, up to 24-inch or 44-inch wide, Epson once again sets the standard for a smoother tonal range ...
...Stylus Pro 7800 and 44-inch Stylus Pro 9800 professional wide-format printers incorporate forward-thinking designs with professional results. Based on Epson Premium Luster Photo Paper (250) New Three-level Black Ink Technology n Simultaneously uses Black, Light Black, and Light Light Black inks n Significantly improves the printer's gray balance while eliminating color... ICM™ workflows Two User-exchangeable Black Ink Modes Both printers can be used for any media type, in roll or cut-sheet, up to 24-inch or 44-inch wide, Epson once again sets the standard for a smoother tonal range ...
Product Information Guide
Page 4
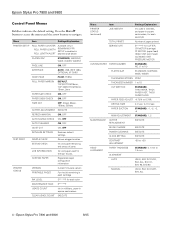
... HEAD ALIGNMENT PAPER THICKNESS STANDARD, 0.1 mm to navigate. Epson Stylus Pro 7800 and 9800 8/05 Press the Menu r button to access the menus and the arrow buttons to 1.5 mm ALIGNMENT AUTO UNI-D, BI-D 2-COLOR, BI-D ALL, BI-D #1, BI-D #2, BI-D #3 MANUAL UNI-D, BI-D 2-COLOR, BI-D ALL 4 - Menu Item Settings/Explanation PRINTER SETUP ROLL PAPER COUNTER ROLL PAPER LENGTH ROLL...
... HEAD ALIGNMENT PAPER THICKNESS STANDARD, 0.1 mm to navigate. Epson Stylus Pro 7800 and 9800 8/05 Press the Menu r button to access the menus and the arrow buttons to 1.5 mm ALIGNMENT AUTO UNI-D, BI-D 2-COLOR, BI-D ALL, BI-D #1, BI-D #2, BI-D #3 MANUAL UNI-D, BI-D 2-COLOR, BI-D ALL 4 - Menu Item Settings/Explanation PRINTER SETUP ROLL PAPER COUNTER ROLL PAPER LENGTH ROLL...
Product Information Guide
Page 5
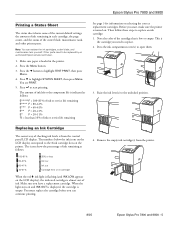
Epson Stylus Pro 7800 and 9800 Printing a Status Sheet The status sheet shows some of the current default settings, the amount of ink remaining in the printer. 2. Note: You can continue printing. 4. The amount of ink left or the component life is indicated as follows: 100-81% 80-61% 60-41% 40-21% 20% or less Ink low Ink...You must replace the cartridge before you have a replacement cartridge. Note the color of ink. Press d to open them. 3. The icons show the percentage of ink remaining as follows: E*****F = 100-81% of ink or service life remaining E**** F = 80-61% E*** F = 60...
Epson Stylus Pro 7800 and 9800 Printing a Status Sheet The status sheet shows some of the current default settings, the amount of ink remaining in the printer. 2. Note: You can continue printing. 4. The amount of ink left or the component life is indicated as follows: 100-81% 80-61% 60-41% 40-21% 20% or less Ink low Ink...You must replace the cartridge before you have a replacement cartridge. Note the color of ink. Press d to open them. 3. The icons show the percentage of ink remaining as follows: E*****F = 100-81% of ink or service life remaining E**** F = 80-61% E*** F = 60...
Product Information Guide
Page 6
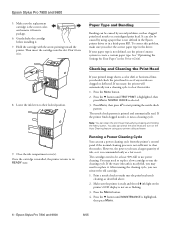
See "Optimizing the Settings for Your Paper" in the driver. Checking and Cleaning the Print Head If your printed image shows a color shift or horizontal lines, you can also be caused by several problems, such as clogged print head nozzles or a misaligned ...in the Printer Guide. 8. To correct this problem, make sure the print head needs cleaning, as a last resort. If necessary, the printer will automatically run the cleaning cycle. NOZZLE CHECK is printed and automatically read. If the waste ink tank is the correct color, and remove it . Epson Stylus Pro 7800 and 9800 8/05...
See "Optimizing the Settings for Your Paper" in the driver. Checking and Cleaning the Print Head If your printed image shows a color shift or horizontal lines, you can also be caused by several problems, such as clogged print head nozzles or a misaligned ...in the Printer Guide. 8. To correct this problem, make sure the print head needs cleaning, as a last resort. If necessary, the printer will automatically run the cleaning cycle. NOZZLE CHECK is printed and automatically read. If the waste ink tank is the correct color, and remove it . Epson Stylus Pro 7800 and 9800 8/05...
Product Information Guide
Page 7
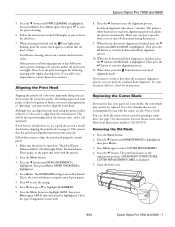
...printer off the printer during this process. 9. See page 5 for most Epson papers. 5. You can check the status of alignment to start the alignment process. Press the d button until BI-D 2-COLOR is the correct thickness setting for instructions. OPEN FRONT COVER TO SEE CUTTER REPLACEMENT LABEL is highlighted. 4. Epson Stylus Pro 7800 and 9800...print head using the printer utility software, it 's all automatic. Make sure the printer is the most thorough job in the shortest time, and it 's also easy to raise or lower the ink levers. 7. Then load Epson Enhanced Matte, Doubleweight ...
...printer off the printer during this process. 9. See page 5 for most Epson papers. 5. You can check the status of alignment to start the alignment process. Press the d button until BI-D 2-COLOR is the correct thickness setting for instructions. OPEN FRONT COVER TO SEE CUTTER REPLACEMENT LABEL is highlighted. 4. Epson Stylus Pro 7800 and 9800...print head using the printer utility software, it 's all automatic. Make sure the printer is the most thorough job in the shortest time, and it 's also easy to raise or lower the ink levers. 7. Then load Epson Enhanced Matte, Doubleweight ...

Product Information Guide
Page 9
... tank needs to spill ink from the maintenance tank when removing it carefully. 4. Replacement tanks are any other operations (READY or PAPER OUT should appear on the LCD display). 2. Related Documentation CPD-20271 CPD-20272 CPD-20270 Epson Stylus Pro 7800 and 9800 Printer Guide Epson Stylus Pro 7800 and 9800 Quick Reference Guide Epson Stylus Pro 7800 and 9800 CD-ROM with existing...
... tank needs to spill ink from the maintenance tank when removing it carefully. 4. Replacement tanks are any other operations (READY or PAPER OUT should appear on the LCD display). 2. Related Documentation CPD-20271 CPD-20272 CPD-20270 Epson Stylus Pro 7800 and 9800 Printer Guide Epson Stylus Pro 7800 and 9800 Quick Reference Guide Epson Stylus Pro 7800 and 9800 CD-ROM with existing...


