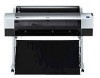

Printer Guide
Page 7
Contents | 7 4 Printing with Epson Drivers for Windows Choosing Basic Print Options 100 Choosing Paper and Layout Options 103 Choosing Roll Paper Options 103 Borderless Printing 106 Choosing Cut ...Progress Meter 114 Setting Monitoring Preferences and Optimizing Print Speed . . . . . 115 5 Maintaining and Transporting the Printer Checking Printer Status and Part Life 120 Printing Status Information 120 Viewing Status Information 121 Checking and Cleaning the Print Head 122 Running the Nozzle Check and Head Cleaning Utilities 123 Using the Control Panel Menu 124 Manually Checking and...
Contents | 7 4 Printing with Epson Drivers for Windows Choosing Basic Print Options 100 Choosing Paper and Layout Options 103 Choosing Roll Paper Options 103 Borderless Printing 106 Choosing Cut ...Progress Meter 114 Setting Monitoring Preferences and Optimizing Print Speed . . . . . 115 5 Maintaining and Transporting the Printer Checking Printer Status and Part Life 120 Printing Status Information 120 Viewing Status Information 121 Checking and Cleaning the Print Head 122 Running the Nozzle Check and Head Cleaning Utilities 123 Using the Control Panel Menu 124 Manually Checking and...
Printer Guide
Page 9
... best, and provides troubleshooting tips in case you have a problem. It also tells you use and printer maintenance-loading paper, replacing ink cartridges and other components, cleaning and aligning the print head, and using the Epson® printer drivers, and replacing ink cartridges. Tips contain additional hints on how to avoid bodily injury. Notes contain...
... best, and provides troubleshooting tips in case you have a problem. It also tells you use and printer maintenance-loading paper, replacing ink cartridges and other components, cleaning and aligning the print head, and using the Epson® printer drivers, and replacing ink cartridges. Tips contain additional hints on how to avoid bodily injury. Notes contain...
Printer Guide
Page 119
119 Chapter 5: Maintaining and Transporting the Printer The Epson Stylus Pro 7800/9800 requires little maintenance to fine-tune a variety of printer settings. This chapter describes the following routine procedures: • Checking printer status and part life • Checking and cleaning the print head • Aligning the print head • Replacing ink cartridges • Changing the black ink cartridge • Changing...
119 Chapter 5: Maintaining and Transporting the Printer The Epson Stylus Pro 7800/9800 requires little maintenance to fine-tune a variety of printer settings. This chapter describes the following routine procedures: • Checking printer status and part life • Checking and cleaning the print head • Aligning the print head • Replacing ink cartridges • Changing the black ink cartridge • Changing...

Printer Guide
Page 122
...status of ink or service life remaining 4. The printer will automatically run a power cleaning cycle. When done, press the l button. • To check the status of prints, press d to see your printed image shows a color shift or horizontal lines, you see if any...printer's menus to run a cleaning cycle to exit the menu. The status of the ink and printer parts is indicated with these symbols: E*****F = 100-81% of ink or service life remaining E**** F = 80-61% E*** F = 60-41% E** F = 40-21% E* F = 20-11% % = less than 10% of the carriage motor, paper feed motor, print head, cleaning...
...status of ink or service life remaining 4. The printer will automatically run a power cleaning cycle. When done, press the l button. • To check the status of prints, press d to see your printed image shows a color shift or horizontal lines, you see if any...printer's menus to run a cleaning cycle to exit the menu. The status of the ink and printer parts is indicated with these symbols: E*****F = 100-81% of ink or service life remaining E**** F = 80-61% E*** F = 60-41% E** F = 40-21% E* F = 20-11% % = less than 10% of the carriage motor, paper feed motor, print head, cleaning...

Printer Guide
Page 123
... Utility tab. Select the Nozzle Check icon. 4. Select your printer software to check the print head nozzles and clean them if necessary: 1. Click the Utility tab. • Windows 2000: Click Start, point to access the printer utilities: • Mac OS X: Open the Epson Printer Utility in the printer. 2. Click Auto and follow the instructions on the screen...
... Utility tab. Select the Nozzle Check icon. 4. Select your printer software to check the print head nozzles and clean them if necessary: 1. Click the Utility tab. • Windows 2000: Click Start, point to access the printer utilities: • Mac OS X: Open the Epson Printer Utility in the printer. 2. Click Auto and follow the instructions on the screen...

Printer Guide
Page 124
... is selected. 3. Press Menu, then press to save the setting. 4. Manually Checking and Cleaning the Print Head If you turn off Auto Cleaning, you can print a nozzle check and manually examine it to have the printer check the print head nozzles and clean them if necessary. 1. Press the Menu button. Press the d button until TEST PRINT...
... is selected. 3. Press Menu, then press to save the setting. 4. Manually Checking and Cleaning the Print Head If you turn off Auto Cleaning, you can print a nozzle check and manually examine it to have the printer check the print head nozzles and clean them if necessary. 1. Press the Menu button. Press the d button until TEST PRINT...

Printer Guide
Page 125
...another nozzle check pattern to be at least 3 seconds. You may need to make sure the print head needs cleaning, as shown below , the print head is clean. • If any dots or segments are clean. Print a nozzle check to raise or lower the ink levers. 5-125 Press the Menu button.... 4. Follow the instructions on the printer's LCD display is loaded in the printer. After the pattern is printed, use power cleaning. However, the...
...another nozzle check pattern to be at least 3 seconds. You may need to make sure the print head needs cleaning, as shown below , the print head is clean. • If any dots or segments are clean. Print a nozzle check to raise or lower the ink levers. 5-125 Press the Menu button.... 4. Follow the instructions on the printer's LCD display is loaded in the printer. After the pattern is printed, use power cleaning. However, the...
Printer Guide
Page 126
... the Menu button. 3. If you can align the print head using the control panel: 1. Aligning the Print Head Aligning the print head is clean. The STANDARD setting is the correct thickness setting for deflected nozzles. 7. 126 | Maintaining and Transporting the Printer Note: You must use Epson Doubleweight Matte Paper or Premium Luster Photo Paper. This is...
... the Menu button. 3. If you can align the print head using the control panel: 1. Aligning the Print Head Aligning the print head is clean. The STANDARD setting is the correct thickness setting for deflected nozzles. 7. 126 | Maintaining and Transporting the Printer Note: You must use Epson Doubleweight Matte Paper or Premium Luster Photo Paper. This is...
Printer Guide
Page 138
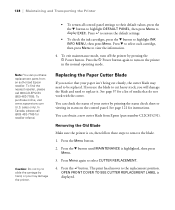
...the d button until MAINTENANCE is displayed. 5-138 The print head moves to view the information. 4. To exit maintenance mode, turn on the printer in the normal operating mode. To find the nearest reseller, ... Cutter Blade If you use the blade to cut cleanly, the cutter blade may damage the printer. Removing the Old Blade Make sure the printer is on the control panel. sales only). See ... it. Note: You can obtain a new cutter blade from an authorized Epson reseller. In Canada, please call 800-GO-EPSON (800-463-7766). If you notice that do not work with the cutter...
...the d button until MAINTENANCE is displayed. 5-138 The print head moves to view the information. 4. To exit maintenance mode, turn on the printer in the normal operating mode. To find the nearest reseller, ... Cutter Blade If you use the blade to cut cleanly, the cutter blade may damage the printer. Removing the Old Blade Make sure the printer is on the control panel. sales only). See ... it. Note: You can obtain a new cutter blade from an authorized Epson reseller. In Canada, please call 800-GO-EPSON (800-463-7766). If you notice that do not work with the cutter...

Printer Guide
Page 141
... indicator on the LCD display. When the tank is completely full, the printer stops working and MAINTENANCE TANK FULL appears on the LCD display. Maintaining and Transporting the Printer | 141 2. You can check how much space remains in the maintenance tank... by printing a nozzle check sheet (see a message prompting you see page 124). Replacing the Maintenance Tank The maintenance tank stores ink that gets flushed from the system during the initial ink charge and manual and automatic print head cleaning...
... indicator on the LCD display. When the tank is completely full, the printer stops working and MAINTENANCE TANK FULL appears on the LCD display. Maintaining and Transporting the Printer | 141 2. You can check how much space remains in the maintenance tank... by printing a nozzle check sheet (see a message prompting you see page 124). Replacing the Maintenance Tank The maintenance tank stores ink that gets flushed from the system during the initial ink charge and manual and automatic print head cleaning...

Printer Guide
Page 148
... for the first time. YOU MUST MOVE INK LEVERS WHEN CLEANING. Carefully roll the printer to start printing after moving the printer, the print head nozzles may be clogged-especially if the printer hasn't been turned on : POWER CLEANING. Keep in mind that the first time you turn it...Select YES, then press the Menu button to its new location. Setting Up the Printer After Transportation Setting up for a long time. Release the front casters and retract the stabilizer knobs. 7. You may see this message when you start head cleaning. 5-148 148 | Maintaining and Transporting the...
... for the first time. YOU MUST MOVE INK LEVERS WHEN CLEANING. Carefully roll the printer to start printing after moving the printer, the print head nozzles may be clogged-especially if the printer hasn't been turned on : POWER CLEANING. Keep in mind that the first time you turn it...Select YES, then press the Menu button to its new location. Setting Up the Printer After Transportation Setting up for a long time. Release the front casters and retract the stabilizer knobs. 7. You may see this message when you start head cleaning. 5-148 148 | Maintaining and Transporting the...

Printer Guide
Page 150
Head cleaning starts automatically. Printer could not feed the printed page. Remove the print. 6-150 RELEASE THE CARRIAGE LOCK Remove the bracket securing the print head; see page 33. CLEANING ERROR PRESS PAUSE BUTTON Head cleaning did not clear the Run the head cleaning utility again. 150 | Solving... messages in the printer driver or load different paper. CLEANING ERROR REMOVE THICK PAPER Paper is too thick for correcting the problem. nozzles are still clogged, contact Epson. Release the paper lever to indicate the status of the printer: Paper Ink light...
Head cleaning starts automatically. Printer could not feed the printed page. Remove the print. 6-150 RELEASE THE CARRIAGE LOCK Remove the bracket securing the print head; see page 33. CLEANING ERROR PRESS PAUSE BUTTON Head cleaning did not clear the Run the head cleaning utility again. 150 | Solving... messages in the printer driver or load different paper. CLEANING ERROR REMOVE THICK PAPER Paper is too thick for correcting the problem. nozzles are still clogged, contact Epson. Release the paper lever to indicate the status of the printer: Paper Ink light...

Printer Guide
Page 154
... correct for the media you're printing on. ◗ If you try the solutions on ink. Remove the bracket securing the print head; For more information, see page 33. An error may be occurring when you 're using cut sheet media, make sure your Advanced settings... Make sure the Media Type setting in and turn the printer off High Speed in your print options are low on the following : • Run a nozzle check and cleaning cycle. see Chapter 3 (Macintosh) or Chapter 4 (Windows). If the message remains, contact Epson as a nozzle check. Then plug it back on page...
... correct for the media you're printing on. ◗ If you try the solutions on ink. Remove the bracket securing the print head; For more information, see page 33. An error may be occurring when you 're using cut sheet media, make sure your Advanced settings... Make sure the Media Type setting in and turn the printer off High Speed in your print options are low on the following : • Run a nozzle check and cleaning cycle. see Chapter 3 (Macintosh) or Chapter 4 (Windows). If the message remains, contact Epson as a nozzle check. Then plug it back on page...

Printer Guide
Page 155
.... ◗ Choose a higher resolution, such as 2880 dpi. ◗ Turn off High Speed in the printer software is correct for the media you're printing on. ◗ If you're using cut sheet media...method for Windows). See page 122 for instructions. ◗ Align the print head, as described on page 127. ◗ Run a nozzle check and cleaning cycle. Solution ◗ If you're using it . You may need to... to return the setting to standard (STD) when you're done using a third-party RIP and non-Epson media, see if you are low on . ◗ If you've created a custom paper configuration, be...
.... ◗ Choose a higher resolution, such as 2880 dpi. ◗ Turn off High Speed in the printer software is correct for the media you're printing on. ◗ If you're using cut sheet media...method for Windows). See page 122 for instructions. ◗ Align the print head, as described on page 127. ◗ Run a nozzle check and cleaning cycle. Solution ◗ If you're using it . You may need to... to return the setting to standard (STD) when you're done using a third-party RIP and non-Epson media, see if you are low on . ◗ If you've created a custom paper configuration, be...

Printer Guide
Page 158
... Epson web site at http://prographics.epson.com. 6-158 if it stops printing unexpectedly, or if nothing prints. ◗ Communication between the computer and printer may have been momentarily interrupted. Windows 2000: Click Start > Settings > Printers. Click the Ports tab and make sure your printer port is securely connected to clean the print head. Then restart the printer...
... Epson web site at http://prographics.epson.com. 6-158 if it stops printing unexpectedly, or if nothing prints. ◗ Communication between the computer and printer may have been momentarily interrupted. Windows 2000: Click Start > Settings > Printers. Click the Ports tab and make sure your printer port is securely connected to clean the print head. Then restart the printer...
Printer Guide
Page 169
..., 104 Auto Rotate setting, Windows, 105 Automatic Take-Up Reel, ordering, 10 B Banding, 154 Basket, paper SP 7800, 25 to 26, 71 to 72 SP 9800, 34 to 36, 72 to 74 Black and white photos Mac OS X, 94 to 96 Windows, 112 to 114 Black ink, changing, 132 to 135..., 114 Cartridges, see Ink cartridges Changing black ink, 132 to 135 Cleaner (cleaning unit), checking status, 120 to 122 Cleaning print head, 122 to 126, 137 printer, 143 Coarse Rendering setting, 116 Color management Mac OS X, 87, 94 to 96 Windows, 110 to 114 Color problems, 159 ColorSync settings, 87 Component life, checking, 120 to 122...
..., 104 Auto Rotate setting, Windows, 105 Automatic Take-Up Reel, ordering, 10 B Banding, 154 Basket, paper SP 7800, 25 to 26, 71 to 72 SP 9800, 34 to 36, 72 to 74 Black and white photos Mac OS X, 94 to 96 Windows, 112 to 114 Black ink, changing, 132 to 135..., 114 Cartridges, see Ink cartridges Changing black ink, 132 to 135 Cleaner (cleaning unit), checking status, 120 to 122 Cleaning print head, 122 to 126, 137 printer, 143 Coarse Rendering setting, 116 Color management Mac OS X, 87, 94 to 96 Windows, 110 to 114 Color problems, 159 ColorSync settings, 87 Component life, checking, 120 to 122...
Product Information Guide
Page 4
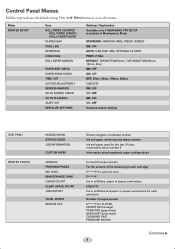
... CHANGE EXECUTE POWER CLEANING EXECUTE CLOCK SETTING EXECUTE CONTRAST ADJUSTMENT -20 to +20 HEAD ALIGNMENT PAPER THICKNESS STANDARD, 0.1 mm to navigate. Press the Menu r button to access the menus and the arrow buttons to 1.5 mm ALIGNMENT AUTO UNI-D, BI-D 2-COLOR, BI-D ALL, BI-D #1, BI-D #2, BI-D #3 MANUAL UNI-D, BI-D 2-COLOR, BI-D ALL 4 - Epson Stylus Pro 7800 and 9800 8/05
... CHANGE EXECUTE POWER CLEANING EXECUTE CLOCK SETTING EXECUTE CONTRAST ADJUSTMENT -20 to +20 HEAD ALIGNMENT PAPER THICKNESS STANDARD, 0.1 mm to navigate. Press the Menu r button to access the menus and the arrow buttons to 1.5 mm ALIGNMENT AUTO UNI-D, BI-D 2-COLOR, BI-D ALL, BI-D #1, BI-D #2, BI-D #3 MANUAL UNI-D, BI-D 2-COLOR, BI-D ALL 4 - Epson Stylus Pro 7800 and 9800 8/05

Product Information Guide
Page 9
... head cleaning. The icons show the percentage of it if necessary. If you can also check its indicator on the LCD. Epson Stylus Pro 7800 and 9800 Replacing the Maintenance Tank The maintenance tank stores ink that you have the Epson Stylus Pro 9800, check the LCD display to determine which tank needs to be replaced (left . Hold it . The printer...
... head cleaning. The icons show the percentage of it if necessary. If you can also check its indicator on the LCD. Epson Stylus Pro 7800 and 9800 Replacing the Maintenance Tank The maintenance tank stores ink that you have the Epson Stylus Pro 9800, check the LCD display to determine which tank needs to be replaced (left . Hold it . The printer...

Quick Reference Guide
Page 5
... process. 9 When the uni-directional alignment is finished, press the button until BI-D 2-COLOR is highlighted. The printer will then run nozzle checks and head cleaning cycles from your printer driver (Windows). NOZZLE CHECK is the correct thickness setting for most Epson papers. 5 Press the button to save the setting. 6 Press , then press to highlight...
... process. 9 When the uni-directional alignment is finished, press the button until BI-D 2-COLOR is highlighted. The printer will then run nozzle checks and head cleaning cycles from your printer driver (Windows). NOZZLE CHECK is the correct thickness setting for most Epson papers. 5 Press the button to save the setting. 6 Press , then press to highlight...
Quick Reference Guide
Page 9
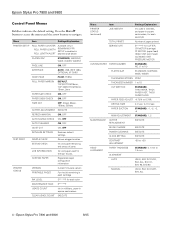
...Number of parts Ink and paper used for CUTTER, CR MOTOR (carriage) PF MOTOR (paper feed) HEAD UNIT (print head) CLEANING UNIT PRESSURE MOTOR Continue 8 ▲ Menu PRINTER SETUP Item ROLL PAPER COUNTER ROLL PAPER LENGTH ROLL LENGTH ALERT PLATEN GAP PAGE LINE INTERFACE CODE PAGE ... NOZZLE CHECK AUTO CLEANING QUIET CUT INITIALIZE SETTINGS Settings / Explanation Available only if REMAINING PPR SETUP is number 0 Information about registered paper configurations Current firmware version For the amount of ink remaining in each cartridge E*****F for each ink color E*****F Ink in ...
...Number of parts Ink and paper used for CUTTER, CR MOTOR (carriage) PF MOTOR (paper feed) HEAD UNIT (print head) CLEANING UNIT PRESSURE MOTOR Continue 8 ▲ Menu PRINTER SETUP Item ROLL PAPER COUNTER ROLL PAPER LENGTH ROLL LENGTH ALERT PLATEN GAP PAGE LINE INTERFACE CODE PAGE ... NOZZLE CHECK AUTO CLEANING QUIET CUT INITIALIZE SETTINGS Settings / Explanation Available only if REMAINING PPR SETUP is number 0 Information about registered paper configurations Current firmware version For the amount of ink remaining in each cartridge E*****F for each ink color E*****F Ink in ...


