Operation Guide - EMP Monitor v4.30
Page 2
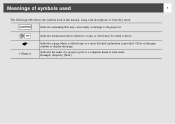
Select Timer - Indicates the name of the buttons on EMP Monitor. Example: Select "Timer" - Timer Settings. Example: Esc button Indicates the name of what they mean. 2 Meanings of symbols used The following table shows the symbols used in this manual, along with descriptions of the buttons or items on the remote control or the control panel. s [ (name) ] "(name)" Timer Indicates a page where a related topic or a more detailed explanation is provided. "Timer Settings".
Select Timer - Indicates the name of the buttons on EMP Monitor. Example: Select "Timer" - Timer Settings. Example: Esc button Indicates the name of what they mean. 2 Meanings of symbols used The following table shows the symbols used in this manual, along with descriptions of the buttons or items on the remote control or the control panel. s [ (name) ] "(name)" Timer Indicates a page where a related topic or a more detailed explanation is provided. "Timer Settings".
Operation Guide - EMP Monitor v4.30
Page 3
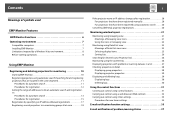
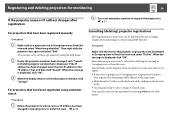
... search 13 Procedures for registration 15 Registration by specifying an IP address (Manual registration 17 Registering several projectors to a monitoring group all at once 18 If the projector name or IP address changes after registration 20 For projectors that have been registered manually 20 For projectors that have been registered using automatic search 20 Cancelling (deleting...
... search 13 Procedures for registration 15 Registration by specifying an IP address (Manual registration 17 Registering several projectors to a monitoring group all at once 18 If the projector name or IP address changes after registration 20 For projectors that have been registered manually 20 For projectors that have been registered using automatic search 20 Cancelling (deleting...
Operation Guide - EMP Monitor v4.30
Page 11
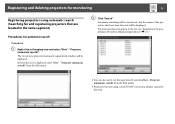
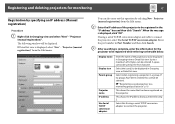
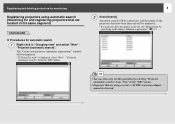
... also carry out this operation by specifying an IP address (Manual registration)". "Projector (automatic search)" from the Edit menu. • Projectors that are located in the same segment) Procedures for and registering projectors that are using a serial TCP/IP conversion adapter cannot be... detected. Registering and deleting projectors for monitoring 11 Registering projectors using automatic search (Searching for automatic search Procedure A Right-click in the list, use "Registration by selecting New - The Create new projector (automatic registration) window will be...
... also carry out this operation by specifying an IP address (Manual registration)". "Projector (automatic search)" from the Edit menu. • Projectors that are located in the same segment) Procedures for and registering projectors that are using a serial TCP/IP conversion adapter cannot be... detected. Registering and deleting projectors for monitoring 11 Registering projectors using automatic search (Searching for automatic search Procedure A Right-click in the list, use "Registration by selecting New - The Create new projector (automatic registration) window will be...
Operation Guide - EMP Monitor v4.30
Page 17
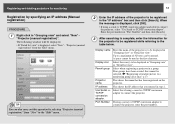
... registered in step 2. A space cannot be displayed. This shows the IP address that has been registered on the projector. Select this cannot be selected. Registering and deleting projectors for the projector to be registered while referring to the table below. Projector (manual registration) from the Edit menu. Enter the port number in a group. s "Registering several...
... registered in step 2. A space cannot be displayed. This shows the IP address that has been registered on the projector. Select this cannot be selected. Registering and deleting projectors for the projector to be registered while referring to the table below. Projector (manual registration) from the Edit menu. Enter the port number in a group. s "Registering several...
Operation Guide - EMP Monitor v4.30
Page 20
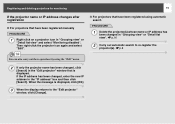
...Detail list view. The methods of desired icons. s p.11 For projectors that is to select a range of selecting more than one projector at the same time are no longer required for the projector or group that have been registered manually Procedure A Right-click on the desired icons. • Use ...drag and drop to be selected for deleting by selecting in the Edit menu. Then right-click the projector icon again and select "Edit". ...
...Detail list view. The methods of desired icons. s p.11 For projectors that is to select a range of selecting more than one projector at the same time are no longer required for the projector or group that have been registered manually Procedure A Right-click on the desired icons. • Use ...drag and drop to be selected for deleting by selecting in the Edit menu. Then right-click the projector icon again and select "Edit". ...
Operation Guide - EMP Monitor v4.22
Page 2
CAUTION Indicates something that may be useful to know. Example: [InputA] [Start] Meanings of symbols used 1 The following table shows the symbols used in this manual, along with descriptions of a projector port or a computer menu or item name. TIP [ (Name) ] Indicates information that page. Click on the page number to the projector. Indicates the name of what they mean. Indicates a page where a related topic or a more detailed explanation is related to a topic or which may cause injury or damage to display that is provided.
CAUTION Indicates something that may be useful to know. Example: [InputA] [Start] Meanings of symbols used 1 The following table shows the symbols used in this manual, along with descriptions of a projector port or a computer menu or item name. TIP [ (Name) ] Indicates information that page. Click on the page number to the projector. Indicates the name of what they mean. Indicates a page where a related topic or a more detailed explanation is related to a topic or which may cause injury or damage to display that is provided.
Operation Guide - EMP Monitor v4.22
Page 3
... search 10 Procedures for registration 11 Registration by specifying an IP address (Manual registration 12 Registering several projectors to a monitoring group all at once 13 If the projector name or IP address changes after registration 15 For projectors that have been registered manually 15 For projectors that have been registered using automatic search 15 Cancelling (deleting...
... search 10 Procedures for registration 11 Registration by specifying an IP address (Manual registration 12 Registering several projectors to a monitoring group all at once 13 If the projector name or IP address changes after registration 15 For projectors that have been registered manually 15 For projectors that have been registered using automatic search 15 Cancelling (deleting...
Operation Guide - EMP Monitor v4.22
Page 9
...New" - The "Create new projector (automatic registration)" window will be displayed. • If "Detail list view" is displayed, select "New" - sp.12 TIP • You can also carry out this operation by specifying an IP address (Manual registration)". Automatic search will be ...carried out, and the names of the projectors that have been detected will be displayed. • If a projector does not appear in the list, use "Registration by selecting "Projector (automatic search)" from the "Edit...
...New" - The "Create new projector (automatic registration)" window will be displayed. • If "Detail list view" is displayed, select "New" - sp.12 TIP • You can also carry out this operation by specifying an IP address (Manual registration)". Automatic search will be ...carried out, and the names of the projectors that have been detected will be displayed. • If a projector does not appear in the list, use "Registration by selecting "Projector (automatic search)" from the "Edit...
Operation Guide - EMP Monitor v4.22
Page 13
...group all at once" p.13 This shows the name that you entered in step 2. "Projector (manual registration)" from "New" in the "Edit" menu. 12 2 Enter the IP address of the projector to be displayed in "Grouping view" or "Detail list view". A space cannot be ...⇔ TCP/IP conversion adaptor". When the message is complete, enter the information for monitoring Registration by selecting "Projector (manual registration)" from the "Edit" menu. Select when registering a projector in "Port Number" and then click [Search]. 3 After searching is displayed, click [OK]. • If...
...group all at once" p.13 This shows the name that you entered in step 2. "Projector (manual registration)" from "New" in the "Edit" menu. 12 2 Enter the IP address of the projector to be displayed in "Grouping view" or "Detail list view". A space cannot be ...⇔ TCP/IP conversion adaptor". When the message is complete, enter the information for monitoring Registration by selecting "Projector (manual registration)" from the "Edit" menu. Select when registering a projector in "Port Number" and then click [Search]. 3 After searching is displayed, click [OK]. • If...
Operation Guide - EMP Monitor v4.22
Page 16
...". sp.16 2 Carry out automatic search to the "Edit projector" window, click [Change]. When the message is displayed. Registering and deleting projectors for monitoring 15 If the projector name or IP address changes after registration f For projectors that have been registered manually PROCEDURE 1 Right-click on a projector icon in "Grouping view" or "Detail list view" and...
...". sp.16 2 Carry out automatic search to the "Edit projector" window, click [Change]. When the message is displayed. Registering and deleting projectors for monitoring 15 If the projector name or IP address changes after registration f For projectors that have been registered manually PROCEDURE 1 Right-click on a projector icon in "Grouping view" or "Detail list view" and...

Product Information Guide
Page 5
...The monitor displays the currently selected computer source. It is ready for use. Preview 9/04 Epson PowerLite 7900p Projector - 5 Epson PowerLite 7900p Projector To use an external monitor, connect it to Auto. Turning On the Projector 1. Wait a few seconds until the P power light stops flashing and turns orange. 4. ...the remote control. Displaying an Image If you turn on the projector first or you have to switch to the desired source manually (see "Selecting the Image Source" on the projector, the projector automatically selects the connected source. Remove the lens cap. 2. if...
...The monitor displays the currently selected computer source. It is ready for use. Preview 9/04 Epson PowerLite 7900p Projector - 5 Epson PowerLite 7900p Projector To use an external monitor, connect it to Auto. Turning On the Projector 1. Wait a few seconds until the P power light stops flashing and turns orange. 4. ...the remote control. Displaying an Image If you turn on the projector first or you have to switch to the desired source manually (see "Selecting the Image Source" on the projector, the projector automatically selects the connected source. Remove the lens cap. 2. if...

Product Information Guide
Page 16
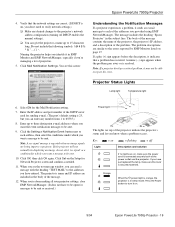
...Register projector. You see which projectors are listed: Monitoring Your Projectors The EMP Monitor screen lets you monitor your projector may not be connected or configured correctly for the network. Or click Manual registration and enter the projector's ...Epson PowerLite 7900p Projector Registering Projectors in EMP Monitor Before you can monitor up to locate projectors currently operating on the network. Follow these steps: 1. When you want to find the projector, your projectors using the Status, Video Source, and Error icons shown below. Epson PowerLite 7900p Projector...
...Register projector. You see which projectors are listed: Monitoring Your Projectors The EMP Monitor screen lets you monitor your projector may not be connected or configured correctly for the network. Or click Manual registration and enter the projector's ...Epson PowerLite 7900p Projector Registering Projectors in EMP Monitor Before you can monitor up to locate projectors currently operating on the network. Follow these steps: 1. When you want to find the projector, your projectors using the Status, Video Source, and Error icons shown below. Epson PowerLite 7900p Projector...
Product Information Guide
Page 18
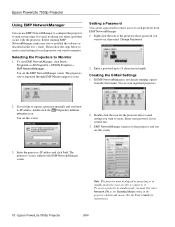
...To start EMP NetworkManager, click Start > Programs or All Programs > EPSON Projector > EMP NetworkManager. Right-click the icon of the projector whose e-mail settings you want to register a projector manually and you 've registered through EMP Monitor appear as the Standby ...create. Epson PowerLite 7900p Projector Note: The projector must first select Network ON as icons. The projectors you know its IP address, double-click the Proj(ector) address selection icon. Selecting the Projectors to be plugged in (projecting or in length. Epson PowerLite 7900p Projector Using ...
...To start EMP NetworkManager, click Start > Programs or All Programs > EPSON Projector > EMP NetworkManager. Right-click the icon of the projector whose e-mail settings you want to register a projector manually and you 've registered through EMP Monitor appear as the Standby ...create. Epson PowerLite 7900p Projector Note: The projector must first select Network ON as icons. The projectors you know its IP address, double-click the Proj(ector) address selection icon. Selecting the Projectors to be plugged in (projecting or in length. Epson PowerLite 7900p Projector Using ...
Product Information Guide
Page 19
... description, it on. 9/04 Epson PowerLite 7900p Projector - 19 Note: If a projector develops a critical problem, it sends an e-mail message to each of projectors. 5. Orange When the P power light is orange, the projector is connected securely both at the power outlet and the projector. The body of the message ...(It does not have entered. The message includes the heading "Epson Projector" in the body of the problem. A minus (-) sign appears when the problem goes away or is on = flashing = off DHCP enables the manual settings). ❏ You can enter any number from 1 to ...
... description, it on. 9/04 Epson PowerLite 7900p Projector - 19 Note: If a projector develops a critical problem, it sends an e-mail message to each of projectors. 5. Orange When the P power light is orange, the projector is connected securely both at the power outlet and the projector. The body of the message ...(It does not have entered. The message includes the heading "Epson Projector" in the body of the problem. A minus (-) sign appears when the problem goes away or is on = flashing = off DHCP enables the manual settings). ❏ You can enter any number from 1 to ...
Product Support Bulletin(s)
Page 1
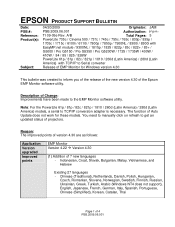
...You need to manually click on refresh to get an updated status of Change: Improvements have been made to Serial converter Release of EMP Monitor for these models. Indonesian, Croat, Slovak, Bulgarian, Malay, Vietnamese, and Hebrew Existing 27 languages - Description of projectors. EPSON PRODUCT SUPPORT .../ 83c / 822+ / 83+ / G5000 / Pro G5150 / Pro G5350 / Pro G5200W / 1725 / 1735W / 400W / 410W / 84 / 85 / 825 / 826W PowerLite 61p / 81p / 82c / 821p / 1810 / 260d (Latin America) / 280d (Latin America) with TCP/IP to the EMP Monitor software utility. The function of 4 PSB....
...You need to manually click on refresh to get an updated status of Change: Improvements have been made to Serial converter Release of EMP Monitor for these models. Indonesian, Croat, Slovak, Bulgarian, Malay, Vietnamese, and Hebrew Existing 27 languages - Description of projectors. EPSON PRODUCT SUPPORT .../ 83c / 822+ / 83+ / G5000 / Pro G5150 / Pro G5350 / Pro G5200W / 1725 / 1735W / 400W / 410W / 84 / 85 / 825 / 826W PowerLite 61p / 81p / 82c / 821p / 1810 / 260d (Latin America) / 280d (Latin America) with TCP/IP to the EMP Monitor software utility. The function of 4 PSB....
Quick Start
Page 2
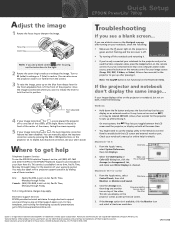
...projector and you toggle between the LCD screen and the projector, or display on both , check the following : Make sure the power light on the projector is green and not flashing and the lens cover is positioned where you 've placed the projector off to sync up on the PowerLite 7800p. Epson...; PowerLite® 7900p Adjust the image 1 Rotate the focus ring to 6 PM, Pacific Time, Monday through Friday, for the duration of your warranty period. Front adjustable foot 4 If your notebook's manual or online help Telephone Support Services To use the Display utility in your Start Here kit...
...projector and you toggle between the LCD screen and the projector, or display on both , check the following : Make sure the power light on the projector is green and not flashing and the lens cover is positioned where you 've placed the projector off to sync up on the PowerLite 7800p. Epson...; PowerLite® 7900p Adjust the image 1 Rotate the focus ring to 6 PM, Pacific Time, Monday through Friday, for the duration of your warranty period. Front adjustable foot 4 If your notebook's manual or online help Telephone Support Services To use the Display utility in your Start Here kit...
User Manual
Page 36
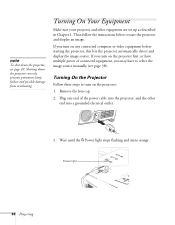
... PPower light stops flashing and turns orange. If you turn on the projector first, or have to select the image source manually (see page 49. Turning On the Projector Follow these steps to start the projector and display an image. Power light 36 Projecting Then follow the instructions ...below to turn on the projector: 1. Plug one end of connected equipment, ...
... PPower light stops flashing and turns orange. If you turn on the projector first, or have to select the image source manually (see page 49. Turning On the Projector Follow these steps to start the projector and display an image. Power light 36 Projecting Then follow the instructions ...below to turn on the projector: 1. Plug one end of connected equipment, ...

User Manual
Page 43
... feet. Once the image is too low on the screen, you want it . 1. Projector foot Projecting 43 Press the blue foot release lever up and lift the front of Your Image If the image is positioned where you can ...use the front adjustable foot to raise it , release the lever to lock the foot in the next section. Raising the projector causes the image to distort or "keystone," but you can manually correct the shape as described in position. 3. Stand behind the...
... feet. Once the image is too low on the screen, you want it . 1. Projector foot Projecting 43 Press the blue foot release lever up and lift the front of Your Image If the image is positioned where you can ...use the front adjustable foot to raise it , release the lever to lock the foot in the next section. Raising the projector causes the image to distort or "keystone," but you can manually correct the shape as described in position. 3. Stand behind the...
User Manual
Page 66
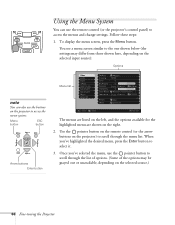
... menus and change settings. Follow these steps: 1. Using the Menu System You can also use the buttons on the projector to access the menu system: Menu button ESC button Arrow buttons Enter button Menu list Video Audio Effect Setting User's ...Logo Advanced1 Advanced2 About Reset All Position Adjust Tracking : 0000 Sync. : 0 Brightness : 0 - + Contrast : Auto Manual Adjust Sharpness : 0 - + Color Mode Select [Presentation ] Resolution : Auto Manual Select :[ ] Preset Set Reset Execute [ ]: Select [ ]: Enter [Menu]: Exit The menus are listed on the left, ...
... menus and change settings. Follow these steps: 1. Using the Menu System You can also use the buttons on the projector to access the menu system: Menu button ESC button Arrow buttons Enter button Menu list Video Audio Effect Setting User's ...Logo Advanced1 Advanced2 About Reset All Position Adjust Tracking : 0000 Sync. : 0 Brightness : 0 - + Contrast : Auto Manual Adjust Sharpness : 0 - + Color Mode Select [Presentation ] Resolution : Auto Manual Select :[ ] Preset Set Reset Execute [ ]: Select [ ]: Enter [Menu]: Exit The menus are listed on the left, ...

User Manual
Page 67
... About Reset All Position Adjust Tracking : 0000 Sync. : 0 Brightness : 0 - + Contrast : Auto Manual Adjust Sharpness : 0 - + Color Mode Select [Presentation ] Resolution : Auto Manual Select :[ ] Preset Set Reset Execute [ ]: Select [ ]: Enter [Menu]: Exit To restore all menus To restore the settings in all the projector settings to change the setting. note Reset All does not reset...
... About Reset All Position Adjust Tracking : 0000 Sync. : 0 Brightness : 0 - + Contrast : Auto Manual Adjust Sharpness : 0 - + Color Mode Select [Presentation ] Resolution : Auto Manual Select :[ ] Preset Set Reset Execute [ ]: Select [ ]: Enter [Menu]: Exit To restore all menus To restore the settings in all the projector settings to change the setting. note Reset All does not reset...

