Getting Started - ColorBurst RIP
Page 2
... Note: The file names may be slightly different, depending on your Epson Stylus® Pro manual to the computer that will run the RIP server. If you are using the Epson Stylus Pro 7800 or 9800 printer, you need to attach the included USB key to set up the Stylus Pro printer on -screen instructions. Getting Started The enclosed CD includes the...
... Note: The file names may be slightly different, depending on your Epson Stylus® Pro manual to the computer that will run the RIP server. If you are using the Epson Stylus Pro 7800 or 9800 printer, you need to attach the included USB key to set up the Stylus Pro printer on -screen instructions. Getting Started The enclosed CD includes the...

Getting Started - ColorBurst RIP
Page 4
... in the Printer Model or Print Using list. 7. In Mac OS X 10.3.x, select Rendezvous from the Bonjour or Rendezvous printers. 10. Select the ColorBurst RIP print server name from the pop-up menu. 9. Tip: If you want to change the name of the printer for Mac OS X 10.3.x through 10.4.x. 1. Make sure ColorBurst Epson RIP...
... in the Printer Model or Print Using list. 7. In Mac OS X 10.3.x, select Rendezvous from the Bonjour or Rendezvous printers. 10. Select the ColorBurst RIP print server name from the pop-up menu. 9. Tip: If you want to change the name of the printer for Mac OS X 10.3.x through 10.4.x. 1. Make sure ColorBurst Epson RIP...
Getting Started - ColorBurst RIP
Page 5
... running and click Choose. 12. Select ColorBurst RIP. Then select the ColorBurst RIP driver under the Printer Model menu. 4 Open the Printer Setup Utility in the Applications > Utilities folder. 8. If you are using Mac OS X 10.4.x, click More Printers. 9. When installation is complete, check the ColorBurst RIP server computer to install the ColorBurst client...
... running and click Choose. 12. Select ColorBurst RIP. Then select the ColorBurst RIP driver under the Printer Model menu. 4 Open the Printer Setup Utility in the Applications > Utilities folder. 8. If you are using Mac OS X 10.4.x, click More Printers. 9. When installation is complete, check the ColorBurst RIP server computer to install the ColorBurst client...

Getting Started - ColorBurst RIP
Page 7
...client system. 3. Unzip the CB Windows Print Driver zip file. 4. Windows 2000: Click Start > Settings > Printers. 5. Browse the network and select the ColorBurst RIP printer, then click Next. If you that setup is connected to use the ColorBurst RIP as the ColorBurst RIP server computer. 2. If not, choose No. Copy the CB... Windows XP and Windows 2000. You're ready to print to continue. 7. Other Windows operating systems are not supported. 1. Double-click the Add Printer icon, then click Next. 6 Click Yes to the ColorBurst RIP. 5. Click Next. 8. Make sure your...
...client system. 3. Unzip the CB Windows Print Driver zip file. 4. Windows 2000: Click Start > Settings > Printers. 5. Browse the network and select the ColorBurst RIP printer, then click Next. If you that setup is connected to use the ColorBurst RIP as the ColorBurst RIP server computer. 2. If not, choose No. Copy the CB... Windows XP and Windows 2000. You're ready to print to continue. 7. Other Windows operating systems are not supported. 1. Double-click the Add Printer icon, then click Next. 6 Click Yes to the ColorBurst RIP. 5. Click Next. 8. Make sure your...

Getting Started - ColorBurst RIP
Page 9
...22. Restart your computer. General Notice: Other product names used herein are registered trademarks of their respective owners. 16. Then click Next. 23. Epson and Epson Stylus are for identification purposes only and may be trademarks of Seiko Epson Corporation. At the next screen, click Have Disk, ... installation, click Finish. 25. Click OK. 21. Follow the on recycled paper. © 2006 Epson America, Inc. 11/06 8 Epson disclaims any and all rights in the Printer name box. Browse to install the software. 24. Printed on -screen instructions to the folder that ...
...22. Restart your computer. General Notice: Other product names used herein are registered trademarks of their respective owners. 16. Then click Next. 23. Epson and Epson Stylus are for identification purposes only and may be trademarks of Seiko Epson Corporation. At the next screen, click Have Disk, ... installation, click Finish. 25. Click OK. 21. Follow the on recycled paper. © 2006 Epson America, Inc. 11/06 8 Epson disclaims any and all rights in the Printer name box. Browse to install the software. 24. Printed on -screen instructions to the folder that ...

Printer Guide
Page 2
... to the purchaser of any options or any consumable products other printers. Epson disclaims any product or service. The information contained herein is designed only for any damages or problems arising from the use with Seiko Epson Corporation's operating and maintenance instructions. Trademarks Epson, Epson Stylus, Epson ESC/P, and MicroWeave are for damages, losses, costs, or expenses incurred...
... to the purchaser of any options or any consumable products other printers. Epson disclaims any product or service. The information contained herein is designed only for any damages or problems arising from the use with Seiko Epson Corporation's operating and maintenance instructions. Trademarks Epson, Epson Stylus, Epson ESC/P, and MicroWeave are for damages, losses, costs, or expenses incurred...

Printer Guide
Page 3
... to correct the interference by the FCC for a Class B digital device, pursuant to Part 15 of the user to obtain and use a shielded equipment interface cable with the instructions, may cause interference levels which exceed the limits established by one interface connector, do not...the FCC Certification of a non-shielded equipment interface cable to this equipment will not occur in a particular installation. This equipment generates, uses, and can be determined by the manufacturer could void the user's authority to operate the equipment. FCC Compliance Statement For United States Users...
... to correct the interference by the FCC for a Class B digital device, pursuant to Part 15 of the user to obtain and use a shielded equipment interface cable with the instructions, may cause interference levels which exceed the limits established by one interface connector, do not...the FCC Certification of a non-shielded equipment interface cable to this equipment will not occur in a particular installation. This equipment generates, uses, and can be determined by the manufacturer could void the user's authority to operate the equipment. FCC Compliance Statement For United States Users...
Printer Guide
Page 6
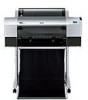
... 2 Handling Paper and Other Media Selecting Media for Your Printer 55 Guidelines for Using Epson Media 56 Using Roll Paper 56 Roll Paper Guidelines 57 Loading the Paper onto the Spindle 58 Placing the Paper in the Printer 59 Removing Paper from the Spindle 62 Switching Between 2-Inch...Adjusting the Platen Gap for Thick or Thin Paper 69 Using the Paper Basket 70 Catching Printouts From the Epson Stylus Pro 7800 71 Catching Printouts in Front of the Epson Stylus Pro 9800 72 Catching Printouts Under the Epson Stylus Pro 9800 73 Optimizing the Settings for Your Paper 75 Creating...
... 2 Handling Paper and Other Media Selecting Media for Your Printer 55 Guidelines for Using Epson Media 56 Using Roll Paper 56 Roll Paper Guidelines 57 Loading the Paper onto the Spindle 58 Placing the Paper in the Printer 59 Removing Paper from the Spindle 62 Switching Between 2-Inch...Adjusting the Platen Gap for Thick or Thin Paper 69 Using the Paper Basket 70 Catching Printouts From the Epson Stylus Pro 7800 71 Catching Printouts in Front of the Epson Stylus Pro 9800 72 Catching Printouts Under the Epson Stylus Pro 9800 73 Optimizing the Settings for Your Paper 75 Creating...

Printer Guide
Page 7
...Epson Drivers for Windows Choosing Basic Print Options 100 Choosing Paper and Layout Options 103 Choosing Roll Paper Options 103 Borderless Printing 106 Choosing Cut Sheet Paper Options 107 Choosing Layout Options 108 Choosing Advanced Print Options 109 Choosing Advanced Black and White Photo Settings 112 Managing Print Jobs 114 Using...132 Draining the Old Ink 132 Installing the New Black Ink Cartridge 134 Updating the Printer Driver Information 135 Changing the Date and Time 136 Using Maintenance Mode 136 Replacing the Paper Cutter Blade 138 Removing the Old Blade 138 Installing...
...Epson Drivers for Windows Choosing Basic Print Options 100 Choosing Paper and Layout Options 103 Choosing Roll Paper Options 103 Borderless Printing 106 Choosing Cut Sheet Paper Options 107 Choosing Layout Options 108 Choosing Advanced Print Options 109 Choosing Advanced Black and White Photo Settings 112 Managing Print Jobs 114 Using...132 Draining the Old Ink 132 Installing the New Black Ink Cartridge 134 Updating the Printer Driver Information 135 Changing the Date and Time 136 Using Maintenance Mode 136 Replacing the Paper Cutter Blade 138 Removing the Old Blade 138 Installing...
Printer Guide
Page 9
...avoid bodily injury. It also tells you how to maintain your printer. You can read the guide using a web browser, such as you have a problem. Notes contain important information about the printer, drivers, and utility software. Warnings, Cautions, Notes, and ...Navigator® or Microsoft® Internet Explorer, versions 4.0 or later. 9 Introduction This Printer Guide provides important information on the CD-ROM provides additional information about your printer to keep it to your printer, loading paper, using the Epson® printer drivers, and replacing ink cartridges.
...avoid bodily injury. It also tells you how to maintain your printer. You can read the guide using a web browser, such as you have a problem. Notes contain important information about the printer, drivers, and utility software. Warnings, Cautions, Notes, and ...Navigator® or Microsoft® Internet Explorer, versions 4.0 or later. 9 Introduction This Printer Guide provides important information on the CD-ROM provides additional information about your printer to keep it to your printer, loading paper, using the Epson® printer drivers, and replacing ink cartridges.
Printer Guide
Page 10
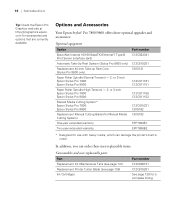
or 3-inch Epson Stylus Pro 7800: Epson Stylus Pro 9800: Manual Media Cutting System* Epson Stylus Pro 7800: Epson Stylus Pro 9800: Replacement Manual Cutting Blade (for Manual Media Cutting System) One-year extended warranty Two-year extended warranty Part number C12C824341 C12C815251 C815121 C12C811161 C12C811151 C12C811155 C12C811152 C12C815231 C815182 C815192 EPP7898B1 EPP7898B2 * Designed for use with heavy media, which can order these optional upgrades and...
or 3-inch Epson Stylus Pro 7800: Epson Stylus Pro 9800: Manual Media Cutting System* Epson Stylus Pro 7800: Epson Stylus Pro 9800: Replacement Manual Cutting Blade (for Manual Media Cutting System) One-year extended warranty Two-year extended warranty Part number C12C824341 C12C815251 C815121 C12C811161 C12C811151 C12C811155 C12C811152 C12C815231 C815182 C815192 EPP7898B1 EPP7898B2 * Designed for use with heavy media, which can order these optional upgrades and...
Printer Guide
Page 12
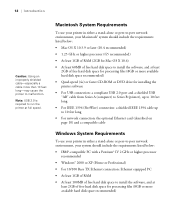
...feet long • For network connection: the optional Ethernet card (described on page 10) and a compatible cable Windows System Requirements To use your printer in either a stand-alone or peer-to-peer network environment, your system should include the requirements listed below: • IBM®-...PC • At least 1GB of RAM • At least 100MB of free hard disk space to malfunction. Macintosh System Requirements To use your printer in either a stand-alone or peer-to-peer network environment, your Macintosh® system should include the requirements listed below: •...
...feet long • For network connection: the optional Ethernet card (described on page 10) and a compatible cable Windows System Requirements To use your printer in either a stand-alone or peer-to-peer network environment, your system should include the requirements listed below: • IBM®-...PC • At least 1GB of RAM • At least 100MB of free hard disk space to malfunction. Macintosh System Requirements To use your printer in either a stand-alone or peer-to-peer network environment, your Macintosh® system should include the requirements listed below: •...
Printer Guide
Page 13
...may need more space behind the printer if you use the equipment safely and effectively. • The printer weighs about 131 lb (Epson Stylus Pro 7800) or 198 lb (Epson Stylus Pro 9800) without ink or paper. Make sure you have sufficient assistance when lifting it. (See page 23 for the 7800 or 32 for the 9800.) ...large sheets of heavy stock or posterboard. (See page 17 for the 7800 or 27 for the 9800.) • Place the printer on the label. • Use only the power cord that comes with the printer. Also keep the printer away from direct sunlight, strong light, or heat sources. • ...
...may need more space behind the printer if you use the equipment safely and effectively. • The printer weighs about 131 lb (Epson Stylus Pro 7800) or 198 lb (Epson Stylus Pro 9800) without ink or paper. Make sure you have sufficient assistance when lifting it. (See page 23 for the 7800 or 32 for the 9800.) ...large sheets of heavy stock or posterboard. (See page 17 for the 7800 or 27 for the 9800.) • Place the printer on the label. • Use only the power cord that comes with the printer. Also keep the printer away from direct sunlight, strong light, or heat sources. • ...
Printer Guide
Page 14
... to do so by an Epson service technician; Do not unplug the printer or turn the printer off . Using it with other equipment may damage the printer. • Do not insert objects through the slots. the printer has been dropped or the cabinet damaged; the printer does not operate normally or ... this button, POWER OFF appears on the printer. • Do not attempt to service the printer yourself. • The lamp in fire or electric shock. • Do not use a damaged or frayed power cord. • If you use with the printer, make sure the total ampere rating of devices...
... to do so by an Epson service technician; Do not unplug the printer or turn the printer off . Using it with other equipment may damage the printer. • Do not insert objects through the slots. the printer has been dropped or the cabinet damaged; the printer does not operate normally or ... this button, POWER OFF appears on the printer. • Do not attempt to service the printer yourself. • The lamp in fire or electric shock. • Do not use a damaged or frayed power cord. • If you use with the printer, make sure the total ampere rating of devices...
Printer Guide
Page 15
... ink cartridges in your skin, wash it off with water. • Shake ink cartridges well before installing them for best results. • Do not use too much force when you shake cartridges that have been previously installed. If ink gets in a cool, dark place. • If ink gets on the... cartridge carton. • Use up the ink cartridge within six months of installation for best results. • Do not dismantle ink cartridges or try to refill them immediately with...
... ink cartridges in your skin, wash it off with water. • Shake ink cartridges well before installing them for best results. • Do not use too much force when you shake cartridges that have been previously installed. If ink gets in a cool, dark place. • If ink gets on the... cartridge carton. • Use up the ink cartridge within six months of installation for best results. • Do not dismantle ink cartridges or try to refill them immediately with...

Printer Guide
Page 17
.... Before you begin, make sure you have sufficient space to direct sunlight, excessive heat, moisture, or dust. Note: When choosing a place for the printer, leave adequate room for using the Epson Stylus Pro 7800: 8 in. 6 in. 24 in. 12 in. You will also need floor space of interference, such as loud speakers, cordless phones, TVs, or...
.... Before you begin, make sure you have sufficient space to direct sunlight, excessive heat, moisture, or dust. Note: When choosing a place for the printer, leave adequate room for using the Epson Stylus Pro 7800: 8 in. 6 in. 24 in. 12 in. You will also need floor space of interference, such as loud speakers, cordless phones, TVs, or...

Printer Guide
Page 19
Setting Up the Printer | 19 Note: Make sure you tighten all bolts before moving to fasten the leg with one collar and one strut bolt at each end. Assemble the left leg and base in the same way. 4. Make sure the bolts are labeled L and R.) Use the included hex wrench to the next section. 2. Insert the right leg into the right base as shown, then fasten it with the two base bolts. Attach the bottom horizontal strut as shown. (Note that the bases are tight. 1-19 Collar Strut bolt Bolt holes Underside view of base showing location of bolt holes 3.
Setting Up the Printer | 19 Note: Make sure you tighten all bolts before moving to fasten the leg with one collar and one strut bolt at each end. Assemble the left leg and base in the same way. 4. Make sure the bolts are labeled L and R.) Use the included hex wrench to the next section. 2. Insert the right leg into the right base as shown, then fasten it with the two base bolts. Attach the bottom horizontal strut as shown. (Note that the bases are tight. 1-19 Collar Strut bolt Bolt holes Underside view of base showing location of bolt holes 3.

Printer Guide
Page 20
Attach the top horizontal strut as shown. Open the box and remove the roll paper, spindle, polystyrene foam, and cardboard cushions. 1-20 Use the small hex wrench to fasten the hex screws. 6. 20 | Setting Up the Printer 5. Make sure each part of the stand is tightened securely. Unpacking the Printer 1.
Attach the top horizontal strut as shown. Open the box and remove the roll paper, spindle, polystyrene foam, and cardboard cushions. 1-20 Use the small hex wrench to fasten the hex screws. 6. 20 | Setting Up the Printer 5. Make sure each part of the stand is tightened securely. Unpacking the Printer 1.
Printer Guide
Page 21
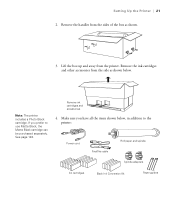
Setting Up the Printer | 21 2. Note: The printer includes a Photo Black cartridge. If you have all the items shown below . Remove ink cartridges and accessories # " 4. Lift the box up and away from the sides of the box as shown below , in addition to use Matte Black, the Matte ...Black cartridge can be purchased separately. Remove the ink cartridges and other accessories from the side as shown. 3. See page 128. Remove the handles from the printer. Make sure you prefer to the printer: Power cord FireWire cable Roll...
Setting Up the Printer | 21 2. Note: The printer includes a Photo Black cartridge. If you have all the items shown below . Remove ink cartridges and accessories # " 4. Lift the box up and away from the sides of the box as shown below , in addition to use Matte Black, the Matte ...Black cartridge can be purchased separately. Remove the ink cartridges and other accessories from the side as shown. 3. See page 128. Remove the handles from the printer. Make sure you prefer to the printer: Power cord FireWire cable Roll...
Printer Guide
Page 26
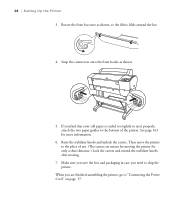
... the connectors onto the front hooks as shown, so the fabric folds around the bar. 4. Then move the printer to "Connecting the Power Cord" on page 37. 1-26 Raise the stabilizer knobs and unlock the casters. If you find that your roll paper is ...curled too tightly to eject properly, attach the two paper guides to the bottom of use. (The casters are finished assembling the printer, go to the place of the printer. Make sure you save the box and packaging in case you are meant for moving the...
... the connectors onto the front hooks as shown, so the fabric folds around the bar. 4. Then move the printer to "Connecting the Power Cord" on page 37. 1-26 Raise the stabilizer knobs and unlock the casters. If you find that your roll paper is ...curled too tightly to eject properly, attach the two paper guides to the bottom of use. (The casters are finished assembling the printer, go to the place of the printer. Make sure you save the box and packaging in case you are meant for moving the...


