
Printer Guide
Page 122
..., paper feed motor, print head, cleaning unit, and pressure motor. You can also turn on Auto Nozzle Check from the printer's control panel. For the last 10 print jobs saved in the printer, you should check the print head to exit the menu. For more information about the... and printer parts is indicated with these symbols: E*****F = 100-81% of ink or service life remaining E**** F = 80-61% E*** F = 60-41% E** F = 40-21% E* F = 20-11% % = less than 10% of other printer parts, press d to see your printed image shows a color shift or horizontal lines, you see if any nozzles are clogged or ...
..., paper feed motor, print head, cleaning unit, and pressure motor. You can also turn on Auto Nozzle Check from the printer's control panel. For the last 10 print jobs saved in the printer, you should check the print head to exit the menu. For more information about the... and printer parts is indicated with these symbols: E*****F = 100-81% of ink or service life remaining E**** F = 80-61% E*** F = 60-41% E** F = 40-21% E* F = 20-11% % = less than 10% of other printer parts, press d to see your printed image shows a color shift or horizontal lines, you see if any nozzles are clogged or ...

Printer Guide
Page 124
... Menu button. 2. Press the d button until TEST PRINT is printed and automatically read . Press the l button twice. 5. The nozzle check pattern is highlighted, then press Menu. 3. Press Menu again. 2. If the printer finds clogged nozzles, it runs a cleaning cycle. Press the d button until AUTO CLEANING is printed and automatically read . 124 | Maintaining and Transporting...
... Menu button. 2. Press the d button until TEST PRINT is printed and automatically read . Press the l button twice. 5. The nozzle check pattern is highlighted, then press Menu. 3. Press Menu again. 2. If the printer finds clogged nozzles, it runs a cleaning cycle. Press the d button until AUTO CLEANING is printed and automatically read . 124 | Maintaining and Transporting...

Printer Guide
Page 148
Setting Up the Printer After Transportation Setting up the printer after transporting it is almost identical to start printing after moving the printer, the print head nozzles may be clogged-especially if the printer hasn't been turned on : POWER CLEANING. If you start head cleaning. 5-148 Keep ...in mind that the first time you have not used your printer for the first time. Select...
Setting Up the Printer After Transportation Setting up the printer after transporting it is almost identical to start printing after moving the printer, the print head nozzles may be clogged-especially if the printer hasn't been turned on : POWER CLEANING. If you start head cleaning. 5-148 Keep ...in mind that the first time you have not used your printer for the first time. Select...

Printer Guide
Page 150
... and includes an explanation and instructions for correcting the problem. RELEASE THE CARRIAGE LOCK Remove the bracket securing the print head; nozzles are still clogged, contact Epson. Remove the print. 6-150 CLEANING ERROR REMOVE THICK PAPER Paper is selected for head cleaning. After cleaning, reload paper. ...11.7 × 16.5) or roll paper that doesn't support borderless printing. Release the paper lever to indicate the status of the printer: Paper Ink light light Paper feed up button Power button and light Enter or cut button Menu or cleaning button Pause or reset...
... and includes an explanation and instructions for correcting the problem. RELEASE THE CARRIAGE LOCK Remove the bracket securing the print head; nozzles are still clogged, contact Epson. Remove the print. 6-150 CLEANING ERROR REMOVE THICK PAPER Paper is selected for head cleaning. After cleaning, reload paper. ...11.7 × 16.5) or roll paper that doesn't support borderless printing. Release the paper lever to indicate the status of the printer: Paper Ink light light Paper feed up button Power button and light Enter or cut button Menu or cleaning button Pause or reset...
Product Brochure
Page 5
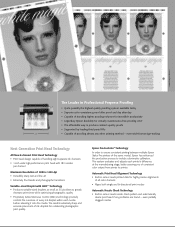
...nozzles per channel Maximum Resolution of proofing almost any problems are found - Epson PreciseColor™ Technology In order to ensure consistent printing between multiple Epson Stylus Pro printers of the same model, Epson...data for highly precise alignments of all color channels n Aligns both single and bi-directional print modes Automatic Nozzle Check Technology n Built-in Professional Prepress ... n Legendary Epson durability for outstanding photographic print quality. even partially clogged nozzles ©2005 Douglas Dubler 3 The Leader in sensor reads nozzle check pattern ...
...nozzles per channel Maximum Resolution of proofing almost any problems are found - Epson PreciseColor™ Technology In order to ensure consistent printing between multiple Epson Stylus Pro printers of the same model, Epson...data for highly precise alignments of all color channels n Aligns both single and bi-directional print modes Automatic Nozzle Check Technology n Built-in Professional Prepress ... n Legendary Epson durability for outstanding photographic print quality. even partially clogged nozzles ©2005 Douglas Dubler 3 The Leader in sensor reads nozzle check pattern ...
Product Information Guide
Page 4
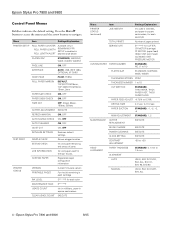
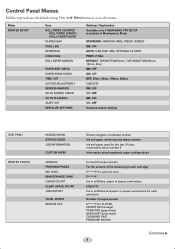
...NOZZLE CHECK Shows clogged nozzles STATUS CHECK Ink and paper remaining and status of parts JOB INFORMATION Ink and paper used for the last 10 jobs CUSTOM PAPER Registered paper configuration information PRINTER STATUS VERSION PRINTABLE PAGES Current firmware version For the ink remaining in each cartridge INK LEVEL E*****F for each color...15 CUT METHOD STANDARD, THIN PAPER, THICK PAPER FAST, THICK PAPER SLOW PAPER FEED ADJUST -0.70% to navigate. Epson Stylus Pro 7800 and 9800 8/05 Epson Stylus Pro 7800 and 9800 Control Panel Menus Boldface indicates the default setting.
...NOZZLE CHECK Shows clogged nozzles STATUS CHECK Ink and paper remaining and status of parts JOB INFORMATION Ink and paper used for the last 10 jobs CUSTOM PAPER Registered paper configuration information PRINTER STATUS VERSION PRINTABLE PAGES Current firmware version For the ink remaining in each cartridge INK LEVEL E*****F for each color...15 CUT METHOD STANDARD, THIN PAPER, THICK PAPER FAST, THICK PAPER SLOW PAPER FEED ADJUST -0.70% to navigate. Epson Stylus Pro 7800 and 9800 8/05 Epson Stylus Pro 7800 and 9800 Control Panel Menus Boldface indicates the default setting.
Product Information Guide
Page 6
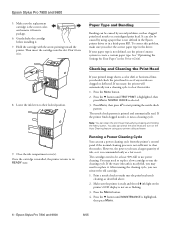
... Running a Power Cleaning Cycle You can clean the print head manually by using your printed image shows a color shift or horizontal lines, you may need to clear the nozzles. 1. Gently shake the cartridge before installing it runs a cleaning cycle. Note: You can run the cleaning ...insert the cartridge into the slot. You may need to replace a low cartridge to see if any nozzles are clogged or deflected. Epson Stylus Pro 7800 and 9800 5. Don't force it from the printer's control panel if the normal cleaning process is nearly full, you should check the print head to ...
... Running a Power Cleaning Cycle You can clean the print head manually by using your printed image shows a color shift or horizontal lines, you may need to clear the nozzles. 1. Gently shake the cartridge before installing it runs a cleaning cycle. Note: You can run the cleaning ...insert the cartridge into the slot. You may need to replace a low cartridge to see if any nozzles are clogged or deflected. Epson Stylus Pro 7800 and 9800 5. Don't force it from the printer's control panel if the normal cleaning process is nearly full, you should check the print head to ...

Quick Reference Guide
Page 5
...nozzles are clogged or deflected. This is highlighted. PAPER THICKNESS is highlighted. The cleaning cycle takes about 7 minutes. Then press again to start with. Checking, Cleaning, and Aligning the Print Head Checking and Cleaning the Print Head If your printed image shows a color.... ALIGNMENT AUTO UNI-D BI-D 2 COLOR BI-D ALL Aligning the Print Head If your printer driver (Windows). This is selected. 4 Press Menu, then press to highlight AUTO, then press Menu again. NOZZLE CHECK is the correct thickness setting for most Epson papers. 5 Press the button to ...
...nozzles are clogged or deflected. This is highlighted. PAPER THICKNESS is highlighted. The cleaning cycle takes about 7 minutes. Then press again to start with. Checking, Cleaning, and Aligning the Print Head Checking and Cleaning the Print Head If your printed image shows a color.... ALIGNMENT AUTO UNI-D BI-D 2 COLOR BI-D ALL Aligning the Print Head If your printer driver (Windows). This is selected. 4 Press Menu, then press to highlight AUTO, then press Menu again. NOZZLE CHECK is the correct thickness setting for most Epson papers. 5 Press the button to ...
Quick Reference Guide
Page 9
... PRESSURE MOTOR Continue 8 ▲ most recent job is enabled in square centimeters for each ink color E*****F Ink in milliliters, paper in square centimeters EXECUTE Ink in milliliters and paper in Maintenance Mode...ON, OFF ON, OFF ON, OFF ON, OFF Restores default settings TEST PRINT PRINTER STATUS NOZZLE CHECK STATUS CHECK JOB INFORMATION CUSTOM PAPER VERSION PRINTABLE PAGES INK LEVEL MAINTENANCE TANK USAGE ...COUNT CLEAR USAGE COUNT JOB HISTORY TOTAL PRINTS SERVICE LIFE Shows clogged or deflected nozzles Ink and paper remaining and status of pages printed E*****F for the...
... PRESSURE MOTOR Continue 8 ▲ most recent job is enabled in square centimeters for each ink color E*****F Ink in milliliters, paper in square centimeters EXECUTE Ink in milliliters and paper in Maintenance Mode...ON, OFF ON, OFF ON, OFF ON, OFF Restores default settings TEST PRINT PRINTER STATUS NOZZLE CHECK STATUS CHECK JOB INFORMATION CUSTOM PAPER VERSION PRINTABLE PAGES INK LEVEL MAINTENANCE TANK USAGE ...COUNT CLEAR USAGE COUNT JOB HISTORY TOTAL PRINTS SERVICE LIFE Shows clogged or deflected nozzles Ink and paper remaining and status of pages printed E*****F for the...


